Bedroom furniture often becomes inconvenient before it becomes unusable. A nightstand may be too bulky for a new bed, a dresser may no longer fit the room, and an old headboard can remain in storage simply because it feels too solid to throw away. A coat of paint can improve the appearance, but sometimes the most useful refurbishment changes the furniture’s purpose as well.
I especially like projects that keep the strongest part of an old piece while giving it a job the home actually needs. A headboard can support an entryway bench or become wall storage.
A bedside table can hold pet bowls instead of a lamp. A dresser can move into the bathroom or kitchen, where its drawers and broad top solve an entirely different storage problem.
The key is to work with the original construction rather than forcing every item into an unsuitable conversion. I don’t think every old bedroom piece needs to become decorative. The best result is usually the one that remains stable, easy to clean, and practical after the novelty of the makeover has worn off.
Inspect Each Piece Before Changing Its Purpose
A conversion adds new loads, moisture, movement, or wall mounting that the furniture may not have handled in the bedroom. Check the structure before buying paint, cutting the top, or removing major sections.
· Test every joint, leg, drawer runner, shelf, and back panel for movement before starting the makeover.
· Look for swollen manufactured board, deep splits, insect damage, or crumbling edges that may make the piece unsuitable.
· Measure the furniture and the new location, including doors, skirting boards, pipes, sockets, and walking space.
· Check whether the top is solid wood, veneer, laminate, or particleboard before drilling or cutting it.
· Decide which structural rails, side panels, and drawer supports must remain in place to keep the frame square.
· Repair wobbling joints and replace missing screws before asking the furniture to support people, plumbing, bowls, or wheels.
· Reject a conversion that exceeds the strength of the original piece; reusing selected parts is better than creating an unsafe object.
Gather Basic Refurbishing and Conversion Tools
These projects use ordinary furniture-making and decorating tools rather than specialist workshop machinery. The exact list depends on the conversion, but preparing the essentials first makes the work much easier to manage.
· Cleaner, cloths, scraper, wood filler, sandpaper, and a small sanding block
· Primer and durable furniture paint, stain, or clear protective finish suited to the surface
· Drill, drill bits, screwdriver, measuring tape, pencil, level, and square
· Jigsaw or suitable hole-cutting tool for bowl, sink, and worktop openings
· Wood screws, brackets, cleats, reinforcement blocks, and construction adhesive where appropriate
· Eye protection, dust mask, work gloves, and a stable surface for cutting
· Replacement knobs, hooks, casters, baskets, cushion materials, or plumbing components required by the chosen project
· Wall anchors or anti-tip hardware suitable for the wall and finished weight
Decide Which Original Furniture Details Deserve to Stay
Refurbishing does not mean removing every clue that the object began as bedroom furniture. Original curves, posts, drawers, moulding, and worn edges can help the new object feel intentional rather than homemade in a rushed way.
· Keep strong drawers when they still provide useful storage in the new location.
· Preserve a shaped headboard edge when it can become the visual back of a bench or wall organizer.
· Reuse solid posts as bench supports instead of replacing them with thinner new legs.
· Leave attractive wood visible on a top, shelf, or work surface when the material can be refinished safely.
· Replace decorative hardware only when it conflicts with the new function or is difficult to grip.
· Remove damaged trim rather than copying it across the whole piece; the finished design can be simpler than the original.
· Use baskets and removable organizers to adapt open spaces without making every storage decision permanent.
Turn an Old Headboard Into an Entryway Storage Bench
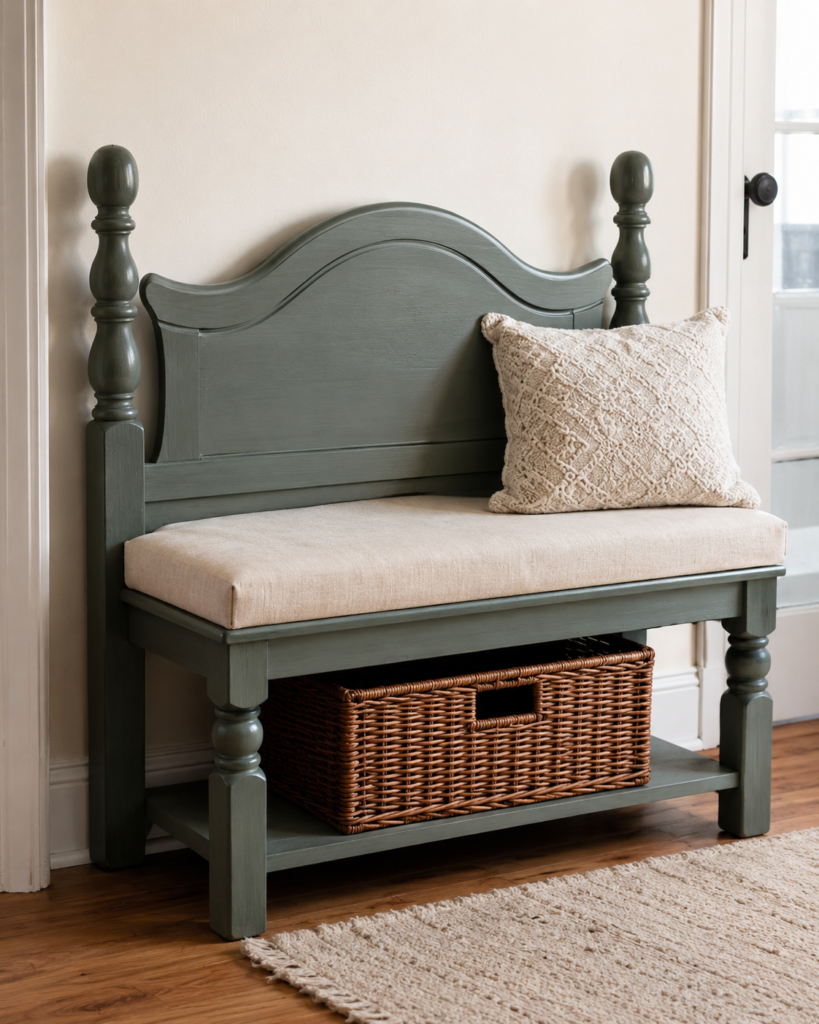
A solid wooden headboard already has the height and shape needed for a bench back. Adding a seat frame, front legs, and a lower shelf changes it into useful hallway furniture without hiding its original character. The turned posts and curved centre panel remain visible, which helps the finished bench look like a planned conversion rather than several unrelated boards joined together.
The lower basket is a practical detail because it stores shoes, scarves, or bags without requiring built-in drawers. The upholstered cushion can also remain removable, making it easier to clean and replace.
Materials and Tools
· Strong wooden headboard with sound posts
· Timber for the seat frame, front legs, and lower shelf
· Plywood or solid board for the seat platform
· Wood screws, brackets, cleats, and wood glue
· Foam, batting, and durable upholstery fabric
· Furniture paint or stain and a protective finish
· Drill, saw, sander, square, clamps, and measuring tools
· Basket sized to fit beneath the seat
Steps for the Headboard Bench
1. Plan the finished seat around the headboard. Measure between the posts and decide on a comfortable seat depth that will not block the hallway. Mark the seat height on both posts, then check that the original headboard panel will sit high enough behind the cushion to remain visible and supportive.
2. Build a rigid seat frame. Join front and back rails to side rails, keep every corner square, and add at least one centre support when the span is wide. Attach the rear of the frame securely to strong areas of the headboard posts rather than to thin decorative panels. Add front legs that match the height and can carry a person’s weight.
3. Add the seat platform and lower storage shelf. Fix the platform to the frame so it cannot shift, then install a lower shelf between the legs for the basket. The shelf also helps brace the bench. Test the bare structure gradually before painting or adding upholstery, and correct any rocking or twisting immediately.
4. Prepare and finish the wood. Fill unnecessary holes, sand rough edges, and apply the chosen paint or stain. Keep the slightly aged details when they suit the design, but smooth every surface that hands, clothing, or the cushion will touch. Allow the finish to settle before assembling the soft parts.
5. Make a removable cushion and complete the safety check. Cut foam to the seat size, wrap it with batting, and cover it in durable fabric with a zip, envelope back, or other removable closure. Sit on the bench carefully, test the lower shelf, and anchor the unit to the wall when its height or location creates a tipping risk.
One detail I wouldn’t skip is testing the frame before upholstery. A soft cushion can hide a weak seat for a moment, but it cannot make the structure safer. A beginner can simplify the idea by using a ready-made bench base and attaching only the headboard as the back.
Convert a Nightstand Into a Raised Pet Feeding Station
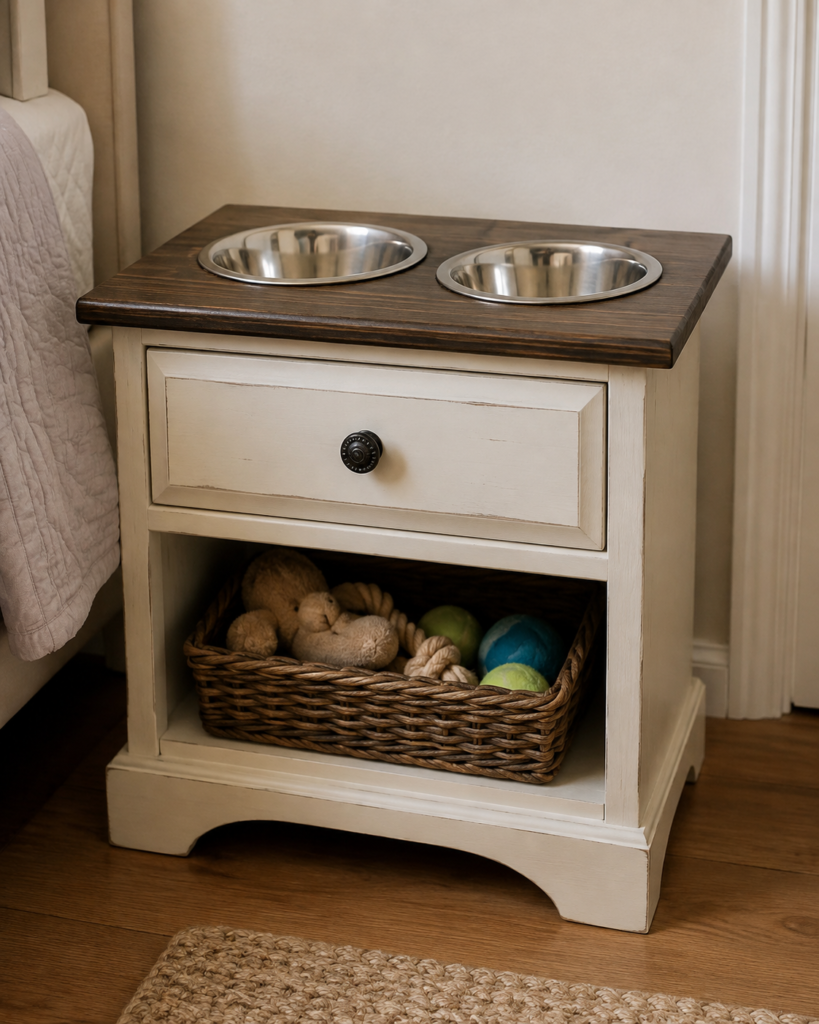
A nightstand has a stable top, useful drawer, and compact footprint, so it can become a pet station with only one major change: carefully cut bowl openings. The drawer remains useful for leads, grooming items, waste bags, or sealed treats, while the lower shelf can hold toys in a basket.
The height should suit the animal, not the original bed. A tall nightstand may be uncomfortable for a small dog or cat, so measure first and choose a piece that allows relaxed access to the bowls.
Materials and Tools
· Sturdy nightstand with a sound top
· Two removable stainless steel pet bowls with raised rims
· Pencil, compass, bowl template, or paper pattern
· Drill and jigsaw suited to the top material
· Sandpaper, wood filler, and sealer for exposed edges
· Durable wipeable furniture finish
· Optional basket and drawer dividers
· Anti-slip feet or wall restraint when needed
Steps for the Pet Station
1. Check the height and internal clearance. Place the bowls on the top and confirm that the pet can reach them comfortably. Remove the drawer and look underneath so the planned openings do not cut through runners, rails, or corner blocks. Leave a generous border of material around both bowls.
2. Mark and cut each opening carefully. Trace the narrower section beneath the bowl rim rather than the widest outside edge. Drill a starter hole inside the marked circle, then cut slowly with a jigsaw. Test the fit several times and enlarge the opening gradually until the rim rests securely on the surface.
3. Seal the cut edges and refinish the furniture. Sand away splinters, fill damaged areas, and protect every exposed edge from water. Paint or refinish the outer surfaces, but keep decorative coatings away from the removable bowl interiors. A wipeable top is more useful here than a highly distressed finish with deep grooves.
4. Organize the remaining storage. Use the drawer for lightweight pet supplies and place a washable basket on the lower shelf for toys. Keep food in suitable sealed containers rather than loose inside a painted drawer. Place heavier items low so the station remains balanced.
5. Install the bowls and test daily use. Set the station on a level floor, add non-slip pads if it moves, and press on each corner to check for wobble. Fill the bowls, remove them for washing, and confirm that the opening does not trap spilled water. Adjust the height or location if the pet appears uncomfortable.
I know it can feel tempting to glue the bowls in place for a cleaner look, but removable bowls are much easier to wash. A one-bowl version is even simpler and leaves more of the original top intact.
Refurbish a Bedroom Dresser as a Bathroom Vanity
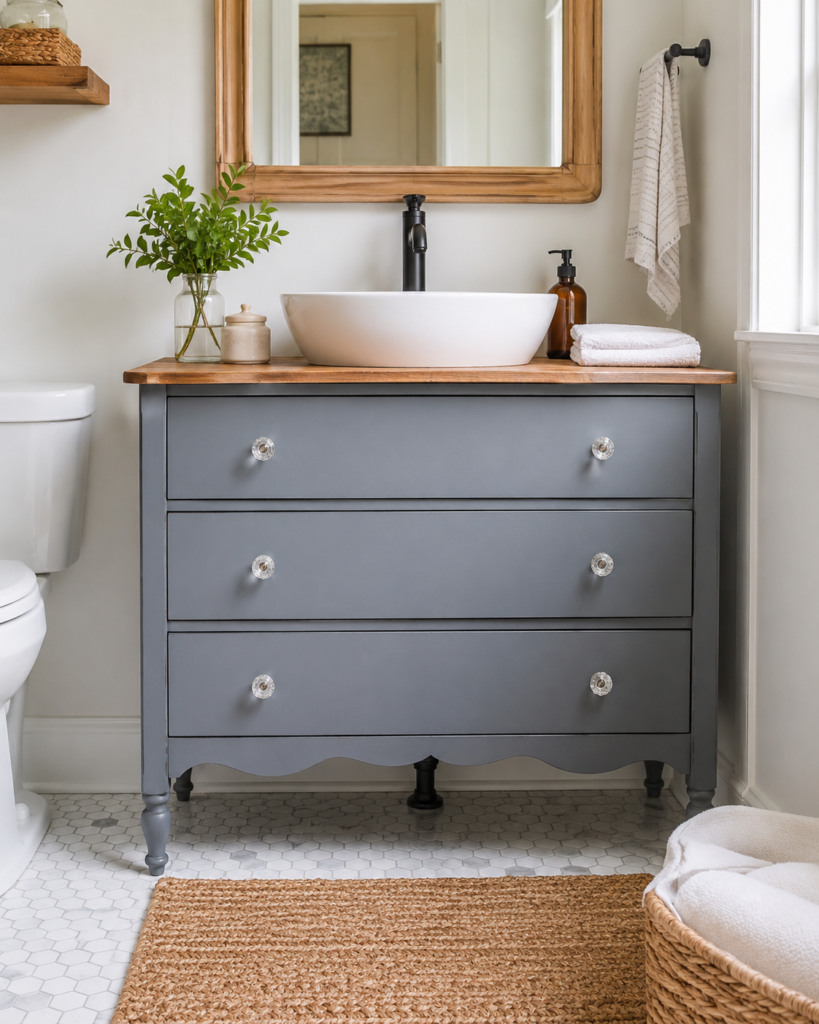
A dresser can offer more storage and character than a standard vanity cabinet, but this conversion needs careful plumbing and moisture planning. A vessel sink preserves more of the upper drawer depth than a fully inset basin, while the broad top provides space for soap, towels, and a small plant.
The visible drawers may remain functional, become shallower, or use fixed fronts depending on the drain position. I’d rather sacrifice part of one drawer than remove the entire internal structure without considering what keeps the dresser square.
Materials and Tools
· Structurally sound dresser of a suitable bathroom height
· Vessel sink, faucet, drain assembly, trap, and supply connections
· Durable sealed top or replacement wood worktop
· Drill, hole saw, jigsaw, screwdriver, and plumbing tools
· Timber for reinforcement and drawer modification
· Moisture-resistant primer, furniture finish, and edge sealer
· Replacement knobs or handles
· Qualified plumbing assistance where required
Steps for the Vanity Conversion
1. Measure the room, plumbing, and dresser together. Position the piece where it will stand and mark the drain, supply lines, faucet location, door clearance, and standing space. Check the sink height before cutting anything, because a tall dresser plus a vessel basin can place the rim uncomfortably high.
2. Reinforce and prepare the top. Remove the upper drawers, inspect the underside, and strengthen weak areas with cleats or a new worktop. Mark only the openings needed for the drain and faucet, then dry-fit the components. Seal cut edges immediately, especially when the furniture contains veneer or manufactured board.
3. Modify the drawers and back panel. Shorten the upper drawer box, create a neat U-shaped clearance, or secure the original drawer front as a false front. Cut the back only where the pipes require access, keeping as much material as possible. Make sure shut-off valves and connections remain reachable after installation.
4. Refinish for a damp room. Clean and sand the dresser, repair worn corners, and apply a finish suited to regular splashes and wiping. Protect the top, drawer edges, base, and cutouts rather than painting only the visible front. Replace damaged hardware with pieces that are comfortable to grip with wet hands.
5. Install the sink and test the system. Complete the plumbing according to the components and local requirements, then run water while checking every connection and drawer clearance. Keep stored items out until the plumbing remains dry. Add a small splash guard or wall protection when water is likely to reach the painted surface.
For a lower-risk version, place the dresser beside an existing pedestal sink and use it only for storage. That keeps the furniture out of the plumbing work while still giving an old bedroom piece a useful bathroom role.
Reuse a Headboard as a Wall-Mounted Entryway Organizer
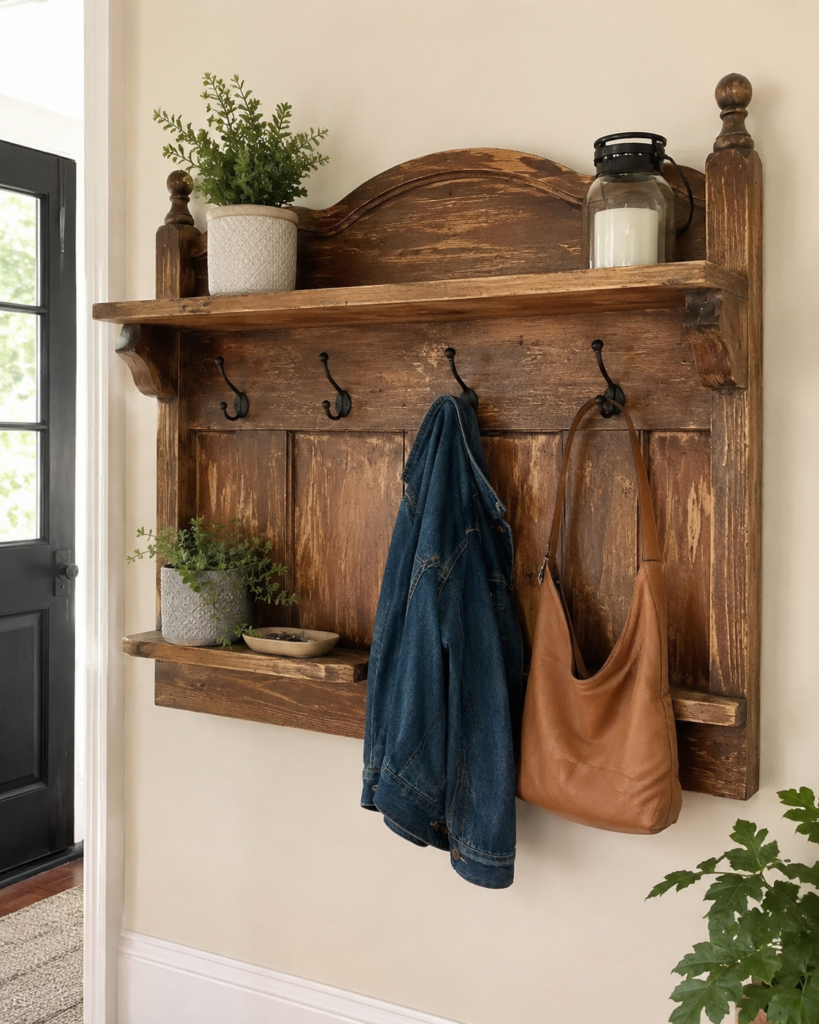
A headboard can work vertically as a wall organizer when there is no floor space for another cabinet. The broad central panel provides a strong place for hooks, while the upper and lower shelves hold keys, small baskets, or decorative items. Keeping the original posts and curved top makes the source material easy to recognise.
This conversion is visually simple but wall mounting is the part that deserves the most attention. Coats and bags create pulling force, so the organizer must attach to framing or suitable heavy-duty anchors rather than relying on small picture hooks.
Materials and Tools
· Solid headboard or substantial wooden bed end
· Timber boards for shallow shelves
· Coat hooks and screws
· Heavy-duty wall cleat or mounting brackets
· Wall anchors suited to the wall construction
· Drill, level, stud finder, saw, and measuring tape
· Sandpaper and furniture finish
· Optional key tray, labels, or small baskets
Steps for the Wall Organizer
1. Prepare the headboard as a wall piece. Remove any bed rails or hardware projecting from the back, tighten loose posts, and inspect the central panel for splits. Decide whether the headboard will keep its full width or lose part of the posts. Sand sharp edges while preserving sound aged marks that suit the finish.
2. Plan the shelves and hooks before drilling. Lay the headboard flat and arrange the upper shelf, lower ledge, and hooks around the items they will hold. Leave enough space between hooks for coats and bags, and keep heavier bags nearer the mounting points. Mark every location with a level and square.
3. Attach the new storage parts. Screw the shelf supports into strong rails or posts rather than thin decorative panels, then fit the shelf boards. Add hooks with screws long enough to grip solid wood. Test each addition by pulling firmly before mounting the organizer on the wall.
4. Finish the wood and prepare the mounting system. Clean or refinish the piece, allowing the character of the original headboard to remain visible. Fit a strong French cleat or heavy brackets across the back. Locate studs where possible and use wall anchors that match the surface and expected weight.
5. Mount, load, and recheck. Lift the organizer with help, secure it level, and test it before hanging coats. Add items gradually, placing lighter decor on the shelves and heavier bags on reinforced hooks. Recheck the fixings after several days because old wood and new screws may settle slightly under load.
For renters, a smaller section of the headboard can sit on top of an existing console and attach with anti-tip straps rather than becoming a fully loaded wall unit. That version should hold light accessories only.
Turn a Bedroom Dresser Into a Rolling Kitchen Island
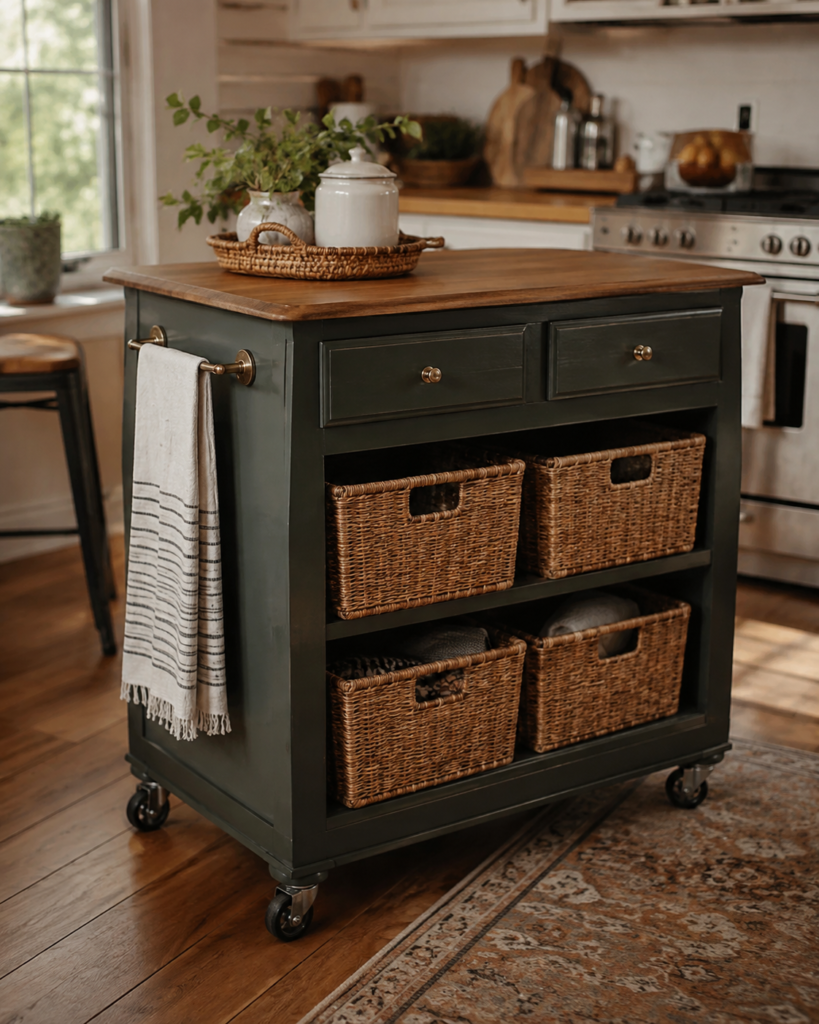
A low dresser can become a compact kitchen island when the frame is strong enough for a worktop and casters. The upper drawers hold utensils or linens, while removing lower drawer boxes creates open spaces for baskets. A towel rail on the side adds function without changing the main structure.
The wheels make this conversion different from a simple dresser repaint. They also concentrate the load at four small points, so the base needs reinforcement before the island is moved across the floor.
Materials and Tools
· Low, sturdy dresser with a strong frame
· Wooden worktop or durable sealed top panel
· Four heavy-duty furniture casters, including locking wheels
· Reinforcement blocks, screws, brackets, and wood glue
· Shelf boards and baskets
· Towel rail or sturdy side handle
· Furniture paint or stain and protective finish
· Drill, saw, sander, level, and measuring tools
Steps for the Kitchen Island
1. Choose the correct height and layout. Measure the dresser with the planned casters and worktop included, then compare the result with nearby counters. Decide which upper drawers will remain and which lower drawers will become open basket shelves. Remove only the parts that are not helping to brace the frame.
2. Reinforce the base for wheels. Add solid blocks inside the lower corners so the caster screws do not rely on thin boards. Mark equal wheel positions, drill pilot holes, and install locking casters. Stand the empty unit upright and roll it slowly to check that every wheel contacts the floor evenly.
3. Create the open storage. Remove unwanted drawer runners and repair the interior surfaces, then install fixed shelves where baskets will sit. Keep the heaviest cookware or supplies on the lowest shelf. Choose baskets that slide out without scraping the frame and leave some air around stored linens.
4. Fit and protect the worktop. Refinish the existing top or add a new wooden panel with a slight overhang. Secure it from below so visible screws do not interrupt the surface. Use a finish suitable for regular kitchen wiping, but keep direct food preparation on appropriate cutting boards unless the worktop is specifically prepared for that use.
5. Add the towel rail and complete a movement test. Fix the rail or side handle into reinforced wood, then load the island gradually. Lock the casters before using the top and avoid pulling the unit by a decorative drawer knob. Roll it through the actual kitchen route to make sure baskets, towels, and nearby doors remain clear.
A stationary version is easier for beginners: keep the original feet, add the worktop and baskets, and skip the wheels. I’d choose that option when the dresser base is not strong enough for repeated movement.
Bedroom Furniture Conversion Problems That Can Ruin a Useful Makeover
Removing structural parts before understanding what they support is one of the biggest problems. Drawer rails, back panels, base boards, and connecting rails often keep the furniture square. Add new reinforcement before taking several parts away.
Cutting openings without inspecting underneath can damage drawer runners or weaken the top. Remove drawers, look from below, and mark every internal obstruction before making holes for bowls, sinks, or plumbing.
Using decorative paint as the only moisture protection causes trouble in pet stations, bathrooms, and kitchens. Seal exposed edges, undersides, joints, and cutouts, then use removable bowls, trays, or work surfaces where water is common.
Adding wheels to thin board without reinforcement can tear the base apart. Casters need solid mounting blocks, suitable screws, and a level installation. Lock the wheels whenever the converted piece is being used as a work surface.
Treating a bench conversion like ordinary storage is unsafe. A person creates far more load than books or bedding. Build a real seat frame, test it gradually, and anchor tall backs where tipping is possible.
Overloading wall-mounted pieces is another avoidable mistake. The headboard organizer may look substantial, but its safe capacity depends on the mounting method and wall. Attach it to studs or suitable anchors and keep the heaviest items near reinforced points.
Finally, forcing every furniture piece into an ambitious project can waste good material. A dresser that cannot handle plumbing may still become dry bathroom storage, and a weak headboard may provide a decorative panel rather than a full bench. A simpler conversion is often the more durable one.
Frequently Asked Questions
Do I need to sand bedroom furniture before refurbishing it?
Most pieces need at least light preparation so repairs and new finishes can grip properly. The amount depends on the existing surface. Avoid aggressive sanding on thin veneer, and test a hidden area before working across the whole piece.
Can particleboard furniture be converted into these projects?
It can work for light, dry indoor storage when the board remains firm and undamaged. It is a poor choice for seating, heavy casters, large cutouts, outdoor exposure, or repeated bathroom moisture unless the design receives substantial reinforcement.
Which project is easiest for a beginner?
The wall organizer and pet station are manageable when the original furniture is solid and the cutting is simple. The bench, bathroom vanity, and rolling island require more structural planning and should not be rushed.
Can I keep the old furniture hardware?
Yes, when the knobs, pulls, and hooks remain secure and suit the new use. Replace hardware that is sharp, loose, difficult to clean, or uncomfortable in a bathroom or kitchen.
How can I make a converted dresser safer?
Keep heavy items low, preserve structural rails, reinforce new openings and caster points, and anchor tall furniture where needed. Test drawers, shelves, and movement before fully loading the piece.
What finish should I use in a bathroom or kitchen?
Choose a durable finish intended for regular wiping and the material underneath. Pay special attention to cut edges, tops, feet, and joints. No decorative coating should be treated as a substitute for proper plumbing, trays, or food-safe work practices.
Do I need professional help for any of these conversions?
A qualified plumber may be needed for the vanity, and structural or mounting help is sensible when you are unsure about a bench or heavy wall organizer. Asking for help with one technical stage still allows the furniture refurbishment to remain your project.
Give Bedroom Furniture a Purpose Beyond the Bedroom
Learning how to refurbish bedroom furniture becomes more useful when the project solves a real household problem. A headboard can offer seating or wall storage, a nightstand can organize pet supplies, and a dresser can serve the bathroom or kitchen without losing the drawers and craftsmanship that made it worth keeping.
Begin with the conversion that matches the furniture’s strength. Keep the solid details, replace damaged parts, and add only the structure the new purpose requires. Once that is done, paint and hardware can support the design instead of trying to disguise weak construction.
Which unused bedroom piece could work harder somewhere else in your home: the headboard, nightstand, or dresser?