Old lockers are useful long after their school, factory, gym, or workshop days are over. Their steel frames are made for repeated handling, the doors already provide separate compartments, and the vents, label slots, hinges, and recessed handles give them a character that ordinary flat-pack storage does not have. The difficulty is seeing past chipped paint, institutional colours, surface rust, and a shape that may feel too tall or too severe for a home.
I think the best locker makeovers begin with function rather than colour. A low bank of lockers can become entryway storage, a tall set can organise a studio, and a smaller cabinet can move onto the wall as a kitchen cupboard.
Once the new use is clear, it becomes easier to decide whether to keep original doors, add shelves, fit legs, replace panels, or join several units together.
Metal furniture rewards careful preparation. Loose rust, grease, sharp edges, weak feet, and sticking doors need attention before primer or decorative details.
I don’t think every dent needs hiding, but the cabinet must be stable, safe, and easy to open. Then the finish can support the locker’s new role instead of simply covering its past.
Inspect Old Lockers Before Planning the Makeover
A locker can look solid from the front while hiding corrosion or weak joints underneath. Check the full unit before moving it indoors or loading it with household items.
· Open every door and check whether hinges, catches, locks, and recessed handles move without forcing.
· Inspect the base, lower corners, legs, roof, and back for rust that has eaten through the metal rather than sitting on the surface.
· Press gently on the frame to see whether it twists, rocks, or separates where adjoining sections were originally joined.
· Run a gloved hand near cut edges, damaged vents, and old screw holes to find sharp points that need smoothing.
· Check whether shelves and shelf clips are present, straight, and strong enough for the planned contents.
· Look for flaking coatings, oily residue, marker ink, glue, labels, and adhesive that may prevent primer from bonding.
· Measure door swing, overall depth, and the intended room so the finished locker does not block a walkway, socket, radiator, or skirting board.
· Decide whether the unit can be moved safely in one piece or needs to be separated before transport.
Gather Materials for Metal Repair and Refinishing
The exact kit depends on whether the lockers will stay freestanding, receive a timber top, or be mounted on a wall. Use products that are compatible with metal and with one another.
· Protective gloves, eye protection, and a suitable mask for dust or spray products
· Mild degreasing cleaner, clean cloths, and brushes for vents and corners
· Scraper, wire brush, sanding pads, or abrasive paper for loose paint and surface rust
· Rust treatment or metal primer suited to the condition of the steel
· Durable metal or cabinet paint and compatible clear protection where needed
· Screwdrivers, spanners, drill bits, clamps, and replacement fasteners
· Metal filler or another suitable repair product for small non-structural holes
· Painter’s tape, drop cloths, and labels for keeping doors and shelves in order
· Optional timber top, legs, adjustable feet, trim, shelf clips, handles, decals, or acrylic panels
· Wall anchors, brackets, or anti-tip fixings selected for the cabinet weight and wall type
Choose a New Use Before Changing the Structure
Lockers can serve many rooms, but the new purpose should guide every structural change. A cabinet for boots and bags needs different access and protection from one holding dishes or art supplies.
· Use a low locker bank in an entryway for shoes, bags, pet leads, sports equipment, and seasonal accessories.
· Keep a tall locker arrangement for utility storage, studio materials, gym equipment, or cleaning supplies.
· Convert a smaller cabinet into wall storage only when the frame and mounting points can safely support the cabinet and its contents.
· Retain individual compartments when several people need labelled storage, or remove selected internal dividers when larger objects need space.
· Add shelves where they improve access, but avoid overloading thin sheet-metal supports with heavy items.
· Choose one calm colour for a furniture-like result, or use stronger colours and decals when the lockers should feel playful.
· Keep vents clear whenever stored items may be damp, such as boots, sports gear, or cleaning cloths.
· Plan how the unit will be anchored before adding a heavy timber top or placing it in a home with children or pets.
Turn a Low Bank of Lockers into Entryway Storage
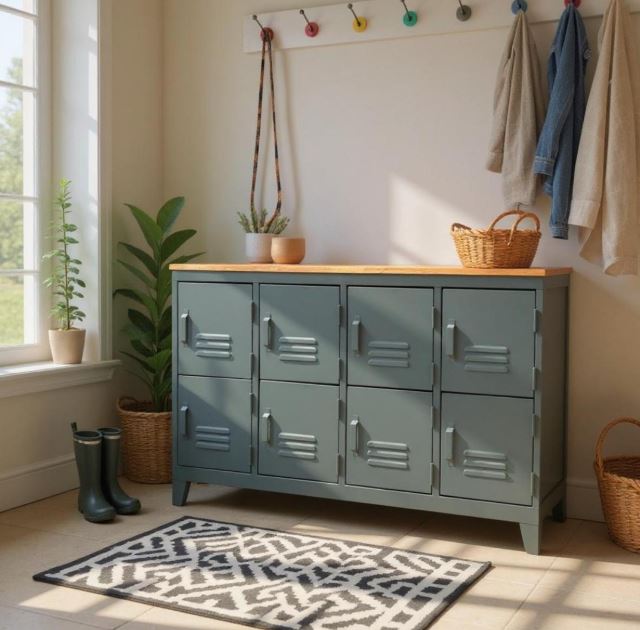
Eight locker compartments have been arranged as a low cabinet that feels more like entryway furniture than institutional storage. The muted grey-green paint softens the metal, while the timber top adds warmth and creates a useful surface for a basket, plant, keys, or a bag. Original vents, handles, and hinges remain visible, so the transformation does not erase the locker character.
The raised base keeps the cabinet from appearing too heavy against the floor, but adding legs is the part that requires the most care. Thin sheet metal should not carry concentrated weight at four improvised points. The base may need an internal frame or a securely attached platform that spreads the load across the cabinet.
Materials and Tools
· Low bank of metal lockers with sound doors and frame
· Cleaner, rust-removal tools, fine abrasive pads, and metal primer
· Durable grey-green or another muted metal paint
· Timber board for the top, finished on all exposed faces
· Internal support frame or base platform where needed
· Short furniture legs or adjustable feet rated for the loaded cabinet
· Bolts, washers, brackets, and fixings suitable for thin metal
· Wall anchor or anti-tip brackets
· Optional shelf liners, baskets, hooks, and labels
Detailed Steps for the Entryway Cabinet
1. Separate and label the locker parts. Remove loose shelves, doors only if the hinges allow safe removal, and any internal brackets that block cleaning. Label each component because older metal doors often fit one opening better than another. Photograph hinge positions and keep small fasteners in separate labelled bags.
2. Repair the steel before decorating it. Degrease the locker, remove loose paint and surface rust, then inspect the lower edges again. Smooth sharp spots and repair only small non-structural holes with a product intended for metal. If rust has thinned the base or damaged a major joint, reinforce or replace that section before continuing.
3. Create a load-spreading base for the legs. Measure the footprint and build or fit a rigid internal support that connects the leg positions. Bolt through the locker base using wide washers or plates so the fixings do not tear through thin sheet metal. Stand the empty cabinet upright and check that all legs carry weight evenly without twisting the doors.
4. Prime and paint in thin, controlled coats. Mask locks and moving parts, then apply metal primer to repaired and bare areas or to the full unit when the chosen system requires it. Paint vents and corners lightly so holes do not clog. Lay removable doors flat where possible and keep paint away from edges that already fit tightly.
5. Fit the timber top and secure the finished cabinet. Finish the top separately, including the underside and edges, then attach it from inside the locker with suitable screws or brackets. Avoid visible fixings through the top surface. Level the unit, anchor it to the wall, and load heavy shoes or equipment into the lower compartments first.
I’d keep the timber top slightly larger than the metal frame only when the walkway allows it. A small overhang can make the cabinet look finished, but an oversized edge near a doorway will collect bumps and bruises remarkably quickly.
A simpler version can sit on a reinforced plinth rather than individual legs. The cabinet will keep the same furniture-like shape, and the continuous base is often easier for a beginner to level and attach safely.
Refresh Tall Lockers with Bright Paint and Personal Decals
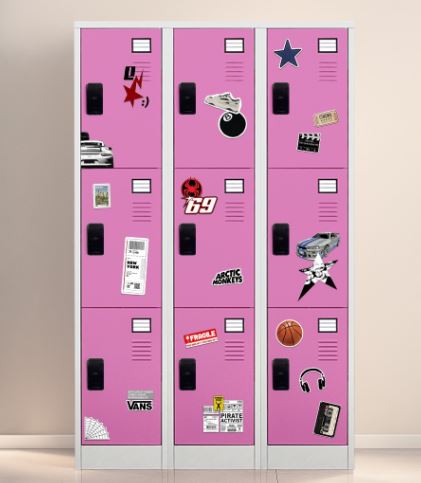
This locker bank uses colour and graphics rather than structural changes. The outer frame stays pale grey, while nine doors carry a strong pink finish. Black recessed handles and white label holders create repeated contrast, and stickers give each compartment a separate identity without affecting storage.
This approach suits bedrooms, studios, craft rooms, or shared family spaces because each door can be labelled or decorated differently. The project only works well when the original hardware remains clean and functional. Thick paint around handles, vents, hinges, and door edges can make a cheerful makeover irritating to use.
Materials and Tools
· Tall multi-door locker bank
· Adhesive remover suitable for painted metal
· Plastic scraper, cleaner, abrasive pads, and rust-treatment supplies
· Metal primer and bright paint for the doors
· Contrasting paint for the outer frame if desired
· Painter’s tape and masking material
· Replacement label cards or inserts
· Vinyl decals, removable stickers, or printed graphics
· Clear protective coating only when compatible with both paint and decals
· Anti-tip fixings for securing the tall cabinet
Detailed Steps for the Painted and Decorated Lockers
1. Remove old labels and adhesive patiently. Warm stubborn sticker residue gently if the surface allows it, then lift it with a plastic scraper rather than a blade that may gouge the metal. Use a compatible adhesive remover in a small test area. Wash away every oily trace because new primer will not bond reliably over remover residue.
2. Prepare the doors and frame as separate colour zones. Mark which areas will remain grey and which will become pink, then remove handles or mask them carefully. Treat rust, smooth chipped paint, and lightly abrade glossy surfaces. Keep label slots, ventilation openings, and hinge movement free from filler and heavy primer.
3. Prime and paint the frame before the doors. Applying the lighter frame colour first usually makes masking easier. Once it is ready for tape, protect the frame and paint the doors in thin coats. Roll the broad faces and use a small brush only where needed so the finish does not become heavy around vents.
4. Reassemble and test every compartment. Refit handles, number plates, and label holders, then open and close each door several times. Correct rubbing edges before adding decals. If a lock no longer operates smoothly, clean or repair the mechanism rather than forcing it through fresh paint.
5. Plan the decal layout before sticking anything down. Arrange paper templates or place removable markers on the doors to balance large and small graphics. Apply decals to clean, fully ready paint and press out air gradually. Keep graphics away from vents, locks, door gaps, and areas handled every day.
I know it can feel tempting to cover every door with as many stickers as possible, but blank space helps the individual graphics stand out. A few repeated colours across the decals will also make unrelated designs feel connected.
For a changeable version, use removable vinyl or magnetic decorations instead of permanent stickers. The lockers can then grow with a child, change with a studio project, or return to a calmer look without another full repaint.
Convert a Locker Cabinet into a Wall-Mounted Kitchen Cupboard
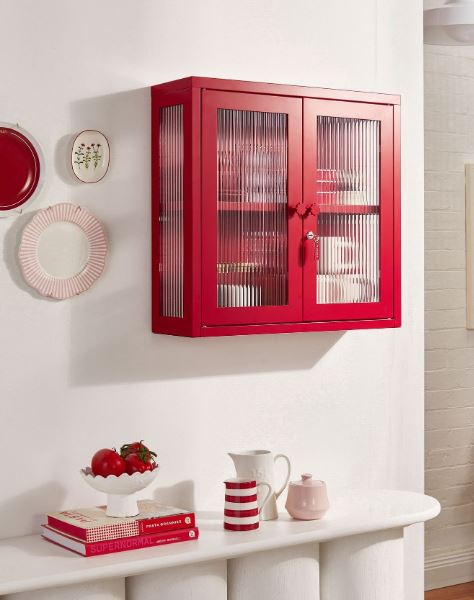
A smaller locker cabinet can move off the floor and become wall storage, but this is the most structurally demanding project in the group. The strong red frame, ribbed translucent door panels, visible locks, and side ventilation give the cabinet a lively kitchen presence. The raised position also frees the surface below and makes the contents easier to reach.
The fluted panels soften the view of dishes and containers without hiding them completely. Acrylic is often lighter than glass and easier to handle in a metal door, but the panel still needs proper mechanical support. Adhesive alone is not enough where doors open repeatedly.
Materials and Tools
· Compact metal locker cabinet with a sound frame and doors
· Drill, metal bits, screwdrivers, clamps, and eye protection
· Rust-removal supplies, metal primer, and red metal paint
· Fluted acrylic or suitable safety glazing cut to the required size
· Panel-retaining strips, clips, screws, or existing door channels
· File or edge-finishing tool appropriate to the insert material
· Internal mounting rail, heavy-duty brackets, or secure hanging system
· Wall anchors and fasteners rated for the wall and loaded cabinet
· Level, stud or fixing-location detector, and a second person for lifting
Detailed Steps for the Wall Cupboard Conversion
1. Confirm that the cabinet can be mounted safely. Empty the locker and inspect the back, top, corners, hinges, and shelf supports. Identify strong structural points for a mounting rail or brackets rather than relying on a thin decorative back panel. Estimate the loaded weight conservatively and choose a wall location that can accept suitable fixings.
2. Remove or modify the solid door panels without weakening the frames. Take the doors off when possible and study how the original panels are held. Keep the outer rails and hinge areas intact. Cut or remove only non-structural material, smooth sharp metal edges, and stop if the door begins to flex or lose its square shape.
3. Measure and fit the translucent inserts. Create a template for each opening because older doors may not be identical. Have acrylic or safety glazing cut with enough clearance for expansion and easy fitting. Support the inserts with clips, channels, or retaining strips on all necessary sides, and make sure no sharp edge remains exposed.
4. Prepare, prime, and paint the cabinet and doors. Degrease all surfaces, remove rust, and abrade the remaining finish. Mask the panel channels and moving hardware, then apply compatible metal primer and thin paint coats. Paint doors flat when possible and clear excess paint from lock openings, hinges, and edges before it hardens.
5. Mount the cabinet before adding contents. Install the rail or brackets level using fixings matched to the wall construction. Lift the empty cabinet with help, secure every mounting point, and test for movement before refitting shelves and doors. Load light items first and keep heavy dishes low and close to the wall.
The detail I would not compromise on is the mounting system. A wall cupboard can look secure while one thin fixing carries most of the load. Use multiple structural points, spread the weight, and ask a qualified installer for help when the wall or cabinet construction is uncertain.
A less complex alternative is to keep the cabinet freestanding on a worktop-height frame. You can still use translucent door inserts and red paint without placing the full cabinet weight on the wall.
Combine Mismatched Lockers into Flexible Freestanding Storage
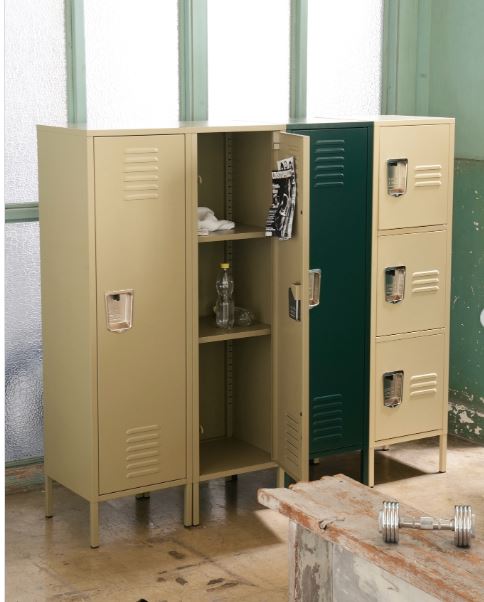
This arrangement combines tall wardrobe-style lockers with a narrow stack of smaller compartments. Muted beige covers most of the group, while one deep green door creates a strong vertical accent. The original recessed handles, vents, shelves, and slender legs remain visible, so the lockers still feel honest rather than disguised as wooden furniture.
Mismatched lockers work when their differences are organised. Repeating two colours, aligning the tops where possible, and keeping similar gaps between units makes the collection feel planned. Inside, adjustable shelves allow the tall compartments to hold folded textiles, bottles, magazines, sports items, or workshop supplies.
Materials and Tools
· A group of compatible tall and narrow metal lockers
· Long level, measuring tape, shims, and adjustable feet where available
· Cleaner, wire brush, sanding pads, rust treatment, and primer
· Muted beige paint and one deep accent colour
· Replacement shelf clips, shelf boards, or shelf liners
· Bolts, connecting brackets, and wide washers
· Wall anchors or anti-tip straps
· Optional labels, magnetic organisers, and interior hooks
· Floor protectors suitable for the room
Detailed Steps for a Mixed Locker Arrangement
1. Dry-arrange the lockers before refinishing them. Place the empty units in their intended order and compare heights, depths, door swings, and leg positions. Decide where the accent colour will sit and which doors need the clearest access. Mark the floor position so the group can be returned to the same layout after painting.
2. Repair each cabinet as an individual unit. Remove shelves and label their heights, then clean interiors, vents, handles, and legs. Treat rust around lower edges and recessed handles, where moisture often collects. Replace missing shelf clips and correct twisted doors before trying to force the cabinets into one line.
3. Prepare and paint with a shared visual plan. Prime bare and repaired metal, then apply the main beige colour to most units. Paint the selected door or cabinet in deep green after masking adjacent surfaces. Keep the finish thin around vents, handle recesses, shelf slots, and door returns so every function remains usable.
4. Level and connect the group. Return the lockers to the marked positions and adjust feet or use metal-compatible shims until the doors hang correctly. Join neighbouring frames at strong internal points with bolts and wide washers where appropriate. Do not pull crooked lockers together so tightly that their frames distort.
5. Anchor, organise, and load from the bottom up. Secure tall units to the wall individually or as a connected group using approved fixing points. Fit shelves, liners, and hooks, then place heavier bottles, tools, or equipment in the lower sections. Keep upper compartments for lighter items and recheck level after loading.
For me, one accent colour is enough here. Several different bright doors would compete with the mixed cabinet shapes, while a single deep green section gives the eye somewhere to pause.
A beginner could start with two lockers rather than a full group. Paint them in related colours, level them carefully, join them at the side, and add more units only when the arrangement proves useful.
Ways to Adapt Locker Storage to Different Rooms
· Entryway: add washable shelf liners, boot trays, name labels, and hooks for umbrellas or pet leads.
· Bedroom: use removable decals, fabric baskets, and shelf divisions for clothing, books, and accessories.
· Kitchen: store light pantry items, mugs, or linens, and keep the cabinet away from direct heat and persistent moisture.
· Studio: add magnetic cups, clips, labels, and shallow shelves for paints, paper, tools, and works in progress.
· Utility room: separate cleaning supplies, cloths, spare bulbs, and household tools while keeping products away from children.
· Workshop: retain strong metal shelves, label hardware clearly, and avoid loading thin doors with heavy hanging tools.
· Home gym: keep vents open for shoes and equipment, use wipeable liners, and allow damp items to dry before closing the doors.
Locker Makeover Choices That Create Problems Later
Covering active rust with paint. Rust that remains loose or damp continues beneath the coating and soon lifts the finish. Remove unstable material, treat the steel properly, and repair perforated areas before decorating.
Attaching legs directly to thin sheet metal. Concentrated weight can bend or tear the base. Spread the load through an internal frame, platform, or reinforcing plates and test the empty cabinet before use.
Blocking vents and door gaps with thick paint. Paint buildup makes doors stick and removes useful airflow. Apply thin coats and clear holes, catches, hinges, and edges while the coating remains workable.
Using decals on uncured or dusty paint. Graphics can trap marks, lift at the edges, or pull away the new finish. Let the surface become ready for normal handling, clean it gently, and plan the layout first.
Mounting a locker by its back panel alone. Many back panels are too thin to carry the loaded cabinet. Use structural rails, corners, or approved brackets and fix them into suitable wall support.
Joining crooked lockers by force. Bolts can distort frames when units are not level. Correct feet, floors, and alignment first, then connect strong points without pulling the doors out of square.
Ignoring sharp internal edges. Cut panels, damaged vents, and old holes can injure hands or snag stored items. File, cover, or repair every exposed edge before the locker returns to use.