An old entertainment center can become awkward long before the wood itself wears out. The television opening may no longer fit a modern screen, the deep shelves collect unused electronics, and the entire unit can feel much heavier than the room around it. Even so, that large frame still offers something valuable: built-in shelving, enclosed cupboards, drawers, a broad central opening, and enough height to create storage that would be expensive to build from the beginning.
I prefer to judge furniture by its structure rather than its original label. An entertainment center does not have to hold a television forever. With careful planning, it can become a coffee station, craft center, pantry, reading nook, office, mudroom unit, or potting station. The strongest transformations use the existing shelves and cabinets instead of removing every part and rebuilding the piece from scratch.
Before choosing a project, measure the unit, the doorway, and the room where it will live. These pieces are often extremely heavy, so decide whether the work should happen in place. I know it can feel tempting to begin painting immediately, but the first useful step is checking the frame, removing obsolete wiring, and deciding which shelves must stay, move, or carry extra weight.
Check the Structure Before Changing the Purpose
Empty the entire unit and remove loose shelves, doors, drawers, television brackets, electrical strips, and cable clips. Vacuum the corners, then wash away dust, furniture polish, grease, and sticky residue. Pay close attention to the base and back panel because damage there affects every later change.
· Check that the unit stands level and that the side towers remain firmly connected to the base.
· Tighten screws and reglue loose wooden joints before adding paint, hooks, worktops, or seating.
· Identify solid wood, veneer, laminate, and manufactured board so you can choose suitable cutting and finishing methods.
· Confirm that adjustable shelves have enough support pins for the weight they will carry.
· Remove damaged electrical components rather than hiding them behind a new back panel.
· Use wall anchors or anti-tip hardware appropriate for the finished project and wall type.
· Wear eye protection when drilling or cutting, and get help before moving a large unit.
Turn the Entertainment Center Into a Coffee Station
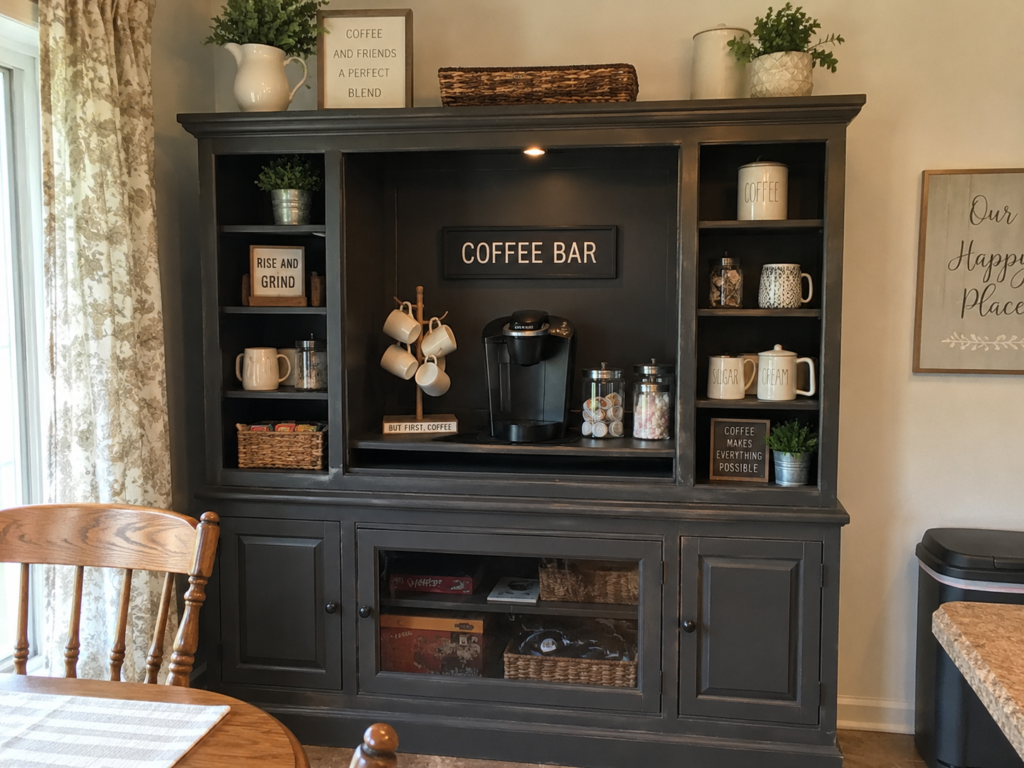
A coffee station suits an entertainment center because the central television opening already provides a wide working area. The side shelves can hold mugs, jars, tea, and small baskets, while the lower cupboards hide spare supplies and less attractive packaging. A dark painted finish can make the original furniture feel more compact, although a lighter colour may work better in a small kitchen or breakfast area.
What matters here is not filling every shelf. Leave enough clear space around the coffee machine for refilling, cleaning, and steam. The shelf beneath the machine should also be strong, level, and easy to wipe.
Materials and Tools
· Entertainment center with a broad central opening
· Cleaner, sandpaper, primer, and furniture paint or stain
· Strong shelf board or worktop panel if the original shelf is weak
· Food-safe or washable liner for the working surface
· Cup hooks, mug tree, or shelf organizers
· Baskets and jars for tea, coffee pods, sugar packets, or filters
· Drill, screwdriver, level, measuring tape, and suitable fasteners
· Optional low-heat task light approved for the intended location
Steps for the Coffee Station
1. Plan the working zone before changing the shelves. Place the coffee machine, kettle, or other appliance inside the central opening and check the height needed to open lids, remove water tanks, and refill beans or pods. Mark a comfortable working level, then decide which existing shelf can be reinforced or moved to that position.
2. Repair and prepare the furniture. Remove obsolete cable hardware, fill unnecessary holes, tighten loose joints, and clean every shelf and cupboard. Sand glossy areas enough to help the new finish grip, but avoid cutting through thin veneer. Then repair damaged edges before applying primer or stain.
3. Create a durable work surface. Add a strong shelf or worktop panel across the central section, supporting it at the sides and back rather than relying on small shelf pins. Cover or seal the surface so coffee drips can be wiped away, and leave access to a nearby outlet without trapping plugs behind the unit.
4. Organize the shelves by frequency of use. Put everyday mugs, filters, and tea at an easy height, keep refill packets in baskets, and store heavier jars on lower shelves. Add hooks only where the backing or shelf edge can carry them securely. Then leave one shelf partly empty so new supplies do not immediately create clutter.
5. Add finishing details and test the routine. Install a simple task light if appropriate, position the machine with clear space around it, and run the full process of filling, brewing, serving, and cleaning. Move anything that blocks access or collects steam. I’d rather remove one decorative sign than squeeze the practical items into an inconvenient corner.
A smaller version can become a tea station or breakfast cupboard. You could also keep the exterior wood finish and paint only the inside to define the working area without making the whole unit feel new.
Create a Fold-Out Sewing and Craft Center
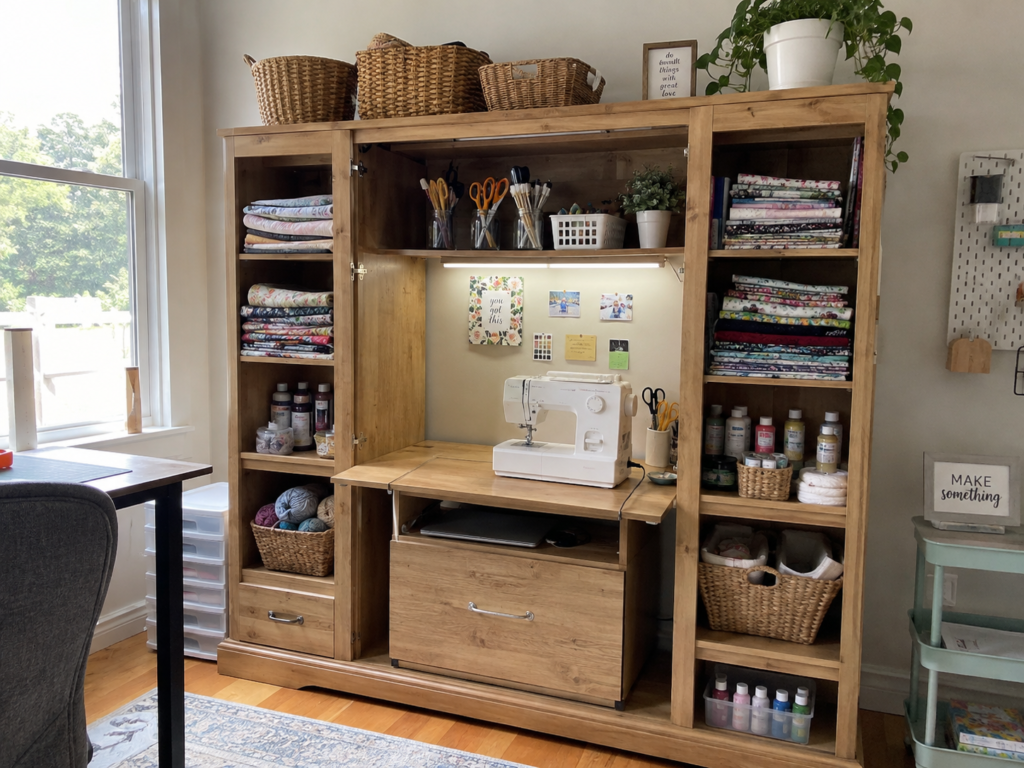
Craft supplies quickly spread beyond the table where they begin, so an entertainment center can be useful precisely because it contains several types of storage. Fabric can remain folded on the side shelves, paints and tools can sit in baskets, and the central opening can hold a sewing machine or cutting area. A fold-out worktop makes the piece more useful without requiring a permanent desk to project into the room.
The challenge is load support. A sewing machine and a person’s hands place repeated pressure on the work surface, so hinges alone are not enough. The open panel needs legs, brackets, or another reliable support system.
Materials and Tools
· Entertainment center with strong side sections
· Plywood or furniture board for a fold-out worktop
· Heavy-duty hinges and folding legs or locking supports
· Shelves, baskets, jars, and drawer organizers
· Magnetic strip, pegboard, cork panel, or small tool rail
· Task light and safe cable-routing clips
· Drill, screwdriver, saw, level, measuring tools, and safety equipment
· Furniture finish suited to the original surface
Steps for the Craft Center
1. Sort the supplies before designing the storage. Separate fabric, yarn, paints, tools, patterns, cutting equipment, and unfinished projects. Measure the largest items, especially the sewing machine and storage bins, so you do not build shelves that are attractive but too shallow or too close together.
2. Choose the worktop height and support method. Mark a comfortable seated or standing level inside the central opening, then cut a worktop that can fold against the unit when not in use. Fit heavy-duty hinges along a reinforced rail and add folding legs or locking brackets that carry the downward pressure safely.
3. Build storage around the actual workflow. Place frequently used scissors, rulers, and marking tools near the worktop, keep folded fabric on wider shelves, and store heavy bottles low. Use baskets for loose materials and a dedicated container for unfinished work so one project does not take over every shelf.
4. Add lighting and cable control. Mount a task light beneath an upper shelf where it will not shine directly into your eyes, then secure the cable along the back or side. Keep plugs accessible, leave ventilation around the sewing machine, and avoid running extension leads beneath moving hinges or folding supports.
5. Test the center with a complete small project. Lower the worktop, set up the machine or tools, retrieve materials, and then pack everything away. Note every awkward reach or unstable area and correct it before loading the shelves fully. The first arrangement rarely ends up being the final one, and that is completely normal.
A no-hinge version can use a fixed desk-height shelf with a chair stored below. For paper crafts, replace some fabric shelving with vertical magazine files and shallow trays.
Repurpose the Unit as a Freestanding Pantry
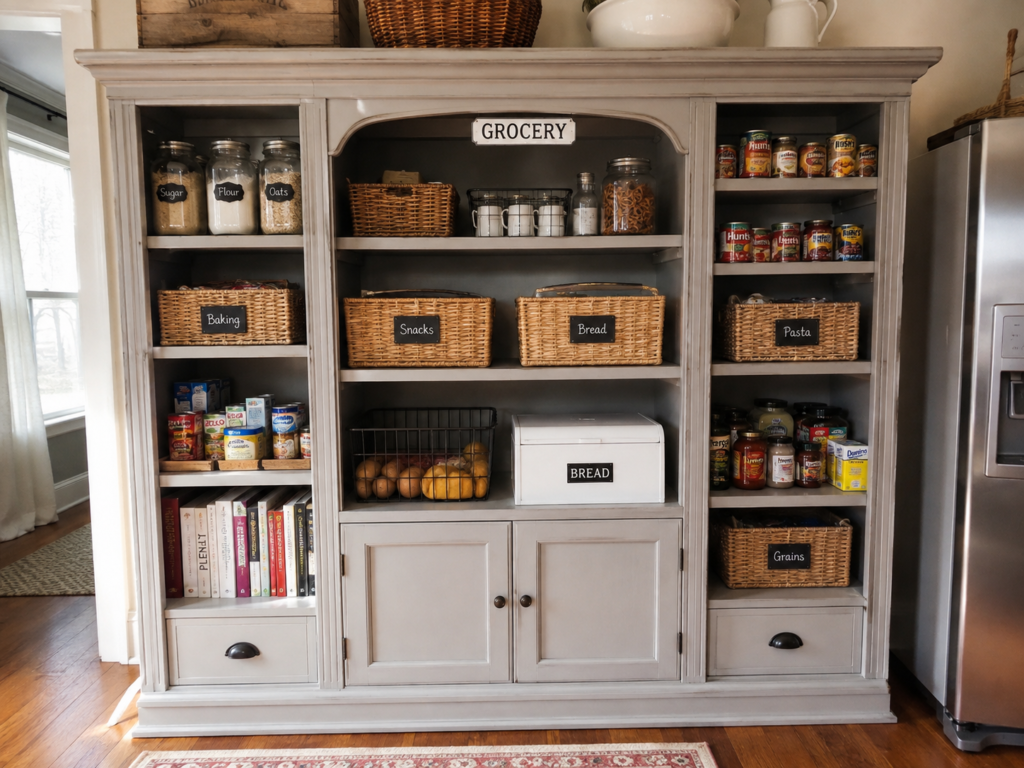
Entertainment centers often have the depth that ordinary bookcases lack, which makes them useful for pantry storage. The central opening can hold baskets, bread storage, or frequently used dry goods, while the narrower side shelves suit jars and tins. Closed cupboards keep bulk refills and appliances out of sight.
Deep shelves can also create a problem because food disappears behind other food. Pull-out baskets, shallow bins, and shelf risers help prevent forgotten packets from collecting at the back.
Materials and Tools
· Clean, structurally sound entertainment center
· Washable interior finish or removable shelf liner
· Baskets, shallow bins, jars, shelf risers, and labels
· Additional shelf boards and strong shelf supports
· Door catches or replacement hinges for lower cupboards
· Anti-tip hardware
· Cleaner, sandpaper, primer, paint, drill, level, and measuring tape
Steps for the Pantry
1. Choose what the pantry will store. Make a list of dry goods, tins, baking supplies, snacks, bread, small appliances, or serving items. Measure tall bottles and wide baskets, then divide the unit into zones. Do not store more categories simply because there is space; the layout should match the household’s real habits.
2. Clean and prepare every food-storage surface. Remove old electronics residue, dust, cable clips, and loose backing material. Repair shelves, sand rough edges, and apply a washable finish or removable liner. Keep food inside its own packaging or suitable containers rather than in direct contact with decorative paint.
3. Adjust the shelves to reduce wasted height. Add stronger supports where jars or tins will create concentrated weight, and use risers on deep shelves so items at the back remain visible. Keep the heaviest containers below waist level and avoid loading adjustable shelves beyond what their pins can safely carry.
4. Use containers to control depth. Place snacks, pasta, baking items, and small packets in separate shallow baskets that can be lifted out as one group. Label the front clearly, but keep the labels broad enough that the system can adapt when shopping habits change.
5. Anchor, load, and review the pantry. Secure the tall unit to the wall, check that doors close without rubbing, and load one shelf at a time. After using the pantry for several days, move frequently handled items closer to the center and remove any container that makes access more difficult.
A smaller household may not need every shelf for food. Cookbooks, linens, and serving dishes can fill the less accessible areas while everyday groceries stay within easy reach.
Build a Children’s Reading Nook Inside the Center
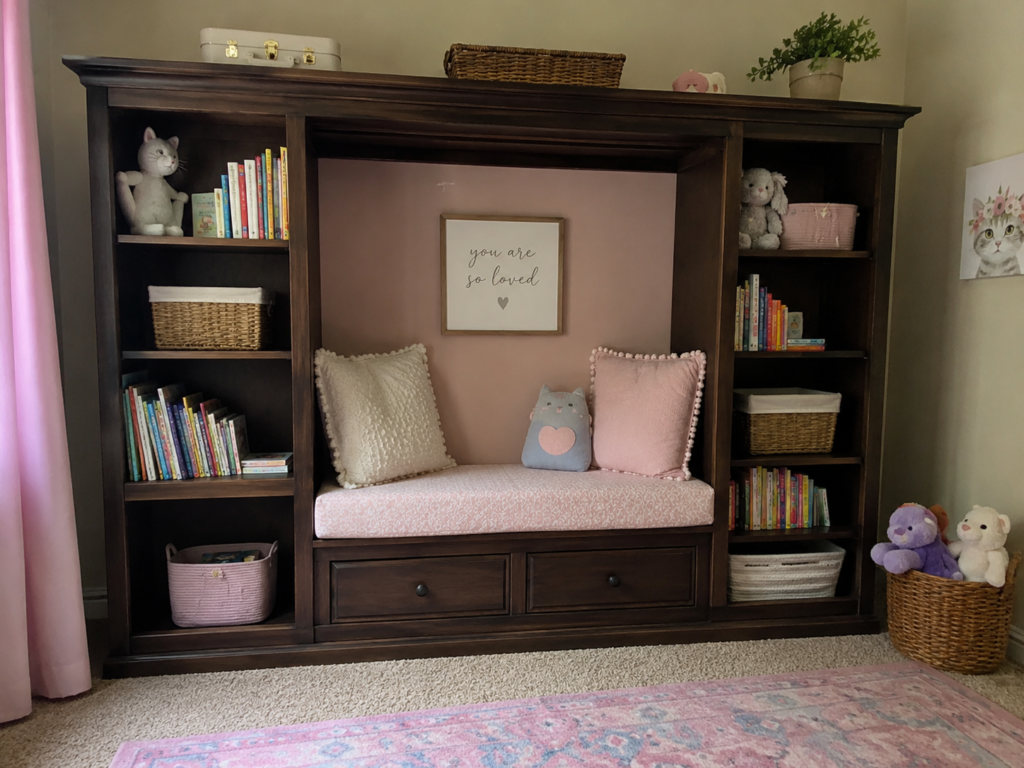
The central television opening can become a small reading seat when the base is low, wide, and strong enough to support weight. Side shelves place books within reach, drawers hide small toys, and baskets keep the lower shelves manageable. This transformation changes the purpose more dramatically than paint alone because the empty media opening becomes a place to sit.
Safety must guide every decision. Do not assume a shelf designed for electronics can support a child. Reinforce the seat, smooth every edge, anchor the unit, and remove doors or hardware that could trap fingers.
Materials and Tools
· Entertainment center with a low, wide central base
· Plywood or solid board for a reinforced seat
· Internal cleats, screws, and support blocks
· Foam cushion, removable fabric cover, and washable pillows
· Low baskets and book supports
· Rounded hardware or covered screw heads
· Anti-tip hardware suited to the wall
· Drill, saw, sander, level, measuring tape, and safety equipment
Steps for the Reading Nook
1. Assess whether the opening can become seating. Measure the width, depth, and height, then inspect how the base shelf connects to the sides and lower cabinets. If the shelf is thin, sagging, or supported only by pins, remove it and build a new seat platform tied securely into the frame.
2. Reinforce the seat from below. Install solid cleats along the side and back panels, add a center support when the span is wide, and fasten the seat board to those supports. Test the platform gradually with weight before adding fabric. A soft cushion cannot hide a weak structure.
3. Prepare the surrounding surfaces for children. Remove sharp brackets, obsolete wire holes, loose trim, and doors that swing into the seating area. Sand edges smooth, repair splinters, and use a durable finish. Then anchor the entire unit to the wall before the shelves are filled.
4. Make a removable cushion and organize the books. Cut foam to fit without blocking the side shelves, cover it with washable fabric, and add only a few light pillows. Place forward-facing or upright books on lower shelves and use lightweight baskets for toys so children can return items without lifting heavy containers.
5. Test the nook in everyday use. Check that feet do not catch on drawer pulls, shelves do not wobble, and no cord or light is within reach. Sit beside the child’s usual path through the room and remove anything that narrows the entrance. I don’t think extra decorations improve the nook if they make it harder to clean or use.
A non-seating version can become a book display with a padded floor cushion placed in front. This is a safer choice when the original base cannot be reinforced confidently.
Convert the Entertainment Center Into a Home Office
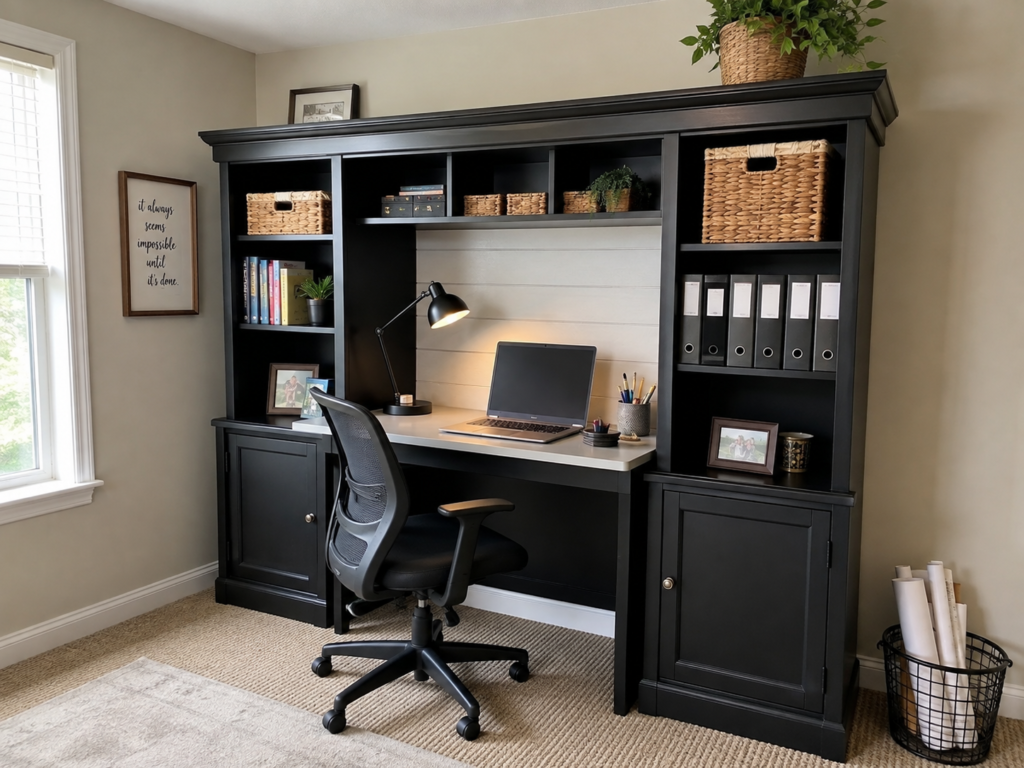
A large media opening is often close to the width needed for a desk, and the surrounding shelves naturally suit files, books, and office supplies. The lower cupboards can hide a printer, paper, or equipment, while the upper shelves keep reference material visible. A fitted desktop also makes the unit feel purposeful rather than like a television cabinet with a chair placed in front.
Legroom and desktop depth matter more than the number of shelves. Measure the chair, knees, and monitor distance before installing the worktop.
Materials and Tools
· Entertainment center with adequate central width
· Strong desktop board or reused worktop
· Cleats, brackets, screws, and optional front support legs
· Cable grommet and cable clips
· Task lamp and surge-protected power access
· File boxes, baskets, and shelf dividers
· Optional keyboard tray
· Drill, saw, level, measuring tools, and furniture finish
Steps for the Home Office
1. Measure the person and the equipment, not just the opening. Check comfortable desktop height, chair width, knee clearance, monitor distance, and the space needed to open lower cabinet doors. Mark the desktop position only after confirming that the chair can roll in and out without striking the base.
2. Remove or reposition obstructing parts. Take out the original television shelf, cable rails, doors, or center dividers that reduce legroom. Preserve the side towers and lower cabinets where possible because they keep the structure stable. Repair the back panel before cutting cable openings.
3. Install a properly supported desktop. Fix strong cleats to the side walls and back, then place the desktop level across them. Add front legs or brackets if the span is wide or the side panels are made from weak board. Test the surface before placing a monitor, printer, or heavy equipment on it.
4. Plan power and cables safely. Add a grommet behind the laptop or monitor, secure cables along the back, and keep the power strip accessible rather than sealed inside a cabinet. Leave ventilation around chargers and printers, and avoid placing paper directly against warm equipment.
5. Organize around the daily tasks. Store files and frequently used books at shoulder height, keep small supplies in baskets, and place rarely used items higher. Then work at the desk for a full session and adjust the lamp, chair, and shelf contents. A desk should support concentration, not require a small expedition every time you need a pen.
A compact version can use the central opening as a standing desk. Another option is to fit doors across the front so the office can close at the end of the day.
Make an Entryway Mudroom Bench and Storage Unit
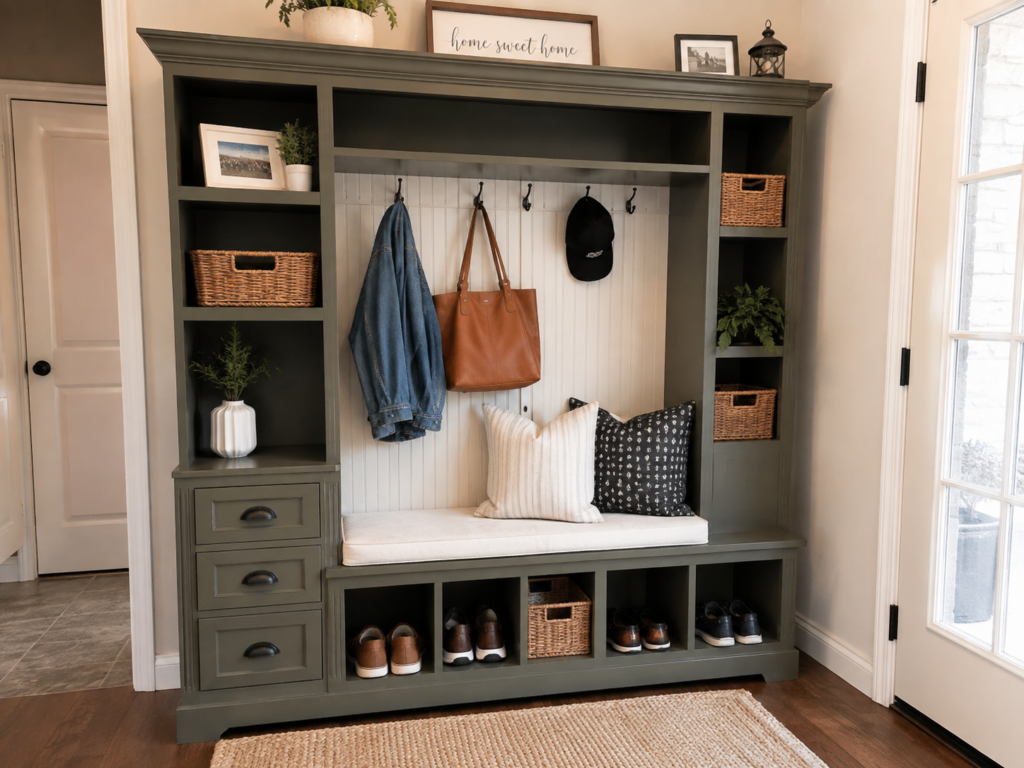
An entertainment center can become a useful entryway unit because it already combines height, side storage, and a wide middle section. The center can hold a bench, hooks can replace the television backing, and the lower base can divide into shoe cubbies. Side shelves store baskets, keys, hats, and bags.
This project has to tolerate repeated pulling, sitting, wet shoes, and heavy bags. Reinforcement and wall anchoring matter far more than decorative trim.
Materials and Tools
· Strong entertainment center with a low base
· Seat board, cleats, and support blocks
· Beadboard, plywood, or another durable back panel
· Coat hooks and suitable mounting screws
· Shelf dividers for shoe cubbies
· Foam cushion with washable cover
· Baskets, boot tray, and wipeable finish
· Anti-tip hardware, drill, saw, level, sander, and measuring tape
Steps for the Mudroom Conversion
1. Plan the entryway functions first. Count the shoes, coats, bags, keys, and seasonal items the household actually uses. Decide who needs to sit, how high the hooks should be, and whether the doors can open without striking the unit. Measure the walkway so the finished bench does not create a narrow passage.
2. Rebuild the central opening for strength. Remove television brackets and weak shelves, then install a reinforced bench platform on cleats and support blocks. Add vertical dividers beneath it for shoe cubbies, fastening them to the base and seat so they cannot shift when shoes are pushed inside.
3. Add a durable back and secure hooks. Fit beadboard or plywood across the central back, attaching it to framing rather than a thin decorative panel. Mark the hook positions according to the people using them, then screw the hooks into solid support. Do not rely on adhesive hooks for heavy coats or bags.
4. Prepare the surfaces for daily wear. Sand rough edges, repair damaged trim, and apply a wipeable finish to the bench, cubbies, and lower areas. Add a removable cushion and a tray for wet footwear. Keep absorbent fabric away from dripping coats unless it can be removed and washed easily.
5. Anchor and test the finished unit. Secure the entertainment center to wall studs or suitable anchors, then test the seat, hooks, drawers, and cubbies one at a time. Load heavier bags low or on reinforced hooks. Step back and remove decorative baskets that occupy space needed for everyday items.
A smaller family may use only one side tower for baskets and leave the other for open display. In a narrow hall, skip the cushion and use a shallower shoe shelf to preserve walking space.
Use the Entertainment Center as a Covered Potting Station
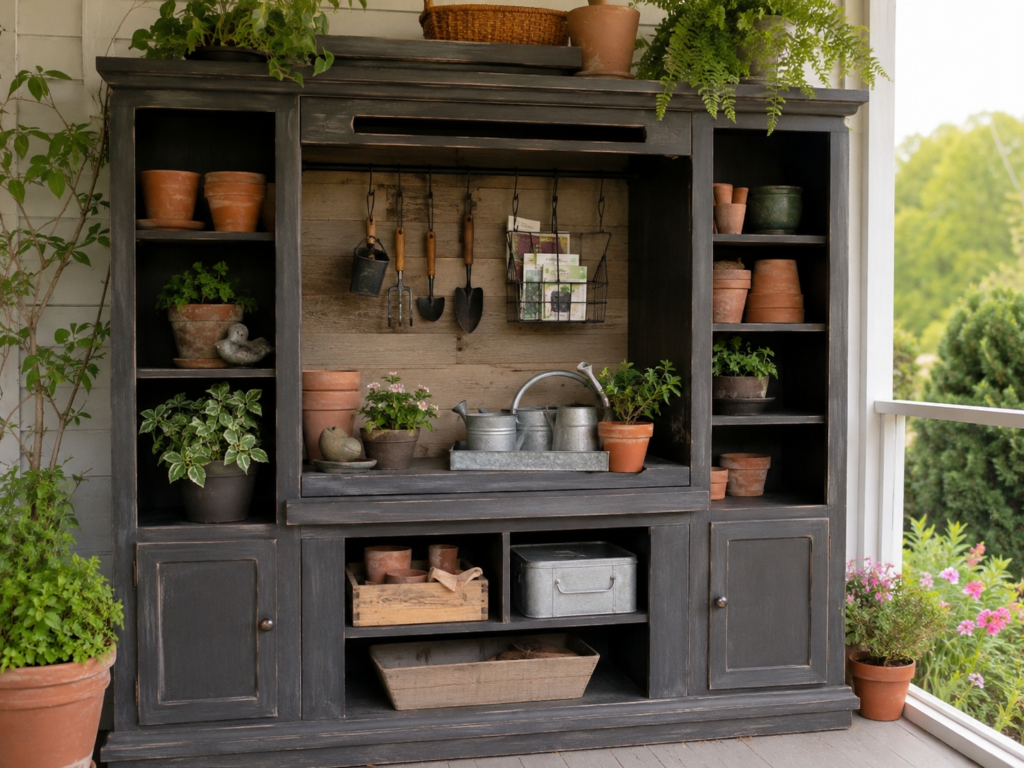
A deep entertainment center can hold more gardening supplies than a small potting table, while the central opening creates a sheltered work surface. Hooks keep hand tools visible, side shelves organize pots, and lower cupboards hide soil bags, trays, or less attractive supplies. This works best on a fully covered porch or inside a shed rather than in direct weather.
Indoor furniture does not become outdoor furniture simply because it has received one coat of paint. Inspect the material carefully and protect every exposed edge, underside, and foot.
Materials and Tools
· Solid entertainment center suitable for a covered location
· Exterior-suitable primer, paint, or protective finish
· Replacement corrosion-resistant screws and hardware
· Durable central worktop or removable metal tray
· Tool hooks, wire baskets, and shelf bins
· Pads or risers to keep the base away from damp flooring
· Drill, sander, screwdriver, level, measuring tools, and safety equipment
· Optional backing boards for attaching hooks securely
Steps for the Potting Station
1. Choose a genuinely sheltered position. Measure the porch or shed and confirm that rain cannot blow directly onto the unit. Check the floor for standing water and leave enough room to open cabinet doors. Manufactured board with swelling or peeling edges is not a sensible choice for this project.
2. Repair and protect the full structure. Replace rusty screws, reglue loose joints, remove damaged veneer, and sand rough areas. Apply the chosen protective finish to the front, back, shelves, underside, and feet. Then raise the base slightly on suitable pads so it does not sit directly on a damp floor.
3. Create a washable working area. Reinforce the central shelf and cover it with a removable metal tray, sealed worktop, or another surface that can handle soil and water. Add a shallow edge or tray to keep loose compost from falling into the lower cabinets.
4. Install hooks and storage by weight. Add a solid backing board if the original panel is thin, then screw hand-tool hooks into that support. Store pots and seed packets on the side shelves, keep heavy soil or watering cans low, and use closed bins for items that must remain dry.
5. Use the station and maintain it. Complete one repotting task, then sweep soil, wipe water, and check where tools naturally return. Adjust the hooks and baskets to match that routine. Inspect the finish and base regularly because small outdoor moisture problems become large furniture problems when ignored.
A shed version can remain natural wood if the surface is sound and protected. For a porch used by children or pets, lock fertilizers and sharp tools inside a secure lower cabinet.
Entertainment Center Makeover Problems That Can Undo the Hard Work
Removing too much structure at once. Side towers, shelves, base rails, and back panels often help brace one another. If several parts must come out, add new supports before the unit is moved or loaded.
Treating shelf pins as permanent structural supports. Adjustable pins may hold light electronics or books, but they are not automatically suitable for a desktop, coffee machine, pantry jars, or a person’s weight. Use fixed cleats, brackets, and reinforcement where the new purpose creates heavier loads.
Painting before resolving the layout. Fresh paint makes later measuring, cutting, drilling, and filling more frustrating. Complete structural changes and dry-fit shelves, hooks, worktops, or seating before applying the final finish.
Ignoring the depth of the original unit. Deep shelves can hide pantry food, create uncomfortable desk reach, or leave craft supplies inaccessible. Use pull-out containers, shelf risers, shallow inner shelves, or a false back to make the depth practical.
Leaving old electrical hardware in place without checking it. Outdated power strips, damaged lights, and hidden cables should be removed or assessed rather than painted around. New appliances and lighting need safe, accessible power and proper ventilation.
Skipping wall anchoring. Coffee stations, offices, reading nooks, and mudroom units can become top-heavy after shelves are loaded. Secure the piece to the wall using hardware suited to the unit and wall construction.
Using an indoor project in uncontrolled weather. A covered potting station still needs protection from damp floors, wind-driven rain, and temperature changes. If the furniture is already swollen or crumbling, reuse smaller solid parts instead of forcing the entire unit outdoors.
Frequently Asked Questions
Can a beginner repurpose a large entertainment center?
Yes, provided the first project does not require major structural cutting or seating. A coffee station, pantry, or simple office is easier than a reading nook or mudroom bench because the original frame carries fewer new loads.
Do I need to take the entertainment center apart before working on it?
Not always. Many units are safer to modify in place because moving them can loosen joints. Remove doors, drawers, shelves, and hardware for easier preparation, but keep the main frame assembled unless you understand how it is constructed.
Can laminate or particleboard entertainment centers be reused?
They can work for dry indoor storage when the panels remain flat and strong. Use a suitable primer and avoid projects that require heavy seating, outdoor exposure, or large unsupported cutouts unless the unit can be reinforced properly.
How do I make deep shelves easier to use?
Use shallow baskets that pull out, shelf risers, turntables, vertical dividers, or a false back. The right solution depends on whether you are storing pantry food, craft supplies, files, or small coffee items.
Should I remove the back panel?
Remove only damaged sections or areas that block the new design. The back can help keep the unit square, so replace it with plywood or another strong panel when hooks, lighting, or structural stability depend on it.
What is the safest way to add a desk or bench?
Support the new surface with fixed cleats, brackets, legs, or framing attached to strong parts of the unit. Do not rely on removable shelf pins. Test the structure gradually before normal use.
How can I make the project easier to move later?
Reduce unnecessary weight, use removable worktops or baskets, and avoid adding heavy decorative materials. Large entertainment centers may still require professional moving help even after repurposing.
Give the Entertainment Center a Job Worth Keeping
The most useful lesson in learning how to repurpose your entertainment center is that the large television opening is not wasted space. It can become a work surface, desk, seat, storage zone, or practical station, while the shelves and cabinets continue doing what they were built to do: hold and organize household items.
Begin with the project that asks the least from the structure. A coffee station or pantry may need only shelf adjustment and a durable finish, while a bench or reading nook requires serious reinforcement. Once the frame has been checked and the new purpose planned, the size that once made the unit feel outdated can become its greatest advantage.
Which new role would make your old entertainment center useful again: coffee station, craft room, pantry, reading nook, office, mudroom, or potting area?