Old chandelier crystals are often too pretty to throw away and too awkward to store. A single drop may have a tiny chip, a missing wire, or no obvious place on a modern light fitting, yet it can still catch daylight beautifully. That is exactly why I don’t think these pieces belong at the back of a drawer.
I like projects that work with the shape an object already has. Chandelier prisms come with drilled holes, faceted surfaces, and a little weight, so they naturally suit hanging ornaments, jewellery, wire sculpture, and decorative details. Even small beads can be useful when a larger crystal is no longer available as a matching set.
The important part is to treat each piece as glass rather than ordinary plastic craft trim. Check the edges, replace rusty connectors, and choose a new use that does not put a heavy crystal where it could fall or be pulled by a child or pet. With that care, a loose box of mismatched drops can become something useful instead of remaining a collection of almost-finished repairs.
Before You Start
Sort the crystals before planning a project. Place intact drops in one group, small beads in another, and chipped pieces in a separate tray. A minor flaw near the drilled hole may make a crystal unsuitable for hanging, while a smooth fragment can sometimes be used inside a securely enclosed mosaic or display.
Clean each piece gently with lukewarm water, a small amount of mild washing-up liquid, and a soft cloth. Avoid sudden temperature changes, harsh abrasives, and long soaking when foil backing, painted details, old glue, or metal caps are present. Dry everything completely before adding wire or adhesive.
Check old jump rings and pins rather than trusting them because they are already attached. Tarnish alone may be harmless, but thin, split, or rusted wire can fail under the weight of a crystal. Replace doubtful connectors with new jewellery findings suited to the size of the hole and the weight of the piece.
Put Unsafe or Heavily Damaged Crystals Aside
Before starting a project, separate chandelier crystals that may be unsafe to handle or unsuitable for regular use.
Set aside crystals that have:
- Sharp chips, deep cracks or broken pointed edges
- Loose metal pins, hooks, wires or connectors
- Rusted or badly corroded metal fittings
- Mould, mildew or serious water damage
- Paint, chemical residue or unknown surface coatings
- Heat, smoke or fire damage
- Permanent cloudiness caused by chemical cleaners
- Weak holes that may break when attached to wire
- Strong odours that remain after careful cleaning
Do not use sharp or badly cracked crystals for jewellery, keychains, bag charms or hanging decorations. Small damaged pieces may be suitable for sealed mosaic projects, but they should be handled with protective gloves and kept away from children and pets.
If the crystals are still attached to an electrical chandelier, disconnect the power and remove them carefully. Do not attempt to repair electrical wiring unless you are qualified to do so.
Check Each Crystal Before Choosing a Project
For ordinary, clean chandelier crystals, inspect:
- Small chips, cracks and sharp edges
- Loose hooks, pins and hanging wires
- Scratches, stains and cloudy areas
- Rust or discolouration around metal fittings
- The strength of drilled holes and attachment points
- The crystal’s size, shape and weight
- Whether matching pairs are available for earrings
- Whether flat surfaces are available for gluing
- How well the crystal reflects natural or artificial light
- Whether the piece is glass, acrylic or another material
Clean crystals gently with a soft cloth before using them. Avoid abrasive cleaners that could scratch the surface or damage decorative coatings.
Check the weight before turning crystals into earrings, necklaces, suncatchers or floral decorations. Heavy pieces require stronger wire, secure hooks and a stable supporting base.
Useful Materials and Tools for Crystal Projects
The exact supplies will depend on the project, but these items are useful for working with chandelier crystals:
- Soft microfibre cloths
- Mild glass-safe cleaning solution
- Protective gloves and safety glasses
- Padded craft mat or folded towel
- Small jewellery pliers
- Wire cutters
- Jump rings and split rings
- Earring hooks, necklace chains and bracelet clasps
- Jewellery wire and floral wire
- Keychain rings and bag-charm clips
- Strong thread, clear cord or fishing line
- Ribbon, twine and replacement hanging hooks
- Beads, charms and decorative spacers
- Strong craft adhesive suitable for glass or acrylic
- Hot-glue gun and glue sticks
- Wooden, metal or ceramic bases
- Wreath frames, vases and flowerpots
- Faux flowers and greenery
- Battery-operated fairy lights or LED candles
- Small storage boxes with padded dividers
Choose wire, hooks and adhesives that can support the crystal’s weight. Test glue on a hidden area first, use only a small amount and allow it to cure fully before hanging or wearing the finished item.
Work over a padded surface to prevent crystals from rolling, falling or breaking. Keep tools and small metal parts organised throughout the project.
Safety matters here: discard pieces with sharp, unstable cracks, wear eye protection when trimming wire, and keep small crystals away from children and pets. Hanging projects should use secure hooks and should never be positioned where someone could walk into them.
Turn Chandelier Crystals into a Hanging Suncatcher
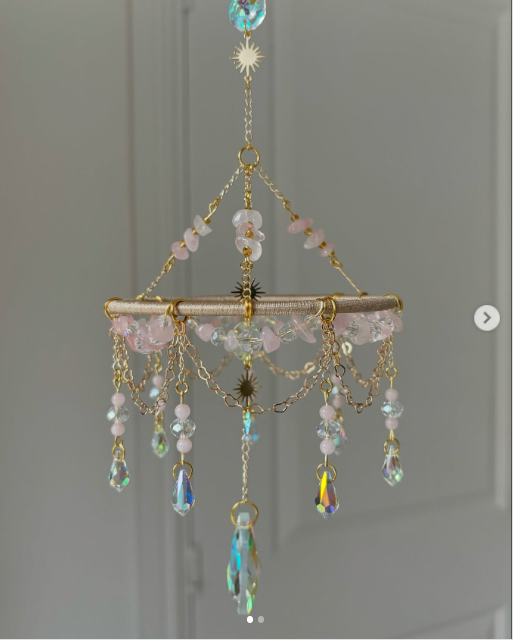
A circular hanging frame gives loose chandelier prisms enough structure to feel intentional rather than random. The design uses several short drops around the edge, one longer crystal at the centre, pale pink beads, small sun-shaped charms, and fine gold-coloured chain. Different crystal shapes work together because their positions repeat around the frame.
This can hang near a bright window, from a covered porch hook, or in a quiet corner where it will not be knocked. I especially like the way a mobile format makes use of odd numbers and unmatched pieces. You do not need a full chandelier set; you need a balanced arrangement and reliable connections.
The central crystal should hang low enough to create a focal point without making the whole ornament top-heavy. Smaller drops can sit at roughly even intervals, while light chains draped between attachment points fill empty spaces without adding much weight.
Materials and Tools
· Several intact chandelier crystal drops in mixed sizes
· Small glass or stone beads in one restrained colour family
· A sturdy metal ring, embroidery hoop, or small lampshade ring
· Fine decorative chain and stronger chain for the main supports
· Jump rings, eye pins, or wrapped-wire connectors
· Optional lightweight charms
· Two pairs of jewellery pliers and wire cutters
· Ceiling or window hook rated for the finished weight
Assemble the Suncatcher
1. Plan the hanging points. Lay the ring flat on a towel and mark evenly spaced positions around its edge with removable tape. Arrange the crystals below those marks before attaching anything. Put the longest or visually heaviest drop at the centre, then distribute similar weights around the outside so one side does not pull lower than the other.
2. Build the crystal drops. Connect each crystal to a short bead link or length of chain using a new jump ring. Close every ring by twisting the ends sideways and returning them to alignment; pulling the gap straight apart weakens the circle. Give each link a gentle tug over the work surface before moving to the frame.
3. Decorate the ring. Wrap the bare ring with cord, ribbon, or fine wire if you want a softer finish, then attach the outer crystal strands at the marked points. Add light bead loops and chain swags between them. Keep the decoration airy, because too many heavy layers can hide the individual crystal shapes and distort the frame.
4. Create a balanced hanger. Attach three equal support chains to the upper edge of the ring and bring them together at one strong connecting ring. Hold the ornament up over a cushioned surface, adjust one chain at a time until the frame sits level, and only then add the top crystal, charm, or hanging loop.
5. Test before display. Hang the finished piece temporarily from a low, secure hook and leave it undisturbed while you check every connection. Make sure the frame does not tilt and that crystals cannot strike each other hard in a light breeze. Then move it to its final position, away from doors, fans, and busy walkways.
The balance matters more than perfect symmetry
For me, the most important check is weight rather than exact spacing. Two crystals may look similar but weigh very differently. A slightly uneven visual arrangement can still hang beautifully, but an unbalanced frame will always look accidental.
A simpler version
Use one metal ring, three outer drops, and a single centre crystal. Leave out the decorative chain and add just a few beads above each prism. This smaller version is easier to level and works well when only four intact crystals remain.
Shape Chandelier Crystals into a Mini Gemstone Tree
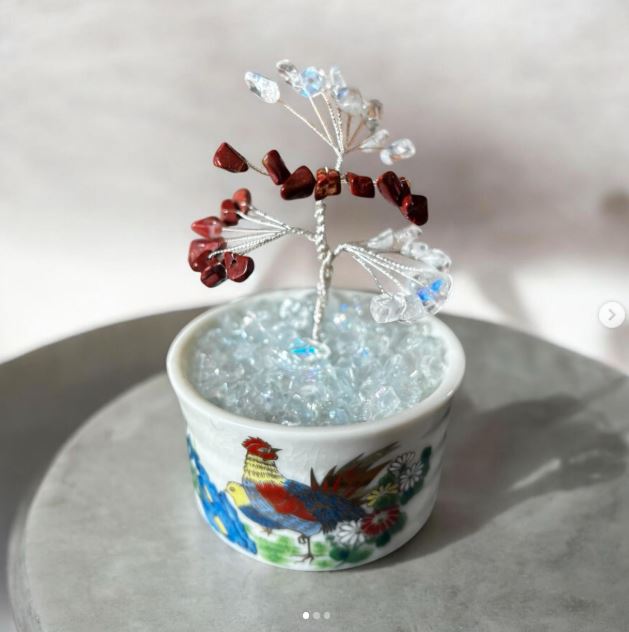
A miniature wire tree is useful for small chandelier beads that no longer have matching partners. Clear pieces form bright branch tips, while dark red chips create a second group of leaves and keep the whole tree from disappearing against a pale background. The narrow twisted trunk gives the loose materials one connected shape.
The decorative ceramic pot adds just as much character as the tree. An unused teacup, salt cellar, tiny planter, or damaged lidded jar base could work in a similar way, provided it stands steadily. Filling the surface with clear chips hides the support material and makes the tree appear to grow from a bed of crystals.
I know it can feel tempting to make every branch equally full, but small trees usually look more natural with a few open spaces. The wire should carry the structure; the crystals are the leaves, not the entire branch.
Materials and Tools
· Small chandelier beads, crystal chips, or lightweight prism fragments with smooth edges
· A second bead colour for contrast
· Fine jewellery wire for the branch tips
· Slightly heavier wire for the trunk
· A small stable ceramic, metal, or wooden container
· Air-dry clay, floral putty, or another firm internal support
· Loose glass chips, pebbles, or beads to cover the base
· Round-nose pliers, flat-nose pliers, and wire cutters
Build the Wire Tree
1. Prepare the container and base. Clean the small pot and check that it sits flat without rocking. Press a firm support material into the lower half, leaving enough space for a decorative top layer. If the vessel is very light, add a clean pebble beneath the support so the finished branches do not tip it over.
2. Make individual branch sprays. Cut several lengths of fine wire and thread one crystal or bead onto the centre of each length. Fold the wire around the bead and twist the two ends together several times. Add two or three more pieces on short side branches, varying their height rather than copying one identical spray repeatedly.
3. Group the branches. Combine three or four sprays and twist their lower wires into a thicker stem. Make several groups, some clear and some coloured, then arrange them on the table before joining them. Keep the heaviest clusters close to the future trunk so slender outer branches are not asked to hold too much weight.
4. Form and anchor the trunk. Wrap the grouped stems around a heavier central wire and twist downward to create the trunk. Bend the base into a small loop or several roots, then press it firmly into the support material inside the pot. Adjust the lean before the base hardens; correcting it later may loosen the whole tree.
5. Cover and shape the base. Add clear chips or small beads over the visible support, using a little compatible adhesive only where pieces need help staying in place. Then spread the branches gently with pliers and fingertips. Turn the pot as you work so the tree has an interesting outline from more than one direction.
Keep the branches light
The part I would check carefully is the wire thickness. Very fine wire looks delicate, but it can sag under real glass. Use it for the smallest tips and bring those tips back into a stronger central stem.
Try a seasonal variation
Clear and pale blue crystals can suggest winter, green glass can create a leafy version, and amber pieces can suit an autumn display. There is no need to buy matching beads; a limited colour palette is usually enough to make reused pieces feel connected.
Turn Small Chandelier Crystals into Beaded Drop Earrings
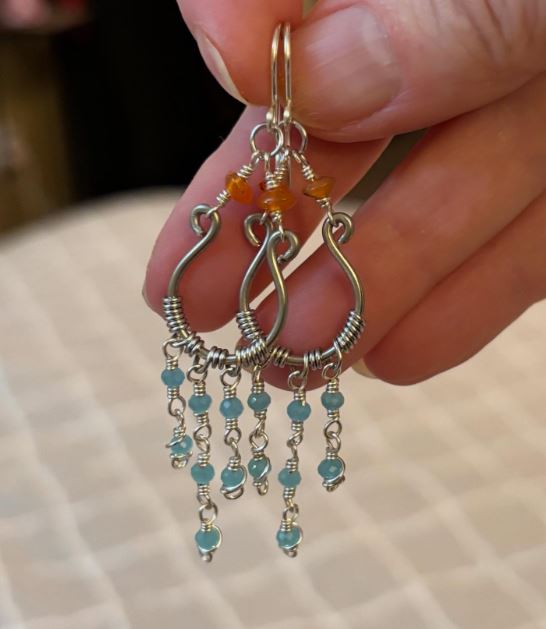
The smallest chandelier beads can be much easier to reuse than large prisms because they are light enough for jewellery. These earrings combine open silver-coloured wire frames with tiny blue dangles, clear crystal accents, and a few warm amber beads near the ear wires. The repeated drops create movement without requiring two perfectly identical collections.
Before using salvaged glass in earrings, compare the weight of the two finished sides. Vintage beads can vary more than they appear to, and a heavy pair may be uncomfortable. Smooth every wire end and inspect the crystal holes for rough edges that could cut through fine wire over time.
A handmade pair does not need to match bead for bead. Mirrored proportions, a shared metal, and similar overall length can make small differences look deliberate.
Materials and Tools
· Small lightweight chandelier beads or crystal drops
· Matching or coordinating seed beads and accent beads
· Jewellery wire suited to wrapping and forming
· Two ear wires made from a skin-compatible metal
· Small jump rings or eye pins
· Round-nose, chain-nose, and flush-cutting pliers
· A ruler and bead mat
· Optional polishing cloth for the metal findings
Make the Earrings
1. Select and compare the beads. Choose two groups with similar total weight, not just similar colour. Lay them in two vertical rows on a bead mat and compare their overall length. Remove any crystal with a cracked hole, sharp edge, or cloudy damage that cannot be cleaned safely.
2. Form the main wire frames. Cut two equal lengths of wire and use round-nose pliers to create matching teardrop or loop shapes. Wrap the ends securely around the top neck of each frame. Keep the curves broad enough to hold the bead dangles without allowing them to overlap into one heavy cluster.
3. Prepare the small dangles. Thread each blue bead and clear crystal onto a short head pin or wire section, then make a wrapped loop above it. Wrapped loops take a little longer than simple open loops, but they are less likely to pull apart. Trim the wire closely and press every cut end inward with pliers.
4. Attach the beads evenly. Add the dangles along the lower half of each wire frame, spacing them so the longest pieces sit near the centre. Place the amber accents above the frame or near the ear wire. Then hold both earrings side by side and move individual links until their lengths and visual weight feel balanced.
5. Finish and wear-test. Attach the ear wires with securely closed loops and polish away handling marks. Wear the earrings for a short period at home before relying on them for a full day. If they pull or swing too heavily, remove one or two glass dangles rather than accepting uncomfortable jewellery.
Comfort comes before extra sparkle
I’d rather use four light drops that move freely than eight heavy ones that pull on the ear. Save larger chandelier pieces for pendants, window ornaments, or bag charms where their weight can be supported more safely.
Make a matching pendant
Use one slightly larger crystal inside the same wire-frame shape and hang it from a strong chain. This creates a coordinated set without forcing the earrings to carry the heaviest pieces.
Decorate a Light Switch Cover with Small Crystals
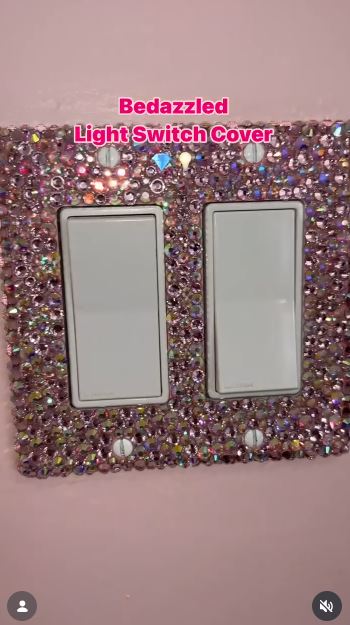
A light switch cover provides a small, defined surface for the tiniest crystals, beads, and flat-backed glass pieces. The visible example uses a dense mix of pink, lilac, clear, and iridescent stones around two switches. Salvaged chandelier beads can join a similar mosaic when they lie flat enough and do not project into the moving switch area.
This is one project where appearance must come second to electrical safety. Decorate only the removable faceplate, never the wall switch mechanism. Keep all pieces and adhesive away from the openings, screw holes, back surface, and edges that must sit flush against the wall.
The plate also needs to remain easy to clean. Raised crystal clusters may look appealing, but they collect dust and can catch fingers. I would keep the thickest pieces near the outer corners and use flatter beads close to the switch openings.
Materials and Tools
· A removable switch plate in sound condition
· Small flat-backed crystals, chandelier beads, or smooth glass fragments
· Clear-drying adhesive specifically suited to the plate material and glass
· Tweezers or a wax pickup pencil
· Rubbing alcohol or another plate-safe cleaner
· Painter’s tape for masking openings and screw holes
· A wooden skewer for removing small amounts of excess adhesive
· Protective work surface
Create the Crystal Mosaic
1. Remove and prepare the plate. Turn off power to the circuit at the breaker before removing the faceplate, and confirm the switches no longer operate. Unscrew only the removable cover, keep the screws safely aside, and take the plate to a separate work surface. Clean and dry it thoroughly so grease does not interfere with the adhesive.
2. Protect the functional areas. Mask the switch openings, screw holes, rear surface, and thin outer edges with painter’s tape. Place the plate on a flat surface and check that it does not rock. Do not decorate any area that must fit beneath a screw head or touch the electrical mechanism.
3. Arrange before gluing. Sort the crystals by size and place the largest accents first, keeping them away from the moving switches. Fill the spaces with smaller flat pieces, but leave a narrow clear border around every opening. Photograph the dry layout if you need a reference while lifting the pieces for adhesive.
4. Attach in small sections. Work across one corner at a time, applying only enough adhesive to hold a few crystals. Set each piece with tweezers and remove squeeze-out immediately with a wooden skewer. Then allow the plate to cure flat for the full period recommended by the adhesive maker; rushing this stage can leave sliding stones and cloudy residue.
5. Inspect and reinstall safely. Remove the masking tape and check both sides for loose pieces, blocked holes, or adhesive ridges. Restore the plate only when everything is fully cured and the back remains completely clean. Reattach it without overtightening the screws, then restore power and confirm the switches move freely without touching the decoration.
Do not decorate the mechanism
One detail I wouldn’t compromise on is the clear space around the switches. The finished plate should be decorative, but it must still behave exactly like an ordinary cover. Any crystal that interferes with movement needs to come off.
Use a removable decorative frame instead
For a lower-risk alternative, decorate a lightweight frame that sits around the switch plate without covering it. Secure the frame to the wall independently, leaving the original electrical cover untouched and fully removable.
Build a Decorative Crystal and Jewellery Cone Tree
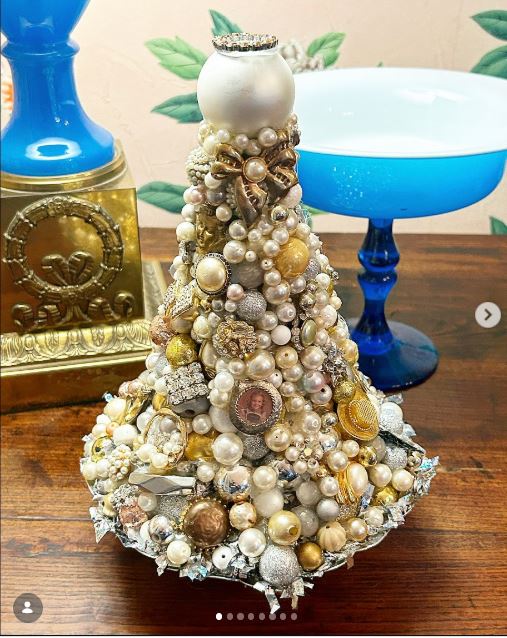
A cone tree can absorb the truly mixed contents of a jewellery box: pearls without partners, brooches with damaged pins, chandelier beads, small charms, buttons, and metallic ornaments. Instead of forcing those pieces into a neat pattern, the design builds texture through close layering from the wide base to the narrow top.
The strongest versions still use some order. Large brooches and rounded ornaments create anchor points, strands of pearls travel between them, and tiny crystals fill narrow gaps. Repeating cream, gold, silver, and clear materials keeps the crowded surface connected.
This can work as a holiday tree, but it does not have to look seasonal. Leave out obvious festive shapes and use a plain finial for a year-round decorative object. The cone should be firm and wide enough at the base to support the weight of glass and metal.
Materials and Tools
· A firm papier-mâché, wood, or dense craft cone
· Small chandelier crystals and loose glass beads
· Broken or unwanted costume jewellery, brooches, pearls, and charms
· Scrap felt, velvet, or sturdy fabric to cover the cone
· Strong adhesive suited to the cone covering and mixed embellishments
· Short pins or fine wire where the base material safely allows them
· Tweezers and small pliers
· A heavy round base or tray, if the cone needs extra stability
Cover the Cone
1. Prepare a stable foundation. Check that the cone stands straight and does not compress under light pressure. Cover it with felt or sturdy fabric, pulling the material smooth and securing the seam at the back. Attach the cone to a wider base if the planned ornaments are heavy, because a narrow lightweight form can become unstable surprisingly quickly.
2. Sort the main decorations. Separate large anchor pieces, medium beads, pearl strands, and tiny gap fillers. Remove sharp pin backs or broken findings that could protrude. Arrange the largest ornaments around the lower half of the cone first, turning the form as you work so one side does not receive all the visual and physical weight.
3. Attach the anchor pieces. Secure brooches, framed charms, and large beads one at a time, supporting heavier items with wire or pins when the cone material allows it safely. Do not rely on a small dot of glue beneath a heavy metal ornament. Leave irregular spaces between the anchors for strands and smaller chandelier beads.
4. Connect the surface. Drape pearl strands and bead chains between the larger pieces, then add crystal drops where their facets remain visible. Work upward in sections rather than covering the entire front before the back. Step away every few minutes; close-up crafting has a habit of convincing us that every remaining gap is an emergency.
5. Fill, finish, and test. Use tiny beads and smooth crystal pieces to fill only the most distracting spaces. Add a secure topper, remove adhesive strings, and turn the tree slowly to check for loose or overly heavy areas. Let it cure completely on a level surface before moving it to a shelf or table away from curious hands.
Leave a little breathing room
I know the temptation is to cover every millimetre, but a few glimpses of fabric help the individual keepsakes remain visible. Too much filler can turn meaningful pieces into one indistinct surface.
Make a smaller keepsake tree
A short cone can use one family brooch, a strand of inherited pearls, and several chandelier beads without becoming extremely heavy. It also needs less adhesive and is easier to store safely between displays.
Crystal Crafting Problems Worth Preventing
Using a cracked crystal in a hanging project
A fracture near the drilled hole can spread when a jump ring moves or when the piece swings. Keep damaged glass out of hanging ornaments and jewellery. A smooth, stable fragment may be used only where it is fully supported and cannot fall or expose a sharp edge.
Trusting old wire and jump rings
Original chandelier findings may have carried weight for years and can look stronger than they are. Replace thin, rusty, or partly open connectors. Every finished link should be tested over a padded surface before the project is displayed.
Choosing glue before checking both materials
An adhesive that grips glass may not bond well to plastic, painted metal, glazed ceramic, fabric, or foam. Match the adhesive to both surfaces and test it on hidden scraps. More glue does not automatically create a stronger joint; it often creates cloudy edges and long curing times.
Making wearable pieces too heavy
Large prisms may work as pendants but can be uncomfortable as earrings. Compare weight before building the design and use the smallest pieces near the ears. Jewellery should not require the wearer to tolerate pulling simply because the glass sparkles.
Ignoring movement and collisions
Hanging crystals can strike each other, windows, walls, or metal frames. Leave enough distance between drops and keep mobiles away from fans and doors. A pretty sound is not worth chipped glass scattered underneath.
Decorating electrical hardware carelessly
Never apply crystals or adhesive to the electrical switch mechanism. Work only on a fully removed faceplate after the circuit is switched off, keep the back clean, and preserve open space around switches and screw holes.
Adding heavy decorations to a weak base
A light cone, tiny pot, or thin ring can fail after several glass and metal pieces are attached. Test the structure early and add weight or reinforcement at the base before decorating. Stability is much harder to fix after the surface is crowded.
Frequently Asked Questions
How can I tell whether an old chandelier crystal is safe to reuse?
Inspect it in bright light and run a soft cloth carefully around the edges. Do not reuse a hanging piece if the hole is cracked, the glass has an unstable fracture, or an edge feels sharp. Small surface scratches are mainly cosmetic, but structural damage needs a cautious decision.
What is the best way to clean chandelier crystals?
Use lukewarm water, a little mild washing-up liquid, and a soft cloth for plain glass pieces. Avoid abrasives and sudden temperature changes. When crystals have foil backing, paint, old glue, or metal caps, clean them with a lightly damp cloth instead of soaking them.
Can I drill a new hole in a crystal?
Drilling glass requires the correct tools, water control, eye protection, and experience, and it can still crack a vintage piece. For most home upcycling projects, I would use an existing hole, a secure wire cage, or a setting designed to hold undrilled glass rather than attempting a new hole.
Which wire works for crystal crafts?
Choose wire according to the weight and purpose of the piece. Fine wrapping wire suits small beads and branch tips, while heavier crystals need stronger jewellery wire, sturdy jump rings, or chain. The wire must also fit through the existing hole without forcing it.
Can chandelier crystals be used outdoors?
They can work in a sheltered outdoor area, but wind, frost, strong temperature changes, and metal corrosion may shorten the life of the project. Keep crystal hangings out of exposed locations and bring them indoors during severe weather. Indoor display is safer for valuable vintage pieces.
How do I stop a crystal mobile from hanging crooked?
Balance the weight before finalising the decorative layout. Use equal upper support chains, hang the frame temporarily, and adjust one attachment point at a time. Do not assume visually similar crystals weigh the same.
What can I do with crystals that have no holes?
Use them in a supported mosaic, set them into a wire cage, or attach them to a stable decorative base with an adhesive suitable for both materials. Avoid hanging an undrilled heavy crystal from glue alone, particularly above furniture or walkways.
Let Old Chandelier Crystals Catch the Light Again
The best way to repurpose chandelier crystals is to begin with the piece itself. A long prism naturally suits a hanging ornament, tiny beads can become jewellery or wire leaves, and mixed fragments can add detail to a firmly supported decorative surface. You do not need to force every crystal into the same project.
I would start with one manageable idea and use only the safest pieces in the box. Replace weak connectors, keep weight in mind, and leave enough space for each facet to catch the light. That small amount of care is what turns leftover chandelier parts into something you can enjoy rather than another fragile project that needs constant repair.
Which forgotten crystal would you most like to reuse first: a single statement drop, a handful of tiny beads, or a completely mismatched collection?