Home offices collect clutter in surprisingly small pieces. A few pens become a crowded mug, loose papers slide beneath the laptop, charging cables tangle across the desk, and useful clips disappear into the nearest drawer. Buying another set of matching organizers may solve the problem, but it can also add more objects to a space that already feels full.
I prefer to look at what is already waiting to be reused before adding something new. A clean tin can can hold pens, a cereal box can support notebooks, and an old drawer may work better on the wall than inside a broken cabinet. These are ordinary items, which is exactly why they make sensible home office organization projects.
The most useful approach is to match the container to the problem rather than decorate first and decide later. I know it can feel tempting to cover every surface with patterned paper, but function matters more than extra detail here. Check what needs storing, choose an item with the right shape, then make the finish calm enough to sit beside the rest of your workspace.
Look at What Your Desk Actually Needs
Before cutting or gluing anything, clear one small area and sort the items that regularly end up loose. You may discover that the real problem is not a lack of storage but a lack of separate places for different types of supplies.
· Group tall tools such as pens, pencils, rulers, and scissors together so you can judge the container height you need.
· Collect small items such as clips, push pins, rubber bands, and sticky notes into temporary cups or bowls.
· Place notebooks, folders, and frequently used papers in one stack to measure their width and weight.
· Follow each charging cable from the device to the plug and remove any cable that no longer belongs on the desk.
· Notice whether wall space, shelf space, or desk space is easier to use in your room.
· Set aside containers that are clean, firm, and large enough for a practical second use.
Gather Basic Upcycling Tools
These five projects use simple materials, but clean measuring and secure edges make a noticeable difference. There is no need for a specialist craft room. A protected work surface and a few reliable tools are enough.
· Scissors, craft knife, metal ruler, pencil, and cutting mat
· Strong paper adhesive, double-sided tape, or a glue suitable for the chosen surface
· Kraft paper, leftover wallpaper, fabric, twine, or plain paint for covering containers
· Fine sandpaper for rough wooden surfaces
· Hole punch, awl, or drill only where the project safely requires an opening
· Small screws and suitable wall anchors for a mounted wooden organizer
· Clean cloths for wiping surfaces and pressing coverings flat
Safety note: Adults should handle sharp cutting tools, drilling, and any rough metal edges. Keep electrical connections ventilated and accessible, and never seal a warm power adapter inside a container without room for airflow.
Turn Clean Tin Cans into a Desk Tool Organizer
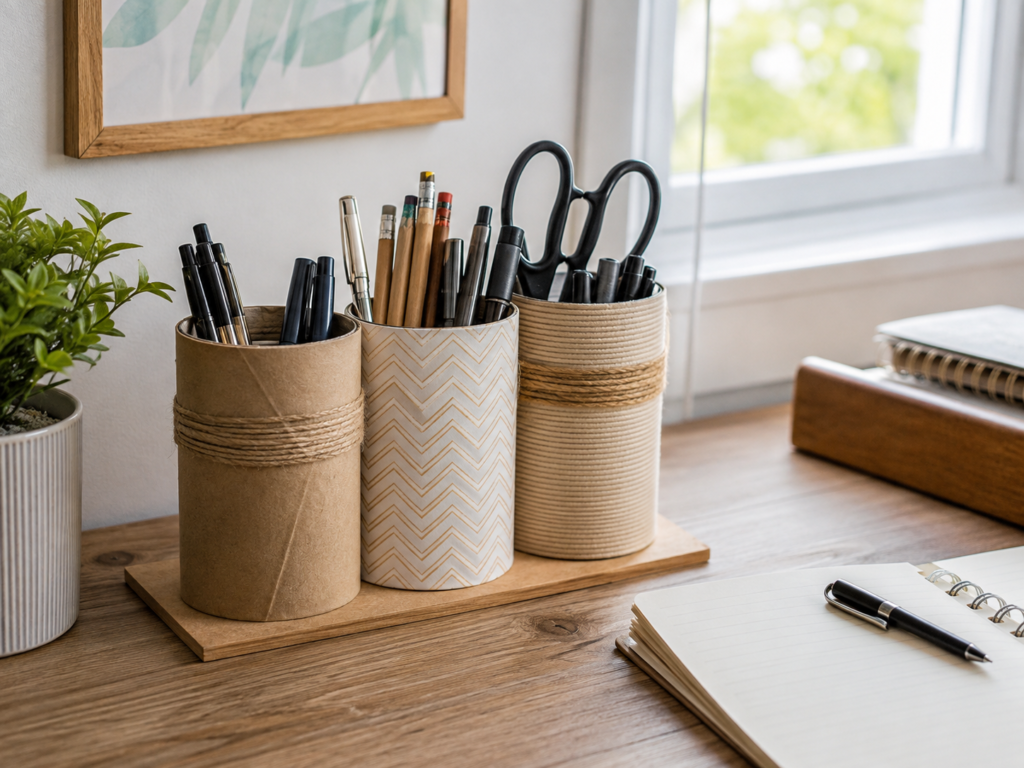
Tin cans have the right height and weight for the tools that usually roll around a desk. Grouping three cans on one small base creates separate spaces for pens, pencils, scissors, and markers without scattering several unrelated containers across the work surface. The neutral paper and twine keep the finish quiet, while the slight differences between the cans make the organizer feel handmade rather than factory-matched.
The arrangement works because each holder has a clear job. Narrow pens can sit together, wooden pencils remain easy to see, and taller scissors stay in the widest can. I don’t think all three coverings need to match exactly. Repeating one material, such as natural twine or kraft paper, is enough to connect them.
Materials and Tools
· Three clean, dry food cans with intact sides
· Fine sandpaper or a metal file for checking rough rims
· Kraft paper, leftover wallpaper, fabric, or thin cord
· Strong double-sided tape or adhesive suitable for metal and paper
· Small wooden offcut or firm recycled board for the base
· Ruler, pencil, scissors, and craft knife
· Optional clear protective finish for paper-covered cans
A Practical Method for the Tin-Can Organizer
1. Prepare the cans carefully. Remove labels, wash away food residue, and let the metal dry completely. Run a finger around the rim only after checking it visually; if anything feels sharp, smooth it with a file or cover it with a secure protective edging before continuing.
2. Measure and cut the coverings. Wrap scrap paper around each can first to create a simple template, then transfer the size to kraft paper, fabric, or wallpaper. Leave only a narrow overlap at the back so the join looks tidy and does not create a bulky ridge.
3. Attach the outer finish. Fix the covering from one straight starting edge and smooth it gradually around the can. Then add a short band of twine where it can hide the join or connect the three designs. Avoid thick decoration near the top because it can catch on scissors and pen clips.
4. Arrange the holders on a base. Test the cans with the actual supplies inside before gluing them down. Place the heaviest or widest holder at the back, leave enough finger space between the rims, and secure the cans only when the arrangement feels balanced.
5. Sort tools by use. Keep the items you reach for daily in the front holders and move occasional markers or craft tools to the back. If the organizer begins to feel crowded, remove duplicates rather than adding a fourth can immediately.
For me, the important detail is the rim. A decorative covering cannot make a rough metal edge safe, so that check comes before colour or pattern. A beginner can simplify the project by using one can without a base, or by covering three cans with the same plain paper and stopping there.
Make a Magazine File from a Cereal Box
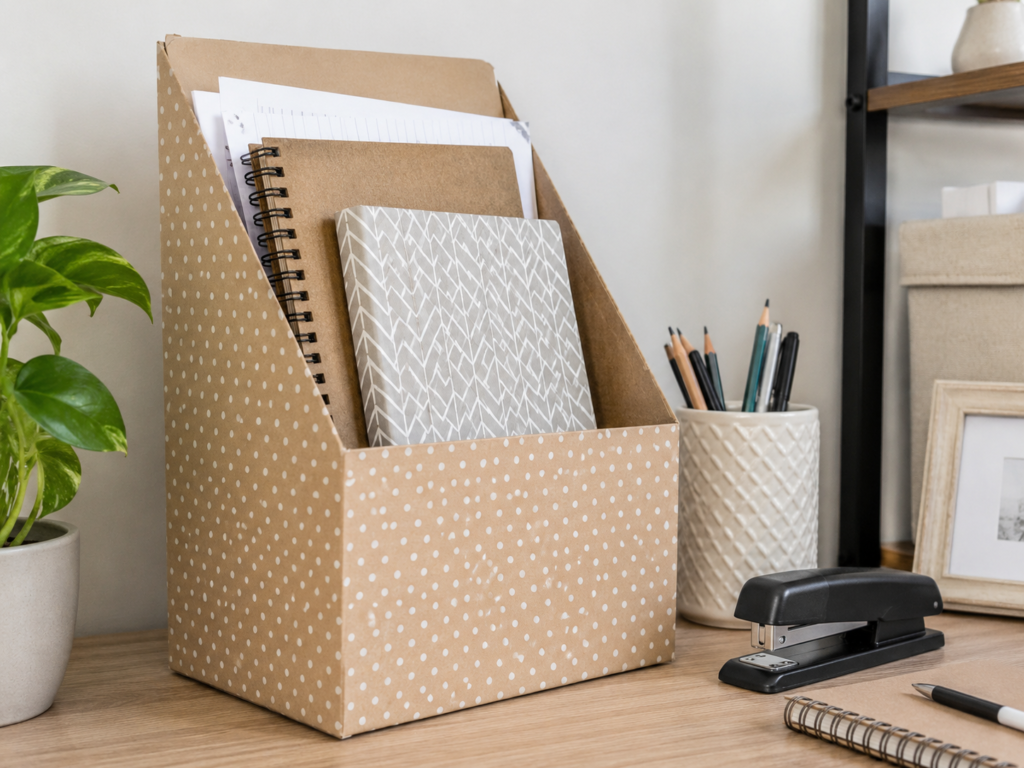
A cereal box already has the tall rectangular shape of a magazine file. Cutting the sides on a diagonal creates easy access at the front while leaving enough height at the back to support notebooks, folders, and loose papers. Covering the printed packaging with kraft paper or a quiet pattern helps it sit naturally in a home office.
This project suits lightweight items rather than heavy books. The visible version works because the box remains upright, the cut edges are clean, and the papers do not rise far beyond the back panel. If the cardboard bends when you load it, reinforce the base before adding more decoration.
Materials and Tools
· One clean, firm cereal box or similar packaging box
· Scrap cardboard for reinforcing the base and back
· Kraft paper, leftover wallpaper, or plain wrapping paper
· Ruler, pencil, scissors, craft knife, and cutting mat
· Double-sided tape or paper adhesive
· Optional clear label holder or handwritten card label
How to Build the Cereal-Box File Holder
1. Choose the strongest box. Check the corners, bottom seam, and back panel before cutting. A box that already collapses inward will not become stronger simply because it is covered, so reinforce weak areas with fitted pieces of scrap cardboard first.
2. Mark a balanced side profile. Measure the same high point at the back of both side panels and the same low point near the front. Join the marks with straight diagonal lines, then cut through one side at a time on a protected surface so the two edges remain even.
3. Strengthen the working areas. Add a second cardboard layer inside the base and, when needed, against the back panel. Keep the reinforcement slightly smaller than the interior so it lies flat without forcing the box out of shape.
4. Cover the outside in sections. Wrap the broad front and back first, then finish the side panels. Smooth the paper from the centre towards the edges and trim around the sloping cuts after the adhesive settles. Then fold a narrow strip over each exposed top edge for a cleaner finish.
5. Load and label the file. Use it for current notebooks, folders, or papers that need to remain upright. Add a small removable label if several file holders sit together, but keep the wording broad enough that the container can change jobs later.
One detail I would not skip is testing the box with the real contents before covering it. A file holder that looks neat while empty may bow as soon as three thick notebooks go inside. For a simpler version, cut the box, reinforce the base, and leave the plain cardboard visible.
Use Glass Jars for Small Office Supplies

Small office supplies create a particular kind of clutter because each item is useful but none of them needs a large drawer. Clear jars solve that problem without hiding what is inside. Paper clips, binder clips, push pins, rubber bands, and sticky notes remain separate, while a taller jar can hold spare pens and markers.
The jars do not need identical lids. A repeated shelf, tray, or lid treatment can make the group feel connected. What matters here is choosing containers with openings wide enough for your hand or fingers. A narrow-necked jar may display clips nicely but become irritating every time you need to retrieve one.
Materials and Tools
· Clean glass jars in several useful sizes
· Lids without rust, sharp edges, or damaged seals
· Warm soapy water and a label-removal method suitable for glass
· Optional paint for the lids or small removable paper labels
· A shallow wooden tray, shelf, or recycled box lid for grouping the jars
· Soft cloth for drying and checking the glass
How to Organize Supplies in Reused Jars
1. Match each jar to one category. Use low, wide jars for clips and push pins, medium jars for rubber bands or sticky notes, and a taller container for pens. Avoid mixing several tiny categories in one jar because you will still need to empty it to find the smallest item.
2. Clean and inspect every container. Remove old labels and adhesive, wash the jars, and let them dry fully before adding paper products. Check for chips around the rim and recycle any damaged glass rather than trying to disguise it with decoration.
3. Create one visual connection. Paint only the lids, use the same small label shape, or place all the jars on one wooden riser. I know it can feel tempting to decorate every jar differently, but the contents already add plenty of colour.
4. Arrange by frequency of use. Keep paper clips and sticky notes nearest the working area, with spare supplies towards the back. Leave a little open space on the tray so each jar can be lifted without knocking against the next one.
The part I like is the visibility. You can see when clips or sticky notes are running low without opening several boxes. For homes with children or pets, keep push pins and other sharp items in securely closed jars placed well out of reach. A no-decoration version is completely practical; clear glass and clean lids are enough.
Turn a Shoebox into a Charging and Cable Station
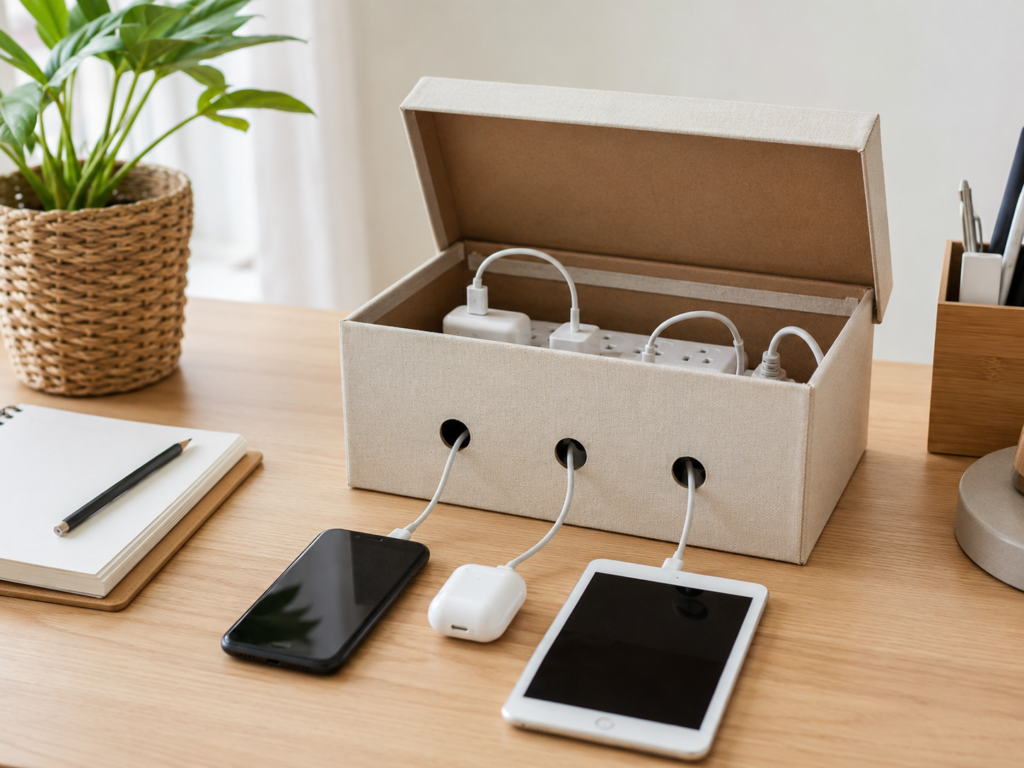
Charging cables quickly make a tidy desk look unfinished. A firm shoebox can hold the power strip and extra cable length while allowing the active ends to reach a phone, tablet, or earbuds case. The lid keeps the central tangle out of sight, but it should remain easy to open so plugs can be checked and changed.
This project needs more care than a paper organizer because it involves electricity. The box is only a way to guide and contain cables; it should not trap heat, cover damaged plugs, or make the power strip difficult to switch off. Choose a roomy box, keep ventilation around adapters, and never force tightly coiled cables inside.
Materials and Tools
· Firm shoebox with a lid that opens easily
· Power strip in good working condition
· Pencil, ruler, and circular template for cable openings
· Craft knife and cutting mat, used by an adult
· Optional metal eyelets or smooth edge protectors for the holes
· Plain paper, fabric, or leftover wallpaper for the outer finish
· Cable labels or small removable tags
A Safer Method for the Shoebox Charging Station
1. Plan the cable route before cutting. Place the unplugged power strip inside the box and decide where its main cord will exit. Mark separate front openings for the charging leads, leaving enough space between them so cables do not rub or cross immediately outside the box.
2. Cut and smooth the openings. Remove the power strip, place the box on a cutting mat, and cut each hole gradually. Cover rough cardboard edges with fitted eyelets, paper edging, or smooth tape so repeated cable movement does not wear through the insulation.
3. Finish the box without blocking airflow. Cover only the outside and keep the lid easy to lift. Do not add thick fabric around plug openings, and avoid lining the inside with loose material that could sit against adapters. Then place the power strip inside with room around each plug.
4. Route and label the cables. Feed one cable through each front opening and attach a small label near the device end if the connectors look similar. Leave enough slack for comfortable use, but avoid large tight coils inside the box.
5. Test access and temperature. Plug in the station, charge one device, and check that the box remains easy to open and the adapters have not become unusually warm. Keep drinks away from the charging area and replace any damaged cable instead of hiding it inside the box.
I would keep this design plain. Extra bows, thick rope, or loose fabric near electrical equipment do not improve its job. A beginner can make a simpler open-top version from a shallow box, using only smooth cable notches along one side and leaving the power strip fully visible.
Repurpose an Old Drawer as Wall Storage
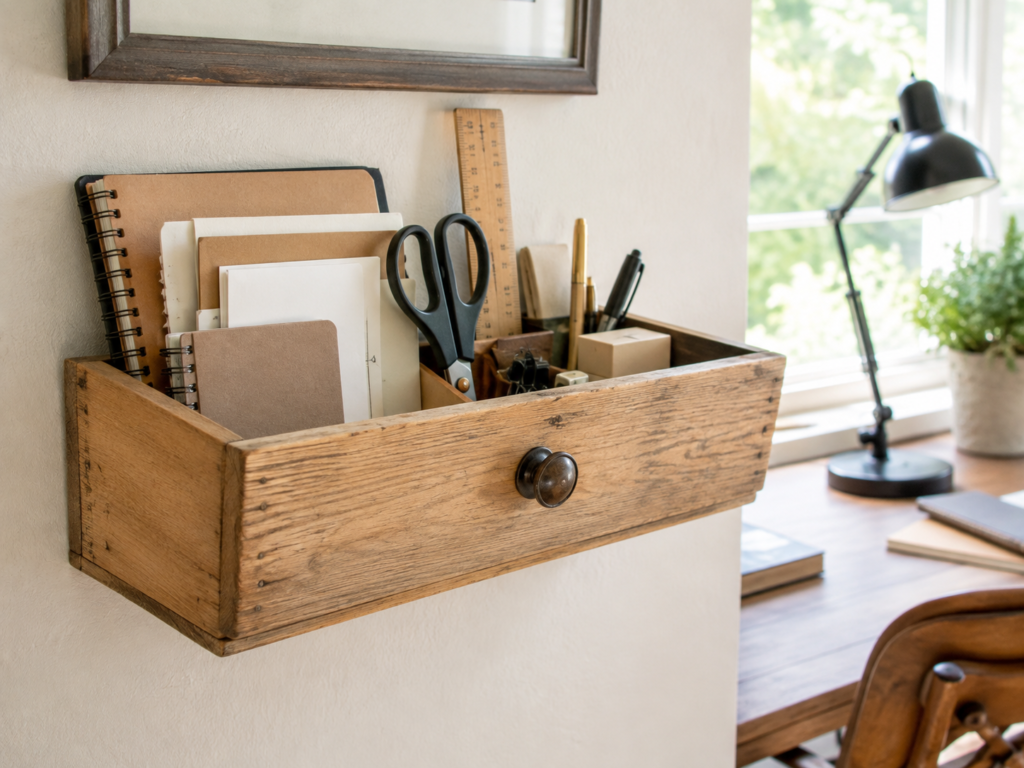
An old drawer can hold much more than it did inside a cabinet. Mounted securely with the open side facing upward, it becomes a shallow wall organizer for notebooks, incoming mail, scissors, rulers, and small boxes. The original knob adds character and also makes the drawer’s former purpose obvious without affecting the storage area.
The project works best with a solid wooden drawer rather than thin, damaged board. Wall storage carries real weight, so the condition of the joints and the mounting method matter more than the paint finish. If the drawer is too deep or heavy for the wall, use it as a desktop caddy instead.
Materials and Tools
· Solid old wooden drawer with firm corners and base
· Screwdriver and pliers for removing unwanted hardware
· Wood glue and clamps for repairing loose joints
· Sandpaper and a clean cloth
· Optional furniture paint, wax, or clear finish
· Interior dividers made from scrap wood or firm board
· Drill, screws, and wall anchors suitable for the wall type and expected load
· Eye protection and a level
How to Convert the Drawer into Office Storage
1. Check the drawer structure. Remove loose nails, inspect the base, and press gently on each corner to find movement. Repair weak joints with suitable wood glue and clamps before sanding. A drawer that cannot hold its shape on a table should not be mounted on a wall.
2. Clean and prepare the finish. Remove dust and grease, sand rough areas, and soften sharp splinters around the rim. Keep the worn wood visible if it suits your room, or add a thin painted finish after testing it on a hidden area.
3. Plan the internal storage. Stand notebooks, mail, and tools inside the drawer while it rests on the desk. Add simple dividers only where they prevent items from falling sideways. Then remove anything that makes the organizer too heavy or difficult to reach.
4. Choose secure mounting points. Locate suitable wall support and use hardware rated for the drawer and its contents. Drill pilot holes where needed, check the organizer with a level, and tighten the fixings without crushing or splitting the old wood.
5. Load the organizer gradually. Add lightweight papers and notebooks first, then check that the drawer remains level and firm. Keep heavier equipment elsewhere and review the fixings occasionally, especially if the contents change.
The part I would check carefully is the wall fixing. A lovely old drawer is not useful if it pulls away from the wall under a stack of notebooks. Renters can skip drilling by using the drawer as a raised desktop organizer, while a smaller drawer can sit on a shelf with removable internal dividers.
Common Mistakes to Avoid
Using a container before checking its condition. Rusty cans, chipped jars, soft cardboard, and loose wooden joints can turn a simple organizer into a short-lived problem. Clean and inspect first, then discard anything that cannot be made safe and stable.
Decorating before testing the size. A cereal box may look suitable until the notebooks bend its sides, and a tin can may be too short for scissors. Load the undecorated container with the real items before spending time on the finish.
Making every project visually busy. Patterned paper, rope, labels, paint, and decorative handles can compete with the supplies already on display. Choose one or two repeated details and let the organizer remain useful rather than turning it into another source of visual clutter.
Ignoring exposed edges. Cut cardboard can fray, metal rims can remain sharp, and drilled cable holes can rub against insulation. Smooth, reinforce, or cover each working edge before using the finished item.
Overloading lightweight materials. Cereal boxes suit papers, not heavy reference books. Glass jars suit small supplies, not crowded drawers where they may knock together. Match the weight of the contents to the strength of the reused item.
Hiding electrical problems inside the shoebox. A cable box should organize working equipment, not conceal split insulation, overloaded sockets, or hot adapters. Keep the lid accessible, provide space around plugs, and replace damaged electrical items.
Mounting an old drawer without proper hardware. Adhesive strips are not a safe substitute for suitable screws and anchors when the organizer will hold notebooks and tools. Use the correct fixings for the wall, or keep the drawer on a desk or shelf.
Frequently Asked Questions
Do all the containers need to match?
No. A repeated material, colour, or placement is usually enough to connect different containers. For example, use kraft paper on the cereal box and one tin can, then keep the jars and drawer plain.
What is the easiest project for a beginner?
The glass-jar organizers need the least construction because cleaning and sorting do most of the work. A single covered tin can is also manageable if the rim is already smooth and safe.
Can I use paint instead of paper coverings?
Yes, when the paint suits the material and the item has been cleaned properly. Test a small hidden area first, use ventilation where required, and avoid painting surfaces that rub against cables or directly hold food.
How can I make cardboard organizers last longer?
Reinforce the base and back with fitted cardboard, keep the organizer dry, and avoid overloading it. A removable inner support often adds more strength than several layers of decorative paper.
Are glass jars safe in a busy family workspace?
They can be, provided the glass is undamaged and placed where it will not be knocked from the desk. Keep sharp supplies in closed jars and move the collection out of reach of young children and pets.
Can I make the charging station without cutting round holes?
Yes. Cut shallow smooth notches along the top edge of an open box and leave the power strip visible. This simpler version gives cables a route without enclosing plugs and adapters.
What can I use instead of mounting the old drawer?
Place it on a shelf, add felt pads underneath, or use it as a desktop caddy. You can also set it upright with the open side facing forward if the base remains stable and the stored items are lightweight.
Give Everyday Containers a Clear Office Job
The most useful lesson behind these creative ways to repurpose everyday items for home office organization is that a container does not need to begin as office storage.
Its shape, strength, and size matter more than its original label. A can can separate writing tools, a cereal box can support active papers, and a drawer can move unused wall space into service.
Begin with the clutter that interrupts your work most often. Then choose one item that already fits that problem and make only the changes it needs. A glass jar may require nothing beyond cleaning, while a wall-mounted drawer deserves slower preparation and secure hardware.
Look around your desk, recycling box, and forgotten furniture pieces before buying another organizer. Which everyday item could take on a clearer, more useful job in your home office?