An empty tissue box has already done the hard part: it has a neat shape, a ready-made opening, and enough surface area to carry fabric, paint, paper, or small decorative details. Throwing it away can feel automatic, but a firm cardboard box or reusable tissue holder can become something far more personal with a little planning.
I’m especially drawn to projects that improve an ordinary object without making it awkward to use. A tissue box still needs to open easily, release tissues without snagging, and sit flat on a table. The decoration should work around those needs rather than cover them up.
The most successful versions keep the central opening clear and use the broad sides as a small canvas. Gingham and lace can make the box feel soft and homely, hand-painted flowers can turn it into table décor, and carefully built details can create a miniature storefront or rickshaw.
I don’t think every reused tissue box needs to look complicated. What matters is choosing a finish that suits the room and securing it well enough for everyday handling.
Set Aside Tissue Boxes With:
· Soft, crushed, or badly warped cardboard that no longer holds its rectangular shape
· Damp patches, mould, staining, or a persistent musty smell
· Grease, cosmetic spills, or residue that cannot be cleaned safely
· A torn top opening that continues to split when tissues are pulled
· Loose laminated layers or flaking printed coating
· Sharp staples, exposed wire, or damaged plastic edges
· A base that rocks, bows, or collapses under light pressure
· Very thin cardboard that bends once fabric, beads, or clay decorations are added
· Damage that prevents a refill pack or inner tissue box from fitting properly
· Any box that held chemicals, medicine, or unsuitable materials before reuse
A weakened cardboard box will not become stronger simply because it is covered. Use it for a light paper craft instead, or recycle it according to local guidance. Heavier decorative finishes are better suited to a rigid reusable holder made from wood, acrylic, thick board, or another stable material.
For a Tissue Box Suitable for Reuse, Inspect:
· Whether all corners remain square and firmly joined
· The strength of the top panel around the tissue opening
· Whether the bottom opens for refilling or needs a removable panel
· The size and shape of the tissue slot
· Any glossy coating that may prevent glue or paint from bonding
· Printed areas that could show through pale fabric or thin paint
· The depth of the box and the size of the refill it will hold
· Whether fabric folds will interfere with the base
· Whether raised decorations will catch on nearby objects
· How the finished box will be cleaned and handled
· Whether the design suits a bedroom, bathroom, living room, dining table, or child-free display area
· Whether beads, ornaments, or small parts can be attached securely
Measure the box before cutting fabric, card, or trim. I know it can feel quicker to work directly against the surface, but a paper template helps you place the opening accurately and keeps seams away from the most visible edges.
Useful Materials and Tools
· Clean, firm tissue box or reusable tissue holder
· Ruler, flexible measuring tape, pencil, and paper for templates
· Craft knife and cutting mat, used with suitable care
· Sharp scissors for fabric, paper, or trim
· Fine sanding pad for wooden or coated holders
· Primer suited to the surface
· Acrylic, craft, or furniture paint as appropriate
· Small flat brushes, detail brushes, and foam applicators
· Fabric, decorative paper, or thin card
· Strong craft glue, fabric adhesive, or decoupage medium
· Double-sided tape or clips for temporary positioning
· Lace, ribbon, cord, or narrow braid
· Lightweight modelling material for raised details
· Small beads, imitation pearls, or decorative stones
· Clear protective finish compatible with the decoration
· Clean cloths, cotton buds, and a soft brush for dusting
· Protective covering for the work surface
Choose only the supplies needed for the finish you are making. A fabric cover does not need primer, and a painted box does not need a drawer full of trim. Keeping the materials focused usually produces a cleaner result.
Cover a Tissue Box with Red Gingham and Eyelet Lace
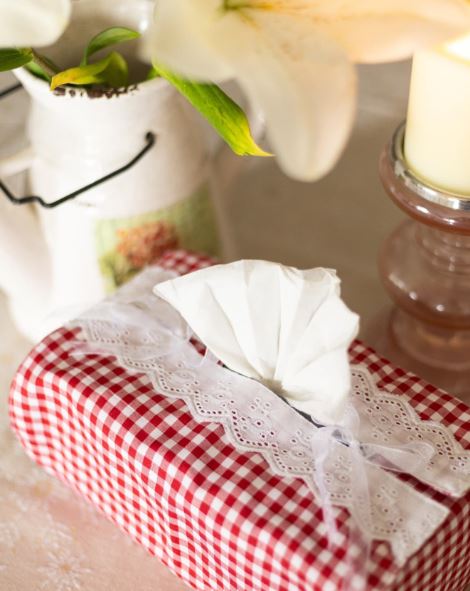
Red-and-white gingham immediately changes the mood of a plain tissue box. The check pattern feels familiar and informal, while the white eyelet lace softens the straight rectangular shape. Because the lace crosses the top rather than wrapping every edge, the cover still looks tidy instead of overly dressed.
The detail that makes this version work is the careful alignment of the checks. A crooked gingham line is more noticeable than a slightly uneven plain fabric, so the front panel should be cut and positioned first. The lace can then follow the centre line and frame the tissue opening without restricting it.
This finish would suit a cottage-style bedroom, guest room, kitchen corner, or a table dressed with red accents. A washable slipcover is the most practical option for a permanent holder. For a disposable box, use a removable sleeve so the fabric can move to the next refill.
Materials and Tools
· Firm rectangular tissue box or reusable cover
· Red-and-white gingham fabric
· White eyelet lace or broderie anglaise trim
· Paper pattern, ruler, pencil, and fabric scissors
· Fabric adhesive, fusible web, or sewing supplies
· Pins or clips for holding the folds
· Thin card for reinforcing a removable sleeve if needed
A Practical Way to Recreate the Look
1. Measure and make a paper pattern. Measure the top, long sides, short ends, and tissue opening rather than cutting directly from the fabric. Add enough allowance for neat folds, then test the paper around the box. The base must remain flat, so avoid bulky overlaps underneath.
2. Align the gingham before cutting. Place the most visible front panel along a straight row of checks and mark the centre. Cut the remaining panels from the same grain direction so the pattern does not suddenly tilt at a corner. Press the fabric first because small creases can distort the lines.
3. Form the cover and finish the opening. Attach or stitch the side seams, then turn the upper opening inward to hide the raw edge. If the fabric feels soft, add a narrow card support under the top panel. Keep checking that a tissue pulls through without catching.
4. Position the lace before securing it. Lay the eyelet trim across the top and adjust both tails until they feel balanced. Stitch or glue it at a few secure points rather than flooding the lace with adhesive. Then tie or overlap the ends in a way that leaves the refill opening accessible.
A softer variation could use blue checks, a small floral print, or a plain linen fabric with the same white trim. Beginners can skip the tied bow and attach two straight lace bands instead. The checks already provide enough pattern, so I’d rather keep any extra decoration small.
Turn a Plain Tissue Box into a Miniature Shopfront
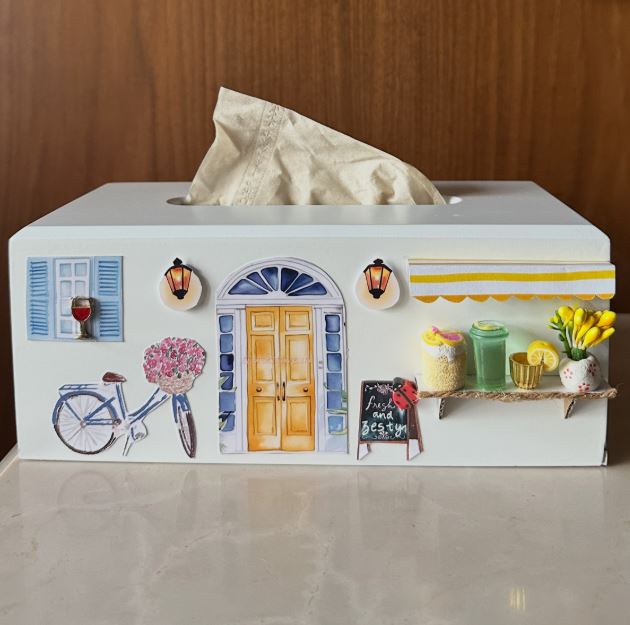
A white tissue holder makes a convincing little building because its long front already resembles a shop façade. The central doorway gives the composition a clear focal point, while the shuttered window, bicycle, striped awning, flowers, drinks, and small chalkboard fill the space without making every part equally busy.
The depth is important here. Flat printed pieces establish the windows and door, then a narrow shelf and a few raised objects create shadows. Keeping the largest elements flat prevents the front from becoming heavy. The tissue opening remains on top, separate from the decorative scene, so the box still functions normally.
This idea suits a craft room, kitchen shelf, or a bright guest space. It also offers a useful way to reuse small scraps from card-making, dollhouse projects, and gift packaging. The miniature details do not need to match one exact shop; they only need a consistent scale and a clear visual order.
Materials and Tools
· Plain white tissue holder or a box covered with white paper
· Printed or hand-painted door, window, bicycle, and sign elements
· Thin card, foam sheet, or lightweight modelling material
· Small wooden strip or firm card for the shelf
· Fine scissors, craft knife, ruler, and cutting mat
· Strong craft glue and a fine applicator
· Small beads or shaped pieces for lights, jars, cups, and flowers
· Clear protective finish for paper details if appropriate
A Practical Way to Recreate the Look
1. Plan the façade on paper. Trace the front panel and mark the centre before placing any decoration. Position the doorway first, then test the window, bicycle, awning, and shelf around it. Leave a narrow visual border so the scene does not look squeezed against the corners.
2. Prepare the flat background pieces. Cut the door, shutters, bicycle, signs, and awning from printed paper or thin card. Add colour before attaching them and reinforce delicate parts from behind. Arrange everything again because the first layout rarely remains the final one.
3. Build only a few raised details. Attach the shelf securely and keep it shallow enough that the box can still sit near a wall. Add lightweight jars, flowers, lamps, or cups in small groups. Use minimal glue so it does not spread around tiny objects and leave shiny marks.
4. Balance and protect the finished front. Step back and check whether one side feels heavier than the other. Remove any detail that blocks the door or competes with the main features. Once the adhesive has set, apply protection only if it is compatible with the paper, paint, and raised pieces.
A beginner-friendly version could use only a door, one window, an awning, and a bicycle silhouette. You could also create a bakery, flower shop, bookshop, or seaside café by changing the small signs and display items. The box does not need twenty tiny accessories to read as a storefront; scale and spacing do more of the work.
Shape a Tissue Box Like a Colourful Three-Wheeled Rickshaw
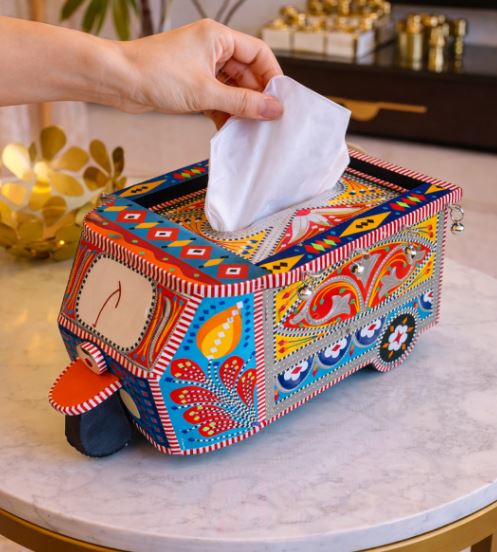
This rickshaw-shaped tissue holder uses the box as part of the vehicle rather than hiding it. The tissue slot becomes the roof opening, while painted side panels, a small front section, wheels, striped edging, and hanging ornaments build the three-wheeled silhouette. Bright floral and geometric patterns connect the separate parts into one lively surface.
The biggest challenge is structure. Added wheels and a projecting front can make a light cardboard box unstable, so this design works best with a rigid holder or a reinforced base. Decorative layers should remain lightweight, and the tissues need enough clearance above the roof so they do not drag across raised trim.
South Asian truck art often depends on repeated borders, contrasting colours, and densely arranged motifs. You do not need to copy every pattern. Choose a small set of shapes, repeat them across the panels, and use narrow striped lines to separate one area from another. That repetition keeps the colour from feeling random.
Materials and Tools
· Rigid tissue holder or reinforced thick-card box
· Firm card, lightweight wood, or foam board for the front and wheel supports
· Small wheels or covered circular card shapes
· Acrylic paints in several strong contrasting colours
· Fine detail brushes and a pencil for pattern planning
· Strong glue, small fasteners, or brackets suited to the base material
· Narrow braid, cord, beads, or light hanging ornaments
· Clear protective coating compatible with the paint
A Practical Way to Recreate the Look
1. Strengthen the main box. Check the base, corners, and roof opening before adding any vehicle parts. Reinforce the inside with fitted card panels if the walls flex. Keep the refill method clear, as sealing the bottom may make the finished holder impossible to use.
2. Build the rickshaw silhouette. Cut matching side supports, a small projecting front, and three wheel shapes. Temporarily tape them in place and check that the holder sits level. Then secure the parts with the method suited to the material, keeping glue away from moving or visible wheel edges.
3. Divide the surface into painted panels. Mark borders around the roof, sides, front, and lower body before painting. Fill the larger background areas first, then add flowers, leaves, diamonds, arches, and striped lines. Repeating the same two or three motifs helps the separate panels feel related.
4. Add trim without blocking the tissues. Attach braid, beads, or tiny hanging pieces only after the painted surface is fully ready for handling. Keep ornaments away from the central tissue slot and the refill opening. Then pull several tissues through to make sure nothing catches.
5. Check weight and stability. Place the holder on its usual surface and press lightly at each corner. Shorten or reposition any decoration that causes rocking. A thin non-slip pad under the base can help, but it should not be used to disguise a badly balanced structure.
A simpler version could stay rectangular and use truck-art painting without the wheels or front projection. That keeps the strong colour and pattern while reducing the construction work. For me, one clean floral panel and a repeated striped border would be better than adding loose ornaments that cannot be secured properly.
Hand-Paint a Tissue Box with Oversized Flowers
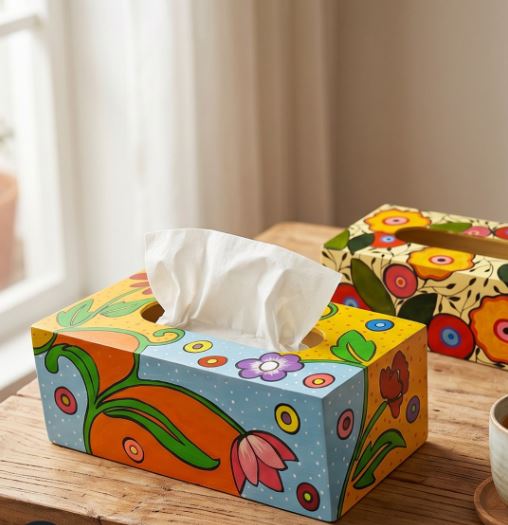
A hand-painted floral cover makes good use of the wide front and side panels. The flowers are deliberately oversized, so the design does not rely on tiny brushwork. Curved green leaves and stems move across the edges, while coloured circles and small white dots fill the open background without competing with the main blooms.
The useful lesson is to let some shapes continue around the corners. A flower or leaf that stops exactly at every edge can make the box look like four separate pictures. Carrying a stem from the front to the side connects the panels and gives the decoration a more natural rhythm.
This method is well suited to a wooden or thick-board holder that can be sanded, primed, and reused. A disposable cardboard box can also be painted, but thin surfaces may warp under wet coats. Use less paint, allow each layer to settle, and avoid soaking the top around the opening.
Materials and Tools
· Wooden, board, or firm cardboard tissue holder
· Fine sanding pad and suitable primer where required
· Acrylic paints for the background, flowers, leaves, outlines, and dots
· Medium flat brush and small round detail brushes
· Soft pencil, chalk, or removable transfer paper
· Palette, water container, and clean cloths
· Compatible clear finish for a reusable holder
A Practical Way to Recreate the Look
1. Prepare a smooth base. Clean the holder and lightly degloss it if the surface is shiny. Prime when the material or old finish requires it, then apply the background colour in thin coats. Paint the top carefully so no ridge forms around the tissue opening.
2. Sketch the largest shapes first. Mark two or three oversized flowers across the front and side panels, allowing some petals or stems to cross a corner. Keep the composition loose and leave open areas between the forms. Small circles can fill gaps later, so there is no need to crowd the first drawing.
3. Build colour from broad areas to details. Fill the main petals, leaves, and stems before adding outlines. Let neighbouring colours settle so they do not bleed into one another. Then add centres, veins, curved marks, and small dots with a finer brush.
4. Correct the balance before sealing. Turn the box slowly and look at every side rather than judging only the front. Add a leaf or small circle where a panel feels empty, but stop before the background disappears. Protect the finish only after the paint is ready and the chosen coating has been tested.
You could adapt the same method with leaves, fruit, abstract curves, or a limited two-colour pattern. Beginners may find it easier to paint one large flower on each long side and use dots on the short ends. A slightly uneven outline can suit this folk-style finish, so there is no reason to chase machine-perfect petals.
Create a Black Marble Tissue Box with Beaded Edging
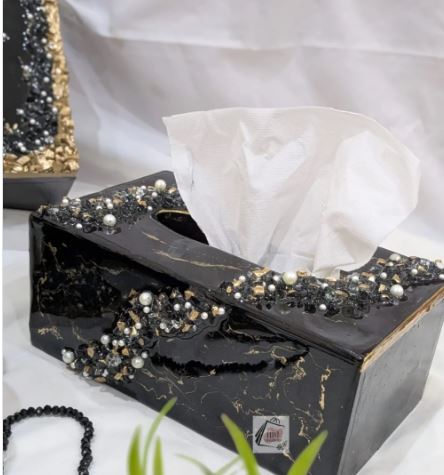
The glossy black surface gives this tissue holder a strong base, while thin gold lines suggest marble without covering the whole box in pattern. Around the top opening, clusters of black, silver, gold, and pearl-like beads form an irregular raised border. The decoration feels more convincing because the beads vary in size and are grouped rather than arranged in one perfectly straight row.
This treatment needs a rigid holder. Heavy embellishment can bend thin cardboard, and a glossy coating will reveal dents that a matte finish might hide. The raised edge also needs to remain smooth enough that tissues do not catch, so the inner boundary should be kept lower and neater than the outer clusters.
A box like this works best in a dressing area, formal sitting room, or a space where it will not be knocked repeatedly. Small beads must be attached securely and kept away from young children and pets. If the holder will be handled often, use fewer pieces and place them only on the top panel.
Materials and Tools
· Rigid wooden, acrylic, resin, or thick-board tissue holder
· Black paint or another suitable dark base finish
· Fine gold paint or metallic lining medium
· Small black, gold, silver, and pearl-like beads or stones
· Strong adhesive suitable for both the holder and embellishments
· Tweezers, wax pencil, or a small pick-up tool
· Fine brush and cotton buds for cleaning glue marks
· Glossy protective finish compatible with the base decoration
· Gloves and good ventilation when required by the products used
A Practical Way to Recreate the Look
1. Prepare the holder for a smooth dark finish. Repair dents and uneven joints because a glossy surface will make them easier to see. Clean and degloss the holder, then apply the required primer and black finish in controlled coats. Keep the tissue opening free of thick paint buildup.
2. Add restrained marble veining. Use a fine brush to draw thin broken gold lines rather than continuous parallel stripes. Let some lines branch and disappear across the surface. I’d test the movement on scrap card first, as too many lines can make the finish look cracked instead of marbled.
3. Plan the beaded border in small clusters. Arrange the largest beads around the outer part of the opening, then fill selected gaps with smaller pieces. Keep the inner edge lower so tissues can slide through easily. Photograph or sketch the arrangement before gluing if you need to move the box during work.
4. Secure and clean each section. Work on a short area at a time and use only enough adhesive to hold the pieces. Remove squeeze-out before it hardens and support the box so beads do not slide while the glue sets. Patience becomes the most demanding tool here, unfortunately.
5. Test the opening and final surface. Pull several tissues through from different angles and remove or reposition anything that catches. Check every bead by hand once the adhesive is ready for normal handling. Apply a compatible protective finish only where it will not cloud the stones or collect between them.
For a quieter version, keep the black-and-gold marble effect and add only a few pearl-like accents at the corners. Another option is a matte charcoal base with bronze veining and no beads. The finish will still feel deliberate, and it will be much easier to dust.
Mistakes That Can Spoil a Reused Tissue Box
Decorating a Weak Box
Fabric, paint, clay pieces, and beads all add weight. If the original box bends when you press the top, reinforce it or choose another base. Decoration cannot correct a collapsing structure.
Blocking the Refill Opening
A removable bottom or sliding panel can become trapped under fabric, paper, or glue. Test the refill method at every stage and keep seams away from catches and hinges.
Making the Tissue Slot Too Tight
Thick folds, raised trim, and beads can reduce the opening. Pull several tissues through before the final adhesive or finish is applied, then widen or lower the decoration where necessary.
Ignoring Pattern Alignment
Gingham checks, stripes, windows, and borders reveal crooked placement quickly. Mark a centre line, use a paper template, and check the design from across the room before securing it.
Adding Too Many Raised Details
Miniature objects and bead clusters create interest, but they also collect dust and catch on hands. Use depth selectively and leave some flat areas so the tissue holder remains practical.
Using the Wrong Adhesive
Paper, fabric, acrylic, wood, beads, and painted finishes do not all respond to the same glue. Test a hidden area and choose an adhesive that bonds the two actual materials without staining or melting them.
Sealing Before the Surface Is Ready
A protective finish can trap moisture, smear detail, or cloud embellishments. Follow the product guidance and test compatibility first. Then handle the box gently while the layers settle.
Frequently Asked Questions
Can I reuse a disposable cardboard tissue box?
Yes, if it is clean, dry, and firm. A removable paper or fabric sleeve is usually more practical than permanently sealing the box because the decoration can move to a new refill.
What is the best tissue box project for a beginner?
A painted floral holder or a simple fabric sleeve is easier than building a miniature storefront or rickshaw. Choose a design with flat decoration and only a few materials for the first attempt.
How do I stop fabric from bunching around the tissue opening?
Create a paper pattern and cut the opening slightly smaller than the final size so the raw edge can turn inward. Clip the fabric carefully around curves or corners, then secure the fold in small sections.
Can I paint directly over a printed tissue box?
Paint may not adhere well to a glossy printed coating, and the design can show through pale colours. Lightly degloss the surface when suitable, use a compatible primer, or cover the box with plain paper before painting.
How can I keep small decorations from falling off?
Use an adhesive designed for both the decoration and the base material, and give each section proper support while it sets. Avoid attaching heavy pieces to thin cardboard or placing beads where hands repeatedly grip the box.
How should I clean a decorated tissue holder?
Dust fabric and raised details with a soft brush, and wipe sealed flat surfaces with a barely damp cloth when the materials allow it. Do not soak cardboard, lace, paper pieces, or bead clusters.
Can I make the cover fit different tissue brands?
A separate reusable holder is the easiest solution because refill packs can sit inside it. For a slipcover, measure the largest box you normally buy and use ties, an overlapping base, or a slightly flexible fabric construction.
Keep Useful Tissue Boxes Out of the Bin
The plain shape of a tissue box leaves plenty of room for a finish that feels personal without interfering with its purpose. Fabric and lace can soften it, painted flowers can make it part of the room, and layered details can turn it into a miniature object that people notice before they realise what it holds.
The most practical way to reuse tissue boxes is to begin with a strong base and protect the opening and refill method throughout the work. Choose the project that suits the materials already available, then keep the first version manageable. A neat fabric sleeve or one painted flower can be just as satisfying as a detailed storefront.
For me, the best result is still a tissue box that works easily every day. When the decoration supports that simple function, an object that would normally be discarded can remain useful for much longer and look considered while doing it.