Rose petals begin changing almost as soon as a bouquet reaches its fullest point. The edges soften, the colour deepens in places, and a flower that looked fresh yesterday may begin releasing perfectly usable petals today. That doesn’t automatically make them rubbish.
I prefer deciding what the petals could become before the entire bouquet collapses into a rather unhelpful heap. Flexible petals may still work in a short decorative garland, while fully dried ones can become potpourri, resin art, a covered bowl, or a textured vase.
I don’t use old florist petals for food, tea, skincare, or bath products unless I know exactly how the roses were grown and treated. Decorative bouquets may have been exposed to products that were never intended for consumption or skin use. For home crafts, it is simpler and safer to keep those petals in decorative projects.
What matters most is timing. Separate the petals while they still look clean, discard anything slimy or mouldy, and dry the rest properly before enclosing them inside a permanent craft.
Separate, Dry, and Sort the Petals Before They Darken
Remove the petals gently rather than pulling the complete flower head apart in one movement. Hold the rose near its base and lift each petal away, checking both sides as you work.
Keep petals that are:
- Clean and free from visible mould
- Dry at the edges rather than wet and slimy
- Free from heavy bruising
- Strong enough to handle
- Suitable in colour and shape for the intended project
- Taken from flowers that have not been sprayed with glitter or decorative chemicals
Discard petals with a sour smell, sticky residue, fuzzy growth, insect damage, or areas that have broken down into soft brown material. A craft cannot rescue a petal that is already decomposing.
Spread the usable petals in a single loose layer on a clean mesh screen, paper-covered tray, or drying rack. Keep them in a warm, dry place with airflow and away from strong direct sunlight, which may change the colour more quickly. Flowers and foliage can be air-dried successfully in warm, dry conditions, although the time required depends on the material and surrounding environment.
Turn the petals occasionally so the lower surfaces are exposed to air. They are ready for dry crafts when they feel papery rather than cool or flexible in the centre.
Sort the finished petals by colour, size, and condition. Keep complete petals for framed art and bowls, smaller fragments for potpourri, and faded pieces for projects where only their texture will remain visible.
Useful Materials and Tools
- Freshly fallen or dried rose petals
- Clean trays or mesh screens
- Soft paintbrush
- Tweezers
- Paper towels
- Airtight storage jars
- Small fabric bags
- Dried herbs and spices
- Picture frame or shadow box
- Epoxy resin and suitable mould, if used
- Chemical-resistant gloves
- Eye protection
- Protective table covering
- Simple bamboo or wooden bowl
- Decoupage medium
- Soft craft brush
- Needle and strong thread
- Reused glass jar or plain vase
- Paper, fabric, or jute scraps
- Strong craft adhesive
- Scissors
- Small labels
Do not seal petals inside resin, glue, or a covered container until they are fully dry. Trapped moisture can discolour the petals and interfere with the finished surface.
When working with epoxy resin, follow the manufacturer’s safety instructions, prevent skin contact, wear appropriate protection, and provide good ventilation.
Make Rose-Petal Potpourri for an Open Decorative Bowl
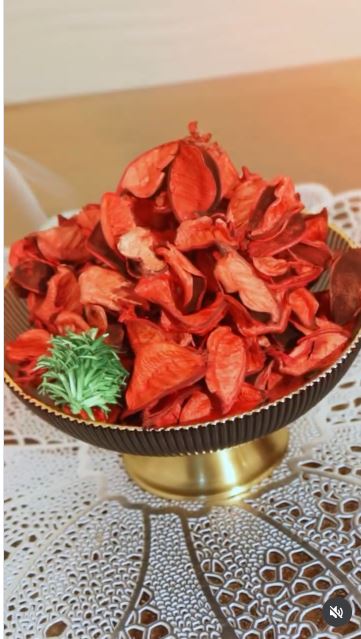
Potpourri is one of the simplest ways to reuse rose petals because small, curled, or uneven pieces can remain useful. The featured arrangement combines dried rose petals into a decorative mixture suited to an open bowl or glass container. Roses are commonly used in potpourri because their petals retain visual interest after drying and may preserve some natural fragrance.
The finished mixture does not need to be strongly scented. In fact, I’d rather notice a mild botanical smell when walking past than feel as though an entire perfume counter has moved into the room.
Materials and Tools
- Fully dried rose petals
- Dried lavender, rosemary, or other suitable botanicals
- Small pieces of dried citrus peel, if desired
- Cinnamon pieces or whole spices
- Glass jar with a lid
- Decorative open bowl
- Wooden spoon
- Optional fragrance oil intended for potpourri
- Small paper label
Make the Potpourri
- Check the dryness of every ingredient. Bend and crush-test a few rose petals before mixing them. Anything that still feels cool, soft, or damp should return to the drying tray rather than entering a storage jar.
- Build the mixture around the rose petals. Place the petals in a wide bowl and add one or two supporting botanicals. Keep the roses as the main visible material instead of burying them beneath a mixture of unrelated colours and textures.
- Add fragrance carefully. When extra scent is wanted, place a small amount of fragrance on a separate absorbent botanical or follow the product instructions. Avoid pouring concentrated oil directly over the entire pile, as it may create dark, greasy patches.
- Let the mixture rest. Transfer the potpourri to a closed jar for a short period so the scent can move through the dry ingredients. Shake or turn the jar gently rather than crushing the petals with a spoon.
- Display a manageable amount. Pour part of the mixture into a clean bowl and keep the rest sealed. Replace any section that becomes dusty, damp, or unpleasant rather than adding more fragrance to disguise the problem.
For me, texture matters more than perfect colour. Faded cream, dusty pink, and deep red petals can sit together naturally if the supporting materials remain simple.
A small fabric sachet offers a contained alternative for drawers and cupboards. Keep fragranced mixtures away from pets and young children, and do not place loose potpourri where it may be mistaken for food.
Preserve Meaningful Petals Inside a Resin Frame
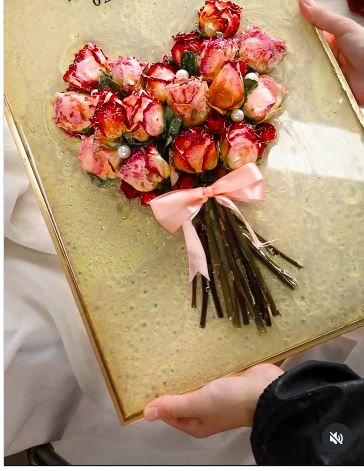
A resin frame suits petals connected to a wedding, anniversary, graduation, memorial, or another bouquet worth remembering. The featured project preserves dried roses in epoxy and turns them into wall art rather than leaving the flowers hidden in a box.
Resin magnifies every trapped detail. A folded petal, air bubble, dust particle, or damp spot may become more noticeable after curing, so preparation matters much more than adding extra decoration later.
Materials and Tools
- Completely dried rose petals
- Frame-shaped resin mould
- Epoxy resin system
- Measuring and mixing containers
- Stirring sticks
- Tweezers
- Chemical-resistant gloves
- Eye protection
- Protective work covering
- Optional photograph, initials, or small paper date
- Hanging hardware suited to the finished weight
Create the Resin Frame
- Test the petals before using the important ones. Place one spare dried petal in a small trial pour to see whether its colour changes or air escapes from its surface. This also lets you practise the resin system without risking the full keepsake.
- Plan the complete composition while dry. Arrange the petals inside the empty mould and photograph the layout. Leave open areas between them so the finished frame does not become a solid block of overlapping flowers.
- Prepare the resin safely. Cover the table, wear suitable gloves and eye protection, and work with the ventilation recommended by the manufacturer. Measure and mix only according to the instructions supplied with the particular resin system.
- Build the frame in controlled layers. Add an initial layer, position the petals with tweezers, and then continue according to the product’s approved process. Watch for petals lifting, folding, or releasing trapped air before the material becomes difficult to adjust.
- Cure and mount the finished piece. Leave the mould undisturbed for the full specified curing period. Once removed, check the weight and attach suitable hanging hardware rather than relying on a decorative ribbon alone.
I know it can feel tempting to include every petal from an important bouquet, but a frame often needs fewer than expected. Save the remaining petals in a labelled envelope or use them in a second, simpler keepsake.
A small resin coaster or freestanding block can preserve only two or three petals. Beginners may prefer a conventional shadow box, which avoids resin and allows the petals to remain removable.
Decoupage Rose Petals Inside a Small Bamboo Bowl
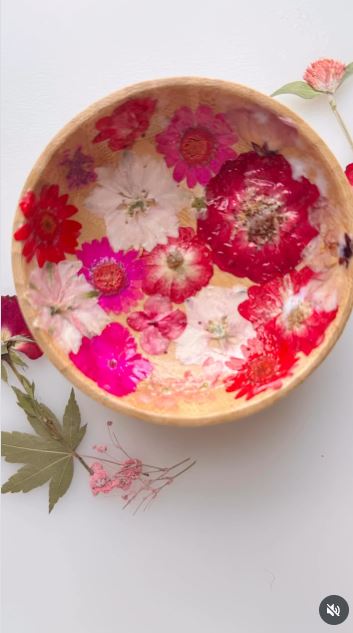
A simple bamboo or wooden bowl gives dried petals enough support to become a practical decorative surface. The featured project presses dried flowers inside an inexpensive bamboo container and seals them beneath a decoupage-style finish. Rose petals can create a similar layered effect, particularly when several tones are arranged together.
Treat the finished bowl as a container for dry objects, not for food or water. The petals, adhesive, and decorative finish were chosen for crafting rather than direct food contact.
Materials and Tools
- Plain bamboo or wooden bowl
- Fully dried rose petals
- Soft dry brush
- Decoupage medium
- Small flat paintbrush
- Tweezers
- Fine abrasive sheet, if the bowl requires smoothing
- Protective table covering
- Optional compatible clear decorative finish
Decorate the Bowl
- Prepare the bowl’s interior. Wipe away dust and check for splinters, loose fibres, or oily residue. Lightly smooth rough areas if appropriate, then remove every trace of sanding dust.
- Test the petal arrangement. Place the largest petals around the bowl without adhesive and decide whether they will overlap, radiate from the centre, or form one concentrated section. Take a photograph before lifting them out.
- Attach the first layer. Brush a thin coat of decoupage medium over a small area and lower each petal into place with tweezers. Smooth from the centre outward with a soft brush rather than dragging the fragile edges.
- Build and seal gradually. Add the remaining petals in sections, allowing the medium to settle as needed. Apply only the compatible finishing coats required to secure the surface without creating thick cloudy pools between the petals.
- Let the bowl cure before use. Keep it upright and free from dust until the finish has hardened according to its instructions. Use it for jewellery, wrapped items, keys, or other dry objects.
The first arrangement rarely becomes the final one, and that’s normal. Curved bowls distort spacing, so step back and check the design from above rather than judging each petal at close range.
A smaller saucer can become a ring dish. One especially meaningful petal may also be placed at the centre of an otherwise painted bowl.
Thread Flexible Rose Petals Into a Short Decorative Garland
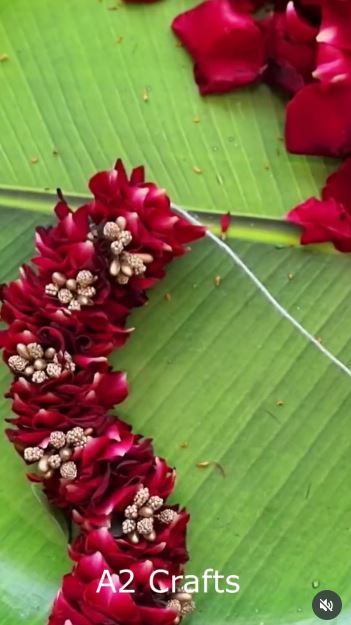
Not every petal needs to be dried before reuse. Petals that have fallen from a fading bouquet but remain flexible can be threaded into a temporary garland. The featured project strings pink and white rose petals together to create a compact floral decoration.
This is a short-lived project rather than permanent décor. Make it close to the time it will be displayed, and remove it once the petals begin breaking down.
Materials and Tools
- Clean flexible rose petals
- Strong cotton thread
- Fine needle
- Small scissors
- Cloth-covered work tray
- Optional felt circles or lightweight paper spacers
- Removable wall hooks
- Ribbon for the ends
Thread the Garland
- Select petals with similar strength. Choose petals that bend without splitting and remove any wet, bruised, or transparent areas. Blot surface moisture gently before bringing them to the sewing area.
- Plan the colour sequence. Arrange small groups of petals on the tray before threading. Alternate two colours, build a gradual fade, or keep the entire garland within one shade.
- Thread through the stronger base. Pass the needle through the thicker pale section near the base of each petal rather than the thin outer edge. Slide the petals into position gently without compressing them into a dense wet bundle.
- Add light spacers when useful. Small felt or paper circles can separate groups and reduce tearing. Then tie secure loops at both ends without pulling the thread so tightly that the petals buckle.
- Hang it in a suitable place. Use the garland indoors, away from direct heat, damp surfaces, food preparation, and strong sunlight. Protect the wall or furniture beneath it in case colour or moisture transfers.
I’d keep this garland short. Long strands become heavier than they look, and the upper petals may tear while you are still working on the lower half.
A tabletop circle around a vase requires less support than a hanging strand. You can also scatter sound petals across a decorative tray for a temporary display without piercing them.
Cover a Reused Jar With Dried Rose-Petal Texture
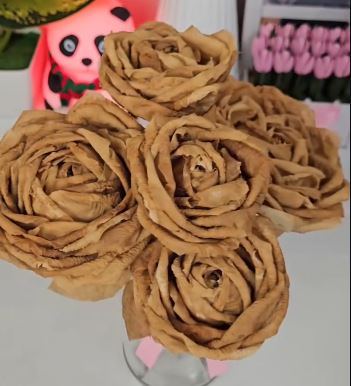
A plain glass jar or unwanted vase can provide structure for petals that are too broken for framing but still hold useful colour. The featured project preserves rose material as part of a handmade vase created from a discarded container.
The petals can cover the full surface or appear in selected bands. Leaving part of the original container visible may make the design feel lighter and helps you see whether water has reached an area that should remain dry.
Materials and Tools
- Clean glass jar or plain vase
- Fully dried rose petals
- Paper scraps or thin fabric
- Decoupage medium or suitable craft adhesive
- Soft paintbrush
- Tweezers
- Jute cord or ribbon
- Protective work covering
- Optional removable inner water container
- Dried flowers for display
Build the Textured Vase
- Prepare the reused container. Remove labels and adhesive residue, wash the jar, and let it dry fully. Check the rim for chips and recycle or discard damaged glass safely rather than covering it with decoration.
- Create a background layer when needed. Add thin paper, fabric, or paint to provide a consistent surface behind the petals. Keep the rim, base, and any section that may contact water free from loose decoration.
- Arrange the petals by size. Place larger complete petals first and use smaller fragments to fill narrow spaces. I don’t think every section needs to match; slight gaps can prevent the texture from becoming bulky.
- Secure the floral surface. Work in small sections with a controlled amount of adhesive. Press each petal gently with a brush, then add the compatible protective coat only after the first layer is secure.
- Use the vase without soaking the craft. Display dried stems or place a separate narrow container of water inside the jar. Wipe spills immediately and lift the vase from its base rather than gripping the decorated sides.
For me, the strongest version keeps the natural petal edges visible. Grinding everything into tiny pieces would create colour, but it would lose the reason rose petals were chosen.
A small jar can become a pencil holder, LED-light cover, or container for wrapped items. Avoid real candles, as dried petals, paper, jute, and adhesive should be kept away from flame.
Why Reused Rose Petals Fade, Crumble, or Grow Mould
Saving Petals That Have Already Become Slimy
Soft, translucent, or foul-smelling petals are breaking down rather than drying attractively. Discard them and work only with material that remains clean and structurally sound.
Stacking Fresh Petals During Drying
Overlapping petals trap moisture and dry unevenly. Spread them loosely and turn them until the centres feel papery.
Sealing Moist Petals Inside Resin or Glue
A petal may feel dry around its edge while retaining moisture near the base. Test several petals before using the most meaningful ones in permanent work.
Using Decorative Bouquets for Food or Skincare
Florist roses may have an unknown treatment history. Keep them in home décor projects unless you know they were grown and handled for edible use.
Mixing Too Many Fragrances Into Potpourri
Several oils, spices, and flowers can create a heavy or confused scent. Start with the rose petals and one supporting botanical, then adjust gradually.
Handling Epoxy With Bare Hands
Uncured resin systems may irritate or sensitise skin. Follow the safety data supplied with the product, prevent contact, wear suitable protective equipment, and work with proper ventilation.
Using a Finished Petal Bowl for Food
Craft adhesives and decorative finishes are not automatically food-safe. Reserve the bowl for jewellery, keys, wrapped items, or display.
Hanging a Fresh Garland for Too Long
Fresh petals continue changing after they are threaded. Treat the garland as temporary décor and remove it when it becomes damp, stained, or fragile.
Applying Thick Glue Over Delicate Petals
A heavy wet layer may wrinkle the petals, move their colour, or create cloudy patches. Build thin controlled coats and let each project dry undisturbed.
Frequently Asked Questions
Can I reuse petals from a store-bought bouquet?
Yes, for decorative crafts, provided the petals remain clean and free from mould. Do not assume they are suitable for food, drinks, skincare, or pet products when their treatment history is unknown.
What is the easiest rose-petal project for a beginner?
Potpourri requires the fewest tools and accepts petals of different sizes. Drying the petals properly is more important than making a complicated mixture.
How do I know when a rose petal is fully dry?
It should feel light and papery across the centre as well as the edges. A cool, flexible, or soft base usually means it needs more drying time.
Can I press rose petals inside a book?
Yes. Place clean petals between absorbent sheets so they do not stain the book pages, then add weight and leave them undisturbed until flat and dry.
Will dried rose petals keep their original colour?
The colour usually changes during drying and may continue fading with light exposure. Treat the softened tone as part of the finished craft rather than expecting the petal to look freshly picked.
Can I add essential oil directly to dried petals?
Use only a product intended for that purpose and follow its directions. Test a small quantity first because concentrated oil can darken petals and overwhelm the room.
How should I store unused dried petals?
Place fully dried petals in a clean, labelled container and keep it in a cool, dark, dry area. Check the container occasionally and discard the contents if moisture or an unusual smell develops.
Let the Bouquet Leave More Than One Memory
These ways to reuse rose petals begin with noticing them before they become too damaged to save.
Fresh flexible petals can form a temporary garland. Once dried, they can add colour to potpourri, preserve a meaningful occasion inside a frame, line a decorative bowl, or create texture on a reused vase.
Begin with the simplest material you have. A handful of broken petals may be ideal for potpourri, while the complete petals from an important bouquet deserve the slower preparation of a framed keepsake.
Which of the five rose-petal ideas would suit your home best: potpourri, a resin frame, a floral bowl, a temporary garland, or an upcycled vase?