Empty shampoo bottles often feel more useful than the average piece of packaging. Their plastic is usually firm enough to hold its shape, the curved sides are comfortable to handle, and the flat base already helps the bottle stand upright. The problem is deciding what that shape should become after the final bit of shampoo has been rinsed away.
I like projects that work with the bottle rather than hiding it beneath, so many decorations that its useful features disappear. A curved bottle can become a planter, the lower half can support a phone, several panels can form a basket, and a bottle with a sturdy handle-like shape can become a small garden scoop.
I don’t think every empty container needs to be saved. Keep bottles that are clean, undamaged, and made from plastic you can cut safely. Recycle the ones that are brittle, badly stained, or unsuitable for the project according to the rules in your local area.
The most important part comes before decorating: remove the residue, plan every opening, and smooth the cut edges. Then the bottle can become something practical instead of another unfinished craft waiting at the back of a cupboard.
Clean the Bottle and Plan the Cut Before the Plastic Slips
Remove the cap, pump, label, and any loose plastic ring around the neck. Rinse the bottle several times with warm water, then wash it with ordinary dish soap and a bottle brush if the opening is wide enough.
Shampoo and conditioner can cling to the shoulders and corners of a bottle. Fill it partly with warm soapy water, close the cap, shake it, and rinse until the water runs clear and no fragrance or slippery residue remains. Leave the bottle upside down until the inside dries completely.
Before cutting, inspect the container for:
- Cracks around the base or neck
- Brittle areas
- Deep dents
- Raised seams
- Thick moulded sections
- Labels that hide damage
- Pumps containing metal springs
- Small removable pieces
- Sharp decorative caps
- A recycling symbol or resin code
- A shape that can stand without support
Draw the cutting line with a washable marker. Place the bottle on a stable surface and make the first opening with a carefully controlled craft knife, then continue with sturdy scissors when the plastic allows it. Never hold the bottle against your body while cutting.
A newly cut edge may look smooth but still scratch skin. Trim away pointed corners, round the shape, and cover or soften the rim where necessary. A fine abrasive can help with some plastics, although it should be tested on an offcut first.
Keep knives, heated tools, drills, and cut plastic away from children. A project intended for a child should not have sharp edges, hazardous points, or small detachable decorations.
I would also keep repurposed cosmetic bottles away from food, drinking water, and pet feeding. Food-contact materials are assessed for their intended conditions of use, and an old shampoo container has not been selected or verified as food packaging.
When a bottle is not suitable for reuse, check the local recycling instructions instead of assuming every plastic bottle belongs in the same bin. The EPA advises checking local acceptance requirements for plastic containers and caps.
Useful Materials and Tools
- Empty shampoo bottles
- Dish soap
- Bottle brush
- Towels
- Washable marker
- Paper template
- Craft knife
- Strong scissors
- Cutting mat
- Fine abrasive sheet
- Hole punch or hand drill
- Eye protection
- Acrylic paint suitable for plastic
- Paintbrushes
- Strong craft adhesive
- Jute rope
- Fabric scraps
- Cardboard
- Potting mix
- Small plants
- Toothbrushes or craft tools
- Ruler
- Pencil
- Decorative paper
- Clear protective finish when appropriate
Work in a ventilated area when using strong adhesive, spray products, or paint. Let every coating cure according to its instructions before bringing the project into regular use.
Turn a Shampoo Bottle Into a Cat-Shaped Planter
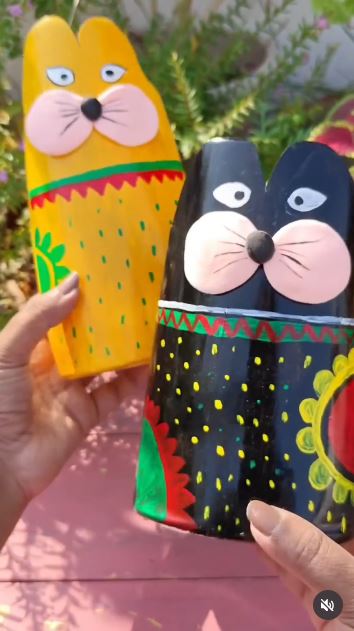
A rounded shampoo bottle already has the compact shape needed for a small planter. The featured transformation cuts the upper section into pointed ears and adds a cat face, allowing the original container to become either a plant pot or a small organiser.
The idea works best with a wide bottle that can stand securely after its neck has been removed. A narrow container may become top-heavy once it contains damp potting mix, especially when the plant grows above the rim.
Materials and Tools
- Clean shampoo bottle
- Washable marker
- Paper cat-ear template
- Craft knife and scissors
- Fine abrasive sheet
- Hand drill or heated awl used by an adult
- Paint suited to plastic
- Paintbrush
- Small plant
- Potting mix
- Optional inner nursery pot
Make the Cat Planter
- Mark the ears and opening. Draw a level line around the bottle, then add two simple triangular ears above it. Keep the ears broad at the base so they do not bend or snap during cutting.
- Cut and smooth the shape. Make one controlled opening with a craft knife and continue around the marked line with scissors. Round every corner, smooth the rim, and remove any thin plastic points.
- Add drainage. Create several small holes in the base while wearing eye protection and supporting the bottle securely. If the container will sit indoors, place a removable nursery pot inside instead of allowing water to collect against a painted surface.
- Paint the face. Lightly prepare the outside when the chosen coating requires it, then add the base colour and facial details in thin layers. Keep paint away from drainage holes and let the finish cure fully.
- Plant without overloading it. Add a small plant with modest roots and enough potting mix to support it. Water carefully and check that the bottle remains stable after the soil becomes damp.
For me, the ears and face already provide enough character. Extra beads, bows, and raised decorations may make the planter harder to clean and easier to knock over.
A simpler version can remain unpainted, with the face drawn on a removable paper sleeve. The same cut shape also works as a pencil cup when you would rather avoid soil and drainage.
Cut a Desktop Phone Stand From the Bottle Base
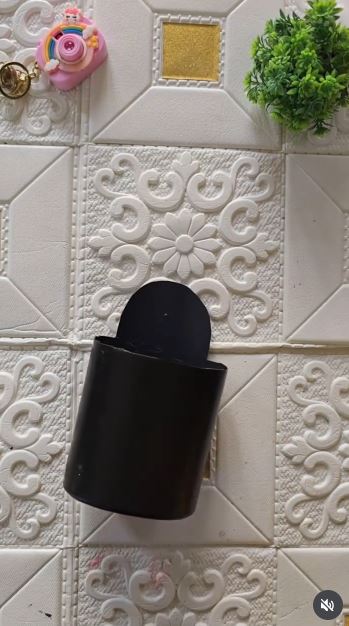
A shampoo bottle with a broad base can become a lightweight phone stand for a desk, kitchen counter, or craft table. The selected project cuts the plastic into a shaped support that holds a phone upright while leaving the screen visible.
This should remain a desktop stand rather than a holder attached directly to an electrical outlet. Keep the phone, cable, and plastic away from hot chargers, cooking surfaces, candles, and other heat sources.
Materials and Tools
- Flat-sided shampoo bottle
- Cardboard phone-stand template
- Marker
- Ruler
- Craft knife
- Strong scissors
- Fine abrasive sheet
- Non-slip fabric or rubber offcut
- Paper adhesive or suitable craft adhesive
- Optional decorative paper
Shape the Phone Stand
- Test the bottle against the phone. Place the phone in front of the uncut bottle and mark the height needed to support its back. The base should be wider than the phone’s thickness and stable enough not to rock.
- Draw the stand profile. Mark a raised back, a lower front lip, and gently curved sides. Avoid narrow tabs, as repeated pressure from the phone may bend or split them.
- Cut and refine the plastic. Open one side carefully, follow the marked outline, and round all exposed corners. Then place the empty stand on the desk and press it lightly to find any unstable areas.
- Add grip. Attach a thin non-slip strip to the base and another where the phone rests. Keep the material flat so it does not push the device forward.
- Check the viewing angle. Test the phone vertically and horizontally without connecting a cable. Reduce the back height or front lip only after confirming where the device feels secure.
The bottle should hold the phone without squeezing it. I’d rather use a slightly wider stand than force a large device between tight plastic sides.
A taller version can hold a recipe card, small tablet, or printed craft instructions. Short offcuts from the same bottle may become cable labels or drawer dividers.
Make a Wall-Mounted Toothbrush and Tool Holder
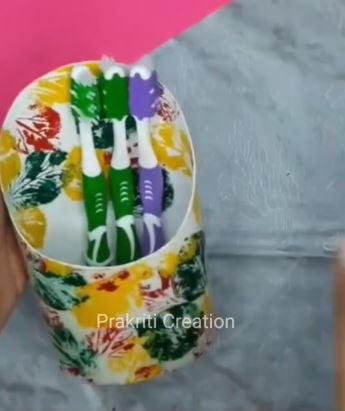
The tall body of a shampoo bottle suits narrow objects such as toothbrushes, combs, paintbrushes, pens, or crochet hooks. The featured project cuts away the upper section and decorates the remaining container as a useful organiser.
Bathroom use needs a little extra thought. Water should not remain trapped around toothbrush handles, so the holder needs drainage and regular cleaning. Mount it where it can dry rather than directly inside the wettest part of the shower.
Materials and Tools
- Clean shampoo bottle
- Marker
- Scissors
- Craft knife
- Fine abrasive sheet
- Hole punch or drill
- Removable wall hook
- Strong hanging cord or suitable wall fixing
- Paint or decorative paper
- Optional removable inner cup
Build the Holder
- Choose the opening height. Place the intended items beside the bottle and mark an angled front opening. Leave the back taller if the holder will hang from a hook.
- Cut and smooth the rim. Follow the line carefully and remove any narrow projections. Test the opening with your hand before adding tools, as the front edge will be touched frequently.
- Create drainage and hanging points. Add small holes at the base for water and a reinforced hole near the upper back for hanging. Keep the hanging hole away from the cut edge so the plastic does not tear under weight.
- Decorate the outside. Paint it, wrap part of it with cord, or cover it with a removable sleeve. Avoid thick decoration near the drainage holes or wall contact points.
- Mount and maintain it. Hang the holder securely, add only lightweight items, and check that it sits flat against the wall. Empty and wash it regularly rather than allowing residue to collect inside.
I know it can feel tempting to fill a new organiser immediately, but five heavy hair tools can pull much harder than two toothbrushes. Match the load to the bottle’s thickness and the strength of the hook.
The same holder can sit on a desk without wall mounting. A pair of matching bottles could separate pens from scissors or makeup brushes from combs.
Join Several Bottles Into a Fabric-Lined Storage Basket
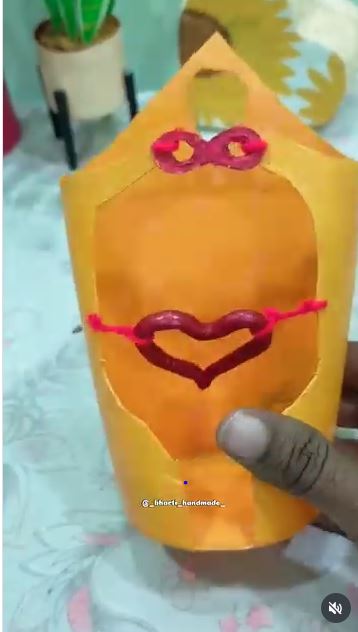
One bottle creates a cup, but several bottles can contribute enough curved plastic for a broader organiser. The selected project uses empty shampoo bottles with jute rope, fabric, and a cardboard base to build a handmade storage basket.
This works best for lightweight objects such as rolled cloths, craft supplies, socks, ribbon, or packaged toiletries. It should not carry heavy tools, glass containers, or anything that could push through the joined plastic panels.
Materials and Tools
- Several clean shampoo bottles
- Strong scissors
- Craft knife
- Cardboard
- Fabric for lining
- Jute rope
- Strong craft adhesive
- Sewing clips
- Ruler
- Marker
- Optional handles made from webbing
Assemble the Basket
- Create matching plastic panels. Remove the necks and bases, open the remaining bottle bodies, and trim them into sections of similar height. Smooth every edge before arranging the basket walls.
- Build a firm base. Cut two matching cardboard shapes and place the lower edges of the plastic panels between them. Test the arrangement without glue so the sides meet evenly around the full perimeter.
- Secure and cover the structure. Attach the panels to the base and join their side edges with suitable adhesive or reinforced stitching holes. Wrap the exterior with jute or fabric only after the structure holds its shape independently.
- Add the lining. Sew or fold a removable fabric liner that covers the plastic edges and cardboard base. A removable lining makes the basket easier to clean and helps hide the joins.
- Finish the handles carefully. Attach webbing handles through reinforced areas rather than gluing them only to decorative rope. Test the empty basket first, then increase the contents gradually.
For me, the plastic should provide hidden structure rather than become a patchwork of visible bottle labels. A consistent outer covering makes the basket feel intentional.
A beginner can simplify this idea by placing cut bottle cups inside an existing cardboard box. The separate compartments can organise pencils, sewing notions, or bathroom supplies without constructing a full basket wall.
Cut a Small Garden Scoop From a Handled Bottle Shape
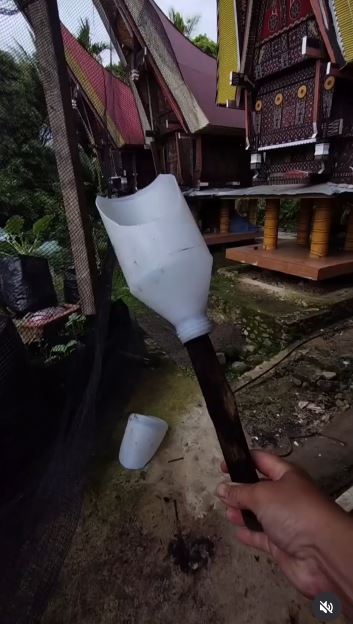
A bottle with a narrow neck and broad lower body can become a scoop for dry potting mix, birdseed storage bins, or lightweight garden materials. The featured idea cuts a used plastic container into a miniature shovel shape for handling soil during potting.
Keep the scoop for non-food materials and label it clearly. A short scoop is useful for filling small pots, where a full garden shovel tends to send soil across the table and somehow into a shoe.
Materials and Tools
- Clean sturdy shampoo bottle
- Marker
- Paper scoop template
- Craft knife
- Strong scissors
- Fine abrasive sheet
- Drill or hole punch
- Hanging cord
- Permanent label
Cut the Garden Scoop
- Choose the handle orientation. Hold the bottle by its neck and decide which side feels most comfortable facing upward. The cap may remain in place when it strengthens the grip.
- Draw the scoop opening. Mark a long diagonal line from the bottle shoulder toward the lower opposite side. Keep enough of the base to carry material without leaving a narrow, flexible point.
- Cut and smooth the shape. Begin the opening with a carefully controlled knife cut, continue with scissors, and round both front corners. Run a cloth over the edge to identify areas that may still snag.
- Add a hanging hole and label. Make a hole through a reinforced part of the handle and attach a short cord. Label the scoop for soil, compost, or another specific non-food material.
- Test it with a light load. Begin with dry potting mix and watch how the handle flexes. Trim the front slightly when the scoop holds too much weight or feels difficult to control.
One practical detail matters here: bigger is not always better. A modest scoop places less stress on the bottle neck and gives you more control around small houseplants.
A shorter version can move pebbles, clay granules, or dry craft materials. Store it out of sunlight when the plastic becomes brittle after prolonged outdoor exposure.
Where Shampoo-Bottle Projects Split, Tip Over, or Stay Soapy
Cutting Before the Bottle Is Completely Dry
Water makes the plastic slippery and difficult to mark. Dry the inside and outside fully before drawing the project outline.
Leaving Product Residue in the Corners
A bottle can look empty while conditioner remains around its shoulders. Repeated rinsing and a bottle brush help prevent sticky residue and unwanted odours.
Making the First Cut While Holding the Bottle
Rounded plastic can roll or collapse under pressure. Place it on a cutting mat and keep your supporting hand away from the blade.
Ignoring the Sharp Inner Edge
The outside may feel smooth while a thin burr remains inside the rim. Check both surfaces and round every point before regular handling.
Using Hot Glue as the Only Structural Connection
Hot glue may not bond reliably to every plastic surface, especially under weight or moisture. Test the adhesive and reinforce handles, basket walls, and hanging points mechanically where possible.
Painting Without Preparing the Surface
Very smooth plastic may cause paint to peel. Clean away grease, test the coating on an offcut, and use a product intended for the material.
Skipping Drainage in a Planter
Water trapped inside a decorative bottle can leave roots sitting in saturated soil. Add drainage holes or keep the plant inside a removable nursery pot.
Mounting a Heavy Holder on a Weak Hook
A wall organiser may become much heavier after it is filled. Use a fixing suitable for the surface and keep the bottle’s load modest.
Treating the Plastic as Food-Safe Storage
A shampoo bottle was designed for a cosmetic product, not as a food container. Keep the finished projects for plants, tools, décor, and non-food storage.
Saving Every Bottle Instead of Recycling the Extras
Reuse is helpful only when the finished item has a real purpose. Check local recycling instructions for clean bottles you do not need, as acceptance and preparation requirements can differ.
Frequently Asked Questions
What is the easiest shampoo-bottle project for a beginner?
The garden scoop or desktop phone stand needs only one bottle and a simple cutting line. Practise on a plain bottle before attempting a detailed cat planter or multi-panel basket.
How can I remove a stubborn label?
Soak the bottle in warm soapy water and peel away as much paper as possible. A small amount of suitable residue remover may help, but wash the bottle again and test the product because some solvents can mark plastic.
Can I use a shampoo bottle as a vase?
Yes, as a decorative container for cut flowers, provided it is clean and stable. Add weight at the base or place a narrower container inside when the bottle tips easily.
Which paint works on shampoo bottles?
Use a coating intended to adhere to plastic and follow its preparation instructions. Test it on a trimmed bottle offcut before painting the full project.
Can children make these projects?
Children can help paint and decorate prepared pieces under supervision. An adult should perform the cutting, drilling, edge finishing, and work involving strong adhesives.
Can the planter remain outdoors?
It may work in a sheltered location, but sunlight, temperature changes, and weather can weaken or fade some plastics and finishes. Inspect it regularly and replace it when cracks appear.
Should the cap remain on the bottle?
Keep it when it supports the project, as with a garden-scoop handle. Remove it when it traps water, interferes with drainage, or creates an unnecessary small detachable part.
Give the Bottle One Clear Job
These ways to reuse shampoo bottles work best when each container receives one practical purpose.
A broad bottle can support a plant. A flat-sided container can hold a phone, while a taller one can organise toothbrushes or craft tools. Several bottle panels can strengthen a basket, and a narrow neck can become the handle of a useful garden scoop.
Begin with the bottle whose shape already resembles the object you need. Clean it carefully, mark the full outline, and smooth every cut before thinking about paint or decoration.
Which of the five ideas would be most useful in your home: the cat planter, phone stand, toothbrush holder, storage basket, or garden scoop?