Yogurt cups are easy to overlook because they are small, familiar, and usually empty within minutes. Yet many of them have shapes that are already useful. Glass jars can hold flowers or soft light, ceramic pots can sit naturally beside other cups, and plastic containers can organise the small things that never seem to have a proper home.
The material matters more than the printed label. A ceramic yogurt pot may need nothing beyond careful washing. A clear glass jar can become part of a decorative project because light and water remain visible through it. Plastic cups are lighter and easier to cut, although they need a different approach when heat, weight, or sharp tools are involved.
I’m Stella Eve Louise, and I don’t think every empty yogurt cup needs paint, ribbon, and three layers of decoration before it becomes useful. Sometimes the original shape is the best part. The first step is simply deciding whether the cup is strong enough, safe enough, and suited to the purpose you have in mind.
Check the Yogurt Cup Before Reusing It
Wash the cup as soon as possible after the yogurt has been removed. Dried residue can settle beneath the rim, around embossed details, or inside a curved base. Use warm water and washing-up liquid, then rinse and dry the container thoroughly.
Remove paper labels slowly. Warm soapy water may loosen them, while a small amount of cooking oil can soften stubborn adhesive on glass or ceramic. Wash the oily area again before using paint, glue, clay, or decorative paper.
Inspect the cup for:
· Cracks in glass or ceramic
· Chips around the drinking or upper rim
· Thin sections in plastic
· Warped plastic caused by heat
· Rough label residue
· Scratches inside the container
· Loose decorative coatings
· Sharp edges
· Strong remaining odours
· A base that rocks or sits unevenly
Do not reuse cracked glass or chipped ceramic for drinks, flowers, candles, or everyday storage. A damaged area may become worse when exposed to heat, water, or regular handling.
Plastic yogurt cups require separate care. Check the recycling and material markings before using them around food, heat, or liquids. I would keep painted or heavily glued plastic cups for craft storage rather than returning them to food use.
Ceramic and glass yogurt pots may look like ordinary cups, but that does not automatically confirm that they are suitable for boiling water or very hot drinks. Before using one as drinkware, check any available manufacturer guidance. If you cannot confirm heat resistance, use it for teaspoons, coffee pods, wrapped sweets, paint water, or another non-heated purpose.
Turn Ceramic Yogurt Pots Into Espresso Cups
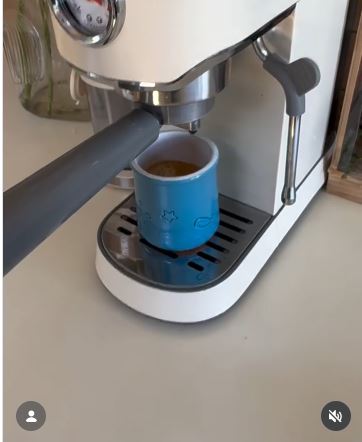
Some yogurt comes in small ceramic pots that already resemble handle-free espresso cups. Their glazed surface, compact size, and finished rim mean the container may need very little alteration once it has been cleaned.
The examples show people saving decorative ceramic yogurt pots and reusing them as small cups. Their existing colour and embossed details remain visible, so the reused containers still look connected even when the designs are not completely identical.
What makes this idea work is restraint. Paint, paper, or rope would hide the surface that made the pot worth saving in the first place. A group of similar containers can sit together as a small collection, while one pot can serve as a spoon holder, matcha-whisk rest, or desk cup if you do not plan to drink from it.
Materials and Tools
· Clean ceramic yogurt pots
· Washing-up liquid
· Soft sponge
· Small cleaning brush
· Clean towel
· Cooking oil for adhesive, if needed
· Baking soda for stubborn odour, if suitable
· Optional felt pads
· Optional shallow tray
Prepare the Ceramic Pots
1. Remove every trace of yogurt and adhesive. Wash the pot carefully with a soft sponge, paying attention to the lower curve and any embossed decoration. Soak only when the ceramic is sound and the finish appears stable, then remove the label without scraping the glaze with a metal blade.
2. Inspect the rim and inner surface. Run a finger gently around the outside of the rim rather than pressing directly onto it. Look for chips, fine cracks, discolouration, or rough areas. Set aside any questionable pot for dry decorative storage instead of drinks.
3. Confirm the intended use. Check whether the manufacturer identifies the container as reusable drinkware or provides guidance about temperature. If heat resistance cannot be confirmed, avoid pouring freshly boiled liquid into it. A cool drink, spoon storage, wrapped snacks, or art supplies may be a more sensible use.
4. Build a practical set. Collect pots of similar height so they sit comfortably together. Place them on a small tray for serving or organising, then add felt pads beneath any rough bases that could scratch a wooden table.
5. Use and wash them gently. Avoid sudden temperature changes, such as moving a cold pot directly into very hot water. Wash by hand when you are unsure whether the decorative finish or glaze can tolerate repeated dishwasher cycles.
I know it can feel tempting to collect every colour immediately, but the useful part comes first. One sound pot that you regularly use is better than a shelf full of chipped containers kept only because they match.
A beginner-friendly variation is to use the pots as coffee-station organisers. One can hold teaspoons, another sugar packets, and a third wrapped biscuits. You could also use a ceramic pot for paintbrush water, but keep it permanently separate from anything used for drinking.
Make Pressed-Flower Votive Holders From Glass Yogurt Jars
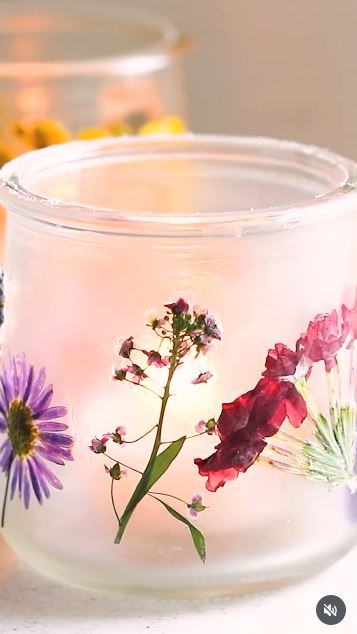
A clear yogurt jar becomes much more interesting once light passes through a thin decorative layer. Pressed flowers suit this shape because their stems and petals can follow the curve of the glass without adding much bulk.
The project uses glass yogurt jars as small decorative light holders. Similar jars may be left clear, painted lightly, wrapped, or decorated with pressed flowers before a tea light or battery-operated light is placed inside.
For a home project, I would choose battery tea lights. They create the soft glow that makes the petals visible without placing a flame close to dried flowers, glue, paper, ribbon, or an unknown glass container.
Materials and Tools
· Clean glass yogurt jars
· Pressed flowers or thin dried leaves
· Clear-drying decoupage adhesive
· Soft flat brush
· Tweezers
· Small scissors
· Baking paper
· Clear water-based protective finish, if suitable
· Battery-operated tea lights
· Optional tissue paper
· Optional fine ribbon
Decorate the Glass Jars
1. Prepare the flowers and glass. Clean the jar until no label adhesive or grease remains. Arrange the dried flowers on baking paper first, trimming long stems only when necessary. Choose flat pieces that can follow the curve without cracking.
2. Test the composition. Stand the jar upright and hold the flowers against it before applying glue. Leave space between larger petals so light can pass through the clear areas. The first arrangement rarely becomes the final one, and that is completely normal.
3. Attach one piece at a time. Brush a thin layer of decoupage adhesive over a small section of glass. Position the flower with tweezers, then press it gently with a soft brush. Work from the centre towards the edges instead of scrubbing repeatedly across the fragile petals.
4. Protect the surface. Once the flowers remain in place, add a light protective layer over them if the adhesive system allows it. Keep the coating thin so the jar does not become cloudy. Then let the surface settle where dust and loose fibres cannot stick to it.
5. Add the light safely. Place a battery tea light inside and check the effect in a dim room. Keep the switch accessible and remove the light when cleaning the jar. Do not use an open flame near dried flowers, paper, ribbon, or ordinary craft adhesive.
For me, the empty spaces matter just as much as the flowers. Covering every centimetre can turn a delicate pattern into a dark block once the light is switched on.
A simpler version uses small pieces of pale tissue paper rather than real flowers. Torn edges can overlap like stained glass, and beginners do not need to worry about breaking brittle stems. You could also tie one narrow ribbon around the rim, but I would stop there rather than hiding the floral pattern beneath more decoration.
These jars can work as table lights for a quiet dinner, shelf decorations, or seasonal displays. Use pastel petals in spring, dried leaves during autumn, or simple white paper shapes for winter. Keep every added material clear of the inside so the battery light sits on a clean, level base.
Add a Clay Flower Frog to a Glass Yogurt Jar
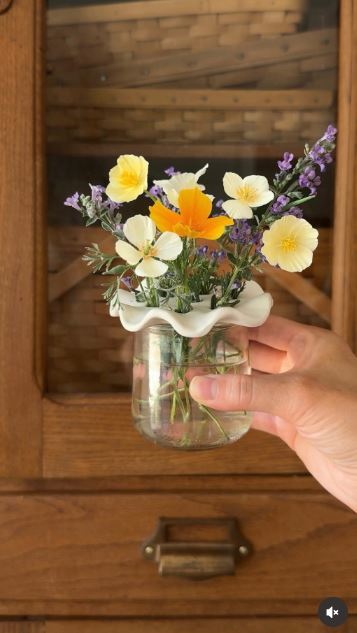
A flower frog is a top or insert that helps separate and support stems. On a small yogurt jar, it allows a few garden cuttings to stand in deliberate positions instead of leaning together against one side.
The project combines a clear glass yogurt jar with a handmade clay flower-frog top. Several holes in the clay support individual flower stems, while the jar beneath remains visible and holds the water.
This idea works particularly well for short stems, small wildflowers, herbs, or plant cuttings that might disappear inside a larger vase. The clay piece should sit securely over the rim but remain removable so the jar can be emptied and cleaned.
Materials and Tools
· Clean glass yogurt jar
· Air-dry clay or another suitable craft clay
· Rolling pin or smooth jar
· Baking paper or craft mat
· Round cutter slightly larger than the jar opening
· Wooden skewer or clay tool
· Fine sandpaper, if suitable
· Water-based craft sealer, if appropriate
· Small flower stems
· Clean water
· Optional paper template
Form the Flower-Frog Top
1. Measure the jar opening. Place the rim on paper and trace around it. Add enough width for the finished clay piece to rest safely on top rather than falling through. Keep the shape modest because a very wide disc can become heavy and unbalanced.
2. Roll and cut the clay. Work on baking paper and roll the clay into an even sheet. Cut a circle using the template, then smooth the outer edge with a damp fingertip or suitable clay tool. Avoid making the centre extremely thin.
3. Create the stem holes. Press a skewer through the clay while it is still workable. Space the holes apart and vary their positions slightly so the arrangement does not form a stiff grid. Then lift the disc carefully and check that no clay has closed the openings underneath.
4. Let the piece firm up properly. Dry or finish the clay according to the instructions for the material you selected. Turn or support it only when the method allows. Once that is done, smooth rough edges gently and apply a suitable decorative finish if desired.
5. Arrange the stems. Fill the clean jar with enough water for the selected cuttings, place the clay top over the rim, and guide one stem through each hole. Keep the arrangement light so the stems do not pull the top sideways.
The part I would check carefully is the fit around the rim. The clay top should rest securely without gripping the glass so tightly that you need force to remove it. Glass and stubbornness are not a particularly helpful craft combination.
A beginner can make the top from sturdy waterproof card for a temporary arrangement. Cut a circle, cover it with suitable material, and punch a few holes before placing it over the jar. It will not last like clay, but it lets you test the idea before making a permanent piece.
Another variation is a small wire grid secured around an external ring. That version may suit repeated use because it does not rely on clay, although all wire ends must be folded and covered so they cannot scratch hands or chip the glass.
Choose the Right Yogurt Cup for the Right Job
Not every yogurt cup suits every project. Grouping the containers by material before you begin can prevent wasted work.
Glass Yogurt Jars
Glass is useful when you want to see water, flowers, stored objects, or a light through the container. It also accepts many decorative finishes, provided the surface is completely clean.
Use sound glass jars for:
· Bud vases
· Battery-light holders
· Craft-supply storage
· Propagation jars
· Decorative displays
· Small bathroom organisers
Avoid drilling or cutting glass unless you have suitable tools and experience. A no-cut project is usually safer and still gives the jar a useful purpose.
Ceramic Yogurt Pots
Ceramic pots often need the least decoration because their colour, glaze, and embossed details are already finished. Check them closely for chips and fine cracks before reuse.
They may suit:
· Spoon storage
· Small non-heated drinks when confirmed suitable
· Paintbrush holders
· Coffee-pod storage
· Jewellery dishes
· Small desk organisers
Do not assume that decorative ceramic packaging can tolerate an oven, microwave, freezer, or boiling liquid.
Plastic Yogurt Cups
Plastic cups are lightweight and useful for temporary or dry projects. Larger tubs can hold craft supplies, while smaller cups can separate beads, buttons, screws, or seedlings.
Keep them away from high heat and open flames. When making drainage holes, place the cup on a stable surface and use a tool that does not crush or split the plastic.
Common Mistakes to Avoid
Reusing a Chipped Rim
A small chip can feel harmless until the container is handled, washed, or placed near the mouth. Retire damaged glass and ceramic pots from drinking use. In many cases, recycling or discarding them according to local guidance is safer than turning them into another frequently handled object.
Assuming Every Pot Is Heat-Safe
A ceramic shape may resemble a coffee cup without being designed for freshly boiled drinks. Confirm the intended use before adding heat. When no guidance is available, choose a cool or dry purpose instead.
Decorating Before Removing Adhesive
Old label glue can cause paint, clay, and decoupage layers to lift. Remove the residue, wash away any oil used during cleaning, and dry the surface before starting the decorative work.
Using Real Flames With Dried Decorations
Pressed flowers, ribbon, tissue paper, and craft adhesive should not sit beside an open flame. Battery tea lights give a similar visual result with much less risk.
Applying Too Much Decoupage Adhesive
A thick layer can wrinkle flowers, make clear glass look cloudy, and create long drips down the jar. Work in small areas with a soft brush and let the first layer settle before deciding whether more is needed.
Making the Clay Top Too Heavy
A thick or oversized flower frog may slide, tip the jar, or strike the glass during removal. Keep the disc balanced and use only a small number of lightweight stems.
Returning Decorated Containers to Food Use
Paint, glue, clay, sealers, and decorative paper may not be suitable for direct contact with food. Once a yogurt cup has become a craft project, keep it for flowers, lights, or dry household objects.
Keeping Every Empty Cup
Reuse should solve a problem rather than create another cupboard full of containers. Save the strongest cups for a specific project and recycle the rest according to the rules in your area.
Frequently Asked Questions
What is the easiest way to reuse a yogurt cup?
A clean glass or ceramic cup can hold teaspoons, pens, makeup brushes, or small craft supplies without any alteration. This is easier than painting, cutting, or attaching decorations and lets the original container remain recognisable.
Can ceramic yogurt pots be used for coffee?
Only use them for hot coffee when you can confirm that the container is suitable for heat and reuse as drinkware. Check for cracks and chips first. When you are unsure, use the pot for cool items or dry storage.
Can I put a candle inside a glass yogurt jar?
A battery-powered tea light is the safer choice, especially when the jar has pressed flowers, paper, ribbon, glue, or paint. Do not assume that an ordinary yogurt jar is designed to withstand the heat of a flame.
How do I remove a stubborn yogurt-jar label?
Warm soapy water may loosen paper labels. A small amount of cooking oil can soften some adhesive on glass or glazed ceramic, but wash the surface again afterwards so no grease remains.
Can plastic yogurt cups be reused as plant pots?
Yes, particularly for seed starting or temporary nursery pots. Add drainage holes and place the cup on a tray. Move the plant into a larger container before its roots become crowded.
How do I clean a yogurt jar decorated with pressed flowers?
Dust the outside gently with a soft, dry cloth. Avoid soaking the decorated surface or scrubbing it. Remove the battery light and wipe the plain inside separately when needed.
What can I use instead of clay for a flower frog?
A temporary top can be cut from sturdy card or thin plastic, provided it fits safely and the edges remain smooth. A wire grid is another option, but cover every sharp end and make sure it cannot scratch the glass.
Give the Smallest Containers a Clear Purpose
Learning how to reuse yogurt cups is less about keeping every container and more about recognising which ones already have useful qualities.
Ceramic pots can remain simple because their finished surfaces do most of the work. Clear glass jars suit flowers and soft lighting, while a small handmade top can turn one into a controlled vase for delicate stems.
Begin with one clean, undamaged cup and choose a purpose that matches its material. Check the rim, avoid unsupported heat, and keep decorative coatings away from food. Then use only as much paint, paper, clay, or ribbon as the project actually needs.
Which yogurt cup would you save first: the ceramic pot for your coffee station, the clear jar for pressed flowers, or the small vase waiting for a clay top?