Old highlighters often reach the end of their writing life unevenly. One may feel completely dry, another may still hold colour in the ink reservoir, and several more may be sitting in a drawer simply because their plastic bodies look too useful to throw away. That mixture of leftover ink, bright caps, and sturdy barrels makes highlighters surprisingly adaptable for small reuse projects.
I’m especially interested in finding practical second uses for ordinary items before buying something new. A finished highlighter does not need to become an elaborate craft to be worth saving. It can label a herb pot, organise a charging cable, hold tiny desk supplies, or contribute the last of its colour to a paper project. What matters is choosing a reuse that suits the part you actually have.
The most useful approach to how to reuse highlighters is to separate function from appearance. The fluorescent colour is eye-catching, but the barrel, cap, felt reservoir, and remaining ink all behave differently. Once you check what is still usable, the highlighter becomes less like one disposable object and more like several small materials that can be given another job.
Check What Is Still Usable Before Taking a Highlighter Apart
A highlighter that no longer makes a strong mark may not be completely empty. The felt tip can dry before every trace of colour has left the inner reservoir, while the plastic barrel and cap may remain perfectly usable. Before pulling anything apart, test the marker on scrap paper and decide whether you want to preserve the remaining ink, reuse the plastic shell, or keep both.
If the barrel is cracked, sharply damaged, or difficult to clean, it is better to skip projects that involve frequent handling. Likewise, an old marker with an unknown sticky residue is not a good candidate for a desk organiser or children’s craft. Reuse works best when the second purpose is sensible rather than forced.
· Keep partly working highlighters intact if they can still serve as ordinary markers or labelling tools.
· Save clean caps and barrels for organisers, plant labels, and craft structures.
· Treat the inner ink reservoir as a separate craft material only when you can remove it without splashing or tearing it apart.
· Discard damaged pieces according to local waste guidance if they are too broken or messy to reuse safely.
Match Each Highlighter Part to a Sensible Second Use
The easiest highlighter upcycling ideas usually depend on shape. Long plastic bodies work well as labels, spacers, or decorative building pieces. Caps are smaller and easier to use as colour-coded holders. Remaining ink is most useful on absorbent paper, where a little colour can be spread, diluted, or transferred without asking it to perform like permanent paint.
I don’t think every highlighter needs to be dismantled just because it is old. Sometimes the best reuse is the one that requires the least alteration. A bright barrel already has colour and a comfortable shape, so using it as a plant marker may be more practical than cutting it into several tiny pieces.
· Use whole barrels where length and colour are useful, such as plant markers or the outer wall of a pen holder.
· Use caps for small organising jobs where colour coding helps you identify cables or categories quickly.
· Use empty shells as lightweight containers only for dry, non-food items such as paper clips or binder clips.
· Use leftover ink on paper crafts rather than on skin, food-contact surfaces, or objects that may be mouthed by children or pets.
Prepare the Highlighters and the Work Area
Highlighter reuse can become messy faster than it looks, especially once a cap, tip, or inner reservoir is removed. Protect the table with scrap card or a washable covering, keep paper towels nearby, and work over a tray when handling leftover ink. If the ink formulation is unknown, avoid treating it like face paint, fabric dye, or food-safe colour.
· Wear disposable gloves if you want to avoid staining your hands while opening ink-filled markers.
· Use small pliers only when necessary, and pull components slowly so the reservoir does not flick colour across the work area.
· Keep a jar or small bowl ready before removing an ink reservoir so you are not carrying a wet piece across the room.
· Wash empty plastic shells and let them dry fully before using adhesive or storing desk items inside them.
· Keep loose caps, cut plastic, and ink-soaked parts away from young children and pets.
Turn Old Highlighters Into Colorful Plant Markers

A row of herb pots makes good use of one feature highlighters already have: strong colour. The long body sits visibly above the soil, while the broad plastic surface gives you room for a short plant name. This works especially well for indoor herbs or seed-starting pots where labels need to be easy to notice rather than decorative in a complicated way.
The practical detail is keeping ink and soil separate. Use a fully closed or thoroughly cleaned body rather than pushing an exposed felt reservoir into damp compost. A permanent marker or adhesive label can carry the plant name, and the highlighter colour itself can become a simple category system for herbs, flowers, or seedlings.
What You May Need
· Clean, empty highlighter bodies with no exposed ink reservoir
· Permanent marker or small waterproof label
· Plant pots or seed trays
· Optional strong scissors or craft knife for an adult if a flat end must be trimmed; smooth any sharp edge before use
A Simple Way to Make the Markers
1. Clean and check the barrel. Remove any loose ink parts and wash the plastic shell if needed. Let it dry completely, then run a finger around the edges to make sure there are no cracks or sharp sections that could catch on your hand.
2. Add the plant name. Write directly on the broad side with a suitable permanent marker, or add a small label if the plastic surface resists ink. Keep the wording short so the name stays readable when leaves begin to grow around it.
3. Place the marker carefully. Push only the clean lower end into the soil and keep the label high enough to read. Then check the pot after watering; if the marker leans, move it closer to the pot edge where the soil may be firmer.
For me, the best part is that the fluorescent colours already do the visual work. I would not add ribbons, glitter, or extra decoration to something that needs to survive watering and handling. If you prefer a calmer look, use highlighters from one colour family or cover the barrel with a narrow paper label before writing the plant name.
Use Leftover Highlighter Ink for Watercolor-Style Painting

A nearly dry highlighter may still contain useful colour inside its felt reservoir. When that remaining ink is transferred into a small amount of water, it can create a bright, transparent liquid for experimental paper painting. It will not behave exactly like artist watercolour, and different marker formulations can react differently, but that is part of why a scrap-paper test matters.
This idea suits cards, colour studies, simple flowers, and abstract marks where permanence is not the main goal. Highlighter colours can fade or shift more readily than archival art materials, so I would treat the finished piece as a casual craft rather than a valuable artwork expected to remain unchanged for years.
Materials for a Small Colour Test
· Old highlighters that still appear to contain some ink
· Small glass jars or washable containers
· A small amount of water
· Paintbrushes and absorbent paper
· Gloves and paper towels if staining is a concern
How to Recover the Remaining Colour
1. Test before opening anything. Make several marks on scrap paper first. If the highlighter still works reasonably well, keep using it normally; taking it apart too early can create more waste than it saves.
2. Transfer the reservoir carefully. Over a protected tray, remove the ink reservoir only if the marker construction allows it without forcing or breaking the barrel. Place it straight into a small jar so any remaining colour stays contained.
3. Add water gradually. Use a small amount at first and allow the colour to move into the water. Stronger liquid is easier to dilute later than a very pale mixture is to strengthen, so there is no need to fill the jar.
4. Test the colour on paper. Brush a small swatch and let it dry before committing to a card or painting. Then compare a full-strength stroke with a more diluted one so you know how quickly the colour spreads and whether it changes after drying.
I know it can feel tempting to mix every fluorescent colour into one jar, but that usually removes the advantage of having several clear hues. Keep them separate at first. If a colour looks too intense for a flower or leaf, dilute it on the palette rather than weakening the whole jar.
Reuse Highlighter Caps as Color-Coded Cable Organizers

Highlighter caps are small enough to disappear in a drawer, yet their bright colours make them useful for a cable system. A cap can act as a visual identifier or a lightweight guide that keeps a lead in the same place, especially on a desk where several black and white charging cables look almost identical at a glance.
The exact attachment method depends on the cap shape and the surface. Rather than permanently gluing a cap to a wall, I would use removable mounting material on a desk edge, cable board, or other surface that can tolerate it. The cap should guide the cable without pinching, crushing, or sharply bending it.
Useful Supplies
· Clean highlighter caps in several colours
· Removable mounting strips, reusable putty, or another surface-appropriate attachment method
· Charging and data cables that fit without being squeezed
· Optional small labels if colour alone is not enough
Set Up a Simple Cable Station
1. Match a cap to each cable. Slide or position the cable beside the cap and check that the connector and insulation are not compressed. A loose guide is better than a tight grip because charging cables need room to move without stress.
2. Choose a sensible mounting point. Keep the organizer near the desk edge or device area so the cable falls naturally. Avoid placing it where a chair, drawer, or laptop hinge could pull against the lead.
3. Attach the caps without damaging the surface. Use a removable method when possible and test it on an inconspicuous area first. Then place each cap far enough apart that the connectors do not collide when several cables are being used.
One detail I would not skip is checking the cable after the desk is in normal use. A neat row can look fine when everything is unplugged but create a sharp bend once a phone is connected. If that happens, move the organizer rather than forcing the cable to follow the original layout.
Turn Empty Highlighter Barrels Into Mini Desk Organizers

Suggested file name: highlighter-barrel-desk-organizers.jpg
Alt text: Empty pink, green, blue, yellow and orange highlighter barrels holding clips and small desk supplies.
Caption: Clean highlighter shells become tiny containers for the desk items that usually collect at the bottom of a drawer.
Paper clips, binder clips, push pins, and other tiny supplies are often the reason a desk drawer feels untidy. Empty highlighter barrels can become small category containers because they are narrow, light, and already colour coded. Grouping several together also makes them easier to keep upright than using a single loose shell.
This is a dry-storage project only. Do not use old marker bodies for food, medicine, cosmetics, or anything that needs a hygienic sealed container. The idea works because the supplies are small, dry, and easy to remove, not because the barrel becomes a general-purpose jar.
What Works Well Here
· Clean, fully empty highlighter shells
· A small tray, box lid, or stable base to keep the containers together
· Strong craft adhesive if you want a permanent grouped organizer
· Paper clips, binder clips, drawing pins, or other dry desk items
Build the Organizer
1. Clean and dry every shell. Remove any remaining felt or ink-bearing parts before washing the plastic. Let the barrels dry inside as well as outside; trapped moisture is unnecessary in a container meant for metal clips and paper supplies.
2. Decide whether to group or separate them. A single barrel may tip easily, so arrange several in a small tray or attach them to a stable base. Move the pieces around first and check that you can reach into each opening without knocking over the others.
3. Assign one supply to each colour. Use pink for paper clips, blue for small binder clips, yellow for push pins, or any system that makes sense to you. Then keep the organizer near the place where those items are actually used so the containers do not become another decorative object with no job.
A little variation helps here. You can keep the shells loose inside a shallow box if you do not want to use adhesive, or group only three for a smaller desk. I would rather make a compact organizer that gets used every day than a large arrangement that takes up more space than the supplies themselves.
Decorate Gift Tags and Cards With Leftover Highlighter Ink

Gift tags are a forgiving place to use small amounts of recovered colour because the painted area is limited and the paper can be tested before you commit. A few loose petals, dots, stripes, or leaves are enough to make a plain tag feel handmade. You do not need the colour to behave exactly like paint for the result to work.
The main challenge is controlling saturation. Highlighter ink can spread quickly on absorbent card, so a heavily loaded brush may create a larger mark than expected. I would keep a scrap of the same paper beside the tag and touch the brush to that first whenever the mixture has been changed.
Gather a Small Paper-Craft Kit
· Plain gift tags, recycled card, or folded greeting-card blanks
· Recovered highlighter colour in separate containers
· Small round paintbrushes
· Scrap paper for testing
· Ribbon or twine if the tag needs a hanger
Paint the Design in Layers
1. Test the paper. Brush one small stroke on a scrap piece and watch how far it travels. Smooth card may keep a sharper edge, while very absorbent paper may feather quickly; that difference should influence how detailed your design can be.
2. Paint the larger shapes first. Use a lightly loaded brush for petals, leaves, stripes, or blocks of colour. Leave some unpainted paper between shapes so the fluorescent tones stay clear instead of merging into a muddy patch.
3. Add smaller details once the first marks settle. Use a drier brush for dots, leaf centres, or stronger edges. Then stop before the surface becomes overworked; highlighter colour is strongest when the simple shapes still look clean and airy.
4. Finish the tag only after it is dry. Add ribbon, handwriting, or a hole reinforcement after the painted area has dried fully. This reduces the chance of smearing colour onto the string, your hands, or the back of another card.
For a quieter version, use only one recovered colour with black handwriting. For a brighter set, make several tags in related colours and repeat one simple motif. The design does not need to be complicated; the small scale is what makes this a good use for the last little bit of ink.
Build a Colorful Pen Holder From Empty Highlighters

This pen holder uses the highlighters as building pieces rather than containers. Standing the empty bodies side by side around a base creates a bright outer wall, while an inner cup or sturdy central container can carry the actual weight of pens and scissors. That distinction matters because a ring of loose plastic markers is decorative on its own but may not be strong enough to hold tall tools securely.
A stable base is more important than perfect colour order. Scissors and pencils create leverage when they lean, so the holder should be broad enough not to tip and the highlighter shells should be attached where they cannot slide away. If you use strong adhesive, work in a ventilated area and follow the adhesive manufacturer’s directions.
Materials and Tools
· A collection of clean, empty highlighter bodies
· A sturdy recycled cup, tin-free cardboard tube, or other safe inner container
· A flat cardboard or wood offcut for the base
· Strong craft adhesive suitable for the materials
· Ruler and pencil for planning the circle
Assemble the Holder Without Rushing the Layout
1. Choose the inner container and base first. Set the cup on the base and test it with the pens, pencils, and scissors you expect to store. If it feels unstable before decoration, change the base rather than expecting the highlighter shells to fix the balance later.
2. Arrange the highlighters dry. Stand the empty bodies around the outside and adjust their spacing before using adhesive. I know it can feel tempting to glue the first one immediately, but a dry arrangement shows whether the final gap will be awkward or whether you need one more piece.
3. Attach the outer row in stages. Secure a few shells, let the arrangement become stable enough to hold its shape, and then continue around the container. Keep the bottoms level so the finished holder sits flat instead of rocking on one lower barrel.
4. Check every edge before use. Once the adhesive has cured according to its instructions, run your hand carefully around the holder and inspect the base. Remove dried glue strings, reinforce any loose shell, and keep sharp tools such as scissors inside the stable inner container rather than between the decorative barrels.
The part I like is that mismatched fluorescent colours look intentional here. You can arrange them in a repeating pattern, place similar colours together, or accept the random order of whatever highlighters you already own. There is no need to buy extra markers just to complete the colour scheme; that would rather defeat the point.
Make Coffee-Filter Suncatchers With Highlighter Ink
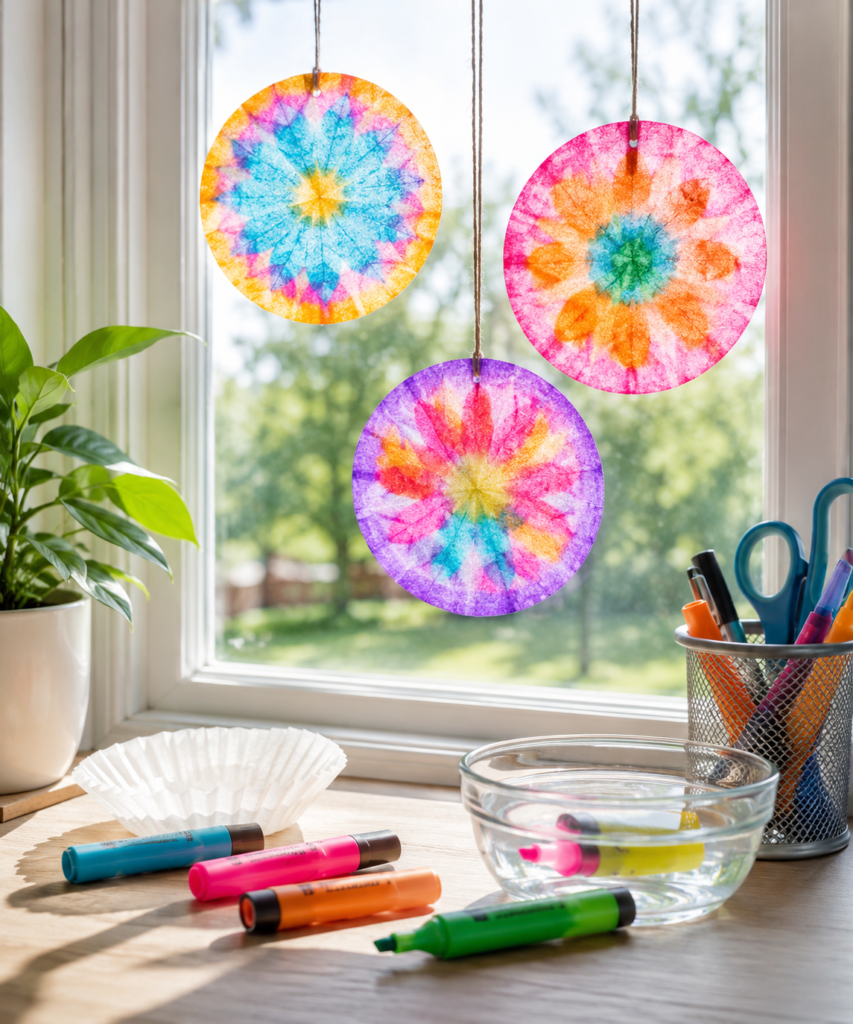
Coffee filters and other thin absorbent papers make the spreading behaviour of highlighter colour part of the design. A drop or brush mark can travel outward, overlap another colour, and dry into soft rings or petal-like shapes. Hung near a bright window, the thin paper lets light through and makes even pale areas more visible.
This works best as a temporary indoor decoration. Highlighter dyes and lightweight paper are not intended for long outdoor exposure, and direct sun may change the colours over time. That is not a reason to avoid the project; it simply means the craft should be treated as a seasonal or replaceable paper decoration rather than permanent window art.
What You Need for the Suncatchers
· White coffee filters or another thin absorbent paper
· Recovered highlighter colour or still-working highlighters
· Small brush, dropper, or cotton bud
· A protected tray or washable mat
· String or thread for hanging
Create the Colour Pattern
1. Flatten the paper on a protected surface. Place the filter on a tray or scrap card because the colour can pass through. If you are using a working highlighter directly, add small marks rather than colouring the entire filter solidly.
2. Add water in controlled amounts. Use a brush or dropper to encourage the colour to travel through the paper. Add one area at a time and let the edges meet naturally; too much water at once can wash every shade into the same pale centre.
3. Build a simple pattern. Repeat colour around the circle, rotate the filter, or add a second shade near the edge. Then stop while some white or pale space remains, because the translucent gaps often make the finished suncatcher look lighter in the window.
4. Dry flat and hang safely. Let the paper dry fully before making a small hanging hole or attaching thread. Keep the finished decoration clear of candles, heaters, and other heat sources, and use a removable hanging method that suits the window area.
If you prefer less mess, keep the highlighters intact and colour small sections of a dry filter before brushing clean water across them. If you have recovered ink, use a separate brush for each colour at first. The first arrangement rarely needs to be perfectly symmetrical; slight differences are what make the paper pattern feel handmade.
Highlighter Parts and Their Best Second Uses: A Quick Practical Comparison
Whole barrel: Best for plant labels, decorative building pieces, or other jobs that use the marker’s length and bright colour without needing the ink.
Cap: Best for colour coding, lightweight cable guides, or small organising details where the cap can remain intact.
Empty shell: Best for dry desk storage when it has been cleaned thoroughly and placed on a stable base.
Remaining ink: Best for casual paper crafts, swatches, gift tags, and absorbent-paper projects where colourfastness is not critical.
Inner reservoir: Useful only as a way to recover remaining colour; once the ink has been removed, dispose of or reuse the felt only if you have a clean, sensible craft purpose for it.
Still-working marker: Keep using it as a highlighter. Reuse does not need to begin before the original function has actually ended.
Highlighter Reuse Errors That Create More Mess Than Use
Opening every old highlighter automatically is the first mistake I would avoid. If a marker still produces a usable line, continuing to use it normally is usually more practical than dismantling it for a craft. Test first, then decide whether the second-life project is actually needed.
Using unclean barrels for storage can transfer old ink onto paper clips, desk surfaces, or your hands. Remove ink-bearing parts, wash the plastic, and let it dry fully before you call the shell an organizer.
Treating recovered highlighter ink like permanent artist paint can lead to disappointing results. The colour may spread, fade, or change differently from purpose-made paint, so use it for casual paper crafts and test a dried swatch before making something you want to keep for a long time.
Adding too much water to recovered ink can make the colour weak and difficult to control. Start with a small amount, test it, and dilute later if necessary. The same rule helps with coffee-filter projects, where excess water can flatten several colours into one pale wash.
Gluing caps or barrels before checking the layout can create awkward gaps and unstable organizers. Arrange the pieces dry first. Then you can move them around, check cable bends or container balance, and only commit when the function makes sense.
Forcing plastic with a knife or pliers can create sharp edges and sudden splashes. Use tools only when needed, work slowly, and stop if the barrel design does not come apart cleanly. A project is not improved by turning a harmless old marker into a cut finger and a fluorescent table.
Frequently Asked Questions
Can I reuse a highlighter that still writes a little?
Yes. If it still produces a useful mark, the simplest second life is often to keep using it for highlighting, labelling, or rough notes. Save dismantling for markers that are genuinely no longer useful in their original form.
Can I add water to a dry highlighter to make it work again?
That depends on the marker formulation and construction, so there is no single method that suits every highlighter. Adding liquid directly to the marker can dilute the colour or create leaks; for craft use, it is safer to treat any recovered colour as an experimental paper medium and test it separately.
Is recovered highlighter ink the same as watercolour paint?
No. It may look similar when diluted and brushed onto paper, but it is not designed to behave like artist watercolour or provide the same permanence. Use it for casual crafts, colour experiments, tags, and temporary decorations rather than assuming archival results.
What can I store inside empty highlighter barrels?
Small dry desk items such as paper clips, push pins, or tiny binder clips are sensible choices if the shell has been cleaned thoroughly. Avoid food, medicine, cosmetics, or anything that needs a hygienic container.
How can I keep a highlighter pen holder from tipping over?
Use a stable inner cup and a broad, flat base before adding the highlighter bodies as decoration. Test the holder with the actual pens and scissors you plan to store; if it tips before decoration, make the base wider or choose a heavier inner container.
Can highlighter plant markers stay outdoors?
They may work for short-term labelling, but sunlight, rain, and temperature changes can affect plastic, writing, and adhesive labels differently. For long-term outdoor use, choose a purpose-made weather-resistant plant label instead of assuming an old highlighter will remain readable indefinitely.
Are these projects suitable for children?
Some paper crafts can be adapted for supervised children, but dismantling markers, handling loose caps, using strong adhesive, cutting plastic, or working with concentrated leftover ink needs adult judgement. Keep small parts and ink-soaked materials away from young children and pets, and use age-appropriate tools.
Give Old Highlighters One More Useful Job
The most practical lesson in how to reuse highlighters is that you do not need one complicated project for the whole marker. The bright body can label a plant, the cap can identify a cable, the empty shell can organise tiny supplies, and the last traces of colour can become a small paper craft. Each part only needs a second use that suits its shape and condition.
Start with the easiest option that solves a real problem around your home or desk. A single plant marker or cable guide may be more useful than saving a large bag of empty markers for a project you never begin. Mindful crafting works best when reuse stays practical, manageable, and connected to what you already need.
Before throwing away the next dry highlighter, check the barrel, cap, and remaining colour separately. Which small job could one of those parts do next?