A bookshelf can outlive the room it was bought for. The shelves may still be strong even when the finish looks dated, the back panel feels plain, or the overall shape no longer suits the rest of the house. I don’t think that makes it unwanted furniture. It often means the piece is ready for a more specific job, whether that is a floral display cabinet, a fitted library, a narrow corner tower, or storage that hides everyday clutter behind painted doors.
The bookshelf makeovers I find most useful keep the original structure whenever it remains sound. Paint, timber lining, moulding, reused crates, decorative paper, and simple doors can completely change how a shelf works without pretending it was built from scratch. The best results usually come from solving one practical problem first, then choosing decoration that supports that new purpose.
A tall unit must be secure, shelves need to carry their intended load, and any new legs or wall fixings have to suit the weight of the finished piece. Once those basics are settled, there is plenty of room to be playful. A slightly ordinary bookshelf can become the feature that gives a blank wall its character.
Before You Start
Check the Structure Before Changing the Style
Empty the bookshelf and inspect every joint, shelf support, corner, foot, and section of backing. Tighten loose screws, reglue separated joints, replace missing shelf pins, and repair any split timber before adding paint or decoration. If the unit rocks when empty, it will not become safer after books, baskets, doors, or decorative trim are added.
Look closely at the material as well. Solid wood, veneered board, laminated furniture, and unfinished crates need different preparation. Sanding too aggressively can cut through a thin veneer, while paint may peel from a glossy laminate unless the surface is cleaned and primed properly.
Plan the New Use and Its Weight
Decide what the shelves will hold before changing their spacing. Books place a concentrated load along each shelf, whereas light ornaments, folded towels, or small plants need less support. I know it can feel tempting to design the decorative part first, but the intended contents should decide whether shelves need reinforcement, extra brackets, or a stronger back.
Measure the wall, ceiling height, skirting board, nearby sockets, door swing, and walking space. Tall units and stacked crates should be anchored to suitable wall structure. A built-in effect also needs a little planning around uneven floors and walls, because most rooms are less square than they appear from across the room.
Prepare the Surface and Work Safely
Remove dust, wax, grease, loose paint, and peeling paper. Label shelves and hardware as you take them apart, then test paint, stain, glue, or wallpaper adhesive on a hidden area. Use eye and hearing protection when cutting or drilling, work in a ventilated area with paints and finishes, and keep the unit supported while you alter it.
Set Aside Bookshelves with Serious Damage
Some bookshelves need major repairs before they can be safely reused. Set the piece aside if you find:
- A loose or separating base
- Broken side panels
- Large cracks around the corners or joints
- Shelves that are badly bowed or split
- Crumbling MDF or particleboard
- Serious swelling caused by water
- Active mold or a lasting damp smell
- Fresh wood dust or signs of insect damage
- A back panel that has completely separated
- Missing structural screws or brackets
- Deep rust on a metal frame
- Sharp or broken edges
- A unit that continues to lean after being placed on a level floor
- An unstable repair from a previous project
- Peeling paint of unknown age that may not be suitable for sanding
Do not turn a weak bookshelf into a desk, plant stand, toy organizer, or mobile cart. These uses can place extra weight on the shelves and frame. Repair the structure first, or reuse only the sound boards for a smaller project.
For Clean and Structurally Sound Bookshelves, Inspect:
- The material, such as solid wood, veneer, laminate, MDF, metal, or plastic
- The overall height, width, and depth
- The condition of the top, sides, base, and back panel
- Loose screws, nails, brackets, and shelf supports
- Cracks around joints and fixing points
- Shelves that sag, move, or sit unevenly
- Worn, chipped, or sharp edges
- Water marks, swelling, and surface bubbles
- Rust on metal parts
- Peeling paint, stain, or varnish
- Grease, furniture polish, wax, and sticky residue
- Old adhesive from labels or shelf liners
- The condition of adjustable shelf holes
- Feet, legs, or casters beneath the unit
- Whether the bookshelf rocks on a level floor
- Whether it can be secured to a wall
- The weight and size of the items it will hold
- The space available in its planned location
- Access to sockets if it will become a workstation
- Protection from water if it will hold plants
- Safe access for children if it will store toys
Measure the room and the bookshelf before removing shelves or adding new parts. Check doorways, corners, skirting boards, and nearby furniture as well. A unit that fits against an empty wall may become too deep once baskets, hooks, wheels, or a work surface are added.
Choose the new purpose before painting. A plant stand may need water-resistant shelf liners, while a toy organizer may need rounded edges and secure storage bins. A workstation will need a comfortable working height and enough support for the equipment placed on it.
Useful Materials and Tools
- Tape measure
- Pencil and notepad
- Spirit level
- Screwdrivers
- Drill and suitable drill bits
- Pliers
- Hammer
- Wood glue
- Screws, nails, and replacement shelf supports
- Corner braces or repair brackets
- Wall-fixing or anti-tip hardware suitable for the wall
- Wood filler
- Filling knife
- Fine- and medium-grit sandpaper
- Sanding block or sanding sponge
- Dust mask
- Protective gloves
- Safety glasses
- Vacuum with a brush attachment
- Clean cloths
- Mild cleaner suitable for the bookshelf material
- Painter’s tape
- Drop cloth or protective sheet
- Primer suitable for wood, laminate, metal, or plastic
- Furniture paint or wood stain
- Paintbrushes
- Small smooth-finish roller
- Paint tray
- Clear protective finish, if needed
- Shelf liner or waterproof mats
- Baskets, bins, hooks, or labels
- Replacement backing board
- Optional legs or load-rated casters
- Optional trim, handles, or decorative panels
- Cable clips or grommets for a workstation
- Small containers for screws and fittings
Keep removed screws, brackets, and shelf supports in labelled containers. Take a photograph before dismantling the unit, especially when the shelves, backing board, or fittings are arranged in a particular order.
Test the cleaner, primer, and paint on a hidden area first. Smooth laminate, coated metal, and plastic may need different preparation from unfinished wood, so choose products made for the actual surface rather than using the same paint on every bookshelf.
Secure any tall or narrow bookshelf to a sound wall before loading it. Use fixings suited to the wall material and the finished weight, and ask an experienced professional for help when the unit is unusually heavy or forms part of permanent joinery.
Give a Narrow Bookshelf a Floral Display-Cabinet Makeover
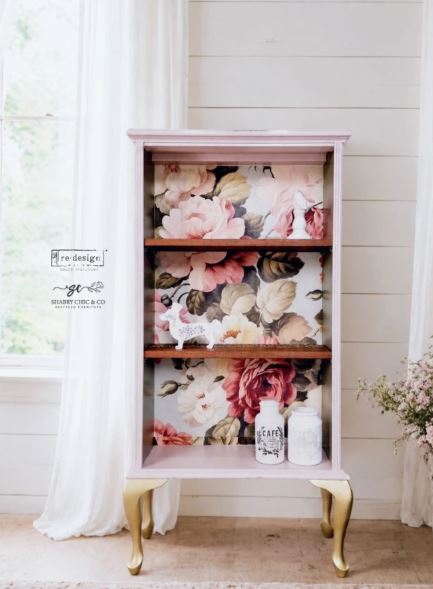
This slim bookshelf uses contrast very deliberately. The frame is painted a soft blush tone, the shelf edges remain a warmer dark wood, and the back is filled with oversized flowers in cream, pink, burgundy, and muted green. Curved metallic legs lift the box from the floor and make it read more like a small cabinet than a basic bookcase.
The floral backing does most of the visual work, so the open shelves can remain fairly simple. That makes this a useful direction for a narrow unit whose back panel is scratched, thin, or simply dull. Wallpaper is the obvious option, although a smooth fabric panel or a printed paper mounted to thin board could create a similar effect and remain easier to replace later.
Because the pattern is large, alignment matters. Each shelf opening should show a pleasing part of the design rather than an accidental line through the centre of a flower. The gold legs also need a properly reinforced base; decorative feet should never be screwed only into thin fibreboard.
Materials and Tools
· A narrow, structurally sound bookshelf or small open cabinet
· Furniture paint in a soft neutral or muted colour
· Large-scale floral wallpaper, fabric, or printed decorative paper
· Wallpaper adhesive, decoupage medium, or a removable panel system suited to the material
· Four sturdy furniture legs and compatible mounting plates
· Timber blocks or plywood for reinforcing the base
· Primer, brushes or a small roller, sandpaper, and protective finish
· Straightedge, craft knife, cutting mat, drill, screws, and clamps
Create the Floral Cabinet
1. Repair and prepare the bookshelf. Remove the shelves if possible, tighten every joint, and clean the frame thoroughly. Fill dents only where they distract from the finished look, then dull glossy surfaces with suitable preparation so the primer and paint can grip.
2. Reinforce the base for new legs. Cut a strong internal support panel or add timber blocks beneath the four mounting positions. Dry-fit the legs and check that their screws will enter solid material. Then place the empty unit upright and make sure the feet sit evenly before moving on.
3. Paint the frame and finish the shelf edges. Prime the surfaces that need it, then apply the chosen furniture paint in thin, even coats. You can paint the shelf edges to match or keep a warm wood strip visible, as this version does. Let every layer cure according to the product instructions before handling the unit heavily.
4. Fit the floral backing. Make a paper template for each opening and use it to choose the best section of the pattern. Cut carefully, test the alignment, then attach the paper or fabric from the centre outward to reduce bubbles. If you prefer a reversible finish, mount the design on thin removable panels instead of gluing it directly to the back.
5. Reassemble and style lightly. Return the shelves, secure the bookshelf to the wall, and check that the new legs remain stable. Use a few bottles, candles, small ceramics, or folded linens rather than covering every flower. The background needs some open space to stay visible.
What I Would Watch Here
I’d check the pattern from several steps back before fixing it. A flower that looks well placed on the worktable can feel oddly cropped once the shelves divide it, and moving the paper by a small amount often makes the whole cabinet look calmer.
A Simpler Version
Skip the new legs and line only the back panel of an existing wall shelf. Leftover wallpaper from one feature wall may be enough, and a plain painted frame will keep the small project from becoming too busy.
Combine Several Bookcases into a Gothic Built-In Library
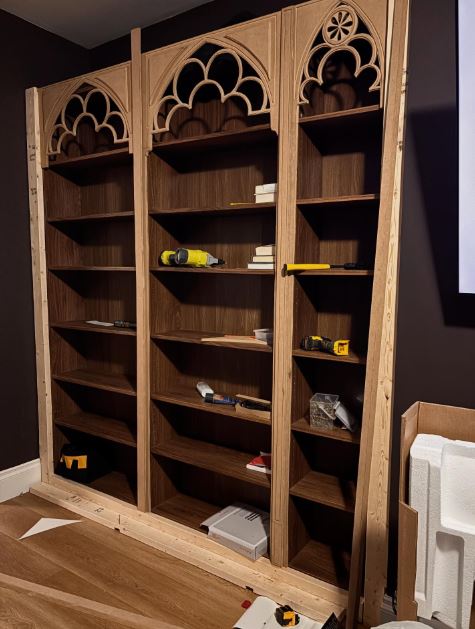
Three tall shelving units become far more convincing as one piece when a continuous base, vertical face frames, and repeated arched panels connect them. The dark shelf interiors provide depth, while the pale timber trim outlines each bay. Pointed arches, rounded tracery, and flower-like cut-outs turn the top section into the main architectural feature.
This is more involved than a paint makeover because the finished unit needs to behave like permanent joinery. Each bookcase must sit level and plumb, the cabinets need to be fixed to one another and to the wall, and the decorative fronts should not interfere with shelf access. The tall side stiles also help hide small gaps between the furniture and the room.
Repeated details are what make the design work. The three bays do not have identical widths, yet the consistent pointed arches and matching timber colour make them belong together. I don’t think the tracery needs to be extremely ornate; one strong repeated shape will usually look more intentional than several unrelated motifs.
Materials and Tools
· Two or more tall bookcases of compatible height and depth
· Timber for a continuous plinth, side fillers, vertical stiles, and top trim
· Plywood or furniture board for the arched decorative panels
· Cardboard or thin sheet material for full-size arch templates
· Jigsaw, drill, clamps, level, square, and suitable saws
· Screws for joining cabinets and fixings suited to the wall structure
· Wood glue, filler, sandpaper, primer, paint, stain, or clear finish
· Optional router or decorative trim for cleaner edges
Build the Library Wall
1. Set out and level the bookcases. Remove the shelves and position every cabinet against the intended wall. Pack beneath the bases where necessary until the top edges align and each unit stands plumb. Check doors, sockets, skirting, and ceiling clearance before fastening anything.
2. Join and anchor the cabinets. Clamp neighbouring sides together and screw through strong structural sections, using discreet positions that will later be covered by trim. Fix each unit to suitable wall framing or masonry. A tall run of loaded shelves should never depend on decorative face trim for stability.
3. Add the shared base and face frames. Build a continuous plinth across the bottom, then fit vertical stiles over the joins and along the outer edges. Scribe filler pieces to uneven walls where needed. These plain structural parts should be accurate before the arched decoration is added.
4. Make the Gothic arch panels. Draw one full-size template and test it above each bay. Transfer the design to plywood or solid timber, cut the main arches first, then add the smaller internal shapes only if the material remains strong enough. Sand every cut edge and dry-fit the panels to check spacing.
5. Finish the trim and reload the shelves. Attach the decorative panels, fill visible fixing holes, and apply the chosen finish. Refit the shelves only after the coating has cured, then distribute heavy books across several levels rather than concentrating them on one long span.
The Detail That Matters Most
For me, the repeated arch template matters more than tiny ornamental details. If the main curves differ noticeably from bay to bay, the whole wall can look improvised. Make one accurate template and use it for every matching section.
An Easier Architectural Update
Use one freestanding bookcase and add a simple pointed-arch top panel without the inner tracery. Paint the cabinet and arch in the same colour, anchor it safely, and you can suggest the same Gothic character with much less cutting.
Refresh a Low Bookshelf with Green Paint and a Timber Back
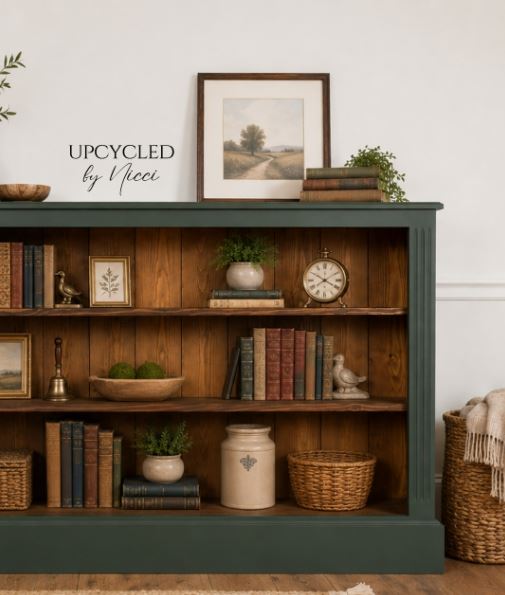
A dark green frame gives this low bookshelf a grounded, traditional look, while the warm timber back prevents the interior from feeling heavy. The shelf boards appear natural or lightly stained, so the books, baskets, pottery, framed art, clock, and plants sit against a softer background rather than disappearing into one dark colour.
This is a practical makeover for a basic open unit that already has useful proportions. Adding a proper back can reduce side-to-side movement, hide a plain wall, and make the shelf feel more like a complete piece of furniture. Vertical boards also introduce quiet texture without needing a bold printed pattern.
The wide lower plinth is important because it visually supports the long shape. A thin base might make the cabinet look top-heavy after the sides are painted dark. The top ledge also extends slightly, which gives framed art and stacked books a defined surface above the open storage.
Materials and Tools
· A low open bookshelf or console-height bookcase
· Furniture paint in deep green or another muted dark tone
· Thin timber boards, tongue-and-groove panels, or plywood strips for the back
· Wood stain, oil, or clear finish for the interior timber
· Timber for a wider base plinth and optional top ledge
· Primer, filler, sandpaper, brushes, and a small roller
· Saw, drill, screws or brads, clamps, square, and level
· Wall straps or brackets suited to the finished unit
Create the Two-Tone Finish
1. Strengthen and square the cabinet. Check the case diagonally and correct any twist before fitting a new back. Repair loose corners and shelf supports, then place the unit on a level surface. A rigid back works best when the cabinet is already square.
2. Prepare the painted sections. Clean the outer frame, side panels, base, and top edge. Sand or prime as the original finish requires, keeping the interior shelves protected if they will remain wood. Masking takes time, but it is easier than removing dark paint from a finished timber edge later.
3. Fit the timber backing. Cut boards or strips to suit the opening and arrange them vertically. Leave sensible movement gaps for real timber and fasten each piece into solid rails rather than a fragile edge. Then stain or seal the backing in a warm tone that complements the shelves.
4. Add the green frame and plinth. Apply the dark paint in even layers to the exterior and any new trim. Build a simple plinth that runs across the full width, checking that it does not block vents or sit awkwardly over skirting. A modest top ledge can finish the silhouette without making the unit bulky.
5. Anchor and arrange the contents. Secure the shelf to the wall and allow the finish to cure before loading it. Place heavier books near the bottom, mix upright and horizontal stacks, and use baskets for less decorative items. Then add a few plants or ceramics, leaving some of the warm backing visible.
Why I Would Keep the Palette Limited
The green and warm wood already provide enough contrast. I’d avoid introducing several extra paint colours on the trim or shelves, because the books and objects will naturally add variety once the unit is in use.
A Lower-Cost Alternative
Paint the frame and cover the existing back with wood-effect wallpaper or carefully cut plywood strips. It will not have the same depth as real boards, but it can create a warmer interior without adding much weight.
Turn Reclaimed Wooden Crates into a Corner Book Tower
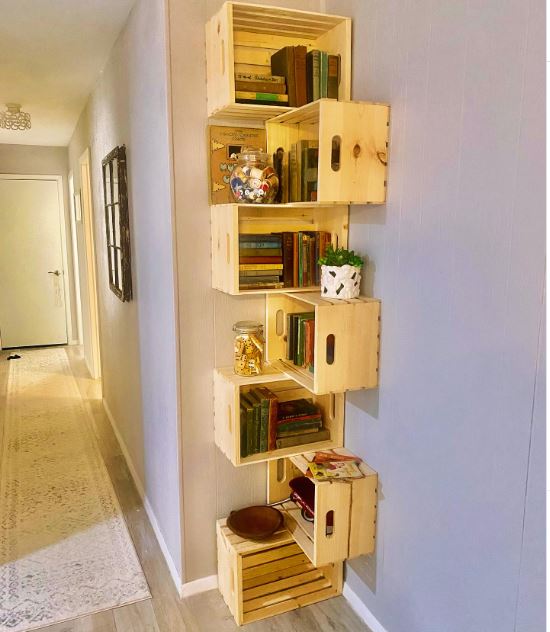
This vertical arrangement uses a series of unfinished wooden crates as separate cubbies. Some open toward the front and others toward the side, creating a staggered rhythm that fits a narrow corner. The built-in handholds become part of the design, while the slatted bases add texture behind the books and small objects.
The idea is useful where a conventional bookcase would feel too wide, but it needs more than careful stacking. A tall zigzag tower has several off-centre loads, especially when books fill the outer edges. The crates should be joined to each other and anchored at multiple points to the wall; the bottom crate alone cannot safely stabilise the whole column.
Crates also vary in strength. Decorative lightweight boxes may split around knots or thin staples, while sturdier produce-style crates can still need reinforcement. Sort the best pieces for the lower sections and keep heavier books closer to the floor.
Materials and Tools
· Sturdy wooden crates in compatible sizes
· Timber blocks or plywood plates for reinforcing weak corners
· Wood glue and screws long enough to join solid sections without protruding
· Wall brackets, straps, or a concealed mounting rail suited to the wall
· Sandpaper, filler, and a clear finish, stain, paint, or wax
· Drill, countersink bit, clamps, level, square, and measuring tape
· Optional thin backing panels for crates that need extra rigidity
· Felt pads or a stable base board for the floor
Assemble the Crate Tower Safely
1. Inspect and prepare every crate. Remove loose staples, splinters, and rough edges, then repair cracked slats or weak corners. Test each crate with a modest load before including it. Place the strongest, heaviest box at the bottom and reserve lighter crates for the upper section.
2. Plan the staggered layout on the floor. Arrange the crates horizontally first and decide which openings will face forward or sideways. Keep enough overlap between neighbouring boxes for secure fixings. Mark the order discreetly so the tower can be rebuilt without guessing.
3. Join the crates in manageable sections. Clamp two or three boxes together and screw through reinforced corners or added internal blocks. Avoid driving screws through thin slats near their ends. Build smaller sections rather than trying to lift and align the complete tower at once.
4. Set the tower level and anchor it. Position the base on a stable floor, check the vertical alignment, then attach the sections to one another. Fix the tower to sound wall structure at several heights using appropriate brackets or a mounting rail. Do not load it until every anchor is tight.
5. Load from the bottom upward. Put heavier books and jars in the lowest crates, then use upper cubbies for lighter paperbacks, a small plant, or soft accessories. Keep objects clear of exposed screw tips and avoid placing breakable items where a side-facing opening could be knocked.
One Safety Point I Would Not Compromise
This tower should look casually stacked without actually being casual construction. I’d rather see a visible wall bracket than a tall arrangement that can shift when someone removes a heavy book from one side.
A Beginner-Friendly Arrangement
Use three crates in a low stepped layout instead of building upward. Join them securely, add a continuous base, and place the unit against a wall. You will still get varied cubbies without creating a tall, narrow structure.
Add Painted Cabinet Doors to a Plain Tall Bookcase
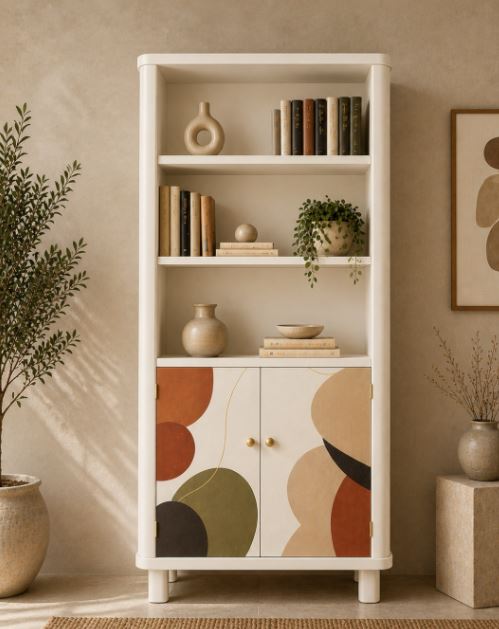
This tall cream bookcase combines open display shelves with a lower two-door cupboard. The rounded outer edges and short cylindrical legs keep the shape soft, while the doors carry overlapping abstract forms in rust, olive, beige, charcoal, black, and cream. Small round knobs sit quietly at the centre so they do not interrupt the painted design.
Adding doors is one of the most practical ways to repurpose a bookshelf because it creates a place for objects that are useful but not pleasant to display. Paperwork, chargers, games, craft supplies, or spare table linens can sit below, while books, pottery, and a trailing plant remain visible above.
The main challenge is fitting doors that stay square. A thin bookshelf side may need an internal frame to carry hinges, and the lower opening should be checked for twist before the doors are cut. Paint the abstract design only after both doors hang correctly, otherwise later trimming can remove part of the composition.
Materials and Tools
· A tall bookshelf with a strong lower section
· Plywood, MDF, or reused cabinet doors suited to the opening
· Timber strips for an internal door frame or centre stop
· Hinges, small knobs, and magnetic catches or another suitable closure
· Primer and furniture paint for the bookcase and door background
· Small quantities of leftover paint for the abstract shapes
· Pencil, flexible curve or paper templates, brushes, and low-tack masking tape
· Drill, screwdriver, square, clamps, and a plane or sanding block for careful fitting
Fit and Paint the Lower Cupboard
1. Strengthen the lower opening. Check that the sides are parallel and the bottom shelf is firmly fixed. Add internal timber strips where the hinges and catches need stronger support. If the case has no solid back, reinforce it before fitting doors so the opening stays square.
2. Cut and test the doors. Measure the opening in several places and allow a small, even clearance around each door. Cut the panels, soften the edges, and clamp them in position to check the centre gap. Then fit the hinges and adjust until both doors open without rubbing.
3. Prepare the whole bookcase for paint. Remove the doors and hardware, clean every surface, and prime according to the material. Apply the warm cream finish to the frame, shelves, legs, and door background. Let it cure before drawing the mural, because low-tack tape can still lift paint that has not hardened.
4. Plan the abstract composition across both doors. Sketch large curved forms on paper or use simple templates, then transfer them lightly to the panels while the doors sit side by side. Continue some shapes across the centre gap so the mural reads as one design. Balance dark areas with lighter open space rather than filling every corner.
5. Paint, refit, and organise the storage. Build the shapes in thin layers, keeping the edges crisp or softly hand-painted according to the look you prefer. Reinstall the hinges, catches, and knobs only after the paint has cured. Anchor the bookcase, then use the lower cupboard for less decorative items and keep the open shelves calm.
How I Would Balance the Pattern
I know it can feel tempting to use every leftover paint colour, but five or six related tones are usually enough. Repeat at least one colour on both doors and let a few shapes cross the centre line; that keeps the two panels connected.
A Quicker Door Update
Use plain doors and add one large painted circle or a pair of simple colour blocks. Peel-and-stick wallpaper can also work on removable panels, provided the edges are sealed neatly and the material suits the surface.
Mistakes That Can Weaken a Repurposed Bookshelf
Decorating Before Repairing the Frame
Paint and wallpaper can hide small marks, but they cannot correct a loose joint or bowed shelf. Repair the structure first and test the empty unit for movement. Otherwise, the new finish may crack as the cabinet shifts under weight.
Treating Every Surface Like Solid Wood
Veneer, laminate, fibreboard, and solid timber react differently to sanding, moisture, screws, and paint. Identify the material before choosing preparation methods. A light scuff and suitable primer may be safer than heavy sanding on a thin decorative surface.
Relying on Decorative Legs Without Reinforcement
New feet change where the furniture carries its weight. Mounting plates fixed only into a thin bottom panel can pull out or distort the case. Add internal blocks or a strong base panel so the load transfers into the cabinet sides.
Stacking Crates Without Mechanical Fixings
An alternating stack may look balanced while empty and still tip when one side is loaded. Join the crates to one another and anchor the assembly to the wall at several heights. Heavy contents should remain low.
Building a Tall Unit Without Allowing for the Room
Skirting boards, sloping floors, uneven walls, sockets, and ceiling moulding can all prevent a bookcase from sitting flat. Measure the actual space and plan fillers, cut-outs, or a plinth before building decorative trim.
Fitting Doors Before Squaring the Case
Cabinet doors reveal even a small twist because gaps become uneven and corners rub. Strengthen the back and level the bookcase first, then fit and adjust the doors before applying a detailed painted design.
Overloading Long Shelves
Books are heavier than most decorative objects and can cause a wide shelf to bow. Add a front lipping, centre support, or stronger board when the span needs it. Spread heavy volumes across several shelves rather than creating one dense row.
Skipping Wall Anchoring
A tall bookshelf can tip when a child climbs, a drawer or door opens, or weight shifts toward the front. Use anchoring hardware suited to the wall and the unit. Decorative styling should never be treated as a substitute for a secure fixing.
Frequently Asked Questions
Can I repurpose a flat-pack bookshelf?
Yes, provided the panels, fixings, and shelf supports remain sound. Avoid heavy sanding on laminate or thin veneer, use a compatible primer, and reinforce areas that will carry new legs, doors, or trim. Anchoring is especially important because many flat-pack units are light for their height.
Do I need to remove the back panel before decorating it?
Not always. A firm, flat back can be painted or covered in place, although removal often makes wallpaper or fabric easier to align. Replace a loose or damaged back rather than covering a surface that no longer braces the cabinet.
What paint works best on a bookshelf?
Choose a durable furniture or interior woodwork paint that suits the existing surface and follow its preparation instructions. Shelves that hold books benefit from a hard-wearing finish that will not remain tacky. Test the complete primer-and-paint system on a hidden area first.
How can I stop bookshelf shelves from bowing?
Reduce the unsupported span, add a centre support, attach a strong front edge, or replace the shelf with a thicker suitable board. Keep the heaviest books near the supports and check shelf pins for wear. A decorative back alone may not prevent sagging.
Can I use fabric instead of wallpaper on the back?
Yes. Smooth, firmly woven fabric can be mounted to thin removable panels or attached with a compatible adhesive. Test for staining and stretch first, then keep the pattern straight while smoothing from the centre outward.
How do I make a bookshelf look built in?
Level and anchor the cabinet, then add a shared plinth, side fillers, vertical face trim, and top moulding that relate to the room. Scribing the outer pieces to the wall usually looks neater than forcing a straight board against an uneven surface. Paint all visible trim together for a unified finish.
Are wooden crates strong enough for books?
Some are, but decorative crates vary greatly. Inspect the slats, corner joints, and fasteners, reinforce weak areas, and test each crate before building with it. Join and anchor the final arrangement rather than relying on friction and weight.
Let the Old Shelf Decide Its New Job
Learning how to repurpose a bookshelf starts with noticing what the existing piece already does well. A narrow cabinet may suit a floral display, three matching units can form a library wall, a low shelf can gain warmth from timber backing, and an awkward corner may be better served by securely joined crates. The most successful change is not always the most complicated one.
Which unused shelf could work harder with secure fixing, a useful back, or concealed storage?