End tables are small enough to overlook and useful enough to miss as soon as they disappear. A scratched top, unfashionable colour, or awkward shape can make one feel ready for disposal, even when its legs, frame, and proportions remain perfectly serviceable. That is often the best moment to rethink it rather than replace it.
I usually begin by asking what the table already does well. A slim pedestal table can become a compact drinks stand, a pair of drawer tables can bring useful storage to a bedroom, and a folding tray can work beside a sofa when floor space is limited.
I don’t think every makeover needs to disguise the original piece. The strongest transformations keep the useful structure and change the part that no longer suits the room.
Paint, découpage, resin-style finishes, stencils, new hardware, and careful surface preparation can all shift an end table into a completely different style. The important part is to choose a method that matches the material and the new purpose. Then the finished table feels intentional instead of merely decorated.
Check the Table Before You Change the Finish
Turn the table over and inspect every joint, screw, bracket, foot, and leg. A decorative top cannot compensate for a loose frame. Tighten hardware, repair split wood, and correct wobbling before adding paint, paper, resin, or extra weight. If the table has drawers, make sure they open cleanly and do not rely on a damaged runner.
Identify the surface as accurately as you can. Solid wood, veneer, laminate, painted MDF, metal, and previously coated furniture all need slightly different preparation. Clean away polish and grease first, then test sanding, primer, paint, or adhesive on a hidden area. I know it can feel tempting to start with the most visible surface, but preparation is what keeps the makeover from peeling or lifting later.
Measure the space where the table will live and think about how it will be used. A drinks table needs a stable, wipeable top. A bedside table needs enough clearance for drawers and lamps. A folding table still needs to close properly after decoration. Keep that function in mind while choosing every finish and detail.
Set Aside End Tables with Serious Safety Problems
Before planning a makeover, separate any end tables that may be unsafe to handle or unsuitable for household use.
Set aside end tables previously used or stored around:
- Mould, mildew or serious water damage
- Pest infestations or animal waste
- Fuel, motor oil, pesticides or strong chemicals
- Smoke, fire or heavy heat damage
- Unknown industrial or workshop substances
- Flaking old paint that may require specialist testing
- Strong odours that remain after careful cleaning
Do not repurpose a table if its legs are badly split, the frame is collapsing, particleboard is crumbling, or a folding mechanism cannot lock safely. Minor damage can often be repaired, but severe contamination or structural failure may make responsible disposal the safer option.
Examine the Table Before Choosing a Makeover
For ordinary, clean end tables, inspect:
- Loose, cracked or wobbling legs
- Weak joints, missing screws and damaged brackets
- Split wood, swollen boards or lifting veneer
- Scratches, dents, stains and peeling finishes
- Grease, furniture polish or residue that may affect paint
- Drawer runners, handles and hinges
- Folding legs, locks and moving mechanisms
- The type of surface, such as solid wood, veneer, laminate, MDF or metal
- The table’s height, balance and available surface area
- Whether the top can safely hold drinks, lamps, books or devices
Turn the table over and inspect the underside as carefully as the visible surfaces. Tighten loose hardware and complete structural repairs before painting or decorating.
Test cleaners, primers, paints and adhesives on a hidden area because different materials require different preparation. Also measure the intended space so the finished table remains practical and does not block drawers, seating or walkways.
Essential Supplies for End-Table repurposing
The materials required will depend on the chosen design, but these basic supplies are useful for most end-table projects:
- Surface cleaner and soft cloths
- Fine sanding pads or suitable sandpaper
- Wood filler and filling knife
- Wood glue, clamps and replacement screws
- Screwdrivers, drill and suitable drill bits
- Measuring tape, ruler and spirit level
- Primer suited to the existing surface
- Furniture paint, wood stain or decorative paint
- Paintbrushes, small roller and paint tray
- Painter’s tape and protective drop cloth
- Stencils, transfers, wallpaper or découpage paper
- Découpage medium or compatible adhesive
- Artist brushes for hand-painted details
- Replacement knobs, handles, feet or trim
- Clear protective finish suitable for tabletops
- Floor protectors for the table legs
- Gloves, eye protection and a dust mask
For resin-style projects, use only products designed for furniture surfaces and follow the manufacturer’s instructions for measuring, ventilation, protective equipment and curing.
Prepare the table and supplies before starting. A stable frame, correctly prepared surface and durable topcoat will help the finished piece remain attractive and useful.
Useful Supplies
· Cleaner suited to the existing finish, soft cloths, and sanding pads
· Primer and furniture paint, stain, or a compatible protective finish
· Brushes, small roller, paint tray, painter’s tape, and drop cloth
· Wood glue, screws, clamps, screwdriver, drill, and suitable bits
· Découpage paper, stencil, transfer, or artist paint depending on the project
· Replacement knobs, handles, feet, or trim when the existing hardware is unsuitable
· Eye protection, dust mask, and ventilation when cutting, sanding, or using strong products
Refresh a Pedestal End Table with Stencilled Texture
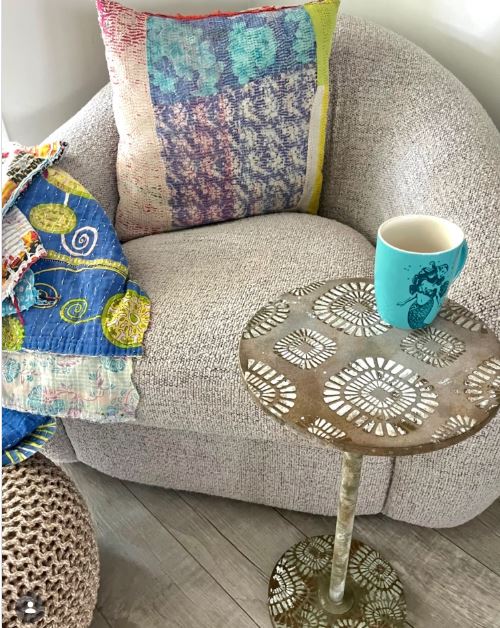
A compact pedestal table is useful beside a rounded chair because it takes up very little floor space. This version keeps the simple circular top and single support but changes the surface with a warm, aged metallic finish and repeated pale stencil marks. The pattern continues across the top and base, which helps the narrow stem feel connected to the wider surfaces.
The table appears decorative without losing its everyday purpose. A mug, small lamp, or book can still sit on the top because the pattern remains flat. That makes this a practical choice for an old drinks table or plant stand whose shape is useful but whose original finish has become dull or uneven.
What makes the idea work is restraint. The stencil is detailed, but it uses one repeated motif rather than several competing designs. I’d keep the top smooth and sealed so the table remains easy to wipe clean.
Materials and Tools
· A small round pedestal end table or plant stand
· Cleaner, sanding pad, and filler for minor surface flaws
· Primer suited to the existing material
· Furniture paint in a warm neutral or metallic-style finish
· A circular floral or geometric stencil
· Stencil brush or small foam applicator
· Clear protective finish suitable for a tabletop
A Practical Way to Recreate the Project
1. Prepare the whole table. Clean the top, stem, and base carefully, because small pedestal tables collect dust around the lower support. Tighten any loose fixings, fill visible dents, and sand only enough to create a reliable surface for the chosen primer.
2. Apply the base colour evenly. Use a brush around the shaped stem and a small roller on flatter areas. Build the finish in thin layers so the circular top remains smooth and the paint does not gather around the edge or foot.
3. Plan the stencil placement before adding paint. Test the motif on paper, then mark a few light reference points around the top. Repeat the design with similar spacing rather than trying to fill every remaining gap. Then carry a smaller number of motifs onto the base for visual balance.
4. Keep the stencil layer light. Remove excess paint from the applicator before dabbing through the stencil so the edges stay clearer. Lift the stencil straight up, clean it when paint begins to build, and allow each area to settle before placing the next repeat nearby.
5. Protect the finished surface. Check the table in natural light, soften any overly sharp areas if needed, and add a compatible protective finish to the top. Let the table cure fully before placing a mug or plant on it, even when patience suddenly feels like the hardest tool in the room.
A Detail Worth Keeping in Mind
For me, the slight variation between stencil marks is part of the appeal. The design should feel handmade, but the table still needs a level, durable surface.
Variations and Simpler Alternatives
A beginner could stencil only the tabletop and leave the pedestal plain. A darker base with pale motifs would give a stronger contrast, while a soft stone colour would create a quieter finish.
Transform Matching End Tables with Floral Découpage and Gold Details
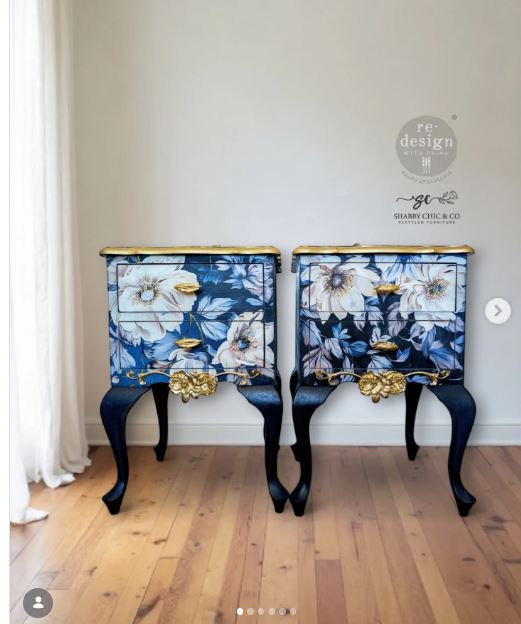
@shabbychicandco @aussienzfurnitureshow
A matching pair of end tables creates an opportunity to use a bold finish without making the room feel random. These tables use deep navy on the shaped legs and frame, floral panels across the drawer fronts, and warm gold details along the edges and hardware. The repeated design lets the two pieces read as a set even when they sit on opposite sides of a bed or sofa.
The floral imagery appears divided across the drawer fronts, so the pattern becomes part of the furniture rather than a separate picture pasted onto each section. Gold edging highlights the curved top and lower decorative details, while the dark paint gives the pale flowers enough contrast to stand out.
This is a more involved makeover because the drawer gaps, paper alignment, and hardware all need care. Even so, a simpler version can use one floral panel per table instead of covering every drawer.
Materials and Tools
· A sound matching pair of drawer end tables
· Degreasing cleaner, fine sanding pads, filler, and primer
· Furniture paint for the frames and legs
· Floral découpage paper, wallpaper, or a suitable furniture transfer
· Découpage medium or adhesive compatible with the paper and surface
· Gold paint, gilding-style wax, or metallic trim for selected details
· Cleaned original hardware or replacement knobs and pulls
· Protective topcoat compatible with the completed finish
A Practical Way to Recreate the Project
1. Remove and label the drawers and hardware. Keep each drawer with its original opening, because older furniture can have small differences that affect the fit. Clean every surface, repair loose joints, and check that the drawer fronts sit evenly before adding decorative paper.
2. Plan the floral arrangement across both tables. Lay the drawers in their final order and position the paper so important flowers do not disappear into gaps or beneath handles. Mark each section on the back of the paper, leaving a small margin for accurate trimming.
3. Paint the frames and plain areas first. Prepare and prime the existing finish as needed, then apply the dark colour in thin coats. Keep paint out of the drawer runners and tight edges so the fronts can still open without scraping.
4. Attach the decorative panels carefully. Apply the chosen medium evenly, smooth the paper from the centre outward, and work out trapped air without stretching the design. Trim the edges only when the material is stable, then seal the fronts with a finish that suits the paper and intended use.
5. Add the gold accents and reinstall the hardware. Use metallic detail on selected edges, mouldings, or handles rather than coating every surface. Then refit the drawers, adjust the gaps, and add soft bumpers if the decorated fronts touch the frame when closing.
A Detail Worth Keeping in Mind
I know it can feel tempting to make the gold more obvious, but the floral panels already carry plenty of detail. A few controlled highlights usually look richer than metallic paint on every edge.
Variations and Simpler Alternatives
Use botanical wallpaper, monochrome line art, or fabric-backed panels for a different mood. A single table could use the same approach on one drawer front while the remaining sections stay painted.
Repurpose a Small Stool into a Wood and Resin End Table
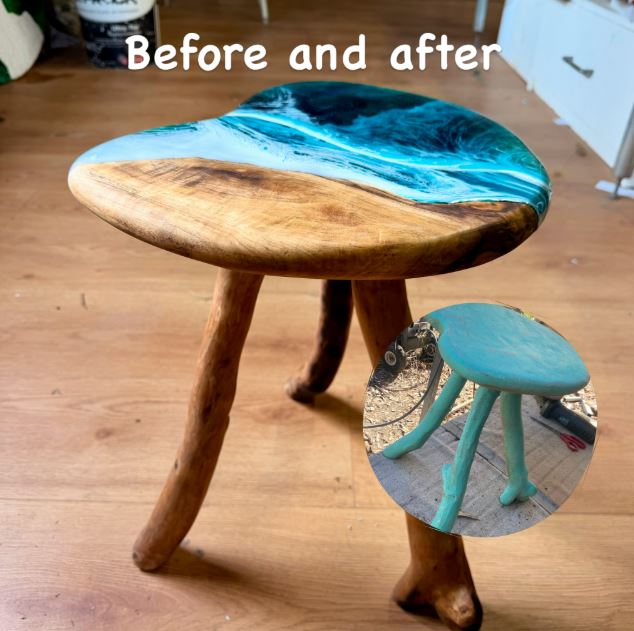
A low stool can become an end table when its height, stability, and top size suit the new job. This makeover removes the solid painted look and reveals warm wood across the irregular top and branch-like legs. A turquoise resin-style section flows through one side of the surface, creating the effect of water beside the natural grain.
The organic shape is part of the character. The top is not a perfect circle, and the legs retain a rustic, slightly uneven form. That makes it well suited to a relaxed room where a factory-smooth side table would feel too formal.
Resin work requires careful measuring, sealing, ventilation, and protective equipment. Readers who do not have that experience can recreate a similar visual effect with paint and a durable clear finish instead of pouring resin. The table still needs to remain level and strong enough for everyday use.
Materials and Tools
· A sturdy wooden stool with suitable end-table height
· Screwdriver, clamps, wood glue, and replacement fasteners as required
· Paint stripper or sanding tools appropriate to the original finish
· Dust mask, eye protection, gloves, and good ventilation
· Wood filler or compatible repair material for unwanted gaps
· Colour pigment and casting material intended for furniture surfaces, or paint for a simpler alternative
· A clear protective finish suitable for the finished tabletop
A Practical Way to Recreate the Project
1. Check whether the stool can safely become a table. Tighten the legs, inspect the underside, and press on each edge to check for rocking. A sculptural surface is not useful if the base shifts whenever a cup is placed near one side.
2. Remove the old painted finish carefully. Use the method suited to the material and coating, then sand the exposed wood without flattening every natural curve. Stop when the grain is clean and the surface feels comfortable to touch.
3. Plan the turquoise section. Mark the shape on the top and decide whether it will be a true filled recess or a painted imitation. If using a casting product, seal the surrounding wood and build secure barriers according to the product instructions so liquid material cannot escape.
4. Create the coloured detail and let it stabilise fully. Work in a ventilated area with the recommended protective equipment. For a paint-based version, layer several blues and white streaks, then blend the edges into the wood before sealing.
5. Level and protect the table. Sand or polish only as appropriate for the chosen system, finish the exposed wood, and check the top with a spirit level. Add discreet floor protectors to the legs, then test the table with light objects before putting it into regular use.
A Detail Worth Keeping in Mind
The part I would not compromise on is stability. I’d rather keep the finish simpler than add a heavy resin layer to a stool whose legs or joints are already weak.
Variations and Simpler Alternatives
A painted “river” with a high-quality clear topcoat gives a similar colour effect with less specialised work. You could also leave the wood completely natural and add colour only to the lower part of the legs.
Repurpose Round End Tables with Hand-Painted Birds and Blossoms

A set of round tables can become a coordinated feature when the same painted scene continues across each top. These three pieces use a deep navy background, flowering branches, and bright blue birds. The composition changes slightly from table to table, but the repeated colours and motifs keep the group connected.
The slim dark legs allow the artwork to remain the focus. Because the painted decoration sits on the top rather than the frame, the tables can still work with many surrounding furniture styles. They would suit a sitting area, bedroom, or reading corner where the artwork can be seen from above.
Hand painting gives the most personal result, but stencils, transfers, or découpage can simplify the process. What matters is planning the branch direction before adding tiny blossoms. The larger shapes should create the movement; small details should support it.
Materials and Tools
· One or more round end tables or nesting tables
· Cleaner, sanding pads, primer, and base paint
· Artist paint or furniture-compatible decorative paint
· Fine detail brushes and a small flat brush
· Chalk, tracing paper, or removable transfer paper for the main outline
· Painter’s tape for protecting the rim or legs
· Clear protective finish suitable for tabletops
A Practical Way to Recreate the Project
1. Prepare every table in the set the same way. Clean, repair, and prime the tops so the base colour looks consistent. Paint the legs separately if needed, keeping the finish thin around joints and screw points.
2. Apply the dark background and let it settle. A smooth navy or deep indigo surface gives the flowers and birds strong contrast. Check the colour under the room’s normal lighting before beginning the artwork, because very dark paint can look different near a window than it does under a lamp.
3. Map the main branches first. Lightly draw or transfer the sweeping lines, making sure each table has a clear focal area. Then paint the branches and larger leaf or flower groups before adding birds, tiny petals, and scattered highlights.
4. Work across the whole set instead of finishing one table completely. Paint the same colour on each piece while it is mixed, then return with the next colour. This keeps the birds, blossoms, and branch tones consistent even though the exact layouts differ.
5. Protect the artwork and test the finished tops. Apply a compatible clear finish when the paint is ready, keeping the surface free from dust. Then place the tables together and separately to confirm that each composition works on its own as well as within the group.
A Detail Worth Keeping in Mind
For me, the empty navy areas matter just as much as the flowers. I don’t think every part of the tabletop needs decoration; open space keeps the birds and branches readable.
Variations and Simpler Alternatives
A beginner could use one branch and a single bird on each table. Leaves in one colour family or a simple moon-and-branch design would create a calmer alternative.
Repurpose a Folding Tray Table into a Vintage Floral End Table
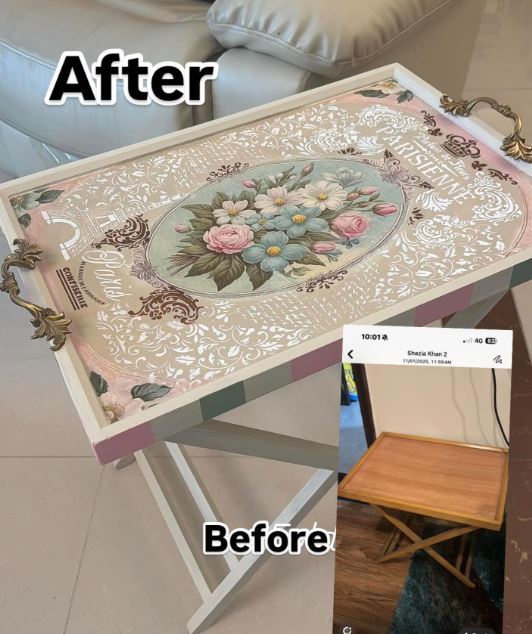
A folding tray table is useful because it can move between rooms and store flat, but plain versions often look temporary. This makeover gives the top a vintage decorative panel with a central floral bouquet, ornate lettering, soft neutral colours, and small blocks of pastel colour around the edge. Curved metal handles make the tray feel more substantial and easier to lift.
The folding base remains simple, which is important. The top already carries the visual detail, so the support does not need competing patterns. This kind of table could sit beside a sofa, hold a laptop briefly, or serve drinks, provided the decorative finish is protected and the folding mechanism remains sound.
The main challenge is preserving movement. Added trim, paper, paint, or handles must not prevent the legs from folding or make the top unbalanced. Test the mechanism after every structural change rather than waiting until the makeover is complete.
Materials and Tools
· A sound folding tray table with a reliable locking mechanism
· Cleaner, sanding pad, filler, and primer
· Furniture paint for the frame and border
· Vintage-style floral paper, transfer, or stencil design
· Découpage medium or suitable adhesive
· Ornate handles with screws sized for the tray thickness
· Drill, screwdriver, ruler, and painter’s tape
· Protective finish suitable for a frequently handled tabletop
A Practical Way to Recreate the Project
1. Inspect the folding frame and tray. Open and close the table several times, tighten loose fasteners, and make sure the legs lock correctly. Mark the areas where the frame touches the underside so new screws or decorative layers do not interfere with movement.
2. Prepare and paint the plain sections. Clean and lightly sand the tray and base as needed, then prime the surfaces. Apply the frame colour and any pastel edge blocks before adding the central image, because it is easier to correct paint without working around finished paper.
3. Position the floral design. Centre the main bouquet or panel on the tray and check how lettering or border details sit around it. Attach the paper or transfer carefully, smoothing from the middle outward and keeping the corners flat.
4. Add the handles and finishing details. Measure both sides so the handles sit at matching positions, drill pilot holes where appropriate, and protect the decorative surface while fastening them. Do not overtighten screws against thin tray material.
5. Seal and retest the whole table. Protect the top with a compatible finish, allow it to cure, and then fold and unfold the base again. Check that the table stands level, the handles feel secure, and the finished surface can cope with the objects you intend to place on it.
A Detail Worth Keeping in Mind
One detail I wouldn’t skip is testing the folded position before drilling for handles. A handle screw that catches the frame can turn a useful table into a very decorative object that no longer closes.
Variations and Simpler Alternatives
Use a map, botanical print, or fabric panel instead of the floral design. For a simpler version, paint the tray in two colours and add one small transfer in the centre.
End Table Makeover Problems That Are Easier to Prevent
Decorating Before Repairing the Frame
Paint, paper, and artwork can hide a loose joint without fixing it. Repair wobbling legs, split rails, weak drawer supports, and folding mechanisms first. A table should remain stable when pressure is placed near every edge, not only at the centre.
Using the Same Preparation on Every Surface
A laminate top does not behave like solid wood, and a thin veneer should not be sanded aggressively. Identify the material, clean away polish and grease, and test the full paint or adhesive system in a hidden place before treating the visible surface.
Adding Detail Where the Table Needs to Move
Folding legs, drawer gaps, hinges, and removable trays need clearance. Thick paint, paper edges, handle screws, and added trim can stop them working. Dry-fit and test moving parts at each stage.
Making the Top Decorative but Impractical
An end table usually holds drinks, lamps, books, or devices. Raised embellishments, rough texture, and delicate unsealed paper can make ordinary use difficult. Keep the main surface level and choose a finish that can be cleaned appropriately.
Ignoring the Weight of New Materials
Resin, heavy hardware, layered trim, and thick panels can change the balance of a small table. Check the frame and legs before adding weight, and keep heavier additions centred where the structure can support them.
Crowding the Design
Floral panels, birds, stencils, metallic details, and decorative handles all need room to be seen. A little plain surface helps the makeover look considered. Remove one element when the design begins to compete with itself.
Skipping the Final Stability Test
Place the table on its intended floor, check it with a level, and test it with light everyday objects before regular use. Add proper floor protectors and re-tighten hardware after the piece has settled.
Frequently Asked Questions
Can any end table be repurposed?
Many can, but the frame must be structurally sound. Tables with severe swelling, crumbling board, badly split legs, or unsafe folding mechanisms may require more repair than they are worth. A simple sturdy frame is usually the best starting point.
Do I need to sand an end table before painting it?
That depends on the original finish and the coating system you plan to use. Glossy or polished surfaces often need cleaning and deglossing, while thin veneer needs a gentle approach. Test a hidden area and follow the preparation guidance for the chosen products.
Can I use wallpaper or fabric on a tabletop?
Yes, provided it is attached evenly and protected with a finish suited to the material and intended use. Keep seams away from high-wear edges and make sure the completed top remains flat enough for everyday objects.
Is resin suitable for a beginner end-table makeover?
Resin-style work can be demanding because it involves accurate mixing, sealing, containment, ventilation, and curing. A painted imitation with a clear protective finish is a more approachable way to create a similar river or marbled effect.
How can I stop an end table from wobbling?
Tighten the joints and hardware first, then check whether the legs are equal and the floor is level. Repair structural problems rather than hiding them with felt pads. Small floor protectors can help only after the frame itself is sound.
What protective finish should I use?
Choose a finish compatible with the paint, paper, transfer, or timber beneath it and suitable for the way the table will be used. A decorative bedroom table and a drinks table may need different levels of protection, so follow the product guidance rather than assuming one coating suits everything.
Can matching tables have slightly different designs?
Yes. Keep the base colour, hardware, and main motif connected, then vary the details. For example, two tables can use different sections of the same floral paper or mirrored bird-and-branch compositions while still reading as a pair.
Give a Small Table a Job That Suits the Room
Learning how to repurpose end tables begins with their useful proportions. A pedestal stand already fits beside a chair, a drawer table provides storage, a low stool can support a compact top, and a folding tray can move where it is needed. The makeover works best when it strengthens that function rather than hiding it beneath decoration.
Choose one change that solves the biggest problem first. That may be a more durable top, a calmer colour, a patterned drawer front, or a better use for a table that has been sitting in storage. Then add only the details that support the new purpose. I’d rather finish one stable, easy-to-use table than rush through five coats and discover the drawer no longer opens.
Which forgotten end table in your home could become useful again with a thoughtful new finish?