A kimono can remain folded for years because the fabric feels too special to cut, even when the garment is no longer being worn. The weave, placement of the motifs, and careful finishing still deserve attention, but keeping every piece untouched is not the only respectful choice. A thoughtful remake can carry those details into something that is used, seen, and enjoyed again.
The part I find most interesting is deciding what the cloth already wants to become. A wide sleeve may provide enough fabric for a bag panel, a damaged hem may leave the upper section suitable for a cropped jacket, and several small patterned pieces can work together when one full panel is no longer available. I don’t think every kimono needs the same solution.
The best results usually come from slow planning rather than complicated sewing. Check the condition first, preserve the strongest motifs, support delicate fabric where it will carry weight, and choose a shape that suits the amount of usable cloth. That approach keeps the finished piece practical without flattening the character of the original textile.
Before You Cut the Kimono
Older kimono fabric may look strong while hiding weak folds, tiny splits, faded areas, or previous repairs. Lay the garment flat in good light and inspect both sides. Gently flex the cloth around the shoulders, underarms, hem, and fold lines, because these areas often receive the most strain.
Identify whether the textile is silk, a silk blend, cotton, wool, rayon, or a synthetic fabric before washing or pressing it. When the fibre is uncertain, avoid soaking the whole garment and test any cleaning method on a hidden area. Valuable, ceremonial, or historically significant pieces are better assessed by a textile professional before they are altered.
Unpick seams only when doing so gives you useful flat panels. Some kimono are built from long rectangular sections, which can be helpful for pattern placement, but the fabric may carry old needle holes or narrow seam allowances. Photograph the garment before dismantling it and label the pieces as you separate them; otherwise, a calm afternoon of unpicking can turn into a fabric jigsaw with no picture on the box.
Protect the Motifs
Place paper pattern pieces over the fabric before cutting and mark the motifs you want to keep whole. A crane, flower cluster, crest, or border may look balanced on the original garment but become awkward when split across a new seam. Move the pattern several times until the important details sit where they can be seen.
Support Delicate Cloth
Fine kimono silk may need a lightweight backing, lining, or interfacing, especially for bags, collars, button areas, and other places that will be handled often. Test the support on a scrap first. It should add stability without making the fabric stiff or changing its drape.
Set Aside Kimonos That Should Not Be Cut
Not every kimono is suitable for a cutting project. Set it aside if it is:
- A family heirloom with strong sentimental value
- An antique or potentially collectible piece
- A formal wedding or ceremonial kimono
- Signed or linked to a known maker
- Decorated with hand painting, embroidery, gold thread, or delicate embellishments
- Marked with family crests
- Made from rare or particularly fine silk
- In excellent original condition
- Borrowed or owned by another family member
- Already weakened by age, moisture, or insects
- Covered with widespread mold
- Giving off a strong musty smell
- Brittle, powdery, or tearing when lightly handled
- Stained by an unknown substance
- Damaged around painted or embroidered areas
- Constructed with decorative sections that may have cultural or historical importance
Do not cut an unfamiliar kimono simply because it is old or no longer worn. Ask the owner about its history and, where necessary, seek advice from a textile specialist, vintage clothing dealer, or kimono expert.
A valuable kimono can still be displayed without permanent alteration. Consider hanging it on a kimono stand, placing it in a deep frame, or using a padded display rod instead.
For Ordinary, Clean Kimonos, Inspect:
- The fabric type, such as silk, wool, cotton, linen, rayon, or polyester
- The strength of the fabric
- Weakness along folds and creases
- Small holes or signs of insect damage
- Water marks and faded areas
- Yellowing around the collar, cuffs, and lining
- Loose seams and damaged hems
- Fraying along the edges
- Tears near the sleeves and underarm area
- Worn sections around the collar
- Loose embroidery, beads, or metallic thread
- Areas where the colour has transferred
- Previous repairs and added patches
- Differences between the outer fabric and lining
- The direction of the print or woven pattern
- Large decorative motifs that should remain complete
- Repeated patterns that may need to match at the seams
- Enough usable fabric for the planned project
- Care labels or cleaning instructions
- Any smell of smoke, perfume, dampness, or storage chemicals
Gently pull the fabric at an inside seam to test its strength. Stop if the fibres separate, crack, or leave fine dust on your fingers. Fabric that looks sound from a distance may be too weak for a bag, jacket, or upholstered item.
Study the design before deciding where to cut. Kimono patterns are often arranged across sleeves, back panels, and lower sections. Mark the parts you want to preserve so an important flower, bird, landscape, or embroidered detail is not divided accidentally.
Measure each usable panel rather than relying only on the overall size of the garment. Seams, stains, worn areas, and pattern placement may reduce the amount of fabric available.
Useful Materials and Tools
- Large clean table or cutting surface
- Clean cotton sheet to protect delicate fabric
- Tape measure
- Clear ruler
- Paper for making patterns
- Pencil or tailor’s chalk
- Washable or removable fabric marker
- Fabric scissors
- Small embroidery scissors
- Seam ripper
- Fine sewing needles
- Pins suitable for delicate fabric
- Fabric clips
- Matching thread
- Sewing machine with a fine or suitable needle
- Spare sewing-machine needles
- Lightweight interfacing
- Suitable lining fabric
- Acid-free tissue paper
- Pressing cloth
- Iron with adjustable heat settings
- Small containers for buttons and removed pieces
- Mild fabric cleaner suitable for the fibre
- Clean white cloths for testing colourfastness
- Soft clothes brush
- Hand-sewing thread for delicate areas
- Zips, buttons, clasps, handles, or ribbon required for the project
- Bias binding for finishing raw edges
- Optional rotary cutter and cutting mat
- Optional overlocker or zigzag stitch for fraying fabric
- Optional magnifying glass for checking fine damage
Wash or clean the kimono only when you know the fabric and dye can safely handle it. Silk, metallic decoration, hand-painted areas, and older dyes may react badly to water, heat, or ordinary detergent.
Test a hidden area before using water, stain remover, steam, fabric glue, or an iron. Use a pressing cloth and begin with a low temperature. Avoid placing a hot iron directly on embroidery, painted designs, metallic thread, or unfamiliar fabric.
When possible, open existing seams with a seam ripper instead of cutting through the garment. This preserves more fabric and gives you straighter panels to use in the new project. Keep all leftover pieces, as small sections can be turned into pockets, trims, covered buttons, ornaments, or repair patches.
Turn an Old Kimono into a Ruffled Statement Jacket
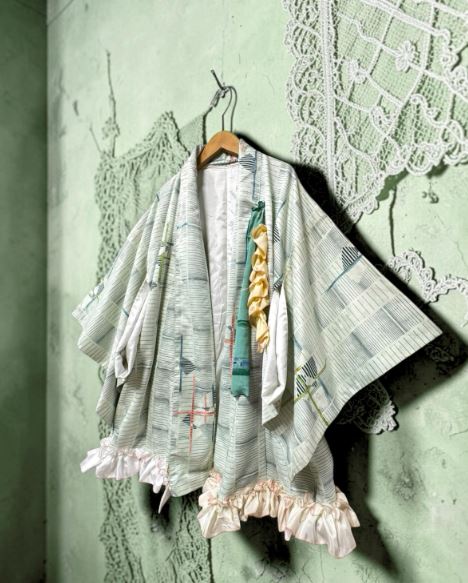
This version keeps the broad sleeves and open front that make a kimono comfortable, then changes the overall proportion with a shortened body and a gathered ruffle around the lower edge. The original cloth has a quiet geometric pattern, while the pale trim adds movement and separates the remake from a simple shortened robe.
The ruffle is useful as well as decorative. It can replace a damaged or uneven hem, add back a little length after shortening, and hide joins where the original fabric was too narrow. A contrasting strip or tie at the front gives the eye one more vertical detail without competing with the main pattern.
For me, the relaxed shape matters more than making every edge perfectly symmetrical. The sleeves can fall softly and the ruffle can gather unevenly by a small amount, but the neckline and front opening still need to hang cleanly. That balance keeps the jacket looking intentional rather than unfinished.
Materials and Tools
· An unwanted kimono with a sound upper body and sleeves
· Lightweight satin, silk, rayon, or soft reclaimed fabric for the ruffle
· A loose jacket pattern, or a well-fitting open jacket to use as a shape reference
· Fine thread, hand-sewing needle, pins or clips, and fabric scissors
· Sewing machine with a suitable fine needle, if the fabric can be machine sewn
· Lightweight stay tape or interfacing for the neckline and front edges
· Optional narrow contrasting textile strip for a tie or decorative front detail
· Pressing cloth and iron used carefully for the fabric type
Make the Ruffled Jacket
1. Assess the garment and choose the new length. Try the kimono on over the kind of clothing you expect to wear beneath it, then mark the proposed hem with removable thread or clips. Check the back and both fronts in a mirror rather than measuring from only one point. Preserve enough fabric for a sensible seam allowance, and move the line if it cuts through a motif you would rather keep whole.
2. Stabilise the neckline and front opening. Before shortening anything, check whether the original collar and front bands can remain in place. Reinforce weak sections from the inside with light stay tape or a narrow supporting strip, taking care not to flatten the cloth. If the original edge is damaged, copy its width and rebuild only the affected area with matching or coordinating fabric.
3. Shorten and level the body. Lay the kimono flat with the side seams aligned, mark the new lower edge, and cut only after checking the line twice. Finish the raw edge with a narrow seam, binding, or overlocked finish suited to the fabric. Then hang the jacket for a while and recheck the hem, because soft cloth can shift once it is no longer held by the original weight.
4. Prepare and attach the gathered trim. Join strips of lightweight fabric until they are long enough to travel around the lower edge without excessive bulk. Finish the lower side of the strip first, run gathering stitches along the upper side, and distribute the fullness while the jacket lies flat. Pin or baste the trim in sections, then stitch it securely and press the seam gently toward the body.
5. Finish the sleeves and front detail. Keep the wide sleeves when they are sound, or shorten them slightly if the new body length makes them feel heavy. Add a narrow contrasting strip, removable scarf, or soft tie near the front only after checking how the jacket hangs when worn. Reinforce loose thread ends, press through a cloth, and let the garment rest on a broad hanger before making any final adjustments.
I’d keep the ruffle lighter than the main kimono fabric. A heavy trim can drag the hem down and make the open front swing awkwardly. For a quieter variation, replace the full ruffle with a narrow pleated band, piping, or a plain facing made from leftover lining.
Turn Kimono Fabric into a Durable Everyday Backpack
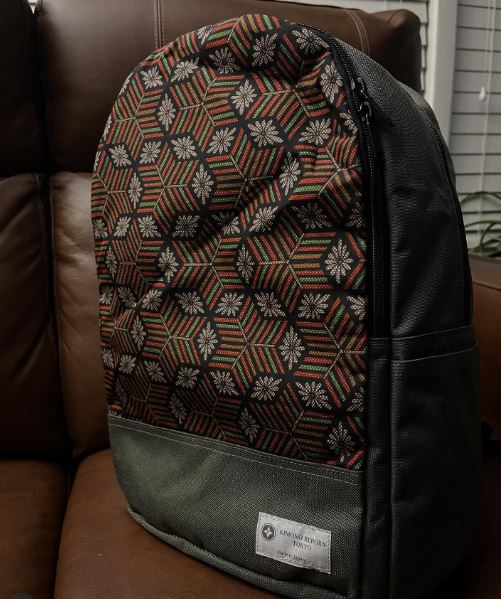
A backpack asks much more of old textile than a decorative cushion or wall panel. The front may carry the kimono pattern, but the base, sides, straps, zip area, and pocket openings need fabric that can cope with repeated handling. This design solves that problem by using the patterned cloth as a featured panel and surrounding it with darker, stronger material.
The placement also protects the visual rhythm of the original textile. Rather than cutting the pattern into many small pieces, one broad section covers most of the front. The black side panels frame it, and the reinforced lower band keeps the more delicate cloth away from the surface when the bag is put down.
I don’t think every scrap should be forced into the outside of the bag. Smaller kimono pieces can line an internal pocket, cover a key strap, or become a removable zip pouch. Keeping some areas plain gives the main panel room to stand out and makes the backpack easier to repair later.
Materials and Tools
· A strong, undamaged kimono panel large enough for the front feature
· Hard-wearing canvas, denim, upholstery cloth, or bag fabric for the sides, base, and back
· Firm lining fabric and a suitable lightweight or medium bag stabiliser
· Main zip, optional pocket zip, sliders, strap webbing, and adjustment hardware
· Matching thread and stronger topstitching thread where appropriate
· Backpack pattern or carefully measured template
· Sewing machine capable of handling the combined layers
· Fine needle for the kimono panel and a stronger needle for heavier construction stages
· Clips, ruler, removable marker, scissors, and seam ripper
Build the Backpack Without Overworking the Kimono Cloth
1. Select and back the feature panel. Choose a kimono section with no weak fold lines and place the backpack template over it until the motif feels centred. Cut the decorative cloth slightly larger than the final front piece, then support it with a compatible backing or stabiliser. Baste the layers together within the seam allowance so the silk or fine weave cannot creep while the bag is assembled.
2. Construct the front and protective lower band. Cut a durable lower panel and any front pocket pieces from the stronger bag fabric. Join the lower band to the backed kimono panel with the decorative side protected from rough surfaces, then press the seam carefully from the reverse. Topstitch only when the fabric tolerates it; otherwise, understitch or hand-secure the seam so the edge stays flat.
3. Prepare the zip, sides, and base. Make the zip panel, side gussets, and base from durable fabric, adding stabiliser where the finished bag needs structure. Mark the centre points on every section before joining them, because a small shift can twist the entire backpack. Clip the layers rather than pinning repeatedly through delicate cloth, then sew slowly around curves and bulky joins.
4. Build the back and straps securely. Use strong fabric and webbing for the back panel, carry handle, and shoulder straps rather than relying on kimono silk in load-bearing areas. Anchor the straps into reinforced sections and test the alignment before closing the lining. Add padding if desired, but keep the strap ends and hardware accessible enough to inspect for wear.
5. Add the lining and complete the final assembly. Construct the lining with internal pockets before attaching it to the outer bag. Join the lining around the zip opening or turn it through a planned gap, then close the opening neatly by hand or machine. Check every seam, zip end, strap anchor, and corner with the bag empty before gradually testing it with light contents.
One detail I wouldn’t skip is a full backing behind the kimono front. It reduces strain and gives you something stronger to stitch into. A simpler beginner version could use the patterned cloth on a ready-made canvas backpack pocket, avoiding the most technical construction while still giving the fabric a useful new place.
Combine Kimono Scraps into a Cropped Patchwork Jacket
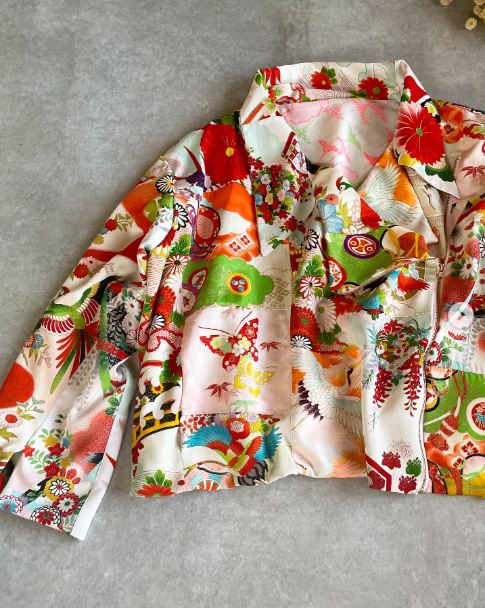
Patchwork works especially well when a kimono has damage scattered across several panels. Instead of trying to cut one large flawless piece, you can save smaller sections and arrange them into new cloth. The jacket shown here uses many motifs, but the cream backgrounds and repeated red, orange, green, and gold tones stop the surface from feeling random.
The boxy cropped shape is a practical choice. It needs less fabric than a long coat, allows straighter pattern pieces, and gives dense patchwork enough structure. A broad collar creates a calm area around the neckline, while the long sleeves let the print continue without adding many separate trims.
The first arrangement rarely becomes the final one, and that’s normal. Move bright motifs away from each other, rotate quieter pieces, and check the jacket from a distance. I’d rather unpin the whole layout twice than sew one very dominant flower into an awkward position and notice it forever.
Materials and Tools
· Usable sections from one or more unwanted kimonos
· Lightweight backing fabric or fine fusible/non-fusible support suited to the textiles
· A simple cropped jacket pattern with relatively broad pieces
· Pattern paper for dividing the jacket into planned patchwork sections
· Fine thread, hand-basting thread, pins or clips, and sharp scissors
· Sewing machine with a fresh needle suitable for the fabric
· Light lining fabric to protect the patchwork seams
· Bias binding, facing fabric, or saved kimono edging for neat internal finishes
· Pressing cloth and iron used cautiously
Piece the Patchwork Before Building the Jacket
1. Sort the scraps by strength, colour, and motif. Remove any cloth that tears easily when gently handled, then group the remaining pieces by background colour and visual weight. Separate large focal motifs from smaller fillers. Photograph a few possible groups before cutting so you can compare combinations without trying to remember which arrangement felt balanced.
2. Create full-size pattern maps. Trace the jacket pattern pieces onto paper and draw patchwork divisions across each shape. Keep the joins away from darts, buttonholes, pocket openings, and other areas that already contain construction stress. Number every paper section and add seam allowances before using the pieces to cut the kimono scraps.
3. Assemble each patchwork panel. Join the scraps into larger units one seam at a time, using a fine stitch and supporting weak edges when needed. Press each seam through a cloth before adding the next piece, changing the seam direction so bulky ridges do not build up. Then place the completed patchwork over a lightweight backing and baste the two layers together.
4. Cut and sew the jacket. Once the patchwork panels are stable, use the original jacket pattern to trim them to their exact final shapes. Sew the shoulders, body, sleeves, and collar in the order recommended by the pattern, checking that important motifs are not swallowed by seams. Handle the pieces from underneath rather than pulling on the patchwork edges.
5. Line and finish the garment. Add a full lining to cover the many internal joins and reduce friction against clothing. Finish the front and hem with a facing, binding, or carefully turned edge that does not make the jacket bulky. Let the finished garment hang, check for rippling or strain, and reinforce any seam where several patchwork joins meet.
A smaller introduction to this method is a patchwork collar, pocket, or back yoke added to a plain jacket. You still get to arrange the motifs, but you avoid making an entire garment from many small seams. Another useful option is to keep each sleeve mostly plain and concentrate the patchwork on the front and back body.
Turn Kimono Silk into Matching Tie-Front Shirts

A solid-coloured or lightly patterned kimono can be surprisingly useful for modern separates because the fabric does not need complex placement. These two shirts use a relaxed camp collar, short sleeves, and narrow front ties. The boxy cut suits fluid cloth and avoids the strain that fitted darts or tight fastenings might place on older silk.
Making two related garments from one kimono is possible when the pattern pieces are compact and the original panels remain broad. They do not need to match exactly. One shirt can use a textured or embroidered section near the neckline while the second stays plain, provided the colour and general shape connect them.
What matters here is controlling the slippery fabric. Cutting on a single layer, basting before machine sewing, and supporting the front edges will save more frustration than rushing toward the finished ties. The ties themselves should be light and flexible; thick knots can pull the fronts out of shape.
Materials and Tools
· A kimono with enough strong silk or similarly fluid fabric for one or two short shirts
· A loose camp-collar or tie-front blouse pattern
· Fine lightweight lining or facing fabric where the main textile needs support
· Fine sharp needle, smooth thread, hand-basting thread, and small pins or clips
· Pattern weights and tissue or paper beneath slippery fabric while cutting
· Lightweight stay tape for shoulder seams and front edges
· Narrow loop turner or bodkin for making the ties
· Pressing cloth and an iron used at a safe setting for the fibre
Cut and Sew the Tie-Front Shirts
1. Plan both garments before cutting either one. Trace all required pattern pieces for the two shirts and arrange them over the opened kimono panels at the same time. Prioritise fronts, collars, and sleeves, then use smaller remaining areas for facings and ties. Mark each piece clearly so the two sets do not become mixed after cutting.
2. Stabilise and cut the silk accurately. Place tissue or clean paper beneath slippery fabric and cut in a single layer when possible. Transfer notches with thread marks or a removable method that will not stain. Add lightweight support to the front edges, collar sections, and any decorative panel before the pieces are handled repeatedly.
3. Assemble the shoulders, collar, and sleeves. Stay-stitch curved neckline edges, reinforce the shoulders, and baste the main seams before machine stitching. Build the collar carefully so both points sit evenly without forcing the silk into a sharp crease. Attach the short sleeves while the garment remains open at the sides, then check that the fabric falls smoothly from the shoulder.
4. Make and position the front ties. Cut narrow strips on the grain that best suits the cloth, stitch them into tubes or neatly folded bands, and turn them without stretching. Pin the ties to the front edges while the shirt is on a dress form or hanger, checking that each pair meets naturally. Secure their ends into reinforced facings rather than stitching them onto one unsupported layer.
5. Close the sides and finish the hems. Sew the side and underarm seams, then finish the allowances with a method that remains soft against the body. Level the cropped hem after the shirt has hung, and use a narrow finish that will not create a stiff ridge. Press lightly, remove all basting, and test the ties while moving your arms to make sure the front does not pull open unevenly.
For a beginner-friendly version, make one shirt first and use the remaining fabric for a scarf, camisole panel, or matching pouch. If ties are not practical, small fabric loops and covered buttons can create a softer closure, though the button areas will still need support.
Mistakes That Can Damage Kimono Fabric
Cutting Before Mapping the Motifs
A pattern piece may fit physically while splitting the most important flower, bird, crest, or border. Trace the garment pattern on transparent paper and move it across the cloth before cutting. Leave yourself enough room to adjust the seam line rather than treating the first placement as final.
Assuming Old Silk Is Strong Everywhere
Age, storage, perspiration, and repeated folding can weaken one part of a kimono while another remains sound. Test the cloth gently and avoid placing fragile areas at shoulders, strap anchors, pocket openings, or elbows. Use weak but attractive sections only where they can be fully backed and protected.
Using Heavy Interfacing on Fluid Cloth
A stiff support can change the drape, create a visible ridge, or make old silk crack along the edge. Test the lightest suitable stabiliser on a scrap and compare it after pressing. Bags may need firm structure, but the structure can come from a separate backing rather than the kimono layer itself.
Pressing Without a Test
Some dyes, metallic threads, textured weaves, and older fibres react poorly to heat, moisture, or direct contact with an iron. Use a pressing cloth, work from the reverse, and test a hidden scrap first. Pressing should settle a seam, not flatten every feature in the fabric.
Letting Decorative Fabric Carry the Load
Backpack straps, bag bases, button areas, and tight ties all experience repeated stress. Reinforce these parts with strong cloth and secure the load-bearing stitches into that support. The kimono textile can remain visible without being asked to do the hardest structural work.
Skipping Basting on Slippery Layers
Fine cloth can creep several millimetres while it is being machine sewn, which is enough to twist a collar or distort a patchwork panel. Hand-baste important seams and remove the stitches after the permanent seam is complete. It takes longer at the table and usually saves time with the seam ripper.
Overfilling the Design
Kimono fabric already carries colour, texture, sheen, and detailed imagery. Extra ruffles, trims, buttons, and contrast panels can compete with those features. Choose one strong change and allow some plain space around it, especially on smaller garments and bags.
Discarding the Small Offcuts Too Soon
Narrow strips can become ties, piping, tabs, covered buttons, labels, or repairs for the finished piece. Sort usable scraps before sweeping the table. Even pieces that are too small for a visible feature may help reinforce a seam from the inside.
Frequently Asked Questions
Can a beginner repurpose a kimono?
Yes, but the first project should match your sewing experience and the condition of the fabric. A scarf, lined pouch, applied pocket, or simple open jacket is easier than a structured backpack or fully patchworked garment. Begin with a less valuable piece and practise on scraps before cutting an important panel.
Should I wash a kimono before cutting it?
That depends on the fibre, dye, construction, and value of the garment. Some cotton or synthetic pieces may tolerate careful cleaning, while older silk, metallic thread, embroidery, or unstable dye may not. Test a hidden area or seek specialist advice rather than automatically putting the whole garment in water.
How do I stop kimono silk from slipping while I cut it?
Cut in a single layer on a large flat surface and place tissue or clean paper beneath the cloth. Use pattern weights, fine pins within the seam allowance, and sharp scissors or a rotary cutter. Mark each piece before lifting it so the grain and orientation remain clear.
What interfacing works with vintage kimono fabric?
There is no single answer because kimono textiles vary widely. Use the lightest support that provides the required stability, and test it on an offcut for drape, colour change, adhesion, and visible texture. A sewn backing is often safer when heat or adhesive may affect the fabric.
Can damaged kimono sections still be used?
Small damaged areas can sometimes be avoided, covered by a seam, or supported from behind, but cloth that tears easily should not sit in a high-stress position. Patchwork is useful because it lets you cut around damage and save the sound motifs. Be honest about the fabric’s strength rather than relying on appearance alone.
How should I care for the finished item?
Keep the original fibre and new construction in mind. A structured bag may need gentle surface cleaning, while a silk jacket may be better aired and professionally cleaned when necessary. Store garments on a suitable hanger or folded with support, and keep them away from strong sunlight and damp conditions.
Is it respectful to cut and repurpose a kimono?
Context matters. A mass-produced, damaged, inherited, ceremonial, antique, or culturally significant kimono may each deserve a different decision. Learn what you can about the piece, avoid altering items of clear historical importance without advice, and use the fabric thoughtfully rather than treating it as an anonymous print.
Let the Kimono Fabric Choose Its Next Form
Learning how to repurpose a kimono begins with looking closely at what remains usable. A sound upper section may become a loose ruffled jacket, one strong patterned panel can carry the front of a backpack, scattered motifs can be pieced into patchwork, and broad silk lengths may provide enough cloth for simple tie-front shirts. The original garment does not need to disappear for the new object to feel useful.
Start with the smallest decision: inspect the cloth, identify one feature worth preserving, and choose a project that does not ask the fabric to carry more strain than it can handle. Then make a paper plan before reaching for the scissors. That pause is often the difference between saving a textile and merely using it up.
I’d be interested to know which part of an unworn kimono you would save first: the sleeves, a border, a single large motif, or the quiet fabric between them?