An old armoire can feel awkward once its original job disappears. The television it once concealed may be gone, the hanging rail may no longer suit your clothes, and the deep interior can become a place where household clutter quietly retires.
That large enclosed space is also what makes the piece worth reconsidering. Shelves, doors, drawers, and a solid cabinet body can support a coffee station, a hidden bar, playroom storage, bathroom linens, or dining-room supplies. Closing the doors then returns the room to a calmer state.
I don’t think every armoire needs to be painted before it becomes useful again. Sometimes the best change happens inside. Removing an outdated television shelf, adding adjustable storage, or lining a dark back panel may be enough to give the cabinet a clear new purpose.
Before choosing a project, look at the weight, condition, depth, ventilation, and access to electricity or plumbing. An armoire is a substantial piece of furniture, so the clever idea still needs to work safely after the doors close.
Inspect the Armoire Before Planning Its New Role
Empty the cabinet completely and remove loose shelves, rails, cable covers, and old brackets. Keep reusable hardware together until the layout is final; a shelf pin or metal support that looks unnecessary today may solve a spacing problem later.
Check the cabinet for:
· Loose joints around the base, top, or doors
· Sagging shelves or cracked shelf supports
· Water damage and swollen fibreboard
· Mould, persistent odours, or insect damage
· Peeling veneer and sharp broken edges
· Doors that swing unevenly or no longer latch
· A weak or missing back panel
· Old electrical components or damaged cables
· Enough internal depth for the intended equipment
· A safe route for power cords and ventilation
· A level base that does not rock
· A practical way to anchor the furniture to the wall
Large armoires can tip forward, especially when doors are open or children pull on shelves. Anchor the finished cabinet to suitable wall structure and get help when moving or lifting it.
Clean the interior with a method suited to the material. Painted wood and sealed veneer usually need only a lightly damp cloth, while unfinished surfaces may require vacuuming and gentle brushing. Allow the cabinet to dry before adding paper, paint, lighting, or stored fabrics.
Measure the door opening as well as the interior. A coffee machine or storage bin may fit inside the cabinet but still refuse to pass through the narrower frame. I know that sounds obvious, but furniture has a talent for saving that little surprise until the item is already halfway across the room.
Turn a Television Armoire Into a Coffee Station
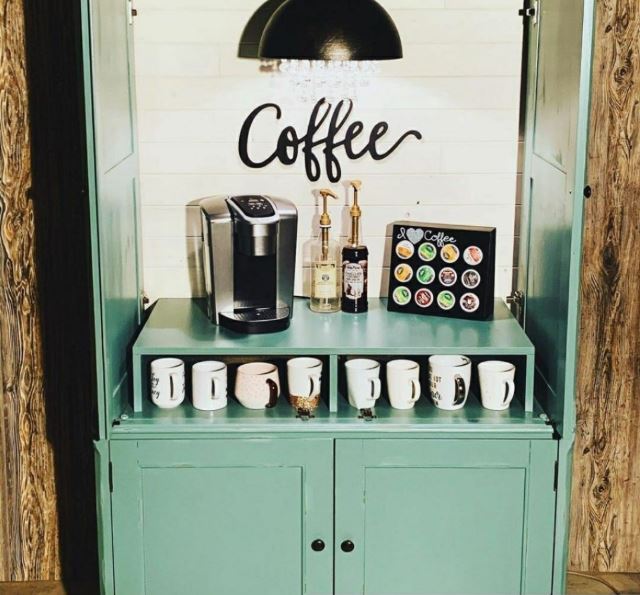
A television armoire already has a broad equipment shelf, lower storage, and cable access, so it adapts naturally to a coffee station. The main shelf can hold the machine and kettle, while upper shelves display mugs and lower compartments store filters, tea, and unopened supplies.
The interior needs to tolerate small spills and regular wiping. A washable shelf liner or sealed work surface is more practical than delicate paper directly beneath the machine.
Materials and Tools
· Clean, structurally sound armoire
· Coffee machine and other equipment for measuring
· Adjustable shelf or strong replacement board
· Washable shelf liner
· Small mug hooks or shelf riser
· Storage baskets or trays
· Drill and suitable bits
· Cable grommet or smooth edge protector
· Battery light or suitable low-heat cabinet lighting
· Wall anchoring hardware
Build the Coffee Station
1. Plan the working height. Place the machine on a temporary shelf and check whether you can fill the water tank, open the top, and remove the drip tray without hitting the cabinet above. Leave enough space to wipe behind the equipment.
2. Create a safe cord route. Use an existing cable opening or drill a properly sized hole in a clear section of the back panel. Fit a smooth grommet so the cord cannot rub against a rough wooden or metal edge.
3. Protect the main surface. Add a washable liner, removable tray, or sealed board beneath the machine. Keep electrical connections away from the area where water may drip during filling.
4. Organise the vertical space. Install a sturdy upper shelf for mugs and light supplies, then use trays or baskets below for packets and filters. Keep frequently used items near the front instead of filling every deep corner.
5. Test the station with the doors open and closed. Run the equipment only with appropriate airflow and follow its clearance guidance. Check that heat, steam, cords, and handles do not touch the doors or interior finish.
For me, the coffee machine should remain the easiest item to reach. Decorative jars can move to the upper shelf; the equipment you lift, fill, and clean every day deserves the comfortable position.
A simpler variation is a tea and hot-chocolate cupboard without powered equipment. Use the main shelf for a tray, cups, and sealed ingredients, then carry the kettle over from the kitchen when needed.
Create a Concealed Dry Bar or Professionally Fitted Wet Bar
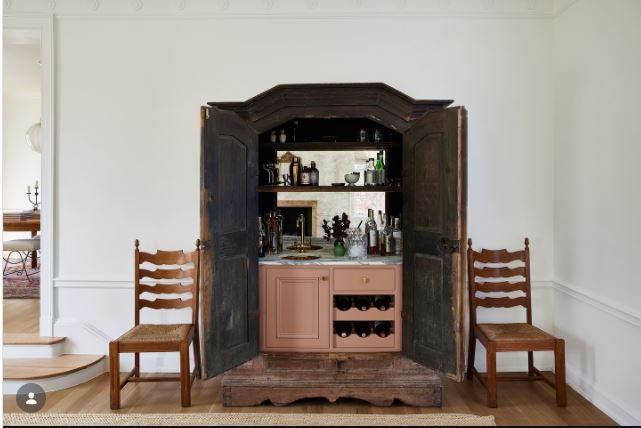
A bar conversion makes good use of the depth and enclosed storage inside an armoire. Shelves can hold glasses, a durable counter can support mixing and serving, and lower cupboards keep bottles or non-alcoholic drinks away from direct light.
A dry bar is the more manageable home project because it does not require water lines or drainage. Adding a sink changes the job completely and should involve qualified help, a suitable location, moisture-resistant materials, and safe access to the plumbing.
Materials and Tools
· Strong armoire with firm shelves and base
· Durable removable or fitted work surface
· Bottle and glass storage
· Shelf brackets or rails
· Mirror, tile panel, or washable backing
· Low-heat cabinet lighting
· Cable grommet where power is required
· Drill, level, and screwdrivers
· Wall anchoring hardware
· Qualified plumber and electrician for a wet-bar installation
Plan the Bar Conversion
1. Decide between a dry and wet bar. A dry bar stores and serves drinks without plumbing. Choose the wet version only when the cabinet location can support safe water, drainage, ventilation, and professional installation.
2. Reinforce the interior. Check every shelf and bracket before adding bottles or heavy glassware. Replace sagging boards and distribute weight across the cabinet rather than concentrating it on one narrow shelf.
3. Add a practical work surface. Fit a level, wipeable top with enough space for a tray, glasses, and preparation. Protect the surrounding wood from splashes and keep the front edge comfortable to reach.
4. Install storage and lighting. Place glasses where they cannot fall when the doors move, and keep bottles upright in strong lower storage. Use lighting intended for enclosed furniture and route cables through protected openings.
5. Check the cabinet as a complete system. Open both doors fully, use the work area, and confirm that the armoire remains stable. Anchor it before loading the shelves and keep children’s access in mind.
I’d rather see a well-organised dry bar than a rushed sink squeezed into furniture that was never designed for water. The hidden effect still works without plumbing, and the project remains much easier to maintain.
The same cabinet can become a non-alcoholic drinks station with sparkling water, cordial, glasses, and serving trays. A removable counter insert lets the armoire return to ordinary storage later.
Convert an Armoire Into Playroom Storage
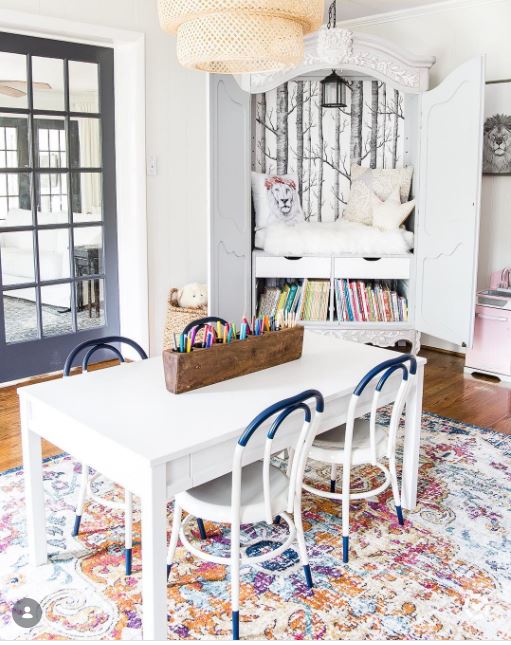
An armoire can hold the mix of shapes that makes playroom storage difficult: board games, tall toys, art supplies, dress-up clothes, and small pieces that need containers. Doors help the room feel calmer, but the inside still needs to be easy for children to understand.
The safest version places lightweight, frequently used items low and reserves upper shelves for adult-managed supplies. Heavy toy boxes should not sit high enough to fall.
Materials and Tools
· Stable armoire with working doors
· Heavy-duty wall anchors or anti-tip straps
· Adjustable shelves
· Lightweight baskets or clear bins
· Large picture labels
· Low hooks for dress-up clothes
· Shelf liner
· Door stops or soft-close hardware, if compatible
· Screwdriver and drill
· Small-parts containers with secure lids
Set Up the Playroom Cabinet
1. Anchor the empty armoire first. Fix the cabinet to suitable wall structure before adding toys. Test the doors and drawers after anchoring so nothing binds or pulls the furniture away from the wall.
2. Divide storage by activity. Group building toys, art supplies, puzzles, and dress-up items separately. Use broad categories that children can recognise instead of creating a complicated system that only an adult understands.
3. Place items by weight and access. Keep heavy bins and everyday toys on low shelves. Put paint, scissors, tiny pieces, or supervised supplies higher and out of unsupervised reach.
4. Add clear labels. Use simple words with photographs or drawings on the front of baskets. Leave some empty space so children can return items without arranging every piece perfectly.
5. Check the closing points. Make sure fingers cannot be trapped by damaged hinges, sharp latches, or fast-closing doors. Repair rough edges and remove keys from locks that could trap a child inside the cabinet.
The first storage plan rarely survives real play, and that is normal. Watch where toys actually end up, then move the baskets instead of expecting children to follow a layout that works only on paper.
For a shared family room, line the door interiors with removable pockets for colouring books and flat games. Keep the outside finish quiet so the cabinet blends with the adult part of the room.
Use an Armoire as a Bathroom Linen Cabinet
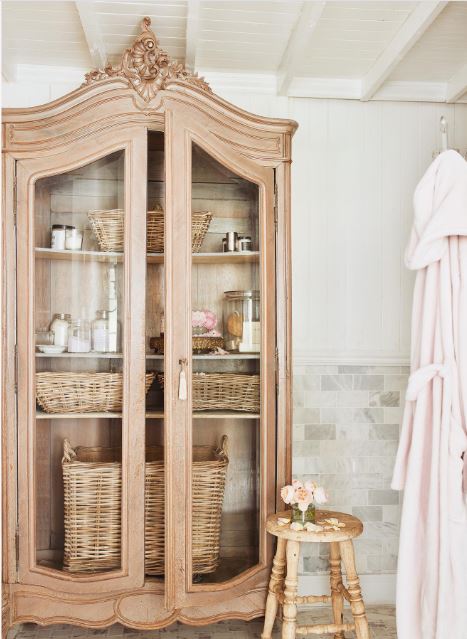
A bathroom without a linen cupboard can benefit from the height and closed storage of an armoire. Folded towels, sealed toiletries, spare paper products, and cleaning cloths can remain together instead of spreading across several smaller cabinets.
Moisture is the deciding factor. The armoire should stand away from direct splashes, and the room needs reasonable ventilation. Swollen veneer, unfinished particleboard, and musty interiors are poor candidates for a humid space.
Materials and Tools
· Dry, structurally sound armoire
· Washable shelf liner
· Ventilated baskets
· Moisture-resistant labels
· Adjustable shelves
· Wall anchoring hardware
· Furniture feet or protective pads
· Small moisture monitor, if useful
· Mild cleaning supplies
· Optional battery light
Prepare the Linen Storage
1. Choose the driest position. Keep the armoire away from the bath edge, shower spray, and areas where wet towels regularly touch the furniture. Leave a small air gap behind the cabinet when the room layout allows.
2. Clean and air the interior. Remove dust and old odours before storing fabric. Let the cabinet stand open in a dry room and do not cover a musty smell with fragrance.
3. Fit shelves around the linens. Measure folded towels and storage baskets, then space shelves to avoid tall empty gaps. Keep heavy cleaning supplies low and do not overload thin shelf boards.
4. Separate damp and dry items. Store only fully dry towels inside. Use a separate open basket outside the armoire for used cloths so moisture is not trapped behind closed doors.
5. Inspect the cabinet regularly. Check the back, feet, and lower shelves for condensation, swelling, or odour. Move the piece or improve ventilation if the material begins to change.
I don’t think a bathroom armoire needs to look like a shop display. Towels can be folded simply, while baskets hide the smaller packets and bottles that make open shelves feel busy.
A bedroom or hallway linen cabinet is the lower-risk alternative when the bathroom stays very humid. You still gain central storage without exposing old wood to daily steam.
Repurpose the Armoire for Dining-Room Storage
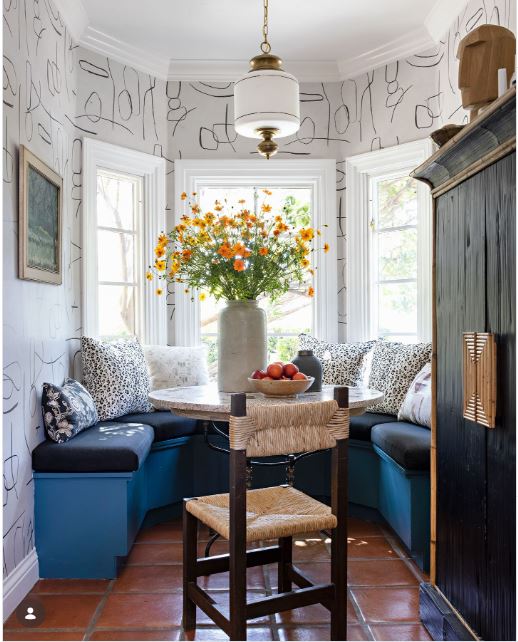
Dining rooms often need storage for objects that do not fit neatly in a shallow sideboard. An armoire can hold tall serving pieces, tablecloths, candles, vases, and less frequently used dishes while keeping the room visually settled.
The original hanging rail may be removed or retained for table linens on hangers. Shelves should be sized around the dishes and serving items rather than installed at equal but unhelpful intervals.
Materials and Tools
· Sound armoire with a stable base
· Strong adjustable shelves
· Shelf pins or brackets
· Plate racks or non-slip shelf liner
· Baskets for napkins and small items
· Table-linen hangers
· Wall anchoring hardware
· Level and tape measure
· Screwdriver and drill
· Optional interior lighting
Arrange the Dining Storage
1. List what needs a home. Measure the tallest serving pieces, stacks of plates, folded linens, and any appliance you plan to store. Design the interior around actual objects instead of copying a generic shelf layout.
2. Strengthen the shelves. Dishes become heavy quickly. Use shelves and supports suited to the load, keep the heaviest stacks low, and avoid placing weight near the unsupported centre of a long board.
3. Protect breakable items. Add non-slip liner beneath dishes and keep tall glass pieces away from the door swing. Plate stands or dividers can prevent large platters from sliding forward.
4. Use the doors and rail carefully. Hang light tablecloths from the existing rail or add shallow racks to the door interiors only when the hinges can carry them. Make sure added storage does not strike the shelves as the doors close.
5. Test serving-day access. Open the armoire beside the dining table and check whether you can reach trays and linens without moving chairs. Adjust the most-used items to waist and shoulder height.
What matters here is access, not symmetry. A taller gap for serving boards is more useful than three perfectly even shelves that leave the large pieces leaning against the wall.
A breakfast-nook version can store mugs, cereals, and placemats in sealed containers. Keep loose food in suitable packaging and protect the furniture from crumbs and spills.
Let the Cabinet’s Construction Guide the New Purpose
Solid-Wood Armoires
Solid wood usually tolerates new shelf supports, careful drilling, and hardware changes better than thin composite panels. It is still heavy, so movement and anchoring need planning.
Veneered or Flat-Pack Cabinets
These pieces may work well for light storage but need caution around swollen edges, weak backs, and screws that no longer grip. Add support rather than assuming the decorative outer panels can carry new loads.
Former Television Armoires
Existing cable holes and broad shelves make them suitable for coffee or media-related stations. Remove obsolete electrical fittings and check ventilation before placing powered equipment inside.
Traditional Wardrobes With Rails
The hanging space can remain useful for linens, dress-up clothes, craft rolls, or cleaning tools. Add shelves only when they can be supported without damaging valuable joinery or weakening the cabinet sides.
Armoire Conversions That Need a Second Look
Ignoring the Risk of Tipping
Tall furniture can move forward when heavy doors open or a child pulls a low shelf. Anchor the armoire before loading it and use hardware appropriate for both the cabinet and wall.
Moving It Without Measuring the Route
Measure doorways, stairs, turns, ceiling height, and the final room before collecting the cabinet. Some armoires dismantle; others become a very large lesson in hallway geometry.
Removing Structural Parts Too Quickly
A shelf, divider, or back panel may strengthen the cabinet as well as organise it. Check how the piece is built before cutting anything away, and add replacement bracing when necessary.
Overloading Old Shelves
Dishes, bottles, appliances, and toy bins can exceed what an old shelf or small peg can carry. Replace weak boards, add centre support, and keep the heaviest items low.
Trapping Heat or Steam
Coffee machines, kettles, mini fridges, and lighting need suitable clearance and airflow. Do not close powered equipment inside the cabinet unless the manufacturer permits that use and the installation is designed safely.
Adding Plumbing as an Informal DIY
A wet bar introduces supply lines, drainage, moisture, and electrical concerns. Use qualified professionals and do not place a sink in furniture that cannot tolerate leaks or structural cutting.
Covering Mould or Musty Odours
Paint and scented liners do not solve moisture damage. Identify the cause, clean or repair the cabinet appropriately, and reject pieces that remain contaminated.
Using Delicate Paper in a Spill Zone
Wallpaper can work on upper panels, but coffee stations and bars need wipeable surfaces around liquids. Use removable trays, sealed panels, or washable liners where spills are likely.
Making Storage Too Complicated
Deep cabinets easily become layered hiding places. Use trays and baskets that pull forward, and leave enough empty space to remove one item without unloading an entire shelf.
Changing a Valuable Antique Irreversibly
Research unusual hardware, joinery, labels, and construction before drilling or cutting. A removable interior insert may provide the new function without damaging a historically interesting piece.
Frequently Asked Questions
Do I need to sand an armoire before painting it?
That depends on the existing finish and the paint system you choose. Clean the surface first, repair loose veneer, and test an inconspicuous area. Avoid sanding unknown old coatings without appropriate precautions.
How can I add shelves without damaging the cabinet?
Use existing shelf-pin holes when possible. A removable freestanding shelf insert is useful for valuable furniture or thin side panels because it carries its own weight.
Can I place a coffee machine inside an armoire?
Only when the machine fits with enough access, ventilation, and clearance. Keep water away from electrical connections and operate the equipment with the doors open unless its instructions allow enclosed use.
Is an armoire safe in a child’s playroom?
It can be, provided the cabinet is stable, firmly anchored, and free from sharp fittings and trapping hazards. Store heavy items low and supervised materials out of reach.
Can I use an old armoire in a bathroom?
Yes, when the room is reasonably ventilated and the furniture stays away from direct water. Avoid swollen composite wood, active mould, and cabinets that already smell damp.
What should I do with the old television shelf?
Reuse it when it remains strong and sits at a practical height. It may become the main coffee surface, a work shelf, or be cut by a capable person into smaller internal shelves.
How do I stop deep armoire storage becoming cluttered?
Use pull-out trays, labelled baskets, and categories that match how the items are used. Avoid stacking unrelated objects in front of one another, and leave some open space for handling.
Give the Armoire One Clear New Job
Creative ways to repurpose an armoire work best when the cabinet gains one clear purpose. A coffee station needs spill protection and cable access, playroom storage needs anchoring and simple labels, and a linen cabinet needs dry air.
The transformation does not have to erase the original furniture. Keep the doors, preserve useful hardware, and use removable shelves or liners where possible. The outside can remain quiet while the interior does the practical work.
Begin with the safest, least permanent change. Empty the cabinet, repair the structure, anchor it, and arrange temporary boxes or shelves before drilling. Then live with the layout long enough to discover what actually deserves a permanent fixing.
Which new role would suit your armoire best: a coffee station that closes after breakfast, a calm playroom cupboard, or dining storage ready for the next gathering?