An old dresser or decorative cabinet can make a far more interesting bathroom vanity than a flat-pack unit, especially when the wood already has good proportions, useful drawers, and details worth preserving. The challenge is not simply adding a basin. A successful refurbishment has to protect the furniture from moisture, make room for plumbing, support a heavy worktop, and still look as though the new parts belong there.
I’m always drawn to projects that keep the character of an older piece rather than sanding away every mark and replacing every handle. A worn finish can often be cleaned and strengthened, while an awkward top can be replaced with stone, marble, timber, or a fitted ceramic basin. What matters is deciding which original features should stay and which areas need practical alteration.
These vanity ideas show four different directions: a wide double-sink dresser, a marble-topped wooden chest, a dark carved vanity with a ceramic basin, and a curved statement cabinet.
Each one needs a slightly different approach, but the basic priorities remain the same: stability, water resistance, accessible plumbing, and a layout that keeps as much useful storage as possible.
Before You Start
Inspect the furniture before buying a sink or worktop. Check for loose joints, split drawer runners, woodworm, water damage, warped tops, and legs that rock under pressure. A bathroom vanity must carry the combined weight of the basin, taps, countertop, water, toiletries, and anyone who leans against it, so repair weak joints before making cosmetic changes.
Measure the available wall space, the finished height you want, the basin depth, the tap position, and the route of the waste and supply pipes. I know it can feel tempting to choose the prettiest sink first, but plumbing often decides whether the top drawers can remain functional. Mark the pipe locations on the back and inside of the cabinet before cutting anything.
Remove old wax, polish, grease, and loose finish with products suitable for the material. Sand only as much as the chosen finish requires, and test cleaners, stains, oils, sealers, or paint on a hidden area. Keep original hardware in labelled bags so nothing disappears halfway through the project.
Set Aside Vanities Affected By:
- Extensive wood rot or crumbling timber
- Active mould or a persistent damp smell
- Severe water damage or swollen panels
- Loose legs or a frame that cannot be stabilised
- Widespread woodworm or insect damage
- Badly warped doors, drawers, or worktops
- Cracked stone, ceramic, or glass surfaces
- Particleboard that has swollen and lost its strength
- Suspected hazardous paint or an unknown old coating
- Damage around electrical fittings or built-in lighting
- Dimensions that do not suit the available bathroom space
- Internal damage that leaves insufficient room for safe plumbing
A vanity with serious structural, moisture, or pest damage may require professional repair and could cost more to restore than replace. Do not install a basin or heavy worktop on furniture that remains unstable after basic repairs.
For a Vanity Suitable for Refurbishment, Inspect:
- The strength of the main frame
- Loose joints, screws, and corner blocks
- Legs, feet, and contact with the floor
- Drawer runners and cabinet hinges
- Cracks, dents, scratches, and chipped edges
- Water stains, mould, and areas of swelling
- The condition of the original worktop
- The back panel and possible pipe routes
- Available space for the basin, tap, waste, and trap
- The depth and movement of the drawers
- Existing knobs, handles, and hinges
- The furniture material, such as solid wood, veneer, MDF, or laminate
- The condition of the paint, stain, wax, or varnish
- The finished height after adding the worktop and basin
- Areas that need reinforcement before cutting
- Surfaces that will require moisture protection
Measure the furniture and bathroom carefully before purchasing the basin or worktop. Mark the proposed plumbing positions inside the cabinet so you can see which drawers or shelves may need to be shortened or adapted.
Useful Materials and Tools
- Tape measure
- Pencil and carpenter’s square
- Spirit level
- Cardboard or paper for making templates
- Screwdrivers
- Adjustable spanner
- Drill and suitable drill bits
- Jigsaw with the correct blade
- Clamps
- Scrap timber for supporting cuts
- Sandpaper in different grits
- Hand-sanding block or electric sander
- Wood glue
- Wood filler
- Screws, brackets, and corner blocks
- Timber strips for internal reinforcement
- Primer suited to the furniture material
- Furniture paint, wood stain, oil, or protective finish
- Paintbrushes and small rollers
- Cleaning cloths and suitable surface cleaner
- Basin and tap set
- Waste fitting and trap
- Flexible water-supply lines
- Worktop or fitted ceramic basin
- Backsplash or upstand
- Bathroom-safe silicone sealant
- Moisture-resistant topcoat
- Dust sheets or protective covering
- Gloves
- Safety glasses
- Hearing protection
- Dust mask or respirator
Keep removed handles, hinges, screws, and drawer parts in labelled containers. Turn off the water before changing existing plumbing, and use a qualified plumber or stone fabricator where the installation or material requires specialist work.
Have a qualified plumber handle connections whenever local rules require it, and ask a stone fabricator to cut heavy marble or stone accurately. Turn off the water before disconnecting or altering existing plumbing.
Convert a Wide Antique Dresser into a Double-Sink Vanity
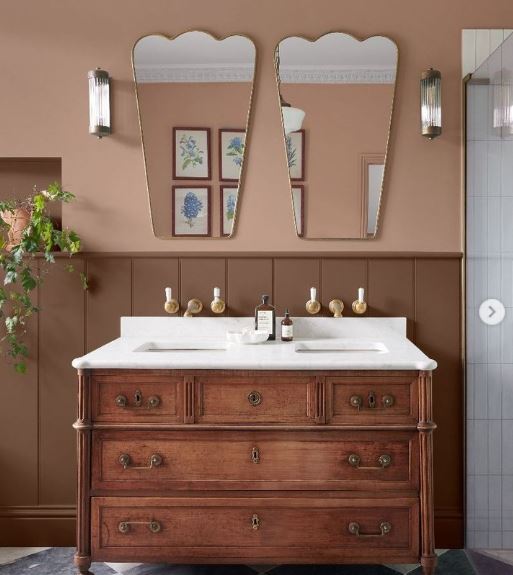
A wide dresser is a sensible starting point for a shared vanity because the long top can hold two sinks without forcing the cabinet to look oversized. This example keeps the warm wood, turned front legs, brass-toned drawer pulls, and the original arrangement of small and large drawer fronts. The pale stone top adds a clean horizontal line, while two separate basins make the piece practical for a larger bathroom.
The most difficult part is protecting useful storage from two sets of pipes. The top drawers may need to become shallow false fronts, or each drawer can be rebuilt around the plumbing with a U-shaped or notched interior. The lower drawers are usually easier to preserve, provided the waste pipes run close to the wall.
The pair of scalloped mirrors and wall lights also show why the vanity should be planned as part of the whole wall. Their symmetry supports the wide cabinet, and the warm wall colour allows the old timber to remain the focal point rather than competing with it.
Materials and Tools
· A strong wide dresser with sound legs and drawer runners
· Two basins, two tap sets, wastes, traps, and supply fittings
· Stone, engineered stone, or another bathroom-suitable worktop
· A narrow backsplash or upstand
· Cardboard or thin board for sink and pipe templates
· Drill, jigsaw, clamps, and suitable cutting blades
· Timber strips for reinforcing the cabinet and altered drawers
· Wood cleaner, matching repair stain or touch-up finish
· Bathroom-safe sealant and a moisture-resistant topcoat
Build the Double Vanity
1. Repair and level the dresser. Tighten loose joints, repair damaged drawer runners, and make sure all four legs sit firmly. Place the dresser in its intended position and check the level from front to back and side to side, because a long countertop will make even a small twist more noticeable.
2. Plan both sink positions. Lay the sink templates on the worktop and centre them over the two usable halves of the dresser. Check the drawer dividers, internal rails, wall pipes, taps, and mirror positions before approving any cut-outs. Then mark which drawers will remain full depth and which need alteration.
3. Strengthen the cabinet around the openings. Add timber rails beneath the top where the original structure will be cut away. Keep the supports clear of the basin bowls and tap fittings, and secure them into strong side panels rather than thin drawer backs. A stone fabricator can use the final template to cut the worktop accurately.
4. Adapt the drawers and back panel. Remove only the material needed for the two waste pipes and supply lines. Rebuild drawer boxes around the plumbing when possible, or secure the original drawer fronts as removable panels so the fittings remain accessible for maintenance.
5. Seal and install the finished vanity. Protect the timber, especially along the top edges, drawer openings, and any fresh cuts. Fit the worktop, sinks, taps, and backsplash, then seal every junction where water could collect. After the plumbing is connected, test both basins and inspect inside the drawers for slow leaks.
A Practical Detail to Keep in Mind
I’d keep the outer drawer fronts as unchanged as possible. They are what make the piece read as an antique dresser rather than a new vanity wearing old hardware. Even when a top drawer cannot function normally, a hinged or removable front can preserve the original rhythm.
Variation to Try
A narrower version could use one sink and leave the other side as open counter space. You could also use deck-mounted taps behind each basin or wall-mounted taps to reduce the amount of hardware passing through the worktop.
Add a Marble Top to a Tall Wooden Dresser
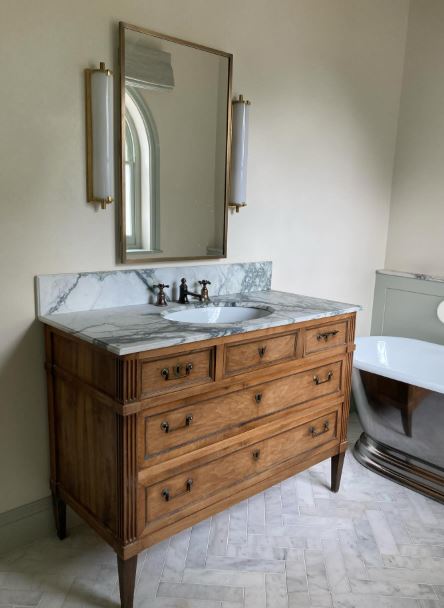
This taller dresser has a more compact footprint than the double vanity, but it still offers generous storage below the basin. The marble top and short matching backsplash create a crisp boundary above the warm timber, while the dark metal tap and drawer pulls connect the old and new elements without trying to match them perfectly.
A tall chest often needs height adjustment before it works comfortably as a vanity. The finished top should suit the intended users, so measure the cabinet with the proposed stone thickness and sink style included.
If the dresser is too high, shortening tapered legs may be possible, but only when the leg shape and joints allow it. Removing decorative feet entirely can change the proportions more than expected.
The vertical fluting at the sides and the graduated drawers are worth preserving. I don’t think a piece like this needs a heavy paint finish. Cleaning, small repairs, and a compatible protective coating can be enough when the existing colour already suits the room.
Materials and Tools
· A tall solid dresser with secure side panels and legs
· Marble or another stone worktop with a matching backsplash
· Oval undermount or inset basin
· Tap, waste, trap, and water supply fittings
· Measuring tools and full-size paper or cardboard templates
· Timber for internal support rails and drawer alterations
· Drill, jigsaw, screws, clamps, and hand tools
· Wood cleaner and a compatible protective finish
· Stone-safe and bathroom-safe sealants
Fit the Marble-Topped Vanity
1. Confirm the finished height. Measure the dresser, worktop thickness, and basin rim before making changes to the legs. Compare the total with an existing vanity that feels comfortable to use. Make any structural height adjustment before ordering the stone so the measurements remain reliable.
2. Prepare the furniture carefully. Remove the drawers and hardware, clean the wood, and repair loose corners or runners. If the finish only looks dry or uneven, test a gentle restoration method first rather than stripping the entire dresser. Protect carved or fluted details from aggressive sanding.
3. Map the sink and plumbing. Place a template over the centre of the top drawer area and mark the waste and tap locations. Check whether the top drawer can be shortened around the basin or whether the drawer front should become fixed. Leave access for the trap and shut-off valves.
4. Add support and install the stone. Fit strong rails inside the dresser so the stone load transfers into the side panels. Ask the fabricator to cut and polish the basin and tap openings, then dry-fit the worktop before applying adhesive or sealant. The backsplash should sit flat against the wall without forcing the cabinet out of level.
5. Finish the plumbing and moisture protection. Install the basin and taps, seal the sink edge and backsplash, and protect exposed wood near the worktop. Run water for several minutes, fill and drain the basin, and inspect every joint from inside the cabinet before returning the drawers.
A Practical Detail to Keep in Mind
The stone should not rely on the old dresser top alone. Older furniture was not built for the concentrated weight of marble and a water-filled basin, so hidden internal rails matter more than they may appear from the outside.
Variation to Try
For a lighter and lower-cost version, a sealed timber top or suitable composite surface may replace marble. A vessel basin can also reduce the size of the cut-out, although it raises the finished height and changes how much splash reaches the surrounding surface.
Fit a Ceramic Basin into a Dark Carved Dresser
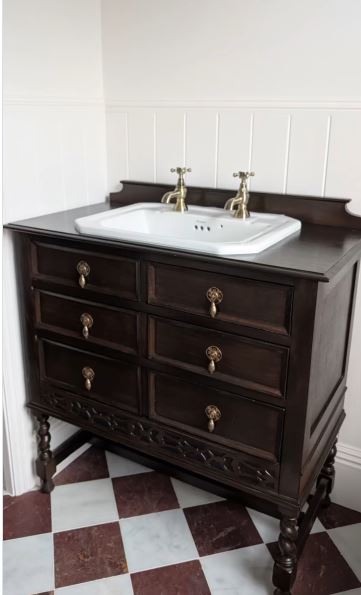
The contrast is the main strength of this compact vanity. A white ceramic basin sits directly into or over the dark top, and the separate traditional taps suit the age of the carved drawer fronts, drop handles, turned legs, and decorative lower rail. The basin itself becomes the lightest element in the room, which keeps the dark furniture from feeling too heavy.
This approach can suit a dresser whose original top is not suitable for a large stone slab. A fitted ceramic basin may cover much of the upper surface and create its own washable working area. Even so, the remaining timber edges and the raised back section still need careful sealing because water can sit where ceramic meets wood.
The checkerboard floor adds pattern, so the vanity does not need extra decorative paint or new hardware. Keeping the existing dark finish gives the piece enough presence and allows small signs of age to remain part of the design.
Materials and Tools
· A compact dresser with a stable frame and decorative front
· A fitted ceramic basin with the correct tap-hole arrangement
· Two taps or a tap set suited to the basin
· Waste, trap, supply lines, and shut-off valves
· Cardboard template and measuring tools
· Drill, jigsaw, and fine-tooth blade suited to the dresser top
· Timber braces and screws for internal reinforcement
· A moisture-resistant finish for exposed wood
· Bathroom-safe sealant
Install the Ceramic Basin
1. Check the basin against the dresser. Set the basin on a full-size template and confirm that it does not overhang awkwardly or block the side panels. Mark the centre line, tap positions, and waste outlet, then open the drawers to see exactly where the bowl and fittings will sit.
2. Stabilise the carved furniture. Tighten loose legs, repair the lower decorative rail, and add discreet corner blocks where the frame needs extra support. Remove the hardware before cleaning or touching up the finish so the original metalwork does not collect residue.
3. Cut the smallest practical opening. Drill starter holes inside the marked line and support the top while using the jigsaw. Work slowly around carved edges and test the basin repeatedly rather than enlarging the opening too quickly. Seal every fresh cut before final installation.
4. Modify the upper storage. Shorten the top drawers around the bowl and tap tails, or convert the affected drawer fronts into fixed or hinged panels. Keep at least one removable access point so a plumber can reach the trap without dismantling the entire vanity.
5. Bed, seal, and test the basin. Install the basin according to its support requirements and apply a neat seal at the ceramic-to-wood joint. Connect the taps and waste, then check for movement when the basin is gently pressed. Test the overflow and watch the sealed timber edges for any sign of water entry.
A Practical Detail to Keep in Mind
The ceramic edge needs even support. I’d rather add a hidden timber frame than depend on a few high points along an uneven antique top, because concentrated pressure can stress both the basin and the furniture.
Variation to Try
A single mixer tap can simplify the plumbing when the basin allows it. For a less formal look, the dark finish could be softened with a waxed or lightly rubbed surface, but avoid decorative distressing around areas that need a reliable water-resistant seal.
Repurpose a Curved Cabinet as a Statement Vanity
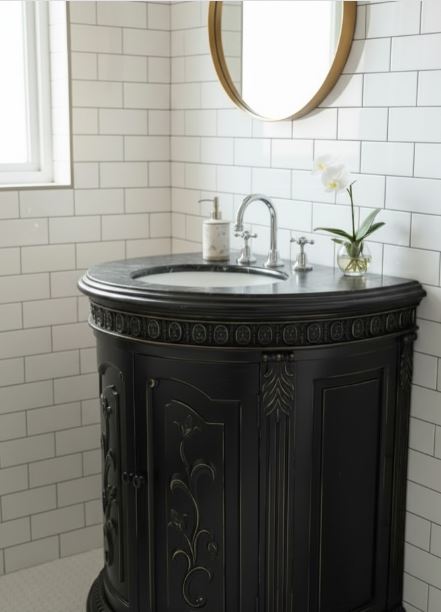
A curved cabinet creates a very different vanity shape from a rectangular dresser. The rounded front softens the corner of the room, while carved floral panels, a decorative top border, and the deep black finish make the cabinet feel deliberate rather than improvised. A dark stone top and oval undermount sink continue the curved lines without introducing another strong colour.
The difficulty lies inside the cabinet. Curved doors and shaped rails leave less predictable space for a basin bowl and trap, and the decorative panels may limit where new support can be fixed. Before cutting, make a cardboard profile of the basin and hold it inside the cabinet to confirm that the doors can still open and the plumbing can sit behind them.
This piece works particularly well in a compact bathroom because the curved front reduces sharp corners. The round mirror above it repeats the shape, while plain white wall tiles prevent the carved details from becoming visually crowded.
Materials and Tools
· A curved cabinet with strong doors, frame, and base
· Dark stone, composite, or another water-resistant top
· Oval undermount basin
· Tap set, waste, trap, and water supply fittings
· Cardboard and flexible curve ruler for templates
· Timber or metal brackets for internal support
· Drill, jigsaw, clamps, and suitable blades
· Black paint or matching touch-up finish, if repairs are needed
· Bathroom-safe sealant and compatible adhesive
Adapt the Curved Cabinet
1. Inspect the curved structure. Open the doors and identify the load-bearing rails, decorative mouldings, and any thin panels that should not carry weight. Repair loose hinges and base joints first, then check that the cabinet sits flat against the tiled wall without rocking.
2. Create inside and outside templates. Trace the final top shape, sink cut-out, and wall edge on card. Make a second template showing the basin bowl and trap below the worktop. This extra template helps you find clashes with door rails before the top is ordered or cut.
3. Build a hidden support frame. Fit rails or brackets inside the strongest parts of the cabinet, keeping them behind the carved front and clear of the doors. Support the stone around the sink opening and along the curved front edge so no narrow section carries the load alone.
4. Prepare access for plumbing. Cut the back neatly for the supply and waste pipes, then protect the raw edges. Position the trap where it can be reached through the doors and secure loose pipes so they do not rub against carved panels when the cabinet is used.
5. Install and finish the vanity. Dry-fit the top and basin, confirm the door clearance, and then complete the final fixing and sealing. Touch up any exposed black finish only after the construction work is complete. Test the tap, waste, overflow, and door movement before storing anything inside.
A Practical Detail to Keep in Mind
For me, the curve is the feature to protect. A top that projects too far or a basin that sits off-centre can make the whole cabinet look unbalanced, so full-size templates are especially valuable here.
Variation to Try
A lighter paint colour would reveal the carved panels differently, while a pale stone top could create stronger contrast. Another option is a small vessel basin placed slightly back from the curved front, provided the finished height and door clearance remain comfortable.
Common Mistakes to Avoid
Choosing Furniture by Appearance Alone
Decorative details cannot compensate for a weak frame, split legs, or damaged joints. Inspect the piece from underneath and inside the drawers, then repair the structure before spending money on a basin or worktop.
Ignoring the Finished Vanity Height
A dresser can look suitable until the countertop and basin add several more centimetres. Measure the complete assembly rather than the bare furniture, especially when using a vessel basin or thick stone.
Cutting Before Checking the Plumbing
A central sink may collide with drawer dividers, rails, wall pipes, or the trap. Mark the full basin shape and all fittings inside the cabinet first, then decide which storage areas can be preserved.
Removing More of the Drawers Than Necessary
It is often possible to shorten a drawer, build a U-shaped box, or keep the front as a removable panel. Taking out every upper drawer may make the conversion easier, but it also removes much of the furniture’s usefulness and character.
Leaving Raw Wood Around New Openings
Fresh cuts absorb moisture quickly. Seal sink openings, pipe holes, trimmed drawers, and the underside of the top before the basin and plumbing make those areas difficult to reach.
Relying on Silicone as Structural Support
Sealant helps keep water out, but it should not carry the weight of a stone top or ceramic basin. Use proper rails, brackets, clips, or supports designed for the chosen materials.
Forgetting Future Maintenance
A trap, shut-off valve, or tap connection will eventually need attention. Keep access through doors, removable drawer fronts, or a discreet back panel instead of sealing every fitting behind fixed timber.
Using an Indoor Finish Without Moisture Protection
A finish that survives in a bedroom may fail beside a sink. Choose a compatible protective system for the existing wood or paint, and pay particular attention to horizontal surfaces and joints where water may sit.
Frequently Asked Questions
Can any dresser be turned into a bathroom vanity?
No. The piece needs a strong frame, enough depth for the basin, and space for plumbing. Avoid badly warped furniture, unstable legs, severe rot, active woodworm, or thin decorative pieces that cannot support a worktop.
Do I need to remove the original finish?
Not always. Clean the surface first and assess whether the existing finish can be repaired or protected. Full stripping makes sense when the coating is failing, incompatible with the new finish, or hiding damage, but it is not automatically required.
How can I keep the drawers working around the sink?
Shorten the drawer box, build it in a U shape around the waste pipe, or turn the front into a hinged or removable panel. Make a plumbing template before altering the drawer so you remove only the space the fittings actually need.
What is the best countertop for a refurbished vanity?
Stone and engineered stone are durable choices when properly supported and sealed. A suitable composite top, fitted ceramic basin, or carefully sealed timber top can also work. The best option depends on weight, budget, maintenance, and the strength of the furniture.
How do I protect an old wooden vanity from water?
Seal fresh cuts, use bathroom-safe sealant around the basin and backsplash, and apply a compatible moisture-resistant finish to exposed timber. Wipe up standing water promptly and check hidden plumbing joints occasionally for slow leaks.
Should I use a vessel sink or an undermount sink?
A vessel sink usually needs a smaller cut-out and can preserve more of the top, but it raises the finished height and leaves more exposed surface around it. An undermount sink creates a cleaner worktop, although it requires accurate fabrication and strong support.
Do I need a plumber for the conversion?
The furniture work can often be completed as a DIY project, but water supply, waste connections, and local plumbing requirements deserve professional attention. A plumber can also help position the trap and valves before you cut drawers or internal rails.
Let the Original Furniture Guide the Refurbishment
Learning how to refurbish a vanity is less about forcing every dresser into the same bathroom layout and more about responding to the piece in front of you. A wide chest can support two sinks, a tall dresser can gain a fitted marble top, a carved cabinet can frame a ceramic basin, and a curved cupboard can become a compact statement vanity.
Keep the strongest original details, make templates before cutting, reinforce the furniture where new weight will sit, and leave sensible access to the plumbing. Then protect every vulnerable edge from moisture. The finished vanity should still feel like the old piece, only with a new purpose that earns it a place in the room for years to come.