Old wicker baskets tend to collect signs of use in very visible places. The handle starts unravelling, the rim loosens, the colour fades unevenly, or one broken strand leaves a gap that seems far more noticeable than it really is. Even so, the basic basket may still be strong enough to carry laundry, hold blankets, organise craft supplies, or sit neatly beneath a table.
I’m Stella Eve Louise, and I think the weave should guide the refurbishment. A basket with a sound structure may need only cleaning and a light stain. One with an attractive shape but tired colour can take paint, while a damaged handle may be wrapped or rewoven instead of removed completely.
Refurbishing wicker baskets is not about covering every mark until the basket looks factory-made. A repaired section can remain visible, and small colour variations often suit natural woven materials. The important part is checking that the base, rim, handles, and main weave can still support the basket’s intended use.
I don’t think decoration should come before repair. A floral liner or painted finish may look cheerful, but it cannot make a loose handle safe enough to carry a heavy load.
Read the Weave and Check the Basket’s Strength
Empty the basket completely and take it into good natural light. Turn it upside down, look inside the corners, and move the handle gently without forcing it.
Check for:
- Broken or missing wicker strands
- Loose ends sticking into the basket
- Splits around the rim
- A weakened or sagging base
- Mould, mildew, or musty odours
- Flaking paint or varnish
- Rusty staples, nails, or wire
- Loose handle wrapping
- Cracked wooden supports
- Sharp edges
- Insect damage
- Stains from damp storage
Decide how the basket will be used after refurbishment. A decorative basket holding dried flowers does not need to withstand the same strain as a laundry hamper, shopping basket, or log holder.
Remove loose dust with a soft brush or a vacuum fitted with a gentle attachment. Work along the weave rather than dragging the brush aggressively across it.
Use only enough moisture to clean the surface. Wicker and natural plant fibres may soften, swell, or lose their shape if they become saturated. Wipe with a lightly damp cloth and mild cleaner, then allow the basket to dry thoroughly in a well-ventilated place away from intense direct heat.
Never paint, stain, glue, or line a basket while the weave still feels damp. Trapped moisture can interfere with the new finish and may encourage unwanted odours or surface growth.
Useful Materials and Tools
- Soft brush
- Vacuum with a brush attachment
- Mild cleaner
- Clean cloths
- Small detail brush
- Fine sandpaper
- Replacement cane, reed, willow, or suitable binding material
- Wood glue or adhesive suited to the basket material
- Small clamps or clips
- Primer suitable for wicker
- Brush-on or spray paint
- Wood stain suitable for the material
- Clear protective finish
- Fabric for a liner
- Pattern paper
- Sewing machine or hand-sewing needle
- Strong thread
- Leather, canvas, or webbing for replacement straps
- Rivets, screws, or other appropriate fasteners
- Gloves
- Eye protection
- Dust mask or suitable respiratory protection when required
- Drop cloth
Work in a ventilated area when using paint, stain, spray products, or strong adhesive. Wear eye protection when cutting old wire, drilling strap holes, or trimming stiff replacement material.
Restore a Faded Basket With a Warm Stained Finish
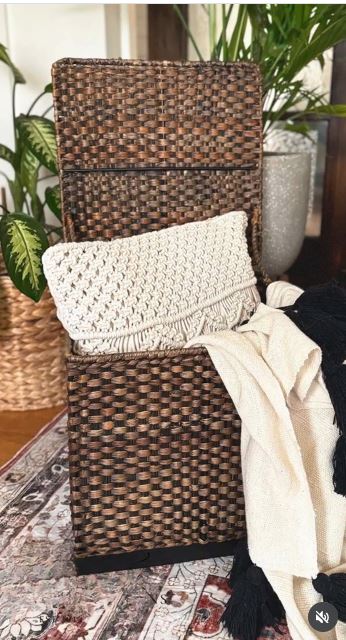
Stain suits a basket that remains structurally sound but has become pale, patchy, or visually dry. The selected project refreshes a tired wicker basket with colour while allowing the woven surface to remain visible.
Unlike opaque paint, stain does not disguise repairs, colour differences, or every mark. That can be an advantage when you want the basket to retain a natural character, but it also means the cleaning and preparation need to be fairly even.
Materials and Tools
- Clean, sound wicker basket
- Fine brush
- Soft cloths
- Fine sandpaper
- Stain compatible with the basket material
- Small natural-bristle or suitable synthetic brush
- Gloves
- Drop cloth
- Compatible protective finish, if required
Refresh the Colour in Four Steps
- Clean and examine the existing surface. Remove dust from the crevices and wipe away dirt or residue. If the basket has an old glossy coating, test whether the chosen stain can penetrate it before working across the whole piece.
- Smooth only the rough areas. Use fine sandpaper carefully on splinters, raised fibres, or obvious worn patches. Avoid flattening the weave or sanding so heavily that thin strands become weaker.
- Apply the stain gradually. Work in small sections and brush along the direction of the weave. Use a second small brush to reach recessed areas, then remove excess product so it does not collect in dark sticky patches.
- Review the basket after the finish settles. Check the underside, rim, and handle for missed areas. Add another controlled layer only if the colour remains too uneven and the product instructions allow it.
For me, a stained basket should still look like woven material. If every groove fills with a heavy dark coating, the texture begins to disappear.
A very light tinted finish can warm pale wicker without changing it dramatically. You could also stain only the base and handle, leaving the main body closer to its original colour.
Give a Thrifted Basket a Colourful Painted Makeover

A painted basket can work as gift packaging, toy storage, craft organisation, or a decorative container. The selected thrift flip uses colour to transform an inexpensive wicker basket into a brighter reusable piece.
Wicker contains many narrow surfaces and recessed gaps, so paint application requires patience. One thick coat may bridge across the openings, form drips, or leave the visible surface painted while the deeper weave remains patchy.
Materials and Tools
- Thrifted wicker basket
- Cleaner and soft brush
- Fine sandpaper
- Wicker-compatible primer
- Brush-on or spray paint
- Small detail brush
- Painter’s tape
- Drop cloth
- Gloves and appropriate respiratory protection
- Compatible sealer, if needed
Paint the Basket in Five Steps
- Repair the structure first. Secure loose strands, correct any sharp ends, and test the handle. Paint should be the final surface treatment rather than the material holding a damaged basket together.
- Prepare the surface for adhesion. Clean away dust and greasy residue, then dull any slick coating lightly when appropriate. Remove sanding dust from the weave before priming.
- Apply primer in controlled layers. Turn the basket so you can reach the underside, rim, interior, and handle from several angles. Avoid flooding the gaps or allowing primer to form heavy beads.
- Build the colour slowly. Apply several light passes rather than trying to cover the basket immediately. Let each layer settle, then use a small brush to correct missed recesses instead of adding excessive paint everywhere.
- Check the finish and intended use. Make sure the handle still moves naturally and the weave has not become brittle. Add a compatible protective finish when the paint system and planned use require one.
I know it can feel tempting to keep spraying until every shadow disappears, but the basket’s depth naturally creates darker recessed areas. A little variation often makes the weave more visible.
Try colour blocking only the lower third of the basket or painting the rim and handle while leaving the main body natural. A stencil can also add simple shapes without covering the full weave.
Update a Laundry Basket With Green Paint and Leather Straps
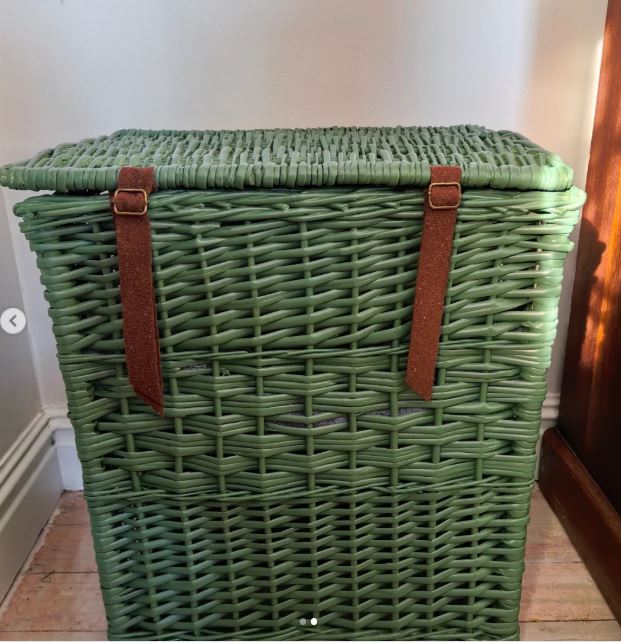
Large laundry baskets often remain structurally useful even after their finish and straps become tired. This makeover uses green spray paint and handmade leather straps to update an old basket for blanket storage.
A large basket needs careful inspection because the lid, hinges, base, and handles may all receive regular strain. Replacement straps should be attached to sound structural points rather than weak decorative strands.
Materials and Tools
- Lidded wicker laundry basket
- Cleaner and brush
- Fine sandpaper
- Wicker-compatible primer
- Paint
- Leather or strong alternative strap material
- Leather punch or suitable drill
- Rivets, bolts, or appropriate fasteners
- Measuring tape
- Cutting mat and suitable knife
- Gloves and eye protection
- Optional fabric liner
Complete the Laundry-Basket Makeover in Five Steps
- Test the basket and lid. Check the base, corners, hinges, and original strap attachment points. Repair loose framework before adding the extra weight and tension of new hardware.
- Clean and prepare the weave. Remove dust from inside and outside, then smooth any sharp fibres. Protect hinges or fittings that should not be painted.
- Apply the new colour. Prime when required and build the paint in light layers from several angles. Open and close the lid during the process so hidden contact areas do not become sealed together.
- Measure and make the straps. Cut matching leather sections and soften any sharp corners. Mark the fixing holes accurately and use hardware suitable for both the strap and the basket’s supporting structure.
- Attach and test the finished basket. Fasten the straps without crushing the wicker. Add blankets or laundry gradually and stop if the attachment points bend or separate.
The leather and green paint already create a strong contrast, so I would keep any additional decoration quiet. This is still a working storage basket, not a place where every remaining craft supply needs to find a home.
Canvas, cotton webbing, or reclaimed belt sections can replace leather when they are strong enough for the intended use. A plain washable liner can also protect blankets from the rough interior.
Problems That Can Spoil a Wicker Basket Refurbishment
Soaking the Basket During Cleaning
Too much water can soften natural fibres, loosen joints, and distort the shape. Use controlled moisture and allow the basket to dry fully before continuing.
Decorating an Unstable Basket
Paint, fabric, and ribbon cannot correct a weak base or broken handle. Repair the structure first and change the basket’s purpose when it is no longer suitable for carrying weight.
Applying One Heavy Paint Coat
Thick paint can bridge the weave, form drips, and dry unevenly in the recesses. Several light layers usually preserve more texture.
Using Stain Over a Sealed Surface
Stain may sit unevenly on top of varnish, paint, or a non-porous coating. Test the surface and choose a compatible finish rather than assuming every wicker basket is unfinished wood.
Hiding Sharp Ends Under a Liner
A fabric liner may conceal broken wicker without making it safe. Trim, smooth, tuck, or repair sharp strands before fitting the fabric.
Wrapping a Structurally Broken Handle
A decorative cover does not restore a cracked handle core. Repair or replace the supporting structure before adding new wrapping.
Attaching Heavy Straps to Weak Weaving
New hardware may tear through fragile strands. Fix straps through sound supports or add appropriate reinforcement.
Using the Same Repair for Every Basket
Willow, cane, rattan, reed, paper fibre, and synthetic wicker do not behave identically. Match the cleaning, adhesive, paint, and replacement material to the basket you have.
Returning Damp Items to Storage
Laundry, towels, plants, and outdoor equipment may carry moisture into the weave. Use a washable liner and let damp items dry before storing them in a refurbished natural-fibre basket.
Frequently Asked Questions
Can every wicker basket be refurbished?
No. A basket with widespread rot, severe mould, crumbling fibres, a collapsed base, or major structural failure may not remain safe for practical use. Small sound sections could still be saved for decorative crafts.
Should I paint or stain my basket?
Choose stain when you want to preserve the natural woven appearance and the surface can accept it. Paint is more suitable when you want stronger colour or need to visually unify repaired areas.
Can I wash a wicker basket with water?
Use only limited moisture unless you know the material and repair method can tolerate more. Avoid leaving the basket soaked, and dry it thoroughly with good airflow.
What is the easiest refurbishment for a beginner?
Cleaning, adding a removable liner, or applying a restrained painted accent is usually easier than replacing woven strands. Begin with a structurally sound basket.
Can I repair wicker with fabric?
Fabric can create a useful visible patch for light storage or decoration. It may not restore the original structural strength, so do not assume a fabric repair makes the basket suitable for heavy carrying.
How do I stop paint from missing the gaps?
Apply light coats from several angles and rotate the basket as you work. Use a small brush for missed recesses rather than flooding the full surface with more paint.
Can refurbished wicker baskets be used outdoors?
Only when the material, finish, and construction suit outdoor conditions. Even protected baskets should not be left where water can collect inside the weave.
Let the Weave Decide the Next Chapter
Learning how to refurbish wicker baskets begins with looking beyond faded colour. The condition of the base, rim, weave, and handle tells you whether the basket needs a light refresh, a visible repair, or a completely different purpose.
A warm stain can preserve the natural surface. Paint can update an ordinary thrifted find, while willow wrapping or linen weaving can address specific damaged areas. Fabric lining and replacement straps make larger baskets more comfortable to use without hiding their woven structure.
Begin with the repair that affects function most. Clean the basket, secure the loose strands, and test its strength before choosing the decorative finish. Then the colour, liner, or new handles can support the basket rather than distract from unresolved damage.
Which wicker basket would you refurbish first: a faded storage basket, a damaged shopping basket, or a large laundry hamper?