Laminate countertops can remain solid and useful long after their pattern starts making a kitchen feel dated. A faded faux-stone print, a yellowed white surface, or a colour that no longer suits the cabinets does not always justify removing the whole worktop.
When the laminate is firmly attached and the material underneath is dry and stable, paint can offer a practical way to change its appearance while keeping the existing counter in use.
This is one of those projects where I would spend more time on preparation than on the decorative part. Laminate is smooth, non-porous, and touched constantly, so ordinary wall paint is not enough.
The surface needs thorough degreasing, gentle abrasion, a bonding primer, and a coating system intended for hard-working surfaces. I don’t think a convincing finish depends on making the counter look like an expensive material. It depends on clean edges, controlled layers, and giving every coat the time specified by its manufacturer.
The finishes here move in three very different directions: rich polished wood grain, a clean solid white surface, and a warmer butcher-block effect. Each one can be adapted to the size and layout of an existing kitchen, but the safest approach is to test the full paint system on a sample board before committing to the countertop.
Before You Begin Painting Laminate Countertops
Empty the worktops completely and inspect the laminate in strong light. Paint can disguise colour and minor cosmetic wear, but it cannot make swollen particleboard, loose edging, deep burns, or a weak substrate structurally sound.
Press around the sink, seams, backsplash joint, front edge, and corners. Any area that feels soft, raised, or crumbly needs proper repair or replacement before decorative work begins.
Check the Surface and the Edges
Look for lifting laminate, open seams, chips, old silicone, and areas where water has reached the material underneath. A small stable chip may be filled with a suitable repair product, but widespread swelling will continue moving beneath paint. Run your hand along the front edge as well. Rounded edges show every ridge, so repairs need to feel smooth before primer is applied.
Remove Grease, Wax, and Silicone Residue
Kitchen surfaces can hold an invisible layer of cooking oil, polish, soap, and cleaning spray. Wash with a degreaser suited to laminate, rinse as directed, and repeat around the cooker and sink where residue tends to collect.
Old silicone is especially troublesome because paint will pull away from it. Remove failing sealant carefully and plan to reseal the joint only after the coating system is ready.
Protect the Kitchen Before Sanding or Painting
Mask the backsplash, wall, sink, taps, cabinets, appliances, and floor. Plastic sheeting is useful around an island because primer and clear coatings can travel farther than expected on a roller.
Work with good ventilation and use the protective equipment required by the products you choose. Keep food, pets, and children away from the work area until tools and coatings have been cleared safely.
Useful Materials and Tools
• Degreasing cleaner suitable for laminate and clean lint-free cloths
• Fine abrasive pads or sandpaper recommended for the chosen coating system
• Vacuum cleaner and a clean dust-removal cloth
• Filler suitable for small chips and shallow surface damage
• Bonding primer designed for smooth, non-porous surfaces
• Countertop paint or another compatible decorative coating
• Small foam roller, paint tray, quality brush, and detail brush
• Low-tack painter’s tape and protective plastic or drop cloths
• Paint colours or glazes required for the selected effect
• Compatible clear protective finish when required by the system
• Gloves, eye protection, and suitable breathing protection
• A sample board or spare piece of laminate for testing the complete finish
Choose the primer, colour layers, and protective finish as one compatible system rather than collecting unrelated products. Check the manufacturer’s instructions for application, ventilation, recoat timing, full cure, cleaning, and heat limitations. No painted surface should be assumed suitable for direct food preparation unless the product information specifically confirms that use.
Paint a Rich Wood-Grain Finish on a Kitchen Island
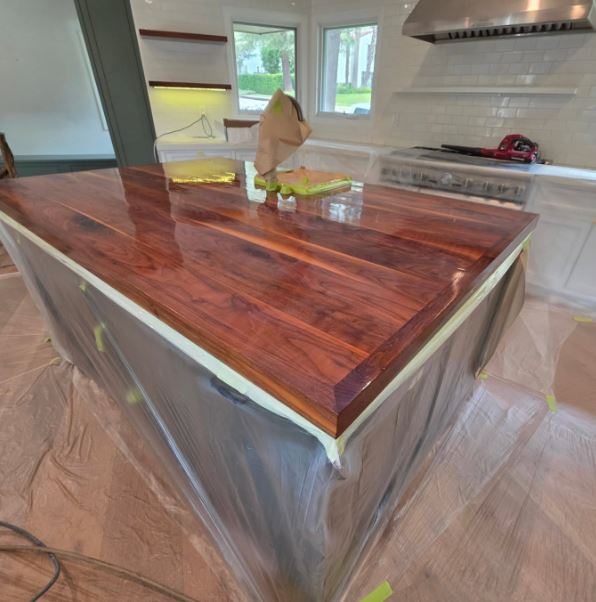
A large island gives a painted wood effect enough space to develop naturally. Long dark lines follow the length of the surface, while reddish-brown variations keep the finish from looking like one flat colour. The high sheen makes the grain appear deeper and also reflects the windows and lighting, so bumps, trapped dust, and uneven roller marks would be particularly noticeable here.
The visible masking around the edge and plastic across the cabinet base show how much protection a liquid finishing stage can require. A similar result could be created with a warm base colour, several thin grain layers, and a compatible clear coat. The exact products used in the pictured project cannot be confirmed from the photograph, so treat this as visual inspiration rather than a record of the creator’s method.
Materials and Tools for a Similar Finish
• Prepared laminate countertop with stable seams and edges
• Bonding primer suited to slick surfaces
• Warm medium-brown base paint
• Darker brown and reddish-brown paint or compatible glaze
• Soft brushes, lint-free cloths, or a wood-graining tool
• Small foam roller for broad areas
• Low-tack tape and extensive protective sheeting
• Compatible clear finish in the sheen recommended for the countertop system
A Practical Way to Recreate the Wood Look
1. Prepare the island as one continuous surface. Clean every section, including the front edge and any seam near the hob or sink. Lightly abrade the laminate without cutting through it, repair small defects, remove dust, and apply the bonding primer in thin even coats.
2. Create a warm base. Apply the medium-brown colour evenly and allow it to reach the stage required for the next layer. Keep the coat smooth because ridges in the base will remain visible beneath the grain, especially after a glossy top finish is added.
3. Build the grain in long, restrained passes. Work in manageable strips that follow the longest direction of the island. Add darker and warmer lines with a brush, cloth, or graining tool, then soften any mark that looks too regular. I know it can feel tempting to add more grain, but a few varied lines usually look more convincing than dozens of identical stripes.
4. Balance the boards and edges. Step back from the island and check the pattern from several directions. Continue selected lines over the rounded or square front edge where practical, but avoid forcing every mark to connect. Then correct abrupt stops and areas where one colour has become too dominant.
5. Protect the decorative layers carefully. Remove all loose dust and apply the compatible clear finish using the method recommended for that product. Watch the edges for runs and the broad centre for bubbles or lap marks. Keep the entire island protected until the coating has completed its stated cure rather than judging readiness only by whether it feels dry on top.
For a softer version, use walnut-brown and muted amber instead of a strong red tone, or choose a satin rather than mirror-like sheen when the coating system allows it. A beginner can practise the grain on a primed board first. I’d rather repaint a sample three times than discover halfway across an island that the lines are too dark or too evenly spaced.
Create a Smooth White Laminate Countertop
@fieldgenerals_homeimprovements
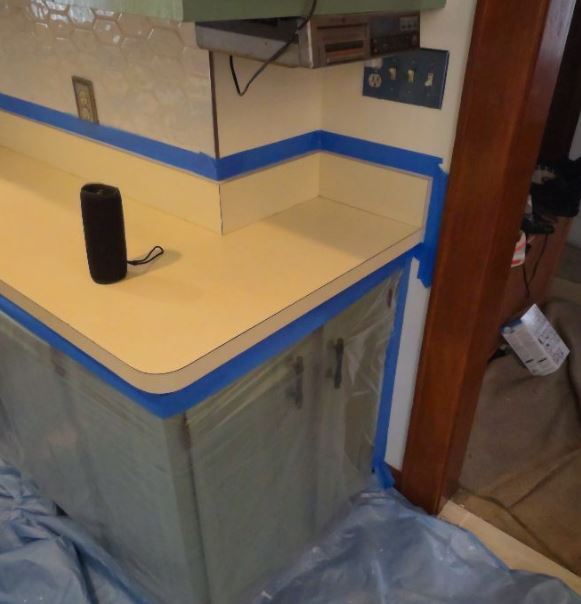
A solid white finish looks simple, but it demands careful surface preparation. There is no decorative pattern to disguise dust, pinholes, patchy primer, or a rough repaired edge. The softly rounded corner in this project is especially important because light travels across it without interruption. A thick coat or an unlevelled repair would create a visible ridge immediately.
Blue painter’s tape protects the tiled backsplash and upper joint, while the neat white lip keeps the finish visually connected from the flat top to the front edge. The result works well with muted green cabinet doors and black handles because the countertop acts as a quiet background rather than introducing another pattern.
Materials and Tools for a Solid White Finish
• Bonding primer compatible with laminate and the chosen white coating
• White countertop paint or resurfacing coating
• Fine abrasive pads for smoothing between stages when permitted
• Small foam roller and a fine brush for joints and edges
• Low-tack painter’s tape for the backsplash, wall, and cabinet line
• Bright portable light for checking the surface from a low angle
• Compatible protective finish if the selected system requires one
A Practical Way to Recreate the White Surface
1. Correct the shape before adding colour. Clean and abrade the laminate, then fill chips or dents along the rounded corner and front lip. Use your fingertips as well as your eyes when checking repairs. A surface that feels uneven before primer will usually look more uneven after white paint reflects across it.
2. Prime the edges and broad areas evenly. Brush a thin layer into the backsplash joint and around corners, then roll the open surface without pressing hard enough to leave ridges. Check underneath the front edge for drips before the primer settles. Smooth only as directed by the product and remove all dust afterward.
3. Apply white in controlled sections. Work from the far side towards your exit so you do not reach over freshly coated areas. Keep a wet edge where the product allows, but avoid repeatedly rolling sections that have begun to set. Inspect from a low angle and correct bubbles or debris while the coating remains workable.
4. Finish the joints and allow a full cure. Remove or replace masking tape according to the product instructions so the line stays clean. Refit sealant only where needed and only when the painted system is ready. Protect the counter from appliances, water, and cleaning until it has completed the stated cure period.
Pure bright white is not the only option. A soft ivory, pale stone, or very light warm grey can be easier to maintain visually while producing the same uncluttered effect. For me, the important decision is the undertone. Compare the sample against the cabinet doors and backsplash in daylight and evening light before coating the full worktop.
Add a Warm Butcher-Block Effect to Laminate
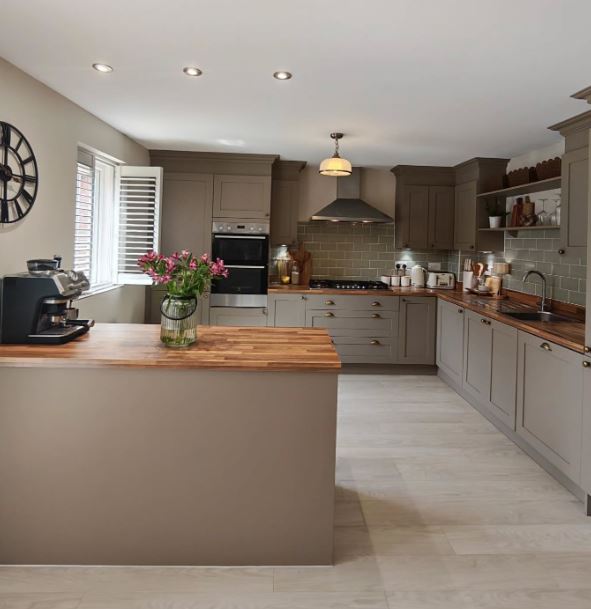
This kitchen uses a warm block-pattern surface across both the island and the perimeter counters. The shorter changes in colour create a butcher-block appearance rather than the long continuous grain seen on the first island.
That variation suits the taupe cabinets, aged brass-toned hardware, grey tiled backsplash, and pale floor because it adds warmth without requiring a dark dramatic finish.
The photograph does not confirm whether the visible worktops are painted laminate, real timber, or another material. Even so, the arrangement offers useful inspiration for painting laminate.
A similar effect would rely on many restrained rectangular sections, several related brown tones, and enough irregularity to prevent the pattern from looking like a checkerboard.
Materials and Tools for a Butcher-Block Effect
• Prepared and primed laminate countertop
• Light honey-brown or tan base paint
• Two or three compatible brown shades for block variation
• Small flat brushes, soft blending brush, and fine artist’s brush
• Straight edge, pencil, and low-tack tape for lightly planning sections
• Sponge or cloth for softening selected colour transitions
• Compatible clear protective finish
A Practical Way to Recreate the Block Pattern
1. Plan the scale before drawing every line. Measure the worktop and decide how wide the suggested timber strips should appear from across the room. Mark only a few reference lines at first. Very small blocks can make a large kitchen look busy, while oversized sections may resemble tiles rather than wood.
2. Apply the light base and establish long strips. Paint the prepared countertop in the lightest warm tone. Once it is ready, sketch or lightly mask several long strip divisions. Keep the lines mostly parallel to the front edge, allowing the pattern to turn logically at corners and around an island.
3. Break the strips into varied blocks. Add staggered end joints so neighbouring rows do not finish at the same point. Paint selected blocks with slightly darker or warmer shades, leaving others close to the base colour. Then soften hard colour boundaries with a dry brush or cloth if the chosen paint remains workable.
4. Add restrained grain and correct the rhythm. Use a fine brush to place a few grain marks inside selected blocks rather than outlining every rectangle heavily. Step back often. The first arrangement rarely stays unchanged, and removing one strong dark block can improve the whole surface more than adding five new details.
5. Seal the full kitchen consistently. When the decorative layers are ready, apply the compatible protective finish across each connected worktop using the same tools and technique. Pay close attention to the sink area, front edges, and joints. Allow the finish to cure fully before returning appliances and everyday items.
A simpler version can use only two wood tones and fewer end joints. For a pale Scandinavian direction, combine light beige, honey, and muted taupe. For a deeper traditional kitchen, use medium oak shades but keep the darkest marks limited. What matters here is the rhythm of the blocks, not perfectly imitating every pore in real timber.
Where Painted Laminate Usually Fails
A Glossy Surface Was Not Degreased or Abraded
Primer needs a clean, prepared surface to grip. Grease, silicone residue, and untouched gloss can create small areas where the coating separates first. Cleaning and abrasion are not interchangeable: sanding grease simply moves contamination around, while cleaning alone may leave the laminate too slick for the specified primer.
The Coats Were Applied Too Heavily
Heavy layers can collect along the front edge, stay soft underneath, or develop marks when the next coat is added. Thin controlled applications are slower, but they are easier to keep level. Follow the recoat guidance for the chosen product rather than adding another layer because the surface looks dry from a distance.
The Countertop Returned to Service Too Soon
Dry-to-touch and fully cured are not the same stage. Small appliances, chopping boards, water, and decorative trays can leave impressions or trap moisture in a coating that has not finished hardening. Plan another place for food preparation during the project so the countertop is not pressed back into use out of necessity.
Heat, Standing Water, and Direct Cutting Were Treated as Normal Use
A painted countertop should be protected with trivets, chopping boards, and trays. Wipe spills rather than allowing water to sit around the sink or seams, and do not place hot cookware directly on the coating. These habits are not complicated, but they matter more on a refinished surface than on some factory-made worktops.
How to Care for Painted Laminate Countertops
Use a soft cloth and a cleaner approved for the coating system. Abrasive powders, harsh scrubbers, and strong chemicals can dull the sheen or mark the clear finish. Lift small appliances rather than dragging them, place absorbent items on trays, and check the sink joint occasionally for failed sealant or trapped moisture.
Keep a small amount of the colour system labelled for future repairs when the manufacturer allows touch-ups. A minor chip is easier to address while it remains small and dry. Do not coat over an active water problem; trace the leak or failed joint first, let the area dry properly, and then decide whether the surface can be repaired.
Frequently Asked Questions
Can every laminate countertop be painted?
No. The laminate should be firmly bonded, and the material beneath it should remain dry and stable. Loose sheets, badly swollen edges, extensive burns, mould, or crumbling particleboard may make replacement or professional repair more sensible than painting.
Do I need to sand laminate before painting?
Most systems require the glossy surface to be deglossed or lightly abraded, but the exact method depends on the products selected. The aim is usually to improve adhesion without sanding through the laminate. Follow the primer manufacturer’s surface-preparation instructions and use a test area first.
Can I use ordinary wall paint?
Ordinary wall paint is not designed for the repeated handling, cleaning, moisture, and abrasion a countertop receives. Use a system intended for laminate, cabinetry, worktops, or another hard-use surface, and confirm that its primer and protective layers are compatible.
Does a painted countertop need a clear coat?
Some countertop systems include protection in the colour coat, while others require a separate clear finish. Do not assume that adding any clear varnish will improve durability; an incompatible topcoat can soften, wrinkle, or lift the layers underneath. Use the complete system recommended by the product manufacturer.
Can I paint around a sink without removing it?
It may be possible to paint carefully around a securely fitted sink, but the edge must be clean, dry, and free from failing silicone. Removing old sealant and creating a neat waterproof joint can be easier when access is clear. Where plumbing or sink removal is uncertain, ask a suitable professional rather than risking damage or a hidden leak.
Make the Existing Countertop Worth Keeping
Learning how to paint laminate countertops is less about covering an old pattern and more about building a finish that suits the surface’s daily job. The glossy wood-grain island makes a strong feature, the smooth white counter keeps the room calm, and the butcher-block effect introduces warmth through smaller colour changes.
Each approach starts with the same unglamorous work: inspection, cleaning, abrasion, careful masking, and patient curing.
Begin with a sample board and choose the finish that fits the cabinets, light, and amount of use in the kitchen. Then keep the decoration controlled and protect the completed surface as you would any refinished item.
Which direction would suit your existing countertop best: deep wood grain, clean white, or a softer block-pattern finish?
How to Paint Bathroom Cabinets: A Complete Step-by-Step Guide
How to Paint Laminate Cabinets Like a Pro: A Step-by-Step Guide
How to Paint Baseboards: Tips, Tricks, and Mistakes to Avoid
How to Paint Adirondack Chairs: A Complete Guide to Reviving Your Outdoor Furniture