Pressed-wood furniture with a laminate coating can look surprisingly stubborn when its colour no longer suits the room. The surface is often too smooth for ordinary paint, while the particleboard or fibreboard underneath can be damaged by moisture and aggressive sanding. That combination makes preparation more important than the colour itself.
I usually look at the edges first. If the laminate remains firmly bonded and the pressed-wood core feels dry and solid, the piece may still have years of useful life left.
A careful painted finish can calm a dated cabinet, highlight raised panels, or give a plain hutch enough character to work in a completely different room. I don’t think the aim should be to hide every sign that the furniture has been used. The better goal is a clean, durable surface that respects what the material can safely handle.
The furniture makeovers below move from soft distressed mint and floral details to warm cream, quiet beige, and deep teal. They also show why a laminate makeover is more convincing when the finish follows the shape of the cabinet instead of treating every flat panel in exactly the same way.
Before You Paint Pressed Wood with Laminate on It
Empty the furniture and remove loose shelves before deciding that paint will solve the problem. Check the back, base, feet, door hinges, drawer runners, and every exposed edge. Laminate can look intact from the front while the core underneath has swollen near the floor or along a damp wall. Paint may improve appearance, but it cannot restore strength to crumbling particleboard.
Identify the Surface Before Sanding
Look closely at a hidden edge, the back of a door, or an unfinished screw hole. Laminate usually appears as a thin decorative layer over a compressed core, while some pieces combine laminate sides with solid-wood trim or separate mouldings. Knowing which part is which prevents you from sanding through a thin coating while trying to treat the whole cabinet like natural timber.
Plan the Finish Around the Furniture’s Use
A display cabinet, bedside cupboard, sideboard, and corner hutch do not receive the same wear. Decide where hands, baskets, books, and doors will rub before choosing the paint system. Frequently touched tops and shelf edges need particular attention, while decorative backing panels can carry a softer finish because they are handled less often.
Remove Hardware and Label Every Part
Take photographs before removing doors, hinges, knobs, catches, and adjustable shelves. Label each part so it returns to the opening where it already fits. Pressed-wood furniture can have very little spare clearance, and even a thin coat of paint may make an unlabelled door rub when it is fitted in the wrong position.
Set Aside Pressed-Wood Furniture With:
• Swollen, soft, or crumbling particleboard around the base, top, sink area, or exposed edges
• Large areas of laminate that have lifted, bubbled, cracked, or separated from the core
• A persistent damp smell, active mould, or signs of continuing moisture
• Severely sagging shelves, bowed side panels, or a base that no longer sits level
• Loose joints that remain unstable after suitable tightening or repair
• Broken hinges or fasteners that have torn away large sections of the pressed-wood core
• Deep heat damage, burns, or missing surface material across a heavily used top
• Widespread peeling paint or an unknown old coating that cannot be prepared safely
• Structural parts that would need major rebuilding before the furniture could carry normal weight
• Damage that makes the cabinet unsafe for its intended room or storage purpose
A small chip or one loose edge may be repairable, but broad swelling usually means moisture has changed the core itself. Do not seal damp damage beneath primer and hope it will stay hidden. A badly weakened piece may need professional repair, replacement panels, or retirement from load-bearing use.
For Pressed Wood with Laminate Suitable for Painting, Inspect:
• Whether the laminate remains flat and firmly bonded across doors, drawers, sides, and top surfaces
• The firmness of the pressed-wood core at corners, screw holes, feet, and lower edges
• Door alignment, drawer movement, shelf support, and the strength of the back panel
• Small chips, scratches, dents, and exposed edges that need filling or sealing
• Grease, polish, wax, smoke residue, adhesive, or silicone that may interfere with adhesion
• The level of gloss and whether a light abrasion test creates an even dull surface
• Existing paint, varnish, or factory coating and whether it remains well attached
• Solid-wood trim, metal hardware, glass, wire, or fabric panels that require separate preparation
• The amount of clearance around doors, drawers, shelves, catches, and hinges
• Whether the top needs extra protection for lamps, plant pots, serving items, or daily storage
• Whether the selected primer, paint, and protective finish are designed to work together
• A hidden test patch for adhesion, colour, sheen, and compatibility before the full makeover begins
Measure the furniture and its intended space before beginning. A narrow cabinet may suit a display corner, while a wider sideboard needs enough room for doors and drawers to open without striking a wall or rug. Once the new purpose is clear, it becomes easier to decide which surfaces need the most durable finish and which decorative details are worth keeping.
Useful Materials and Tools
• Mild degreasing cleaner suitable for laminate and clean lint-free cloths
• Fine abrasive pads or sandpaper recommended for the chosen primer system
• Vacuum cleaner and a clean dust-removal cloth
• Filler or repair compound suitable for small chips and stable pressed-wood edges
• Wood glue or suitable adhesive for minor bonded-edge repairs
• Clamps and protective blocks for holding repaired laminate flat
• High-adhesion bonding primer for smooth, non-porous surfaces
• Furniture paint compatible with the selected primer
• Small smooth roller, quality brush, and detail brush for moulding
• Painter’s tape, drop cloth, and masking paper or plastic
• Screwdrivers, small drill, and replacement fasteners when the core can hold them securely
• New knobs, cleaned original hardware, decorative transfers, or backing paper where required
• Compatible clear protective finish when the paint system calls for one
• Gloves, safety glasses, and suitable breathing protection
• A sample board or hidden area for testing the complete coating system
Choose primer, paint, and any protective finish as one compatible system. Follow the manufacturer’s instructions for ventilation, application, recoat timing, curing, and cleaning. There is no benefit in adding an extra clear coat if it is not compatible with the paint beneath it; more layers do not automatically mean a stronger finish.
Give a Tall Display Cabinet a Distressed Mint Finish
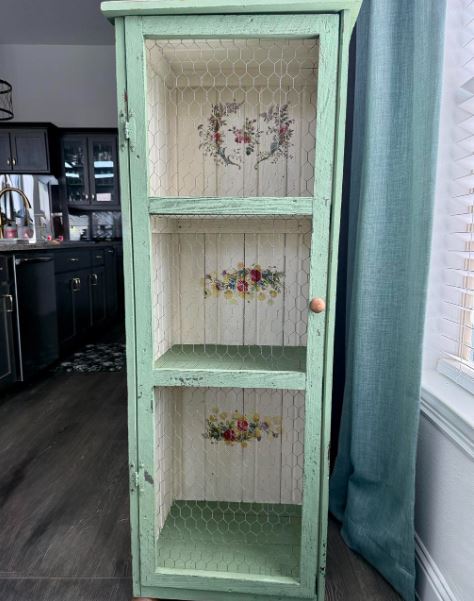
A tall, narrow cabinet benefits from colour that makes its height feel intentional rather than heavy. The soft mint exterior gives this piece a faded farmhouse character, while the pale interior keeps the shelves easy to see. Small floral details on the backing panels stop the inside from looking empty, and the chicken-wire front adds texture without hiding the contents.
This kind of finish can work on laminated pressed wood, but the distressed areas need restraint. Sanding through paint is very different from sanding deeply into laminate. I’d create most of the worn effect with controlled paint layers and a light hand, keeping abrasion away from swollen edges or exposed particleboard.
Materials and Tools
• Tall laminated cabinet with a stable frame and firmly attached surface
• Cleaner, fine abrasive pad, repair filler, and bonding primer
• Soft mint or pale green furniture paint and a lighter or darker accent tone if desired
• Small roller, angled brush, and fine detail brush
• Chicken wire only if the door frame can support it safely, plus suitable retaining clips or staples
• Floral paper, transfers, or thin decorative panels for the cabinet back
• Simple wooden knob, cleaned original hardware, and compatible protective finish
• Gloves and eye protection, especially when cutting or fastening wire
A Practical Way to Recreate the Look
1. Check the cabinet and separate the removable parts. Remove the door, knob, shelves, and backing panel when construction allows. Test the frame for movement and repair only sound, stable edges. If the laminate is lifting across a large area, do not rely on paint to hold it down.
2. Clean, degloss, and prime the laminate. Wash away grease and polish, then abrade the glossy surface lightly and evenly. Remove every trace of dust before applying a bonding primer in thin coats. Keep primer out of hinge recesses and shelf-pin holes so the parts still fit afterward.
3. Build the mint finish without exposing the core. Apply the main colour with a small roller on broad panels and a brush around edges. Add a slightly different tone only where it helps the frame look aged, then soften selected high points very gently. The laminate should remain sealed beneath the paint rather than appearing as raw chips.
4. Add the decorative interior and wire front. Fit floral paper or panels to the back only after checking the layout from each shelf opening. If replacing a door insert with chicken wire, cut and secure it carefully so no sharp edge remains exposed. Keep the wire evenly tensioned without pulling a light pressed-wood frame out of square.
5. Reassemble and test everyday use. Reinstall the shelves, door, and knob after the finish is ready for handling. Open the door repeatedly and check for rubbing at the painted edges. Use the cabinet for light display items unless the shelf supports have been confirmed strong enough for heavier storage.
For a simpler version, keep the original door insert and use floral backing only inside. A solid sage or smoky blue finish would also suit the narrow shape. For me, the worn edges work because they are limited; covering every corner with artificial distressing would make the laminate damage look accidental rather than considered.
Pair a Cream Painted Cabinet with a Warm Wood-Look Top
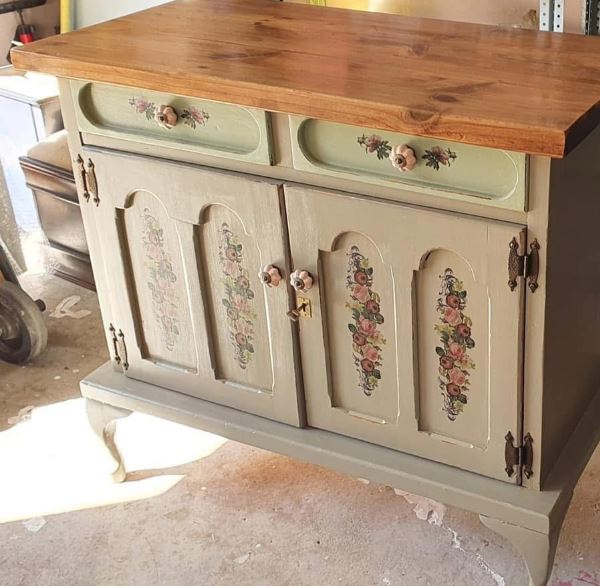
This compact cabinet uses contrast rather than one colour across every surface. The cream body keeps the moulded doors and drawers light, while the brown top visually grounds the piece. Floral details repeat across the recessed panels, and rose-shaped knobs continue the softer theme without covering the cabinet’s original proportions.
The top may be natural wood, veneer, or a wood-effect laminate, so it should be identified before preparation. If your own cabinet has a laminated top, do not sand it as though thick timber lies underneath. A painted wood effect or a solid warm brown coating can create a similar contrast while keeping the laminate sealed.
Materials and Tools
• Compact laminated cabinet with secure doors, drawers, and legs
• Cleaner, fine abrasive pads, filler, bonding primer, and masking tape
• Warm cream, soft grey, or pale beige furniture paint
• A compatible brown paint system for a wood-look laminate top, or a suitable finish for real timber
• Floral transfers, decoupage paper, or hand-painted motifs
• Small roller, flat brush, detail brush, and smoothing tool
• Rose-style knobs or simple replacements that fit the existing holes
• Cleaned hinges and latches, plus a compatible protective coating where required
A Practical Way to Recreate the Look
1. Work out which surfaces need separate treatment. Remove the doors, drawers, knobs, and hinges, then inspect the top from an unfinished edge. Decide whether it is laminate, veneer, or solid timber before sanding. Label the fronts so the curved panels and gaps line up correctly during reassembly.
2. Prepare the body for a pale finish. Clean the laminate thoroughly and repair small stable chips. Lightly degloss the surface, apply bonding primer, and check the pale primer under side light for ridges. Cream paint makes poor preparation easy to notice around recesses and corners.
3. Create the warm top safely. For natural timber, use a preparation method suited to the wood and existing finish. For laminate, prime it and build the colour with compatible brown layers, using long restrained strokes if you want a wood-like direction. Keep the edges neat where the top meets the painted base.
4. Arrange the floral details before attaching them. Place paper templates over the recessed panels and drawer fronts to judge scale and repetition. Then apply the chosen transfer or paper method according to its instructions, smoothing from the centre outward. Stop before every available panel becomes crowded with decoration.
5. Refit the hardware and protect contact points. Install the knobs, hinges, and latch only after the finish is ready for careful handling. Adjust doors before forcing them against newly painted edges, and add small bumpers where appropriate. Use a tray or mat on the top if the cabinet will hold plant pots, bottles, or regularly moved objects.
A beginner could skip the floral transfers and let the cream-and-brown contrast do the work. Another option is to decorate only the upper drawers or one panel on each door. I know it can feel tempting to use every pretty motif in the packet, but leaving quiet areas makes the painted details easier to notice.
Use Warm Neutral Paint to Define Raised Panels
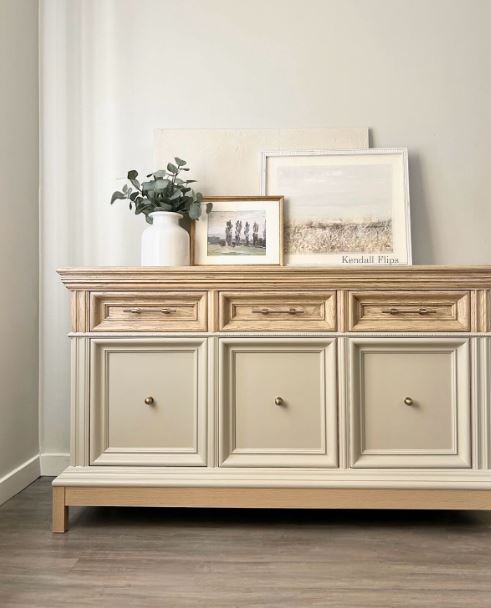
A wide sideboard already has plenty of visual structure, so a quiet colour can be more effective than an elaborate finish. The warm beige paint connects the three drawers and three doors, while slightly lighter moulding helps the raised panels remain visible. Small round knobs keep the long front calm and allow the frame lines to carry the design.
This approach is useful when a laminate pattern feels dated but the cabinet’s proportions still work. It also suits rooms where floral transfers or heavy distressing would compete with artwork, rugs, or other furniture. The finish looks simple, but even drawer gaps and crisp panel edges are what make it convincing.
Materials and Tools
• Wide laminated sideboard with stable doors, drawers, and base
• Degreasing cleaner, fine abrasive pads, filler, and bonding primer
• Warm beige, putty, taupe, or soft mushroom furniture paint
• A slightly lighter or deeper compatible tone for restrained panel definition
• Smooth small roller, angled brush, and small detail brush
• Simple knobs or cleaned original hardware
• Measuring tape, screwdriver, felt pads, and compatible protective finish if needed
A Practical Way to Recreate the Look
1. Correct the fit before adding paint. Remove drawers and doors, then check whether any edge already rubs. Tighten hinges, repair secure screw holes where possible, and test the base for movement. Paint adds thickness, so a slightly tight drawer needs attention before the decorative work starts.
2. Prepare broad laminate panels evenly. Clean the surfaces, lightly dull the gloss, and vacuum the moulding lines carefully. Apply bonding primer in controlled coats, using a brush in narrow recesses and a roller on larger panels. Do not let primer collect in corners where it can soften the raised profile.
3. Apply the warm neutral base colour. Paint doors and drawers flat when possible so the coating can level without running. Work in a consistent direction across long rails and broad panels. Then inspect the colour in the room because a beige that looks grey in daylight may appear much warmer under evening lighting.
4. Define the moulding with a restrained second tone. Use a small brush or a nearly dry technique to place a slightly different colour on selected trim. Keep the effect subtle and repeat it consistently across all three sections. If one panel looks noticeably darker, soften it before the paint begins to set.
5. Reassemble with balanced spacing. Refit the drawers, doors, and knobs, then adjust gaps from one end of the sideboard to the other. Add bumpers where painted fronts meet the frame and keep heavy objects low inside. Anchor the furniture if its location, height, or drawer arrangement creates a tipping concern.
This method also works with smoky green, muted clay, or soft blue-grey. A very simple version can use one colour only, relying on natural light to reveal the panel shape. I’d rather keep the highlighting faint than create a stripe around every moulding; the raised construction already provides enough depth.
Paint a Corner Hutch Deep Teal and Add Floral Door Panels
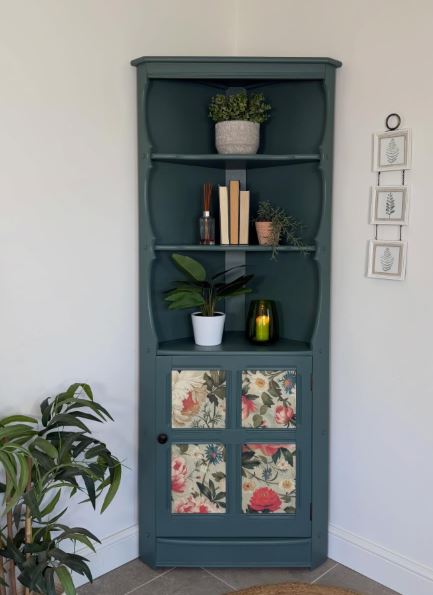
A corner hutch can disappear into the room when its finish is too similar to the wall, or feel bulky when the colour is too bright. Deep teal gives this narrow piece a clear outline while allowing the open shelves to hold plants, books, and small objects without looking cluttered. The floral lower panels introduce colour where the doors already provide a natural frame.
Because corner furniture has several angled surfaces, paint thickness and brush marks deserve extra attention. The inner shelf curves, door edges, and side seams can collect excess coating. This is where thin layers and patient inspection matter more than trying to finish the entire hutch in one heavy pass.
Materials and Tools
• Stable laminated corner hutch with sound shelves and cupboard doors
• Cleaner, fine abrasive pads, repair compound, and high-adhesion primer
• Deep teal, blue-green, or dark green furniture paint
• Small smooth roller, angled brush, and narrow detail brush
• Floral wallpaper, decoupage paper, fabric-backed panels, or removable inserts
• Straight edge, craft knife or scissors, cutting mat, and smoothing tool
• Suitable adhesive or removable mounting method for the chosen panel material
• Simple dark knob, door bumpers, and compatible protective finish if required
A Practical Way to Recreate the Look
1. Inspect the angled structure and shelf supports. Move the hutch away from the wall and check the back, base, corner joints, and shelf edges. Repair loose but sound joints before painting. Confirm that the cupboard doors close squarely, as an uneven corner cabinet can place extra strain on light pressed-wood panels.
2. Prepare the laminate in small sections. Remove the doors and knob, then clean the open shelves from top to bottom. Lightly degloss each surface and apply bonding primer, keeping coats thin on curved shelf fronts and narrow internal corners. Use a small brush to remove pooling before it dries into ridges.
3. Build an even deep-teal finish. Paint the inner shelves first, followed by the outer frame, sides, and doors. A dark colour can hide varied laminate patterns, but it also makes dust and missed edges obvious. Check the hutch under side light and correct thin areas without repeatedly brushing paint that has begun to settle.
4. Cut and place the floral inserts. Measure each recessed door panel separately because the openings may not be identical. Cut paper or removable inserts slightly oversized, test the fit, and then trim gradually. Align the strongest flowers across the four panels so the design feels connected rather than randomly divided.
5. Reassemble and style the shelves lightly. Fit the doors, knob, and bumpers, then check that the decorative panels remain flat when the cupboard is used. Place heavier objects on lower shelves and leave some open space between plants, books, and containers. The floral doors already provide pattern, so the upper display does not need to be filled completely.
For a rental-friendly or reversible option, fit the floral design to thin removable boards rather than attaching paper directly to the doors. You could also use cane-effect panels, plain linen, or a small-scale geometric pattern. The deep teal is strong enough to stand alone, so removing the floral inserts later would still leave a useful painted hutch.
What Can Cause Paint to Fail on Laminated Pressed Wood
Painting Over Loose Laminate
Primer bonds to the surface it touches, not to the weak core beneath it. If the laminate is bubbling or lifting, paint may remain attached to the loose sheet while the sheet continues separating. Repair only small, stable areas with a method suited to the material, and set aside furniture with widespread delamination.
Sanding Through the Decorative Layer
Laminate needs enough abrasion to reduce gloss, not deep sanding intended for solid wood. Once the pressed-wood core is exposed, its fibres can become rough and absorb moisture from coatings unevenly. Use a fine abrasive, gentle pressure, and frequent visual checks, especially at corners and moulded edges.
Skipping the Hidden Adhesion Test
A coating system may behave differently over factory laminate, old polish, or a previous furniture paint. Test the cleaner, abrasion, primer, colour, and protective finish together on a hidden area. A small failure behind a door is easier to correct than peeling across the entire cabinet front.
Applying Heavy Paint Around Doors and Drawers
Thick layers collect at contact points and reduce already limited clearance. Doors may stick, drawer fronts may chip, and shelves may scrape as soon as the furniture is used. Correct rubbing before painting, keep coats thin, and test moving parts carefully during reassembly.
Closing the Furniture Before the Finish Is Ready
A surface can feel dry while still being vulnerable to pressure from hinges, knobs, stacked objects, and door bumpers. Follow the product guidance rather than guessing from touch. Then handle the furniture gently at first and avoid loading shelves until the coating system is ready for normal use.
Using Decoration Without Considering Function
Transfers, paper panels, wire inserts, and distressed edges should support the cabinet’s purpose. Delicate paper near wet plant pots or exposed wire edges on a frequently handled door can create avoidable problems. Choose washable, removable, or protected details according to where the piece will stand and how often it will be used.
Frequently Asked Questions
Can you paint laminate over pressed wood?
Yes, when the laminate is firmly attached and the pressed-wood core is dry and structurally sound. The surface usually needs thorough cleaning, light deglossing, and a bonding primer intended for smooth non-porous materials. Paint should not be used to hide broad swelling, crumbling edges, or loose laminate.
Do I need to sand laminated particleboard before painting?
Most systems benefit from light abrasion, but the exact preparation depends on the primer and existing coating. The aim is to reduce gloss and improve grip without cutting through the laminate. A fine abrasive pad is often easier to control around edges than aggressive sandpaper.
What type of primer works on laminate furniture?
Use a high-adhesion bonding primer that specifically lists slick or non-porous surfaces among its suitable uses. Confirm that it is compatible with the furniture paint and any protective finish you plan to apply. Test the full system on a hidden area rather than assuming that products from different ranges will work together.
Can I paint a laminate top to look like wood?
A wood-look effect can be created with compatible brown layers, glazes, or controlled grain-like strokes over a suitable primer. Keep the pattern restrained and protect the top according to its intended use. Do not sand a laminate top deeply in an attempt to reveal timber that may not be present.
How can I stop painted doors and drawers from sticking?
Repair poor alignment before painting and keep coating layers thin around contact points. Label every part, clear paint from hinge recesses, and use small bumpers where appropriate. Allow the finish to reach the handling stage specified by the product before closing doors or loading drawers.
Can decorative paper be added over painted laminate furniture?
Yes, provided the painted surface is ready and the adhesive or mounting method is compatible with it. Measure recessed panels separately and test the layout before attaching anything. Removable inserts are a useful alternative when you may want to change the pattern later.
Does painted pressed-wood furniture need a clear topcoat?
That depends on the paint system and how the furniture will be used. Some coatings are designed to work without an additional layer, while others specify a compatible protective finish. Do not add an unrelated clear coat simply because the surface will receive wear; incompatibility can cause clouding, wrinkling, or poor adhesion.
Let the Laminate Surface Guide the Makeover
The most reliable way to paint pressed wood with laminate on it is to work with the material rather than treating it like solid timber. Firm edges, a dry core, careful cleaning, gentle abrasion, and a suitable bonding primer create the foundation.
After that, colour and decoration can follow the furniture’s shape: mint can lighten a narrow display cabinet, cream can soften a compact cupboard, warm beige can define a broad sideboard, and deep teal can give a corner hutch a clearer presence.
Reusing a sound cabinet also avoids discarding storage that still works. Begin with the piece that needs the fewest structural repairs, test every coating in a hidden area, and give moving parts enough clearance. Which finish would suit the laminated pressed-wood furniture you already have at home?
How to Use Acrylic Paint like Watercolor
How To Paint Furniture Without Sanding: Transform Your Furniture with Ease