A garage door can occupy a surprisingly large part of the front of a house, so faded paint, rust marks, uneven colour, or an outdated finish rarely stays unnoticed. Replacing the entire door may feel like the obvious solution, but a sound door often needs careful preparation and a better colour rather than complete removal.
I prefer to look at what can be kept before replacing a large working feature. Paint can help an existing garage door sit more comfortably beside the brick, siding, roof, trim, shutters, and front entrance. It can also highlight panel details that disappeared beneath an old pale finish.
The best result begins long before the roller touches the door. You need to identify the material, check the manufacturer’s painting instructions, clean the surface thoroughly, repair loose paint or rust, and choose products made for exterior use.
Garage doors move, flex, heat up in sunlight, and meet weather from several directions. That makes product compatibility and patient preparation more important than trying to finish everything in one hurried afternoon.
Before You Begin
Check the label, paperwork, or manufacturer details for the garage door before changing its finish. Some manufacturers restrict the types or colours of paint that can be used, and ignoring those instructions may affect the warranty. Dark colours can also create additional heat concerns on certain doors, particularly when a pale factory finish is changed to black.
Examine the door while it is closed and again while each section is visible. Look for:
- Loose or flaking paint
- Rust on metal panels
- Cracked or exposed wood
- Dents or damaged overlays
- Failing seals
- Loose decorative hardware
- Moisture trapped around lower edges
- Paint already sticking between moving sections
A garage door with broken springs, damaged tracks, severe panel distortion, or unsafe movement needs professional repair before cosmetic work begins. Painting must never involve adjusting or dismantling the spring, cable, track, or opener system.
Choose a dry period and avoid painting in rain, strong direct sunlight, or conditions outside the product’s permitted temperature range. Paint that dries too quickly can become difficult to level, while cold or damp conditions may delay curing. Always rely on the technical instructions printed for the exact primer and paint rather than using a general drying estimate.
Materials and Tools
- Cleaner suitable for the garage-door material
- Bucket, sponge, and soft brush
- Garden hose
- Scraper for loose paint
- Sandpaper or sanding sponge
- Wire brush for localised rust
- Exterior primer suitable for wood or metal
- Compatible exterior paint
- Angled brush
- Small roller and tray
- Painter’s tape
- Drop cloths
- Gloves
- Eye protection
- Dust protection when sanding
- Step ladder used on firm, level ground
- Small touch-up brush
Do not paint the tracks, rollers, cables, springs, flexible seals, or moving joints unless the door manufacturer specifically allows it. Protect windows, handles, trim, weather seals, and surrounding masonry before beginning.
Refresh a Faded Door With Charcoal Grey
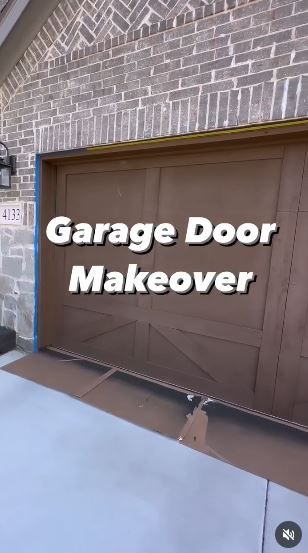
A charcoal garage door can create stronger contrast than white or beige while remaining softer than pure black. This makeover uses a deep grey finish to separate the door from the lighter exterior and make its horizontal sections more noticeable.
Charcoal is often easier to coordinate with roofing, stone, shutters, dark window frames, and metal lighting. The undertone still matters. One grey may appear blue beside warm brick, while another can turn brown or green in afternoon light.
Paint a sample board and hold it vertically beside the door at different times of day. A small sample viewed indoors cannot show how the colour will react to direct sun, shade, nearby landscaping, and exterior lighting.
Materials and Tools
- Exterior cleaner
- Scraper and sanding sponge
- Rust-inhibiting primer for exposed metal, if needed
- Exterior paint approved for the door
- Angled brush
- Fine roller
- Painter’s tape
- Drop cloth
- Sample board
Paint the Charcoal Finish in Four Steps
- Clean and assess the existing coating. Wash the door from top to bottom and remove residue with clean water. Once dry, scrape loose paint and feather rough edges so the new coating does not simply copy every ridge beneath it.
- Prime only as the surface requires. Spot-prime bare metal, rust-treated areas, repairs, or exposed material with a compatible primer. A fully sound painted surface may need different preparation, so follow the chosen paint and door manufacturer’s directions.
- Cut in around the panel details. Use an angled brush around windows, recessed sections, raised edges, and the door perimeter. Then roll the flatter areas in controlled sections, keeping the roller lightly loaded to reduce drips.
- Apply the next coat and inspect the joins. Follow the stated recoating time, then repeat the same order. Before operating the door, check that paint has not bridged flexible seals or collected between panel edges.
For me, charcoal works best when it connects to at least one other feature on the house. It might relate to the roof, window frames, shutters, or exterior lights rather than appearing as one unrelated dark rectangle.
A medium grey is a safer variation for doors receiving strong sun or for homeowners who want less contrast. You could also paint the surrounding trim in a slightly lighter version of the same colour family.
Use Deep Green as an Exterior Accent
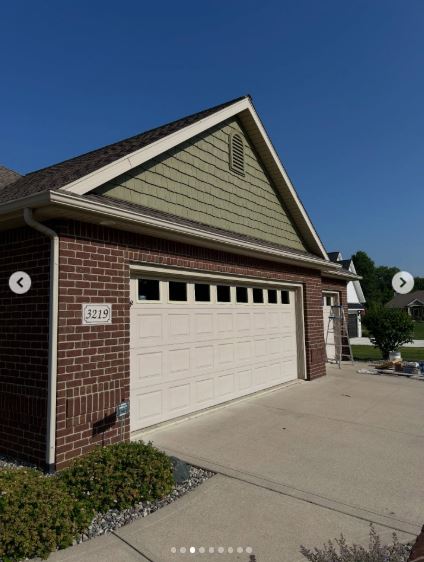
This project uses a deep green on the garage door and shutters, giving the home a repeated accent rather than treating the garage as a separate feature. The colour works because it appears in more than one place and relates to the exterior as a complete palette.
Green can sit comfortably beside warm brick, cream siding, timber details, planting, and muted stone. Even so, the exact shade needs testing. Dark olive, blue-green, forest green, and grey-green can look very different beside the same wall.
Materials and Tools
- Exterior paint in a tested green shade
- Compatible primer
- Cleaner and sponge
- Sanding materials
- Angled brush
- Small roller
- Painter’s tape
- Sample boards
- Colour references from the shutters or trim
Coordinate the Colour in Four Steps
- Study the existing exterior palette. Note the undertones in brick, roofing, stone, siding, and fixed window frames. Choose several green samples that connect with those permanent materials rather than matching only a cushion, plant pot, or temporary decoration.
- Test the colour vertically outdoors. Paint large sample boards and move them beside the garage door, shutters, and front entrance. Check them in morning sun, afternoon light, full shade, and under exterior lighting.
- Prepare and paint the garage door systematically. Clean, repair, prime where required, and paint from the upper panels downward. Keep the application consistent so the same colour does not appear patchy across different sections.
- Repeat the accent carefully elsewhere. Paint shutters or another suitable exterior feature only when the material and coating system allow it. There’s no need to repeat the green on every possible object around the house.
The part I would keep restrained is the repetition. A garage door and shutters may create enough connection; adding green to the trim, railings, furniture, pots, and front door could make the exterior feel overplanned.
A muted sage can create a lighter version, while a deep blue-green may suit cool grey siding. You could also keep the garage door neutral and introduce green only through the surrounding trim.
Coordinate the Garage Door With the Main Entrance
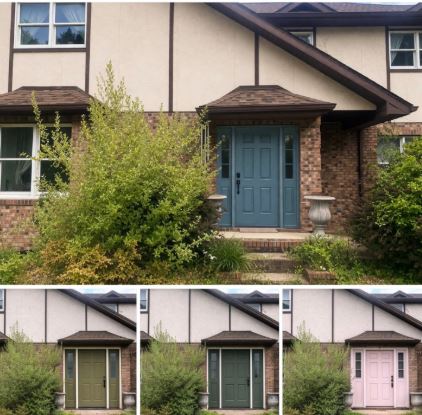
A garage door often feels disconnected because its colour relates to neither the front entrance nor the fixed materials around it. This exterior refresh coordinates the garage and other doors so they read as part of one design rather than isolated updates.
Coordination does not require painting every door exactly the same colour. A garage door can use a quieter mid-tone while the front door carries the deeper accent. Another option is to repeat one colour while changing the sheen or surrounding trim.
Benjamin Moore recommends considering the full exterior, including trim and shutters, when selecting a garage-door colour. Testing the proposed colour before committing also helps determine whether the door should blend in or stand out.
Materials and Tools
- Exterior colour samples
- Large sample boards
- Exterior cleaner
- Material-appropriate primers
- Compatible paints for each door
- Brushes and rollers
- Painter’s tape
- Notebook or phone camera for comparing options
Plan the Coordinated Finish in Four Steps
- Identify which feature should receive the most attention. Decide whether the front entrance or the garage should be the stronger focal point. A large garage door may need a quieter shade when the entrance already has decorative glass, columns, or a bold colour.
- Build a small exterior palette. Choose a main wall colour, trim colour, and one or two accents. Place the samples beside the roof, masonry, windows, and paving rather than judging them individually.
- Paint each surface with its correct system. A wooden front door and metal garage door may require different primers and coatings even when their finished colours look similar. Follow the preparation instructions for each material.
- Inspect the complete facade before adding more colour. Let the major painted areas settle visually, then decide whether handles, lights, shutters, or planters need any change. Often they do not.
I’d rather coordinate through related undertones than force an exact match across materials. The same paint colour can appear different on wood, metal, and textured siding, so visual balance matters more than matching a label.
For a gentle result, use a warm greige garage door with a deeper brown or green entrance. For stronger contrast, repeat a dark door colour and keep the surrounding trim light.
Paint a Faux Wood Finish on a Metal Garage Door
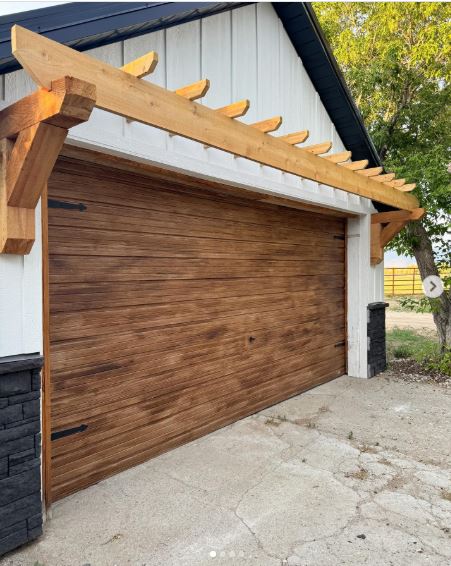
This project changes a plain garage door with a faux wood treatment, then finishes the look with black decorative hardware. The horizontal brown movement follows the panel layout, making the painted surface resemble timber from a distance.
A faux wood finish requires more planning than a solid colour. The base coat, glaze or upper colour, grain direction, and protective system must all be compatible with the garage-door material. A decorative gel stain or glaze should not be applied merely because it worked on indoor furniture.
The grain should follow the visual construction of the door. Horizontal panels normally look more convincing when the main grain runs horizontally, while vertical frame details may change direction.
Materials and Tools
- Cleaner
- Material-appropriate primer
- Warm tan or brown exterior base coat
- Compatible darker glaze, coating, or faux-finish product
- Wide brush or graining tool
- Small detail brush
- Clean cloths
- Sample metal panel or board
- Exterior protective finish when required
- Optional manufacturer-approved decorative hardware
Build the Faux Wood Effect in Five Steps
- Test the complete system first. Apply the primer, base, grain colour, and any protective finish to a sample surface. Check adhesion, colour, sheen, and whether the upper layer remains workable long enough to create grain.
- Apply an even warm base. Prepare the door fully and cover it with the lighter colour. The base should remain visible through the darker layer, so avoid choosing two colours that are almost identical.
- Work panel by panel. Apply a controlled amount of the darker product and drag the brush or graining tool in the intended direction. Vary the pressure and allow some sections to remain lighter.
- Create joins that respect the door design. Stop the grain at panel edges rather than dragging one continuous mark across hinges, gaps, windows, or frame details. Step back after each row to check whether the movement remains consistent.
- Protect and finish the appearance. Add only the protective coating recommended for the chosen system. Install decorative handles or magnetic accents only when they are suitable for the door and cannot interfere with its movement.
For me, the grain should be visible without turning every panel into a collection of dark stripes. A softer finish often reads as wood more convincingly from the driveway.
You could use a pale oak palette, medium walnut, weathered grey wood, or a deeper brown. Practise on a small side door or removable sample before attempting the full garage door.
Refresh a Real Wooden Garage Door With Exterior Stain
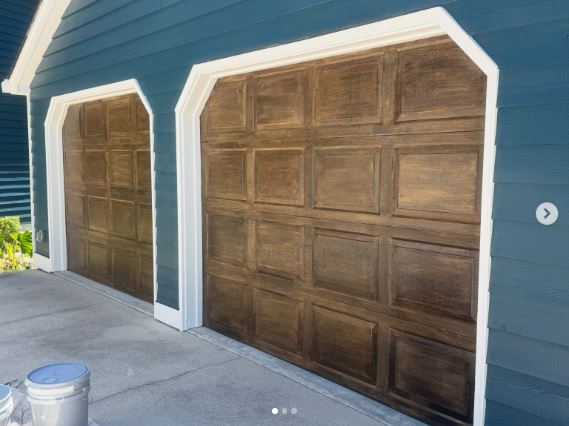
A real wooden garage door may not need opaque paint at all. This project refreshes stained timber so its natural grain remains part of the final appearance rather than being hidden beneath a solid coating.
Wood needs close inspection before refinishing because lower edges, panel joins, and exposed sections may hold moisture or show cracking. Peeling clear finish, grey fibres, and uneven fading must be prepared according to the stain manufacturer’s instructions.
Exterior stain can be transparent, semi-transparent, or more solid in appearance. The existing finish and condition of the door will determine which options remain practical. Benjamin Moore lists exterior stain as an appropriate finish option for wooden garage doors, alongside exterior acrylic paint for wood and metal.
Materials and Tools
- Wood cleaner suitable for exterior doors
- Scraper
- Sanding materials
- Exterior wood stain
- Compatible conditioner or primer when specified
- Natural- or synthetic-bristle brush suited to the product
- Cloths
- Painter’s tape
- Drop cloth
- Protective equipment
Refresh the Wood in Four Steps
- Inspect the timber and existing finish. Check for cracks, rot, failing joints, loose finish, and water damage. Repair structural problems before treating colour loss as the main issue.
- Clean and prepare the grain. Remove surface dirt and loose coating without damaging sound wood. Sand or strip only as required by the stain system, then remove the dust completely.
- Apply the stain in manageable sections. Follow the panel and grain direction, keeping the edge workable so one area does not dry before the next begins. Wipe or brush excess product according to the manufacturer’s instructions.
- Check the door after the finish cures. Reconnect and operate the door carefully, then inspect the edges and joints. Maintain the wood before the finish begins failing badly again.
One detail I wouldn’t ignore is the lower edge. It sits close to rain splash, damp paving, and road dirt, so fading or coating failure may begin there before it becomes obvious across the main panels.
A more opaque stain can help unify uneven wood while retaining some texture. A clear or lighter treatment may suit timber that remains consistent and attractive after cleaning.
A Reliable Five-Step Garage-Door Painting Method
The project ideas use different colours and decorative finishes, but the basic professional process remains similar.
- Confirm the material and approved coating. Identify whether the door is steel, aluminium, wood, composite, vinyl, or another material. Read the manufacturer’s paint restrictions before choosing a primer, colour, or dark finish.
- Clean and repair the surface. Wash from top to bottom with an appropriate cleaner, rinse, and allow the door to dry. Remove loose paint, treat rust, dull glossy areas when required, and repair only with products suitable for the door.
- Mask and secure the working area. Disconnect the opener, protect windows and trim, cover the driveway, and keep people away from the work zone. Do not interfere with springs, cables, rollers, or tracks.
- Prime and paint from the top down. Brush panel recesses and edges before rolling the flat areas. Follow the stated drying and recoating times, and avoid overloading the roller.
- Inspect before returning the door to service. Remove tape carefully, check for paint bridging between moving sections, and allow the coating to cure. Reconnect the opener only after the door moves freely and safely.
This sequence matches manufacturer guidance that emphasises cleaning, removing loose paint, treating rust, protecting hardware and windows, applying compatible primer, and working from the upper panels downward.
Common Mistakes to Avoid
Ignoring the Manufacturer’s Colour Restrictions
A paint colour may affect heat absorption, door performance, and warranty coverage. Check the documentation before changing a pale door to black or another very dark shade.
Painting Over Dirt or Chalking
Exterior grime creates a weak layer beneath the paint. Wash the door properly, rinse away cleaner residue, and let it dry before continuing. Clopay recommends cleaning from top to bottom and avoiding abrasive powders or solvents on its doors.
Leaving Rust Beneath New Paint
Rust may continue spreading beneath the coating. Remove loose rust with a wire brush and use a suitable rust-inhibiting primer on exposed areas.
Painting the Moving Hardware
Paint on tracks, rollers, cables, springs, seals, or joints can interfere with operation. Mask these areas and keep decorative coatings on approved surfaces only.
Painting in Direct Hot Sun
Strong sunlight may heat the door and make the paint dry too quickly to level properly. Choose a suitable weather window and follow the environmental limits stated for the coating.
Applying One Heavy Coat
Heavy paint can sag, collect in panel corners, and bridge moving gaps. Use controlled layers and allow the recommended time between coats.
Reconnecting the Opener Too Soon
The door should move freely without sticking before automatic operation resumes. Inspect the panel joints and remove accidental paint bridges first.
Choosing Colour Without Viewing It Outdoors
A colour may change beside brick, siding, roof materials, and natural light. Test large samples vertically and observe them throughout the day.
Frequently Asked Questions
What type of paint should I use on a garage door?
Use an exterior coating approved for the door’s material and permitted by its manufacturer. Benjamin Moore recommends exterior acrylic options for wood and metal, while individual garage-door manufacturers may specify or prohibit particular coatings.
Do I need to sand the garage door?
Remove loose paint and smooth rough edges, and dull an existing glossy finish when the selected coating requires it. The amount of sanding depends on the surface condition, material, and product instructions.
Is primer always necessary?
Bare material, repairs, exposed metal, rust-treated areas, and major colour changes often need primer. A sound existing coating may not require full priming when the new paint specifically allows direct application.
Can I paint a white garage door black?
Only after checking the manufacturer’s approved colour range and warranty conditions. Some doors may absorb excessive heat or experience performance problems when changed to a very dark colour.
Should I use a brush, roller, or sprayer?
A brush helps with edges, recesses, and window details, while a roller works well across broad flat panels. Spraying can produce a smooth finish but requires careful masking, suitable equipment, weather control, and safe handling.
Can I paint the door while it is closed?
Many sections can be painted while the door is closed, but carefully repositioning it may help expose panel edges. Disconnect the opener first and follow the manufacturer’s safety instructions. Never place hands near springs, cables, or other high-tension components.
How should I maintain the painted door?
Wash it gently using the cleaning method approved by the manufacturer and inspect it for chips, rust, or coating failure. Avoid abrasive cleaners and solvents that may damage the finish.
Let Preparation Do Most of the Professional Work
Learning how to paint your garage door like a pro has less to do with owning an expensive sprayer and more to do with making sensible decisions before opening the paint.
Check the door instructions, choose a colour that suits both the house and the material, clean every panel, repair unstable areas, and keep paint away from the moving system. Then work from the top down with controlled coats rather than trying to cover the whole door heavily in one pass.
Begin with large exterior colour samples before committing to charcoal, green, black, faux wood, or another strong finish. The right choice should connect the garage to the rest of the house rather than making it compete with the front entrance.
Which finish would suit your home best: a calm charcoal, a coordinated colour from the existing exterior, or a warmer faux wood effect?