Painted marble works best when the surface doesn’t look as though every line was planned with a ruler. Real stone contains cloudy areas, faint colour shifts, interrupted veins, and small details that almost disappear into the background. Those irregularities are what make faux marble painting techniques convincing.
I especially like this finish for furniture and counters that remain useful but no longer suit the room around them. A plain nightstand, secondhand table, dated vanity, or worn furniture top can become the foundation for something much more considered without replacing the entire object.
The paint colours can stay close to familiar white and grey marble, or move into pink, gold, green, black, and warmer stone-inspired combinations. What matters is building the effect slowly. A smooth base gives the design somewhere to sit, soft cloudy layers create depth, and a few carefully blended veins provide structure. I don’t think covering every inch with dark lines improves the finish. Usually, the quieter areas make the strongest veins more believable.
Before You Begin Painting a Marble Effect
Clean the surface before deciding which paint or primer to use. Grease, furniture polish, dust, soap residue, and hand oils can interfere with adhesion even when the surface appears clean. Kitchen and bathroom counters deserve extra attention around taps, handles, edges, and frequently touched areas.
Inspect the existing finish as well. Peeling paint, lifted laminate, loose veneer, swollen wood, and cracked acrylic need repair before decorative painting begins. A marble pattern may disguise colour, but it won’t make an unstable surface secure.
Choose products that suit the material beneath them. Wood, laminate, acrylic, previously painted furniture, and countertops may require different primers and protective finishes. For frequently used surfaces, confirm that the final sealer is suitable for the expected wear, moisture, and cleaning routine.
Keep a photograph or sample of real marble nearby. You aren’t trying to copy every line exactly. It simply helps you notice how veins divide, fade, widen, reconnect, and disappear beneath softer colour.
Work in a ventilated space and follow the safety instructions for primers, paints, glazes, and clear coatings. Wear gloves when required, protect the surrounding floor, and keep children and pets away from wet coatings and tools.
Paint a Soft Faux Marble Top on a Nightstand
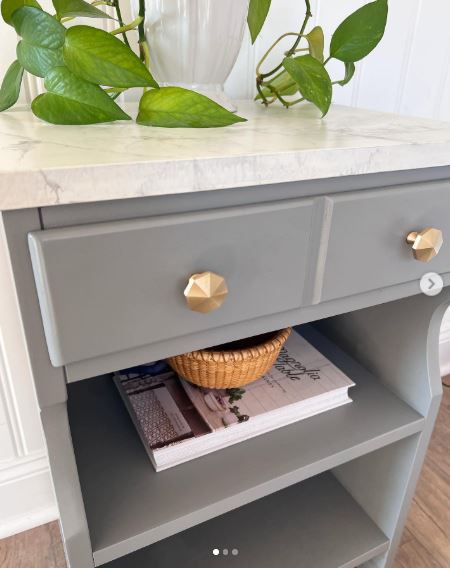
This nightstand makeover uses several chalk-paint colours, a brush, and blown air to create a soft faux marble effect across the top. The finished surface appears lightly layered rather than covered with sharply defined veins, which suits a small bedroom piece where a heavily patterned top could feel overpowering.
The technique is useful for beginners because the cloudy background does part of the work. Instead of relying only on fine brush lines, you can let diluted colour spread and blend into the base. A hair dryer or similar source of cool, controlled air may help move wet paint, although the airflow should remain gentle enough to avoid pushing everything into one large puddle.
Materials and Tools
- A clean nightstand or bedside table
- Primer suitable for the existing surface
- Pale base paint
- Two or three grey, beige, or muted stone-coloured paints
- Small paintbrushes
- Soft flat brush
- Water or compatible glazing medium
- Small cups for mixing
- Natural sponge or lint-free cloth
- Hair dryer on a cool or low setting, if suitable
- Protective clear coat intended for furniture
Create the Finish in Four Steps
- Prepare a smooth, even background. Remove the drawer and hardware if they interfere with painting, then clean and prime the top as required. Apply the pale base colour in thin coats and allow it to become fully ready for decorative work before adding the marble details.
- Build soft cloudy patches. Dilute small amounts of the secondary colours and dab them lightly across selected areas. Blend the edges with a clean damp brush or sponge so the patches appear to sit beneath the surface rather than forming obvious painted circles.
- Add and move the veins. Paint a few loose, broken lines through the cloudy areas, changing the pressure so they don’t remain the same width. While the paint is still workable, use a soft brush or gentle airflow to feather parts of the lines and create small branches.
- Refine and protect the top. Soften any vein that looks too dark by glazing a little base colour over it. Once the effect has dried properly, apply a compatible clear finish and let it harden before returning lamps, books, or drinks to the nightstand.
The part I would watch carefully is the airflow. Too much pressure can scatter wet paint towards the edge and leave a pattern that looks more like a weather map than stone.
A smaller variation could be painted only inside a tray top or drawer-front panel. Warm beige and pale taupe would create a softer limestone-like appearance, while blue-grey accents could suit a cooler bedroom palette.
Give a Reclaimed Decorative Table a Layered Grey Marble Finish
@jonathonmarcmendes_paintedlove
This furniture flip begins with a decorative table found at a reuse centre and adds a faux marble finish using layered furniture paint. The table’s shaped base and detailed construction already provide interest, so the painted top acts as a focal point without requiring a completely new piece of furniture.
A detailed table can carry stronger veining than a small plain surface, but the pattern still needs direction. Marble veins usually move across the top rather than forming separate outlines around every corner. Letting a few lines continue over the edge can also make the surface appear more like a single slab.
Materials and Tools
- Reclaimed decorative table
- Surface cleaner
- Primer compatible with the existing finish
- Light base paint
- Medium and dark grey furniture paints
- Glazing medium or water when compatible
- Small artist’s brush
- Soft blending brush
- Sponge
- Fine roller for the base
- Clear furniture sealer
Recreate a Similar Look in Four Steps
- Repair the table before decorating it. Tighten weak joints, repair loose moulding, and clean away dust or polish. Prepare the top according to its condition, then apply primer and a smooth light base coat.
- Map the main movement lightly. Use chalk or a very diluted grey to suggest two or three main routes across the top. Avoid creating a symmetrical pattern, and leave generous areas almost untouched.
- Layer colour around the main veins. Add pale grey clouds beside parts of the marked lines, then blend them with a soft brush. Paint the darker vein in broken sections, adding thin branches that become lighter as they move away from the main line.
- Connect the top and edges. Carry selected veins gently over the edge while leaving others to disappear before reaching it. Once dry, soften anything too harsh with a thin glaze of the base colour, then seal the surface with a product suitable for furniture use.
For me, the furniture shape matters as much as the marble design. A decorative base already asks for attention, so I’d keep the top varied but not crowded.
You could leave the legs in their original wood finish for contrast, paint the base in a deep solid colour, or add a small amount of gold wax to raised details. The marble should still remain the main surface treatment rather than competing with several unrelated effects.
Add Colourful Veining to a Hand-Painted Table
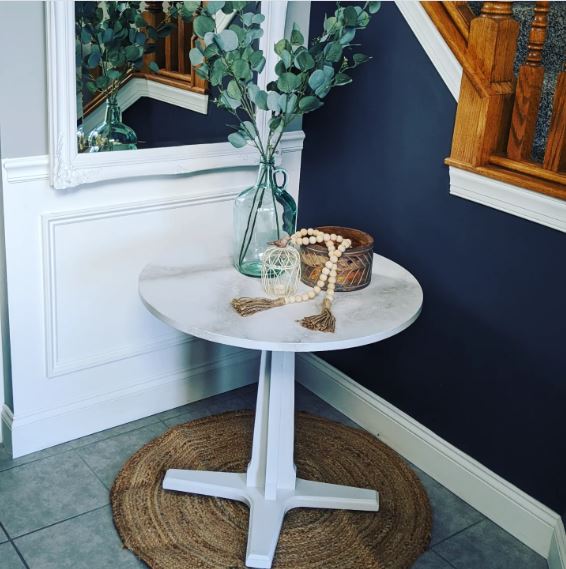
Faux marble doesn’t have to imitate only white Carrara stone. This hand-painted table uses colour and visible veining to create a more expressive finish while still relying on the movement associated with natural stone. The creator describes building the result through paint and veining, with the project developing through experimentation.
Colour works best when several shades belong to the same visual family. A green marble effect, for example, may combine pale sage, deeper green, grey, cream, and a restrained warm accent. Using every colour at equal strength can flatten the design because the eye no longer knows where to rest.
Materials and Tools
- Table with a stable paintable top
- Suitable primer
- Base paint in the lightest chosen colour
- Two or three coordinating coloured paints
- Small amount of dark paint for deeper veins
- Optional metallic paint or wax
- Natural sponge
- Fine artist’s brushes
- Soft blending brush
- Mixing palette
- Protective clear coat
Paint the Coloured Marble in Five Steps
- Choose a limited colour family. Select one pale base, one middle colour, and one deeper shade before beginning. Add metallic colour only as a restrained accent rather than treating it as another full layer.
- Apply the background with uneven variation. Cover the prepared surface with the lightest colour, then blend small areas of the middle shade into it. Keep some sections calm because the quieter base will help the coloured veins stand out.
- Create the main veins. Paint a few irregular lines with the deeper shade, turning the brush as you work. Vary their width and let them stop, fade, or split instead of carrying every line from one side to the other.
- Add softer branches and mineral-like details. Mix the deeper colour with the base shade to create lighter branches. Then add a small amount of metallic colour beside selected sections, blending it so it appears embedded rather than drawn on top.
- Glaze and seal the design. Brush a translucent layer of the base colour over any area that feels too busy. Once the pattern has dried, apply a compatible finish that suits how the table will be used.
I know it can feel tempting to keep adding colour because the palette looks attractive on the brush. Then you step back and realise the surface has nowhere quiet left. Pausing early is usually easier than painting the calm areas back in.
A beginner-friendly version could use only pale green, cream, and one darker green. Black marble with fine white and gold veining is another option, although dust and uneven brush marks may remain more visible on a dark base.
Refresh a Closet Vanity With a Grey Marble Paint Kit
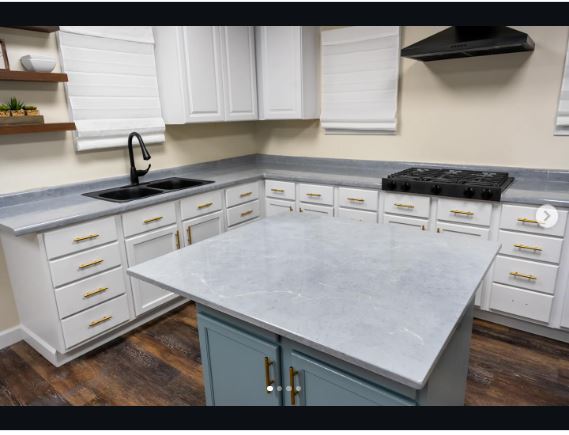
This closet vanity receives a white and grey marble-style top using a coordinated countertop paint system. The lighter surface changes the appearance of the vanity without requiring the cabinet base or surrounding storage to be replaced.
A kit can simplify colour selection because the primer, base, vein colours, and protective finish are designed to work together. Even so, the result still depends on how the veins are placed and blended. The materials provide the system; they don’t make every painted line automatically look like marble.
Vanity tops experience cosmetics, spills, hot tools, and repeated cleaning, so follow the coating manufacturer’s instructions closely. Do not assume that a finish suitable for a decorative table automatically suits a counter.
Materials and Tools
- Clean vanity top in repairable condition
- Countertop coating system suitable for the surface
- Degreasing cleaner
- Painter’s tape and masking material
- Foam roller
- Small brush
- Fine veining brush
- Sponge or soft blending brush
- Gloves and other protection required by the product
- Compatible protective topcoat
Complete the Vanity in Four Steps
- Remove or mask everything around the top. Take away loose fittings where practical and protect walls, cabinet fronts, mirrors, and flooring. Clean the vanity carefully, especially near cosmetics and frequently handled edges.
- Apply the required primer and base. Follow the product sequence rather than substituting drying or recoating times. Roll the broad surface smoothly and use a brush around the back edge, corners, and openings.
- Paint restrained grey veins. Begin with fewer lines than you think you need, using different widths and broken sections. Soften parts with the recommended sponge or brush, then add a small number of finer branches.
- Seal and allow the surface to harden. Apply the approved protective coating evenly and keep the vanity clear while it cures. Avoid placing bottles, trays, or hot tools back on the surface simply because it feels dry to a fingertip.
One detail I wouldn’t skip is practising the vein movement on a painted sample board. It gives your hand a chance to loosen up before the brush reaches the actual vanity.
A softer variation could use warm greige veins rather than cool grey. You could also paint only a removable vanity insert or small dressing table before committing to a fixed countertop.
Create a Marble Effect on an Acrylic Vanity Top
@countrycottageinteriorsonline
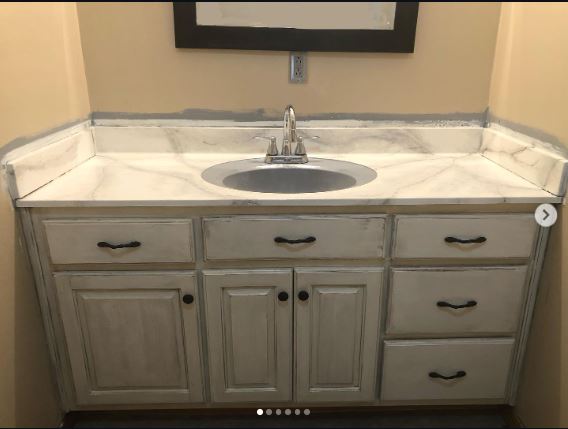
An acrylic vanity top can be difficult because the surface is smooth, non-porous, and regularly exposed to water. This project uses the existing acrylic top as the base for a painted faux marble effect, showing how a fixed bathroom feature can be visually changed without removing it.
The preparation method matters more here than on an unfinished wooden board. The primer and coating must be suitable for acrylic or the exact synthetic surface involved. A decorative result that looks convincing on the first day is not useful if it lifts around the sink after repeated cleaning.
Materials and Tools
- Acrylic vanity top in sound condition
- Cleaner suitable for bathroom residue
- Adhesion primer approved for acrylic or similar non-porous material
- Pale countertop paint
- Grey and darker vein colours
- Fine brush
- Soft blending brush or sponge
- Painter’s tape
- Foam roller
- Gloves
- Water-resistant compatible topcoat
Build the Finish in Five Steps
- Identify the surface before buying paint. Confirm whether the top is acrylic, cultured material, laminate, or another synthetic product. Clean it thoroughly and complete any surface preparation required by the selected coating.
- Mask the sink and surrounding areas carefully. Press tape firmly around curves, taps, the backsplash, and cabinet edges. Protect the sink bowl from drips, especially when using primers or sealers that may be difficult to remove later.
- Create a smooth base layer. Apply the primer and pale base using the recommended tools. Keep the roller texture even and check around the sink opening for ridges or pooled paint.
- Paint veins that respond to the shape. Let the pattern move across the surface and around the sink rather than outlining the basin. Blend some sections almost completely into the background, then add a few narrow dark details for depth.
- Protect the finish against bathroom use. Apply the compatible topcoat as directed and keep water, soap, cosmetics, and cleaning tools away while it cures. Inspect the edges near the sink before returning the vanity to regular use.
The sink opening can make people change the direction of every vein, but I’d avoid creating a neat ring around it. Natural stone would continue behind the cut-out, so the pattern should feel as though the basin interrupted a larger slab.
For a lower-risk trial, practise on a spare acrylic panel or a removable bathroom shelf. A smaller sample also helps you test whether the colours become warmer or cooler under the room’s lighting.
Add Pink and Gold Veining to a Furniture Top
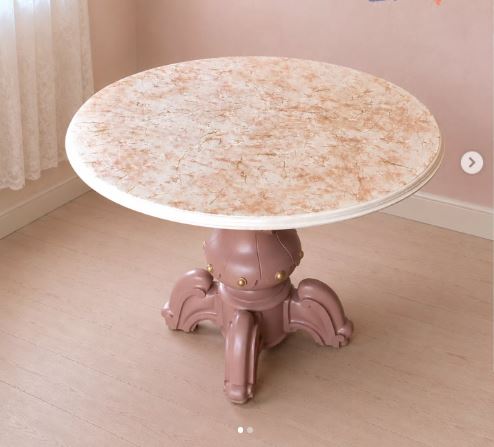
A warm white base, pink painted movement, and gold wax create a softer alternative to the familiar grey marble finish. The project uses colour to change an overlooked furniture piece while allowing the top to stand apart from the painted base.
Pink and gold can become overly decorative very quickly, so their proportions matter. Pink works well as a cloudy mineral tone, while gold is more convincing when it appears in occasional fine sections rather than outlining every vein.
Materials and Tools
- Furniture piece with a flat or gently shaped top
- Cleaner and suitable primer
- Warm white furniture paint
- Pale and medium pink paint
- Fine grey, brown, or muted plum paint for depth
- Gold wax or compatible metallic paint
- Small artist’s brush
- Soft blending brush
- Sponge
- Clear protective finish when compatible
Paint the Warm Marble Effect in Four Steps
- Create a warm neutral foundation. Prepare the furniture and apply a warm white or soft cream base. Let the surface become ready for decorative painting so the pink layers don’t mix accidentally into wet base paint.
- Add pale pink movement. Dab diluted pink in loose diagonal areas and soften the edges with a sponge. Keep the coverage uneven, allowing the warm white to remain dominant.
- Paint the veins and metallic accents. Add a few deeper pink or muted plum lines through selected cloudy areas. Once they are blended, place very fine gold accents beside only a small portion of the veins.
- Balance and protect the surface. Step back and cover any overly bright detail with a thin warm-white glaze. Allow the design to dry, then add a compatible protective finish if the furniture will receive regular use.
For me, the gold should be something you notice after the pink, not the first thing visible from across the room. A little metallic finish can suggest mineral detail; too much starts to look like decorative striping.
You could replace pink with muted blue, terracotta, or sage. Silver or pewter accents may suit cool colours better than gold, while a plain painted base can keep the furniture from becoming visually heavy.
Common Mistakes to Avoid
Drawing Every Vein the Same Width
Real marble contains thick sections, fine branches, faded marks, and veins that disappear. Change your brush pressure and colour strength so the pattern doesn’t resemble repeated lightning bolts.
Covering the Entire Surface With Veins
Marble needs calm background areas. When every section contains a dark line, the finish becomes flat and busy. Begin with fewer veins and add only where the surface genuinely feels empty.
Skipping the Surface Test
A paint technique that works on wood may not bond to laminate, acrylic, or a countertop coating. Test the primer, paint, and protective finish together on a hidden area or sample surface before committing to the full project.
Blending Until All the Detail Disappears
Softening is important, but overblending can turn several colours into one muddy patch. Blend the edges of veins while allowing selected darker sections to remain visible.
Using Too Many Unrelated Colours
A marble finish can be colourful without becoming random. Choose a base colour, one or two related tones, and a restrained accent. Repeat those colours in different strengths rather than introducing a new shade every few inches.
Applying a Sealer That Doesn’t Suit the Surface
Furniture tops, vanities, and counters experience different levels of water, heat, cleaning, and abrasion. Use a finish approved for both the paint system and the intended surface.
Rushing Between Layers
Painting new veins into a wet base can make the design spread unpredictably. Sealing paint that hasn’t dried sufficiently may also disturb the pattern. Follow the product directions and allow each stage the time it requires.
Frequently Asked Questions
Which surface is easiest for a first faux marble project?
A small wooden table top, tray, or furniture panel is usually more manageable than a fixed countertop. You can reach the edges easily, practise the veins without awkward corners, and repaint the base if the first arrangement feels too busy.
What type of brush creates realistic marble veins?
A fine artist’s brush can create narrow lines, while a small soft brush helps blend and widen selected areas. Some people also use feathers, but the tool matters less than changing pressure and avoiding perfectly straight lines.
Can faux marble be painted over laminate?
It may be possible when the laminate remains firmly attached and you use preparation products approved for slick, non-porous surfaces. Test adhesion before painting the full piece and follow the coating manufacturer’s instructions.
Should the veins continue over the edge?
Selected veins can continue over an edge to suggest that the surface is one solid slab. Do not carry every line over in exactly the same way. Some should fade, split, or stop before reaching the edge.
How can I fix a vein that is too dark?
Let the area settle, then soften it with a damp blending brush if the paint remains workable. Once dry, you can apply a thin glaze of the base colour over part of the vein and repaint only a small amount of detail.
Does every faux marble surface need a glossy finish?
No. Polished marble usually suggests more shine, while honed stone has a softer appearance. Choose the sheen according to the look you want and the practical demands of the surface, using only a finish compatible with the paint beneath it.
Can I use faux marble painting on a kitchen counter?
Only use a complete coating system approved for that counter material and intended level of use. Consider water, heat, food preparation, cleaning products, and curing requirements before beginning. Do not apply ordinary craft paint to a working counter and assume a clear coat will solve every durability issue.
Let the Quiet Parts Make the Marble Look Real
The most useful faux marble painting techniques aren’t really about drawing more veins. They are about building depth, leaving calm areas, and knowing when a line needs to be softened rather than extended.
Begin on a small nightstand, tray, or furniture top where you can practise without working around taps and fixed cabinets. Once the cloudy background feels natural, add one main vein, then a few lighter branches. You can always introduce another detail, but removing ten unnecessary lines is a less cheerful afternoon.
An old surface doesn’t need to resemble one particular type of stone. Grey, green, pink, gold, cream, and darker colours can all work when they are used with balance. Which forgotten table, vanity, or furniture top would you choose for your first painted marble finish?