Long sleeves often remain useful after the rest of a shirt has lost its shape. The cuffs may be worn, the front may carry a permanent stain, or the shirt may simply no longer fit, yet those long tubes of soft fabric can still wrap comfortably around the head. That makes them especially useful for making bohemian headbands.
I like projects that begin with the strongest part of an old garment rather than treating the whole item as waste. A stretchy sleeve can become a simple loop headband with very little sewing, while the shirt body can provide longer strips for knots, braids, bows, and wider turban shapes.
The fabric already has colour, softness, and a little history. You only need to decide how structured you want the finished accessory to be. Some styles rely on natural stretch, while others use elastic, hand stitching, or a plain headband base for support. I don’t think every finished edge needs to look factory-made, especially when a soft rolled edge suits the relaxed bohemian style. It does, however, need to feel comfortable and remain secure when worn.
Before You Cut the Shirt
Wash and dry the long sleeve shirt before measuring it. Fabric that has already been worn may contain stretched areas around the elbows, cuffs, neckline, and underarms. Cleaning it first also helps you identify stains or weak patches that should not become part of the finished headband.
Lay the shirt flat and inspect both sleeves as well as the front and back body. Stretch the fabric gently in both directions. Most knit shirts stretch more across the body than from shoulder to hem, and placing that stretch around the head usually creates a more comfortable band.
Do not cut directly through seams until you have planned which parts you want to use. Existing sleeve seams can sometimes remain hidden inside a wide headband, saving you extra sewing. At other times, removing them gives you a smoother strip for braiding or tying.
Useful Materials and Tools
- A clean long sleeve shirt
- Fabric scissors
- Measuring tape
- Tailor’s chalk or washable fabric marker
- Pins or sewing clips
- Hand-sewing needle
- Coordinating thread
- Sewing machine, if available
- Narrow elastic or a reusable hair tie
- Safety pin for threading elastic
- Iron and pressing cloth when suitable for the fabric
- Optional beads, fabric flowers, tassels, or lace scraps
Keep sharp scissors, pins, needles, beads, and small decorations away from young children and pets. Test the iron on an offcut first, particularly when the shirt contains synthetic fibres or a printed design.
Sew a Knotted or Bow Headband From a Long Fabric Strip
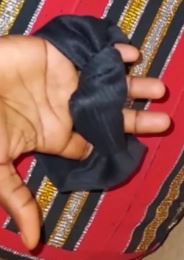
This project demonstrates two related styles made from one long rectangular strip: a knotted headband and a bow version. The long shape gives you enough fabric to tie the front while the sewn edges create a more structured finish than a raw T-shirt loop.
The body of a long sleeve shirt is usually more useful than one sleeve for this design because you need length for the knot or bow. You can cut across the shirt’s front and back, open the side seams, and join sections when one uninterrupted strip is not available.
Materials and Tools
- Long rectangular strip cut from the shirt
- Fabric scissors
- Measuring tape
- Pins or clips
- Sewing machine or hand-sewing needle
- Coordinating thread
- Turning tool or blunt knitting needle
- Iron and pressing cloth, when suitable
Sew the Headband in Four Steps
- Measure the head and plan the ties. Wrap a measuring tape around the position where the headband will sit, then add enough length for the knot or bow. Cut the strip wider than the desired finished band because it will be folded and stitched.
- Fold and sew the long tube. Place the right sides together, align the long edges, and stitch along the length while leaving both short ends accessible. Keep the seam allowance consistent so the finished band does not change width halfway around the head.
- Turn and shape the fabric. Turn the tube right side out, gently push out the corners, and press it without stretching the knit. Fold the short ends inward and close them with small stitches.
- Tie and test the finished headband. Wrap it around the head and form either a compact knot or a loose bow. Then move your head from side to side and check that the band stays in place without pressing uncomfortably behind the ears.
I know a large bow can look quite manageable while it is lying on the table. Once it reaches your head, it may suddenly develop ambitions of its own. Begin with a loose knot, then enlarge it gradually.
A shirt with contrasting sleeves can provide one colour for the main band and another for the bow ends. Lace or embroidered sections from the original garment can also be positioned at the front, provided the fabric remains soft against the skin.
A shorter strip can become a narrow forehead tie rather than a full bow. For a reversible result, join two different shirt fabrics before sewing the tube.
Combine Old Shirt Fabric Into a Twist Turban Headband
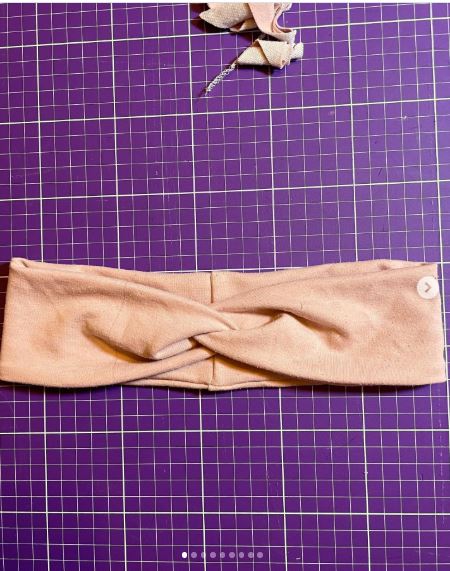
This project uses fabric saved from old clothing, including T-shirt material and a scarf section, to make twist and turban headbands. Combining two reclaimed fabrics creates more depth than using one plain strip, while the wide shape gives the accessory a relaxed, wrapped appearance.
The two materials should have reasonably similar stretch. A rigid woven scarf joined to a very soft knit can pull unevenly unless the woven section is limited to the decorative front or an elastic section is added at the back.
Materials and Tools
- Long sleeve shirt fabric
- Coordinating scarf or fabric scrap
- Fabric scissors
- Pins or sewing clips
- Stretch needle
- Polyester or stretch-compatible thread
- Sewing machine with a stretch stitch or narrow zigzag
- Optional elastic for the back
- Measuring tape
Construct the Turban Style in Five Steps
- Choose fabrics that can work together. Stretch both materials gently and compare how they behave. Place the firmer fabric at the decorative front and reserve the softer shirt knit for the back if their stretch differs noticeably.
- Cut two matching long pieces. Use the strongest areas of the shirt, avoiding worn elbows and underarms. Cut the second strip from the scarf or leftover fabric, keeping both pieces similar in width and long enough to wrap around the head.
- Sew each strip into a tube. Fold the pieces lengthwise with the right sides together, stitch the long edges, and turn them right side out. Keep the seams positioned underneath or inside the final twist.
- Create the centre crossing. Lay one tube across the other, fold each strip through the centre, and pull them in opposite directions to form an interlocked front. Arrange the fabric until the crossing lies flat rather than forming a hard lump.
- Join the back securely. Measure the band around your head, trim only after confirming the fit, and sew the ends together. Cover the back seam with a small matching fabric rectangle or elastic casing for a neater finish.
For me, the front crossing matters more than making every fold identical. A little unevenness helps the fabric look wrapped rather than mechanically pleated.
You can make a neutral version with two shades of brown, cream, or faded black. For a stronger bohemian feel, combine a plain shirt with paisley, floral, block-printed, or tie-dyed fabric.
A beginner can use one fabric for both tubes. This still creates the interlocked shape without requiring you to manage two different stretch levels.
Common Mistakes to Avoid
Cutting Before Testing the Stretch
A strip that matches your exact head measurement may still become too loose or too tight depending on the fabric. Wrap an uncut section around your head first and notice how much it stretches comfortably.
Using Weak Elbow or Underarm Fabric
These sections often receive the most wear. Hold the shirt up to the light and avoid fabric that looks thin, distorted, or likely to tear around the stitches.
Pulling Knit Fabric While Sewing
Stretching the edge beneath the machine can create a wavy seam. Guide the fabric without pulling it, use a stretch-compatible stitch, and test your settings on an offcut.
Making the Front Knot Too Bulky
Several layers can become uncomfortable or make the headband slide backwards. Trim excess seam allowance and test the knot before closing the final seam.
Placing a Hard Seam Behind the Ear
A join may look hidden but still cause discomfort. Position the main seam at the centre back and cover bulky raw edges with a soft fabric wrap.
Using Heavy Decorations
Large beads, metal pieces, or thick clusters of embellishments can pull the headband out of position. Choose lightweight fabric flowers, small buttons, a little embroidery, or a few securely sewn accents.
Forgetting That Knits Roll
Raw knit edges may curl inward after cutting. Use that feature deliberately for braided strips, or stabilise and hem the edge when you need a flat band.
Making the Headband Too Tight
A headband should stay secure without creating pressure around the temples or behind the ears. Add an elastic section or remake the back join if the fit remains uncomfortable after a short test.
Frequently Asked Questions
Which part of a long sleeve shirt is best for a headband?
The sleeve is useful for a quick loop because it already forms a tube. The front and back body provide longer pieces for knots, bows, braids, and wide turban styles. Avoid worn elbows, underarms, and damaged seams.
Can I make a headband without a sewing machine?
Yes. A no-sew twisted loop may require no stitching at all, while simple seams can be closed by hand with small backstitches. Use strong thread and keep the stitches flexible enough for knit fabric.
How wide should the fabric strip be?
The width depends on the style. A narrow braid uses several slim strips, while a turban or headbandanna needs a much wider piece. Fold a paper or fabric sample around your head before cutting the final shirt section.
Should I hem the raw edges?
Many T-shirt knits do not fray like woven fabrics, although they may curl. You can leave a clean raw edge for a relaxed finish, hide it inside a tube, or finish it with a stretch stitch when you prefer a flatter result.
Can I use a woven button-up shirt?
Yes, but woven fabric has less stretch. Use longer tie ends, an elastic back, or a shaped headband pattern rather than relying on the fabric to stretch over the head.
How can I stop the headband from sliding?
Check that it is not too loose, position the greatest stretch around the head, and avoid making the front decoration too heavy. A narrow elastic back or small strip of textured fabric on the inside may also improve the hold.
How should an upcycled shirt headband be washed?
Use a gentle method appropriate for the original shirt fabric and any added decorations. Place embellished headbands in a small laundry bag or wash them by hand, then reshape them before drying.
Let the Shirt Sleeves Become the Starting Point
Learning how to upcycle a long sleeve shirt into bohemian headbands begins with looking at the garment in sections. The shirt may no longer work as clothing, but one sleeve can still become a soft loop, the body can provide a long bow, and smaller scraps can form braids, wraps, or a shaped headbandanna.
Begin with the simplest style that suits the fabric you already have. A stretchy sleeve needs very little alteration, while a firmer shirt may work better with ties or an elastic back. Then save the remaining sound pieces rather than cutting more fabric than the design requires.
Which section of your old shirt would you use first: the sleeves for a quick loop or the body for a knotted bohemian headband?