Old doilies often stay folded inside cupboards because their crochet patterns feel too carefully made to discard, yet they no longer suit the table or furniture they once covered. I don’t think such detailed handwork should remain hidden simply because our decorating habits have changed.
I enjoy finding practical ways to reuse ordinary and forgotten materials. Doilies are especially interesting because each one already contains shape, texture, and decoration. You aren’t beginning with a plain piece of fabric. The pattern has already done much of the visual work for you.
The difficulty is deciding how much to change. Some doilies can become part of a completely new garment, while others work better when joined into a removable decoration for a wall, window, shelf, or celebration. What matters is preserving the strongest sections, supporting delicate crochet where necessary, and arranging the pieces before attaching anything permanently.
Before You Start
Vintage crochet can appear strong while still having weak threads around the centre, edges, or previously repaired areas. Hold each doily gently and look for loose loops, thinning fibres, stains, stretched sections, and old repairs. A piece with minor damage can still be useful, but place the weaker area somewhere that will not carry tension.
Clean the doilies according to the condition of the fibre. Hand washing is usually the gentlest approach when you don’t know the exact material, although particularly fragile or valuable pieces may be better left as they are. Avoid aggressive scrubbing and twisting. Support the wet crochet with both hands, reshape it on a towel, and allow it to dry flat.
Sort the pieces by size, colour, pattern, and strength once they are clean. This doesn’t mean everything must match. In fact, variations in cream, white, beige, faded colour, and crochet style can make the finished work more interesting. Sorting simply helps you see what you have before scissors, pins, or thread enter the situation.
A final decision is whether the transformation should be permanent. Heirloom pieces with personal meaning may be better attached with removable hand stitches than cut or glued. Thrifted doilies with little sentimental value can give you more freedom to experiment.
Turn Vintage Doilies Into a Patchwork Dress
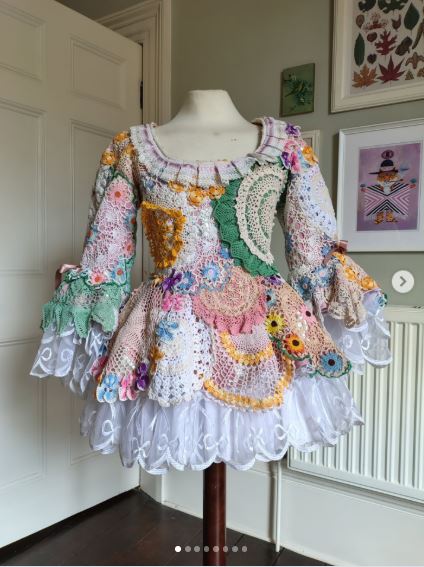
A doily dress changes the material more dramatically than a simple fabric embellishment. Instead of attaching one crochet circle to an existing garment, this design brings many reclaimed textiles together to create much of the garment’s visible structure.
The irregular arrangement is part of what makes the idea work. Circular doilies, narrow runners, floral crochet sections, and differently coloured pieces do not behave like ordinary dressmaking fabric. Their open spaces, shaped edges, and changing thread weights create a patchwork surface that would be difficult to reproduce with new fabric.
There is no need to force every piece into the same colour family. A dress made only from identical white circles could become visually flat, while a mixture of aged cream, brighter crochet, small floral patterns, and strips of reclaimed trim gives the eye different areas to explore. The important part is creating balance rather than exact matching.
This is an involved sewing project because crochet stretches differently in every direction. The garment also needs a secure internal structure so that delicate pieces are not carrying the full weight of the dress or pulling against the wearer’s body.
Materials and Tools
· A selection of vintage doilies, crochet runners, lace pieces, or reclaimed table linens
· A simple dress, slip, or lightweight lining to use as a supporting base
· Sewing thread in coordinating or neutral colours
· Hand-sewing needles
· Fabric scissors
· Dressmaking pins or clips
· A dress form or padded hanger, if available
· Soft ribbon, binding, or fabric strips for reinforcing selected edges
· A sewing machine for the lining and structural seams, if suitable
· Tailor’s chalk or removable fabric marker
A Practical Five-Step Method
1. Prepare a supporting garment before arranging the crochet. Choose a simple dress, slip, or lining that fits comfortably without relying on the doilies for support. Check that you can sit, walk, and move your arms easily, because correcting the fit becomes much harder after the crochet has been attached.
2. Arrange the largest pieces first. Place the garment on a dress form or lay it flat, then position the strongest doilies across the front, back, and skirt. I know it can feel tempting to fill every gap immediately, but begin with the main shapes and leave space for adjustments.
3. Pin and test the full layout. Add smaller crochet pieces between the larger ones, allowing some edges to overlap where the patterns meet awkwardly. Turn the garment around and check it from several angles, then try it on carefully to make sure the arrangement does not restrict movement or expose areas you intended to cover.
4. Attach the crochet to the supporting layer. Sew around the strongest outer sections with small hand stitches, working gradually rather than securing one piece completely before checking the rest. Avoid pulling the thread too tightly, since this can gather the lining, distort the crochet, and create uncomfortable puckering.
5. Reinforce and finish the garment. Add ribbon, binding, or fabric support around areas that receive more strain, such as the waist, shoulders, side seams, and closures. Trim only loose threads that are clearly separate from the crochet structure, then move around in the finished dress and reinforce any edges that lift or stretch.
The part I would check most carefully is the weight distribution. A large crochet piece may seem secure when the dress is lying flat but begin to pull once the garment is hanging. More attachment points usually work better than a few tight stitches.
Simpler Clothing and Accessory Variations
A full dress is not the only way to bring doilies into a wardrobe. Beginners can use the same arrangement principles on a smaller, more manageable surface.
A single doily could cover the back panel of a denim jacket, provided it is stitched around several strong points rather than attached only at the top. Smaller pieces can sit over plain pockets, cuffs, collars, or the front of a fabric bag. A circular crochet section can also become an outer pocket when backed with sturdy fabric.
For a removable design, sew the doily to a separate fabric patch and attach that patch with buttons, snaps, or careful hand stitching. This approach protects the original garment and makes washing easier.
I’d rather begin with one secure pocket or jacket panel than cut several treasured pieces for an ambitious project that never gets finished. The smaller version still displays the crochet clearly and teaches you how the material behaves.
Join Assorted Doilies Into a Decorative Garland
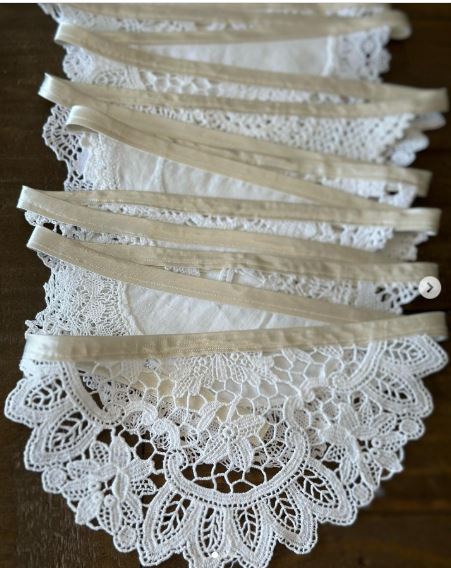
A garland gives mismatched doilies a shared purpose without asking them to behave like one continuous piece of fabric. Each shape remains visible, but the repeated spacing and connecting cord make the separate pieces feel like one decoration.
This project works particularly well for small doilies that are too decorative to use as coasters but too numerous to frame individually. It can also accommodate pieces with slight discolouration or irregular edges, since the shapes do not need to look identical.
Before attaching anything, decide how you want the garland to hang. A straight line suits shelves, mantelpieces, headboards, and market displays. A gentle curve works well across a window, wall, doorway, or party table. The deeper the curve, the more length you will need at both ends.
Spacing matters more than perfect matching. Very large gaps can make the garland look unfinished, while heavy overlapping may hide the individual patterns. Lay everything on the floor or a long table until the rhythm feels even.
Materials and Tools
· Small and medium vintage doilies
· Cotton tape, ribbon, strong cord, or fabric binding
· Hand-sewing needle and coordinating thread
· Fabric scissors
· Pins or removable clips
· Measuring tape
· Optional small safety pins, buttons, or fabric loops for removable attachments
· Suitable wall hooks or removable hanging strips for lightweight displays
Make the Garland in Four Steps
1. Plan the sequence on a flat surface. Arrange the doilies in a line and alternate the sizes, colours, and denser patterns. Move them around several times until one side does not appear noticeably heavier than the other, keeping the most delicate pieces away from the ends where the garland may be handled more often.
2. Prepare the connecting strip. Cut cotton tape, ribbon, or cord longer than the planned decoration so there is enough material for hanging loops. Mark the centre and work outward, since beginning in the middle makes it easier to keep the weight balanced.
3. Attach each doily securely. Pin the top edge of each piece to the tape and add several small stitches through strong sections of the crochet. Then lift the garland from both ends to see how it hangs before continuing, adjusting any pieces that turn sideways or bunch together.
4. Finish the ends and test the display. Create loops or ties at both ends and reinforce them with extra stitching. Hang the garland temporarily, step back, and check the curve before trimming loose thread or making the installation permanent.
For me, the layout matters more than finding a perfectly coordinated collection. The differences are what allow each doily to be noticed. I don’t think additional beads, tassels, or heavy decorations are necessary unless the garland is being made for a particular celebration.
Ways to Adapt the Garland
A short version can decorate a small shelf or the front of a craft table. A longer garland can run across a bedroom wall, wedding backdrop, studio window, or covered outdoor area during dry weather.
For seasonal use, thread the doilies onto a removable ribbon rather than sewing them permanently. You can then change the spacing, mix in lightweight fabric shapes, or remove the crochet pieces before storing the ribbon.
A no-sew version may be possible with tiny safety pins or removable loops, but place the metal fasteners through sturdy openings rather than piercing the thread. Fabric adhesive would make the project faster, although it could stiffen the crochet and make future reuse difficult.
If children or pets can reach the display, secure both ends properly and avoid long loose cords. The finished garland should remain a decoration, not something that can be pulled down easily.
Common Mistakes to Avoid
Cutting Before Planning the Layout
Crochet edges can unravel once the supporting threads are cut. Arrange full pieces first and look for ways to overlap, fold, or place them around seams before reaching for scissors. When cutting is unavoidable, reinforce the intended cutting line before separating the material.
Sewing Through Weak Threads
A loose or thinning loop cannot hold repeated tension. Examine the area around each attachment point and stitch through several stronger sections instead of relying on one fragile part. Backing the crochet with fabric can also spread the pressure.
Pulling the Stitches Too Tightly
Tight thread may gather the lining of a dress or curl the top of a garland. The stitch should hold the doily in position without forcing it into a new shape. Pause regularly and flatten the work to check for puckering.
Ignoring the Weight of the Finished Project
A single doily feels light, but several layers can become surprisingly heavy. Clothing needs internal support, while a long garland needs reinforced ends and suitable hooks. Test the finished piece before wearing it for several hours or hanging it above furniture.
Using Permanent Glue on Sentimental Pieces
Adhesive can soak into crochet fibres, leave stiff patches, or make future removal difficult. Hand stitching takes longer, but it is usually easier to reverse. Reserve permanent glue for pieces you are comfortable altering permanently.
Adding Too Much Decoration
Doilies already contain a lot of pattern. Extra trims can make a garment feel crowded or cause a garland to sag. Complete the main construction first, step back, and add only what improves the overall balance.
Frequently Asked Questions
Should vintage doilies be washed before upcycling?
Clean pieces are easier to handle and less likely to transfer dust or marks onto a garment. However, very old, damaged, or sentimental crochet may not tolerate ordinary washing. Check the fibre carefully and use the gentlest appropriate method.
Can beginners make a doily dress?
A complete dress requires patience, fitting experience, and a reliable supporting layer. Beginners may find it easier to decorate an existing jacket, skirt, tote bag, or simple dress with one or two doilies first. That smaller project teaches the same attachment skills with less risk.
How can I attach a doily without cutting it?
Arrange the whole piece over the garment or decoration and secure it with small hand stitches around several strong edges. Folding a small section beneath a seam or overlapping it with another doily can help it fit without cutting.
Is fabric glue suitable for attaching doilies?
Fabric glue can work for decorative items that will not be washed, folded, or handled frequently. Test it on a spare piece because some adhesives remain visible through open crochet or dry into hard patches. Sewing generally offers more control and easier removal.
How do I stop a doily from stretching on clothing?
Attach it to a stable lining or existing garment rather than allowing it to support itself. Use several loose, evenly spaced stitches and reinforce high-stress areas. Store the finished garment on a supportive hanger or folded flat if hanging causes the crochet to lengthen.
Can a doily garland be used outdoors?
It can be displayed temporarily in a dry, sheltered location, but moisture, wind, and strong sunlight may damage old fibres. Bring it indoors after use and make sure it is completely dry before storage. Avoid leaving vintage crochet outside permanently.
How should finished doily projects be stored?
Keep garments and garlands clean, dry, and away from direct sunlight. Fold them loosely with plain tissue or soft fabric between delicate layers, and avoid placing heavy objects on top. Check the attachment points before using the project again.
Give Old Doilies a Useful Place Outside the Drawer
Learning how to upcycle doilies begins with looking at their condition rather than treating every piece in the same way. Strong crochet can become part of a garment, while smaller pieces may be better suited to a reusable garland or a simple clothing detail.
You don’t need a perfectly matching collection. A thoughtful arrangement, secure attachment points, and enough support will usually matter more than identical colours or patterns. Begin with one manageable piece, keep the original crochet visible, and let its shape influence the design instead of forcing it into something unsuitable.
Which forgotten textile would you bring out of storage first?