An oversized T-shirt, a soft button-down, or a square scarf can already contain most of what a halter top needs. The useful pieces are often hiding in the original garment: an existing hem, a printed front, a button placket, or enough fabric at the shoulders to become long ties.
The first cut matters more than the last stitch. A neckline that looks modest while the garment lies flat may drop much lower once the top hangs from the neck, and ties that appear generous can become short after the edges are folded.
I’m Stella Eve Louise, and I don’t think a good clothing upcycle should rely on bravery with scissors. It should rely on measuring, pinning, trying the shape over another top, and removing less fabric than you think you need. Then the garment still has room to become wearable instead of turning into a hopeful pile of strips.
The projects below use closely related Instagram transformations: two T-shirt conversions, a softer ring-front design, and a scarf method that does not require cutting. Choose the version that suits your fabric, sewing confidence, and preferred coverage.
Check the Fabric and Fit Before You Cut
Wash and dry the garment the way you expect to care for the finished top. Cutting first and shrinking later can shorten the body, tighten the neck ties, and change the armholes. Press the fabric lightly so twisted seams and deep creases do not distort your markings.
Look closely for:
· Stretch across the body or in several directions
· A printed design you want centred
· Thin or worn fabric near the underarms
· Side seams that twist toward the front or back
· A neckline rib that may be reused
· An original hem worth keeping
· Buttons or a placket that can become part of the closure
· Enough fabric for neck and back ties
· A weight that will not pull heavily on the neck
· Fabric that becomes transparent when stretched
Try the shape with clips, pins, or temporary ties before cutting a deep neckline. Never cut a garment while someone is wearing it.
Use a comfortable halter top, fitted tank, or paper pattern as a reference. Do not copy only the outside edge. Notice where the underarm begins, how high the front rises, and whether the back is tied, elasticated, buttoned, or partly covered.
If the garment has a graphic, mark the centre front before folding. Folding helps with symmetry, but it can also place the print slightly off-centre when the factory seams are twisted. I know it is tempting to trust those seams; they are not always as cooperative as they look.
Make a Quick Practice Version
Use an old plain T-shirt with a similar amount of stretch before cutting a favourite band, university, or souvenir tee. The practice version shows how much the neckline opens, how raw jersey rolls, and whether the ties need extra length.
There is no need to finish every edge on the test piece. Mark the changes directly on it, then transfer the improved outline to the garment you want to keep.
Cut and Tie an Oversized T-Shirt Into a No-Sew Halter
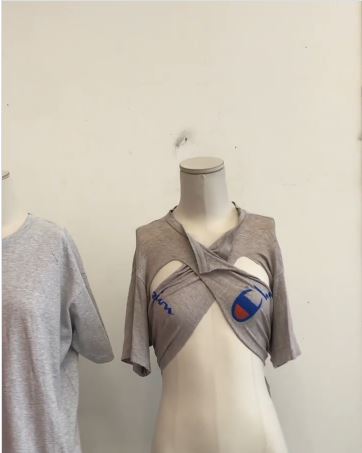
A loose jersey T-shirt is the most forgiving starting point because the knit edge usually rolls rather than frays. The sleeves, shoulders, and upper back can become ties, while the front and lower hem remain recognisable.
This approach works best with a shirt larger than your usual size. A fitted tee offers little spare fabric for knots and very little room to correct a neckline cut too wide.
Materials and Tools
· Oversized cotton or cotton-blend T-shirt
· Sharp fabric scissors
· Washable fabric marker or tailor’s chalk
· Tape measure
· Fitted tank or halter for reference
· Clips or safety pins
· Large flat work surface
Shape the No-Sew Halter
Mark the centre and intended length. Lay the shirt flat without stretching it. Mark the centre front, the lowest acceptable neckline point, and the intended hem before removing sleeves or side fabric.
Create the front shape. Cut away the sleeves, then draw a gradual line from each underarm toward the neck. Leave wide straps at first because narrow ties can always be trimmed after fitting.
Open and divide the back. Remove the upper-back section while keeping broad fabric bands at the neck and lower edge. Divide those bands into balanced ties long enough for a comfortable double knot.
Try the top over a fitted layer. Tie the neck and back loosely and check coverage, armhole depth, and the position of the graphic. Remove small amounts from one area at a time rather than reshaping everything during the first fitting.
Refine the raw edges. Stretch straight jersey edges gently if you want them to roll inward. Round sharp corners, even the ties, and reinforce any point that starts to split with a few hand stitches.
The neck ties should position the top, not carry all its weight. If it feels heavy at the back of your neck, tighten or widen the lower back tie instead of pulling the neck knot harder.
For more coverage, keep a larger part of the original back and cut only a narrow opening below the neck. You can also leave the original hem for a full-length version.
Turn a Soft Shirt Into a Ring-Front Halter
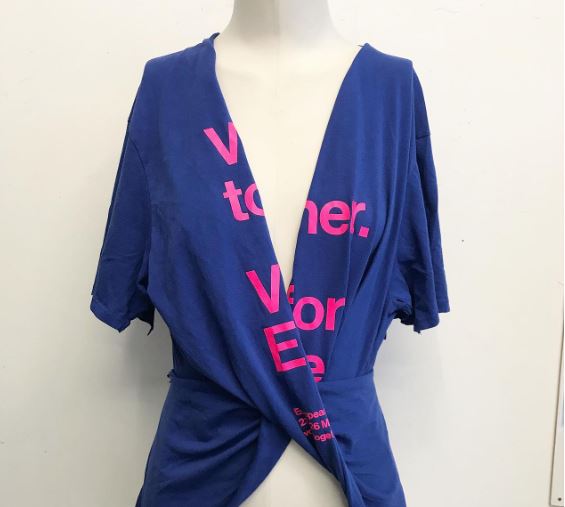
A soft shirt or lightweight knit can become a more structured halter when two front panels meet at a central ring. The ring controls the centre opening, while the upper corners form neck ties and the lower sections wrap or fasten around the body.
Use a smooth, fully closed ring made for garments or accessories. Rough jewellery, split rings, and metal with peeling coating can catch fabric and irritate the skin.
Materials and Tools
· Soft oversized shirt, blouse, or lightweight knit top
· Smooth closed garment ring
· Fabric scissors
· Tailor’s chalk
· Pins or clips
· Sewing machine or hand-sewing needle
· Matching thread
· Optional bias tape or lining strips
· Iron suited to the fabric
Build the Ring-Front Shape
Identify two strong front panels. Close the garment and mark balanced sections that can reach the ring without twisting. Preserve an existing hem or button placket when it helps the lower edge sit neatly.
Cut the neckline and arm areas. Remove the collar, sleeves, and unnecessary upper back according to the planned silhouette. Leave generous seam allowance and keep the neck straps wide until fitting.
Wrap the centre through the ring. Thread each front panel through the ring and fold it back onto itself. Pin the folds, try the top over a fitted layer, and adjust the plunge before sewing.
Finish and reinforce the edges. Fold, bind, or line the neckline and armholes according to the fabric. Reinforce the ring connection because this small area controls both the shape and coverage.
Create the back and neck closures. Use fabric strips, retained buttons, or original hem sections for ties. Test sitting, reaching, and bending before shortening any strap.
I would keep the first version slightly higher at the centre. It is much easier to lower the ring after fitting than to rebuild fabric already cut away.
A beginner can skip the ring and overlap the two front panels instead. Stitch them together at a comfortable height and add ties made from the removed sleeves.
Choose the Method That Suits the Original Garment
Oversized Jersey T-Shirts
These are best for cut-and-tie designs because the knit edge usually rolls and the extra width provides longer straps. Keep the lower hem whenever possible.
Graphic and Souvenir Tees
Plan the design around the artwork before deciding which side becomes the front. Reinforce the corners around the print because older jersey may be weaker than it appears.
Soft Button-Down Shirts
Use the button placket, finished hem, and sleeve fabric as built-in construction details. Woven fabrics usually need finished edges and more sewing than jersey.
Scarves and Large Fabric Squares
Choose a no-cut tying method when the fabric is valuable, delicate, or still useful as an accessory. Smooth rings and removable fastening methods protect the original edges.
Halter-Top Cuts That Are Difficult to Undo
Cutting the Neckline Too Low
Fabric drops when it hangs from the neck. Mark a higher starting point, fit the top, and lower the neckline gradually.
Making the Neck Ties Too Narrow
Thin straps can twist, dig into the skin, and tear where they meet the body. Begin with wide straps and narrow them only after testing the weight.
Ignoring the Direction of Stretch
A cut that works across the grain may sag when turned. Pull the fabric in several directions before choosing the front and tie placement.
Trusting Twisted Factory Seams
Mass-produced tees may not lie perfectly square. Mark the true centre from the graphic and neckline instead of relying only on side seams.
Cutting Through the Graphic
Plan with paper before using scissors. Move the neckline, reverse the shirt, or use sleeve fabric for ties rather than sacrificing important artwork.
Skipping Reinforcement at Tie Corners
The point where a tie joins the body receives concentrated tension. Add small stitches, tape, or backing before the fabric starts to split.
Using a Rough or Open Ring
Split rings and sharp jewellery can snag fabric and skin. Use a smooth closed ring that can support the folded material without scraping it.
Shortening Ties Before Testing Movement
A top that fits while standing may tighten when you sit or raise your arms. Test movement first, then trim the ends.
Cutting a Valuable Scarf
A no-cut halter offers the same styling idea without permanently changing the fabric. Use removable ties and hidden security instead.
Frequently Asked Questions
Can I make a halter top without sewing?
Yes. Stretch jersey and large scarves work well for cut-and-tie or knot-based methods. Reinforce any weak corners by hand if the fabric starts to split.
What type of T-shirt works best?
An oversized cotton or cotton-blend jersey tee gives the most room for ties and fitting corrections. Very thin or brittle shirts may tear around the neck and back straps.
How can I make the top more supportive?
Use wider neck straps, a broad back band, and reinforcement at the tie corners. A bandeau or fitted layer can add coverage without changing the upcycled top.
Do raw T-shirt edges need hemming?
Jersey often rolls and does not unravel like woven fabric, so a no-sew finish may be acceptable. Hem or bind the edge when it stretches unevenly or needs a cleaner look.
Can I turn a button-down shirt into a halter?
Yes, but woven fabric usually needs finished seams and reinforced closures. Reuse the placket, hem, and sleeve fabric to reduce the amount of new construction.
How do I stop scarf knots from slipping?
Use a textured scarf, double knots, or removable fashion tape. Always test movement and keep the knot away from a place where it presses uncomfortably.
What can I make from the leftover fabric?
Sleeves and back panels can become wider ties, a headband, scrunchie, small pouch, or matching patch. Save the strongest offcuts until the top has been worn and adjusted.
Let the Original Garment Decide the Final Shape
Learning how to upcycle a halter top is less about forcing one pattern onto every garment and more about noticing what the original piece already offers. A roomy T-shirt provides long ties, a graphic tee asks to be cut around its artwork, a button-down gives you finished edges, and a scarf may not need cutting at all.
Begin with the most reversible step. Pin the neckline, tie temporary straps, and test the shape over another top. Then remove fabric gradually and reinforce every point that carries tension.
The strongest upcycle is the one you will actually wear. It does not need the deepest neckline, the smallest back, or the most complicated knot. It needs comfortable straps, dependable coverage, and enough of the original garment left to make the transformation feel intentional.
Which piece would you start with: an oversized plain tee, a graphic shirt worth preserving, a soft button-down, or a scarf that can return to its original form after one evening?