Old corsets are difficult to discard because so much of their character sits in the construction. The eyelets, lacing, shaped panels, lace trim, and rows of stitching still look interesting even after the garment no longer fits or feels comfortable to wear. A damaged lining or stretched fastening does not automatically make the whole piece useless.
I am Stella Eve Louise, and I especially like projects that keep those recognisable details while giving the fabric a calmer, more practical job. A corset can become a cushion front, a tote panel, a jewellery display, a plant-pot cover, or a small organiser without needing complicated tailoring. The best approach is usually to use the corset as a decorative outer layer and add a simple lining, backing, box, or cushion insert underneath.
I don’t think every conversion needs to preserve the garment in one perfect piece. Some corsets are strong enough to reuse whole, while others are better opened along a seam and treated as shaped fabric panels.
What matters is checking the condition first, keeping the useful structure, and choosing a new purpose that does not place more strain on weak fabric than it can handle.
Inspect the Corset Before Cutting or Reusing It
A corset may look firm because of its boning, but the outer fabric, lining, eyelets, and stitching can age at different rates. Check the full piece before deciding whether it should carry weight, hang on a wall, or remain only decorative.
· Look for torn seams, loose eyelets, rust marks, stretched fabric, cracked faux leather, or boning that is pushing through the casing.
· Gently bend each panel and listen for brittle plastic boning or broken internal supports.
· Check whether hooks, busks, lacing, and trim are secure enough to remain part of the finished project.
· Wash only when the fabric and internal structure can tolerate it; otherwise use careful surface cleaning and allow the corset to dry fully.
· Remove sharp or damaged metal parts before turning the corset into a cushion, bag, or frequently handled organiser.
· Choose decorative wall use for fragile vintage pieces rather than forcing them into a project that needs regular washing or heavy loading.
Gather Sewing and Support Materials for Corset Projects
Most corset upcycles become easier when the original garment is supported by a new inner layer. The extra fabric or base does the practical work, while the corset provides shape and detail.
· Seam ripper, fabric scissors, pins or clips, measuring tape, chalk, and hand-sewing needles
· Strong thread and a sewing machine when the fabric can be stitched safely
· Cotton canvas, upholstery fabric, felt, or another firm lining material
· Cushion insert, plain tote bag, sturdy container, plant pot, or backing board depending on the project
· Ribbon, twill tape, webbing, or premade handles for new ties and carrying straps
· Small hooks, eye screws, picture-hanging hardware, or removable wall strips for lightweight displays
· Interfacing, foam, cardboard, or thin plywood when the project needs extra shape
· Eye protection and suitable tools when drilling a backing board or attaching hardware
Decide Which Original Corset Details Should Stay Visible
The strongest corset projects do not hide every sign of the original garment. Choose one or two features to lead the design, then keep the rest of the construction quiet enough for the new object to remain useful.
· Keep the lacing panel visible when it can become the centre detail on a cushion, bag, or wall pocket.
· Preserve firm boned seams because they help a tote, organiser, or plant cover hold its shape.
· Use a hook-and-eye or busk front as a decorative closure only when it still opens and closes smoothly.
· Trim away damaged lace rather than adding more decoration around weak edges.
· Retain eyelets for hanging necklaces, threading ribbon, or attaching handles when the surrounding fabric remains strong.
· Remove uncomfortable or sharp internal pieces if the finished object will be touched, carried, or placed on furniture.
· Let an aged finish remain visible on a decorative project, but reinforce it from behind so the wear does not continue spreading.
Turn a Corset Front Into a Decorative Cushion
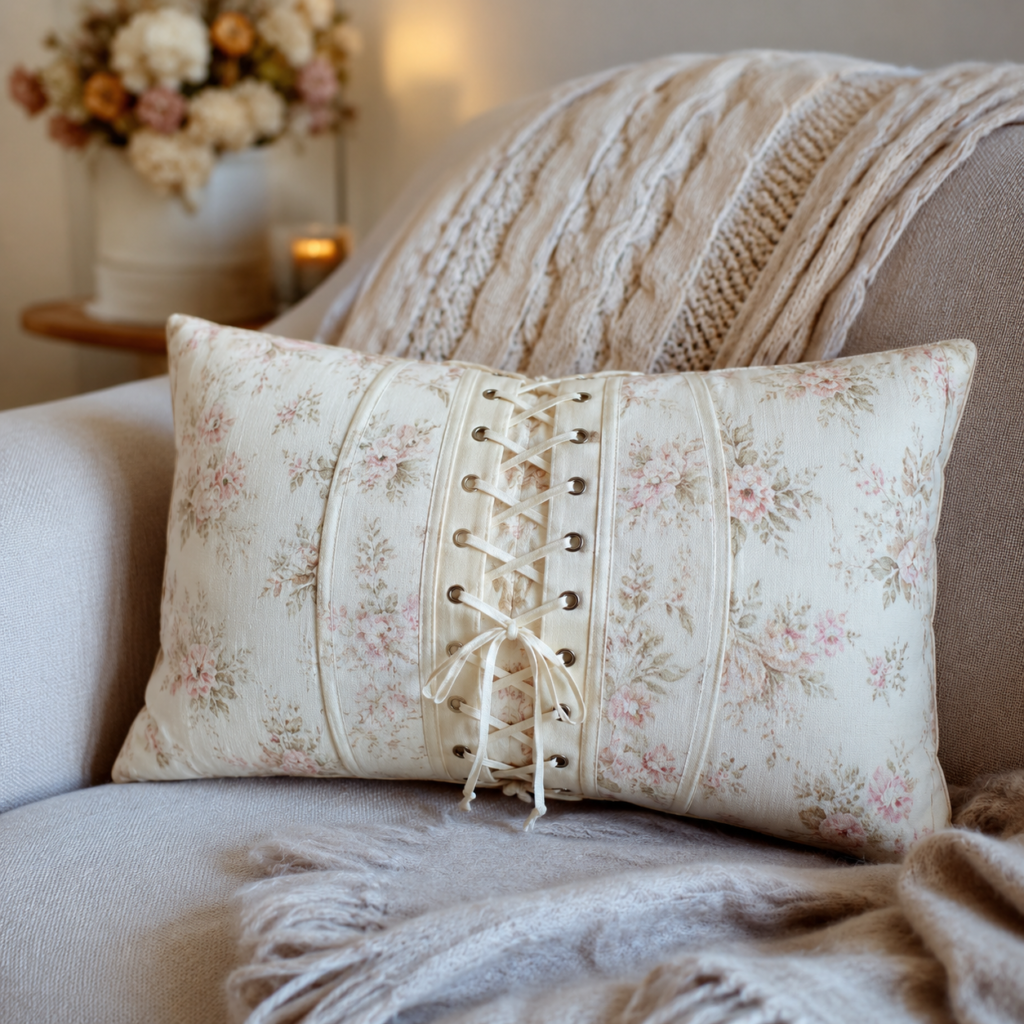
A cushion is one of the most manageable ways to reuse a corset because the new cover can carry the pressure instead of the old garment. The corset front works like an applied decorative panel, while plain fabric forms the back and any missing side sections. The lacing remains visible, but no one needs to sit directly on exposed hooks or stiff boning.
This version suits a corset with an attractive front that is no longer wearable around the sides or back. A long rectangular cushion gives the shaped panel room to sit flat without forcing it into a square. If the corset fabric feels delicate, place it over a complete cushion cover rather than using it as the only outer layer.
Materials and Tools
· Corset front or two sound corset panels
· Firm backing fabric and fabric for the cushion back
· Cushion insert
· Lightweight fusible or sew-in interfacing if the fabric needs support
· Pins or clips, thread, fabric scissors, and sewing machine or hand-sewing needle
· Optional zip, envelope-back pieces, or buttons for a removable cover
Steps for Making the Corset Cushion
1. Prepare the corset panel. Remove damaged side sections, loose hooks, and any boning that feels sharp or broken. Press the fabric carefully from the reverse with a protective cloth when the material allows it, then place the panel over firm backing fabric and secure the edges so both layers behave as one piece.
2. Plan the cushion size around the usable corset section. Place the panel on the cushion insert and decide how much plain fabric should appear at each side. I know it can feel tempting to cut immediately, but leave extra seam allowance and check that the lacing will sit straight once the cover is filled.
3. Create the front panel. Stitch the corset section to the backing around strong seams or outer edges rather than through fragile lace. Add matching side pieces if needed, then trim the completed front into a clean rectangle while keeping the most recognisable seams and lacing centred.
4. Add the cushion back. Use an envelope closure for a beginner-friendly removable cover, or insert a zip along one edge. Sew the front and back with right sides together, clip bulky corners carefully, then turn the cover and check that no boning or metal parts can be felt through the fabric.
5. Insert the cushion and adjust the lacing. Fill the cover gradually so the corset panel does not pull out of shape. Loosen or tighten the ribbon until it lies neatly, then secure the ends in a small bow or tuck them behind the panel if long tails are likely to catch.
For me, this project works best when the corset detail covers only part of the cushion. A complete corset wrapped tightly around a pillow can twist and create hard ridges, while a supported centre panel keeps the result soft enough to use. A simpler version can be made by hand-stitching the corset panel onto a ready-made cushion cover.
Sew a Structured Tote Bag From Corset Panels
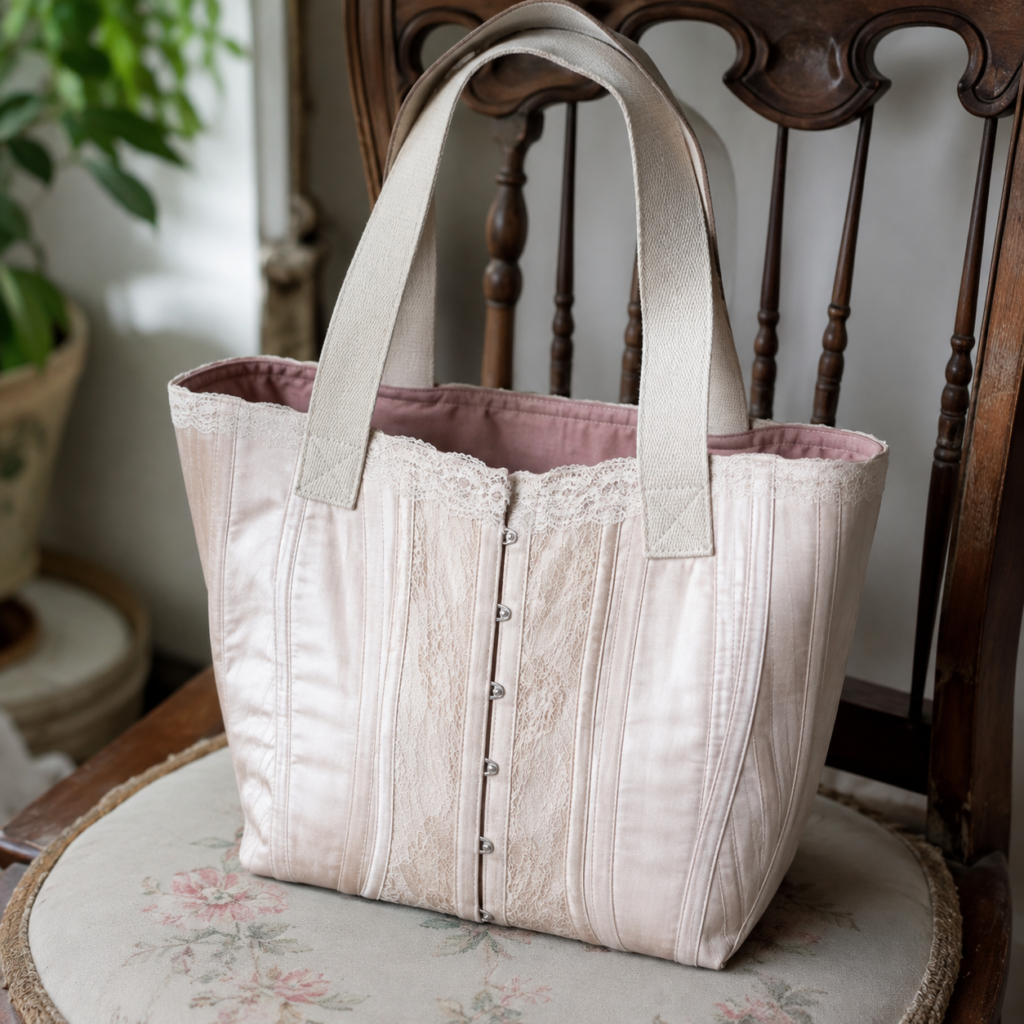
Corset panels already contain vertical stitching and light structure, which can give a small tote a neat shape. The key is not to expect the old garment to carry the contents by itself. A strong lining, boxed base, and handles attached through reinforced areas should take the actual load.
A front busk or hook closure can remain visible as a decorative centre line, but it does not need to function as the bag opening. The top edge can stay completely open, close with a magnetic tab, or use a simple zip fixed into the lining. This is a good use for two broad corset sections that are still attractive even if the lacing panel has stretched.
Materials and Tools
· Usable corset panels
· Firm canvas, denim, or upholstery fabric for the lining and internal bag body
· Webbing, twill tape, leather offcuts, or premade tote handles
· Interfacing or thin foam for additional body
· Thread, fabric scissors, clips, sewing machine, and hand needle
· Optional magnetic snap, zip, or internal pocket fabric
How to Build the Corset Tote
1. Open and flatten the corset. Remove the back lacing and carefully unpick one side seam so the garment can lie more evenly. Take out any broken boning, then decide whether the front and back sections will become two separate bag faces or whether one corset panel will be applied to a complete fabric tote shell.
2. Make a strong inner bag. Cut two matching rectangles from firm fabric and add boxed corners if you want a flat base. Sew any internal pocket before joining the lining pieces, then test the size against the corset panels. The lining should be slightly smaller than the outer shape so it does not sag beyond the decorative fabric.
3. Attach the corset panels to the outer support. Place each section over canvas or interfaced fabric, smooth the shaped seams, and stitch around strong panel lines. Avoid sewing repeatedly through old eyelets because the surrounding cloth may tear. Trim the supported pieces only after both sides look balanced.
4. Join the bag and reinforce the handles. Sew the outer pieces together, keeping bulky boning away from the seam allowance. Insert each handle between the outer fabric and lining, then add a square or crossed reinforcement stitch through the support layer. The handle attachment should never depend only on lace trim or a thin corset edge.
5. Finish the upper edge and test the load. Join the lining and outer bag, turn the tote through a small opening, and close the gap neatly. Add a simple closure if useful, then test the bag with folded fabric or another light load before carrying heavier objects.
One detail I would not skip is reinforcing the handle area. The corset may feel firm in your hands, but that firmness often comes from narrow boning rather than strong load-bearing fabric. Beginners can simplify the project by sewing one corset front onto a plain ready-made canvas tote and leaving the existing handles untouched.
Mount a Corset as a Jewellery Display
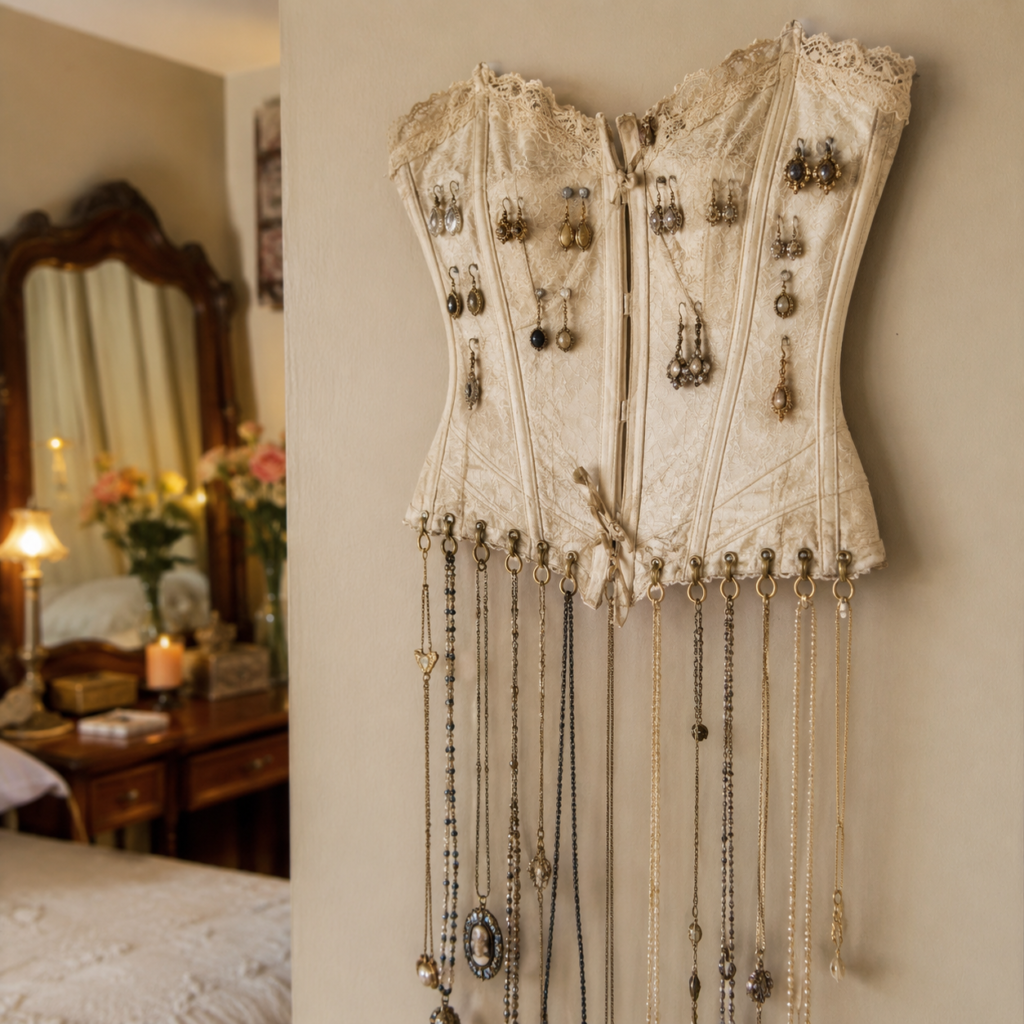
A wall display makes good use of a corset that is visually interesting but too delicate for sewing into another object. The eyelets can hold small rings or necklace hooks, while earrings can be pinned through firm lace or attached to a separate mesh layer behind it. Because the jewellery hangs vertically, the piece also works as decorative wall art when it is not completely filled.
The corset should be supported on a board or shallow frame rather than hanging from one ribbon. That backing prevents the fabric from stretching and keeps the shaped waist from folding inward. Light jewellery is suitable; heavy statement necklaces should hang from hooks fixed into the board, not from ageing eyelets alone.
Materials and Tools
· Corset with sound front panels or eyelets
· Thin plywood, cork board, stretched canvas, or sturdy foam board
· Neutral fabric or felt to cover the backing
· Small hooks, screw eyes, pins, or earring mesh
· Strong thread, upholstery tacks, staple gun, or suitable adhesive for the backing material
· Picture-hanging hardware appropriate for the finished weight
Steps for Creating the Jewellery Display
1. Choose and prepare the backing. Trace the corset shape onto plywood, cork, or another rigid board, leaving a small margin that can remain hidden behind the garment. Cover the board with felt or plain fabric so rough edges and hardware do not rub against the corset.
2. Arrange the corset before fixing anything. Lay it flat over the backing and adjust the lacing until the waist and top edge look balanced. Mark the locations of strong seams, existing eyelets, and areas where small hooks can pass through to the board without damaging decorative lace.
3. Secure the garment to the support. Use discreet hand stitches, upholstery tacks, or staples along hidden edges, depending on the backing material. Keep the fabric smooth but do not stretch it tightly. Then add board-mounted hooks along the lower edge for heavier necklaces and lighter loops through existing eyelets.
4. Create separate spaces for earrings and chains. Pin earring hooks through firm lace or a mesh insert, and leave enough distance between long necklaces to reduce tangling. Small brooches can sit near the upper panels, while rings can hang from short ribbon loops fixed to the backing.
5. Mount the display and load it gradually. Attach proper wall hardware to the board, check that it sits level, then add jewellery a few pieces at a time. If the fabric begins to pull around an eyelet, move that item to a board-mounted hook before the opening stretches further.
I would keep the arrangement lighter than a shop display. A little open space lets the corset shape remain visible and makes individual pieces easier to remove. For a rental-friendly version, mount the corset inside a lightweight shadow box and place the box on a dresser instead of fixing it directly to the wall.
Use a Corset as a Removable Plant-Pot Cover
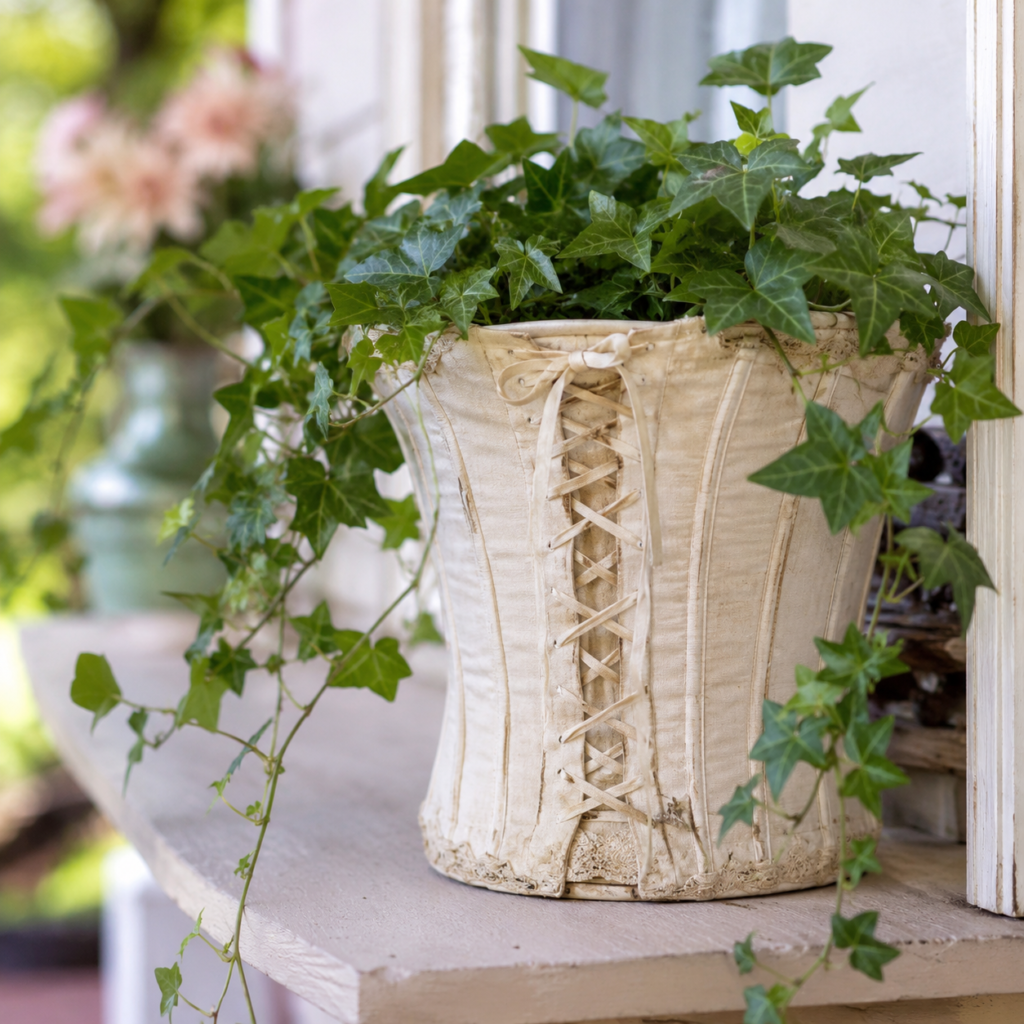
The safest plant version treats the corset as a removable sleeve around an ordinary waterproof pot. Soil and water should never sit directly against the garment, especially when the fabric contains steel components, delicate lace, or cardboard-like internal layers. A slightly tapered planter often fits the corset shape naturally, and the lacing can adjust the width.
This idea works particularly well with trailing plants because the leaves soften the upper edge and help the decorative cover feel intentional. Use the corset indoors, on a sheltered porch, or in another dry location. Repeated rain and strong sun will quickly damage most clothing fabrics, so outdoor exposure should remain limited.
Materials and Tools
· Corset large enough to wrap around the chosen plant pot
· Waterproof inner pot with drainage tray or sealed outer cachepot
· Optional rigid sleeve made from a clean bucket, plastic container, or thin flexible sheet
· Ribbon or cord for adjusting the lacing
· Needle and thread, clips, or removable fasteners
· Felt pads or a washable tray to protect the surface below
How to Make the Corset Pot Cover
1. Select a dry, contained planter. Choose a waterproof pot that fits fully inside the corset without forcing the fabric outward. Place a tray beneath it and confirm that water cannot drain into the garment. If the pot is narrow, add a lightweight rigid sleeve around it so the corset keeps a smooth shape.
2. Clean and prepare the corset. Remove loose metal pieces and repair openings that could catch on leaves. Loosen the lacing completely, wrap the garment around the empty pot, and check where the upper and lower edges sit. The corset should not cover drainage holes or rest in pooled water.
3. Adjust the fit without permanent cutting. Lace the back or front gradually until the cover sits snugly but can still slide off. Use hidden clips, a short hand-stitched loop, or removable hook-and-loop tape if the ends overlap. Then place felt pads between the pot and any metal fasteners that could scratch it.
4. Insert the plant after watering elsewhere. Let excess water drain before returning the pot to the cover. Arrange trailing stems over the top edge without tying them to the corset, and keep damp leaves away from lace for long periods.
5. Remove the cover for care. Slide the corset off whenever the plant needs thorough watering, cleaning, or repotting. Check the inside regularly for moisture marks, then allow both the pot and fabric to dry before putting them back together.
I know the finished effect can make it tempting to plant directly inside the corset, but fabric is not a substitute for a planter. Keeping a proper pot inside makes the idea easier to clean and far more likely to last. A beginner version can use a corset belt or wide bodice panel around a small cachepot instead of a full garment.
Make a Desktop Craft Organiser From a Corset
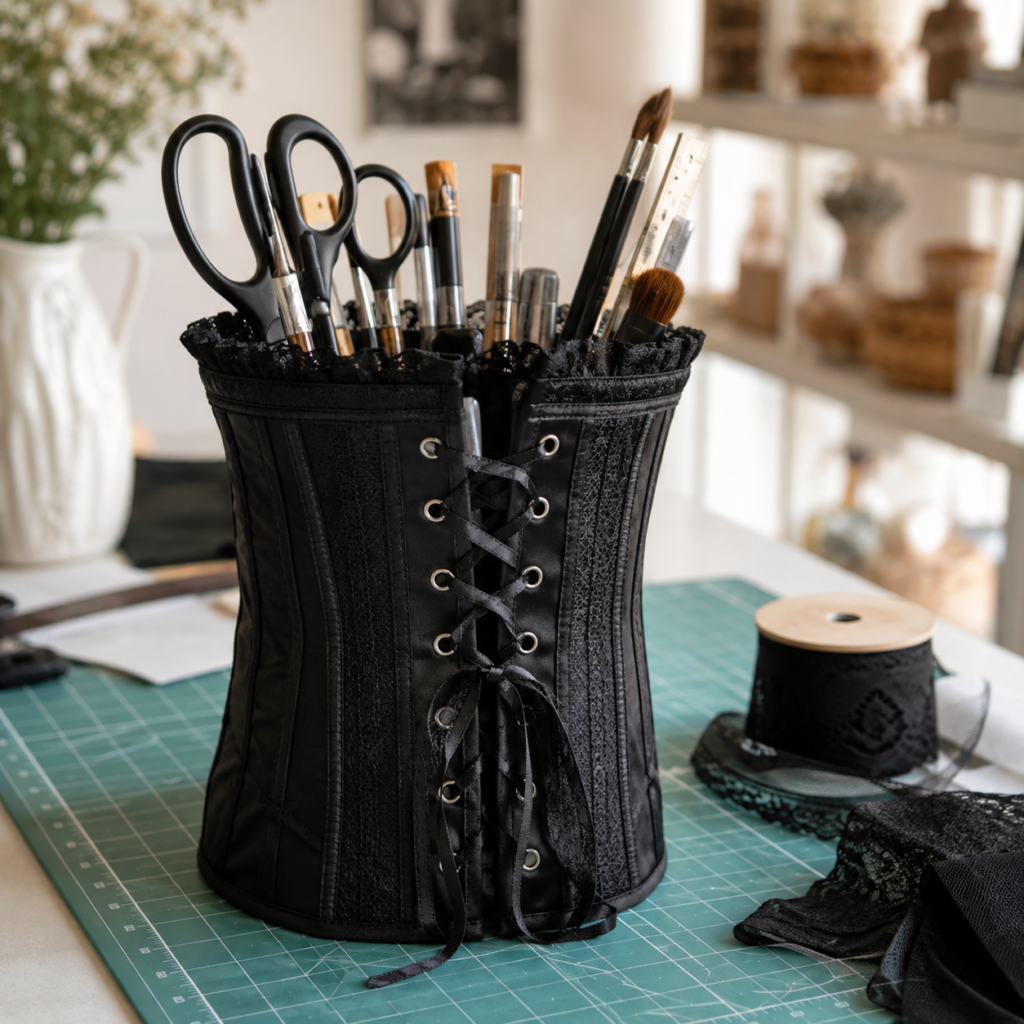
A corset can look like a freestanding container, but it needs a solid inner base to work safely. A clean food tin, plastic tub, small wastebasket, or handmade cardboard cylinder can support the garment while the corset provides the outer finish. This avoids complicated pattern cutting and keeps scissors or rulers from pressing against the fabric.
The organiser can hold lightweight craft tools, makeup brushes, knitting needles, or rolled paper. Divide the interior with smaller jars so long and short items remain upright. The lacing also makes it easy to remove the corset when the inner container needs cleaning.
Materials and Tools
· Short corset or corset belt
· Firm container that fits inside the garment
· Felt, fabric, or paper for covering the container
· Smaller jars or tubes for internal divisions
· Ribbon or cord for lacing
· Double-sided tape, removable adhesive strips, or a few hand stitches
· Scissors, ruler, clips, and optional cardboard for a false base
Steps for the Corset Craft Organiser
1. Find a container that supports the whole corset. Test several household containers before cutting anything, and choose one that fills the lower half without stretching the waist. Cover the container in plain fabric or paper if its colour shows through lace or eyelets.
2. Prepare the inner divisions. Place narrow jars, cardboard tubes, or small cups inside the main container to separate scissors, pens, brushes, and rulers. Add a raised false base beneath shorter tools so they do not disappear below the corset edge.
3. Wrap and lace the corset around the base. Position the most attractive panel at the front, then tighten the lacing evenly from top to bottom. Use small removable adhesive strips between the corset and container if the garment slides, but avoid glue on delicate or collectible fabric.
4. Protect the fabric from sharp tools. Keep scissor points and craft knives inside firm cups rather than allowing them to rest against the lining. Trim or cover any exposed boning, and make sure heavy rulers cannot tip the organiser when removed from one side.
5. Fill the organiser in balanced groups. Place taller items near the centre and lighter tools around the edges. Then lift the complete organiser carefully and press each side to check that the inner container, not the corset, carries the weight.
The part I like here is that the corset does not need to be permanently altered. If you change your desk later, you can loosen the lacing, wash the inner container, or use the garment around a different base. A very simple alternative is to wrap only one corset panel around a square pen pot and secure it with ribbon.
Create a Wall Pocket and Key Station From a Corset
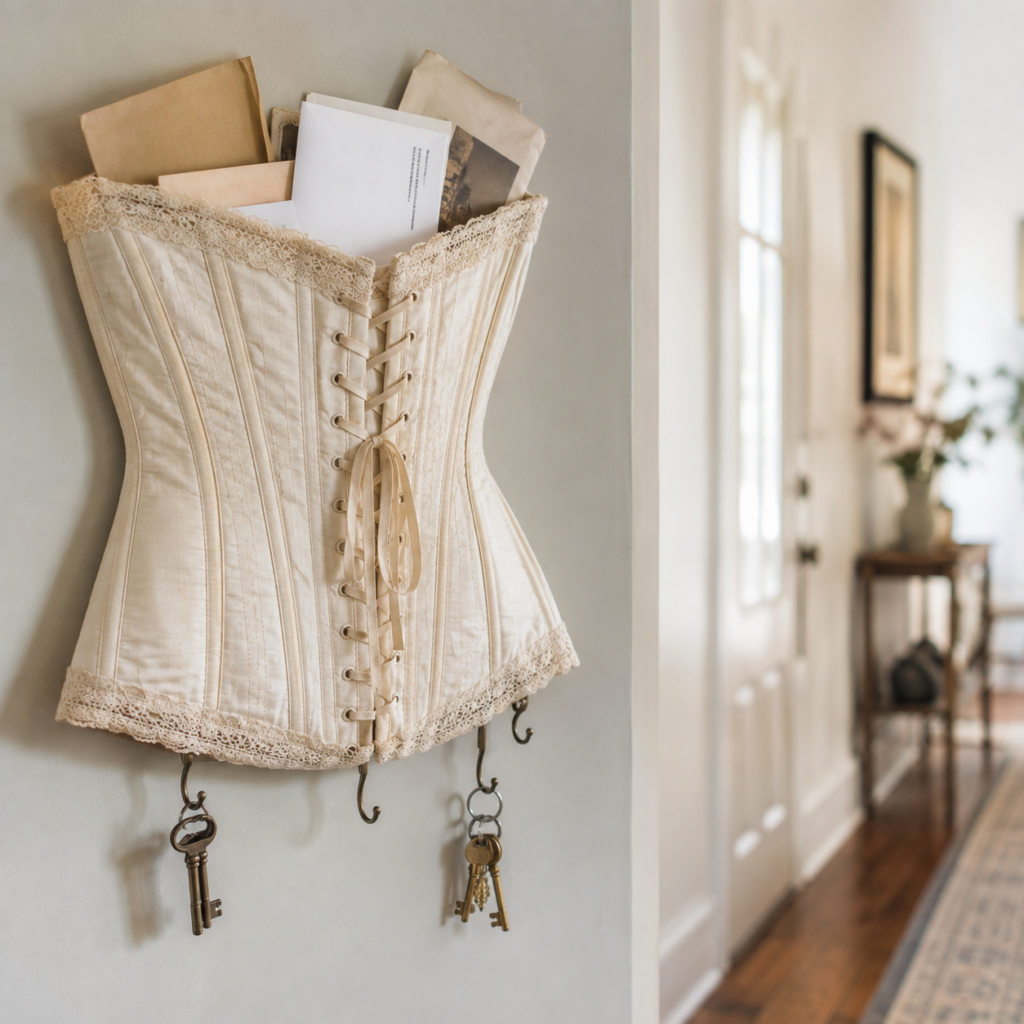
A corset can form a useful shallow wall pocket when it is fixed to a rigid backing and closed along the lower edge. Letters and lightweight notes sit inside the bodice shape, while keys hang from hooks attached to the board below. The board is essential because keys should not pull directly on old fabric.
This conversion suits an entryway, dressing area, or home office. The top opening should remain wide enough for envelopes but not so deep that small papers disappear. Dried flowers can be added for display, though I would keep them in a separate narrow container so stems do not catch in the lining.
Materials and Tools
· Corset with a sound front or back panel
· Thin plywood, sturdy framed board, or cork board
· Backing fabric or felt
· Small metal hooks for keys
· Needle and strong thread, upholstery tacks, or staple gun
· Picture-hanging hardware and suitable wall fixings
· Optional narrow divider, envelope sleeve, or lightweight removable insert
How to Assemble the Wall Pocket
1. Prepare the backing and hardware. Cut or select a board slightly smaller than the corset outline, cover it with felt, and attach the key hooks near the lower edge. Position the hooks far enough apart that keys will not rub against the lace or hang over one another.
2. Shape the corset into a pocket. Close the front busk or adjust the lacing until the garment sits flat against the board. Fold or stitch the lower opening so papers cannot fall through, then add a slim fabric insert if the corset is too deep or contains gaps around the sides.
3. Attach the corset without over-stretching it. Fix strong seam allowances to the board with hand stitches, tacks, or hidden staples. Leave the upper edge open and slightly relaxed so envelopes slide in easily. Check that the board supports the entire shape rather than hanging from the corset straps or lacing.
4. Add simple internal organisation. Use one lightweight divider to separate outgoing notes from incoming mail, or place a narrow card sleeve near the front. Avoid filling the pocket with thick notebooks because the shaped waist can restrict the space and push the garment away from the board.
5. Mount and test the finished station. Fix the board to the wall with hardware suited to its weight, then add a few papers and keys. Recheck the hooks and wall fixings after use, and remove unnecessary contents before the pocket begins to bulge.
One practical rule matters here: the corset should hold the letters, but the backing board should hold the corset and the keys. That division keeps the project useful without asking old fabric to perform like wood or metal. For renters, place the backed organiser on a narrow console or use a lightweight board with removable hanging strips, keeping the contents very light.
Corset Upcycling Problems That Can Spoil a Practical Makeover
Using the corset as the only structural material is the most common problem. Boning creates shape, but it does not turn thin fabric into a safe bag, tool container, or wall support. Add lining, backing, or an inner container so the new base carries the weight.
Cutting through every seam can also remove the very construction that makes the corset interesting. Open only the areas needed for the project and keep strong stitched channels intact whenever possible. If one panel is badly damaged, replace that section with plain supporting fabric rather than unpicking the entire garment.
Leaving sharp hooks, broken boning, or rough eyelets inside a cushion or bag can damage both the user and the finished fabric. Run your hands carefully over every edge, remove unsafe parts, and cover firm internal pieces with felt or lining before closing the project.
Direct contact with water is another avoidable mistake. A corset plant cover should always surround a waterproof pot, and the fabric should come off before heavy watering. Wet soil, rusting metal, and damp lace are not a helpful combination, however attractive the planter looks from across the room.
Overloading decorative eyelets can tear the surrounding cloth. Use them for ribbon, light chains, or small accessories, but attach heavy necklaces, handles, and keys to a rigid support. The eyelet can remain visible while hidden hardware performs the harder job.
Finally, adding too many trims can make the original construction disappear. Corsets already contain strong lines, fastenings, and texture. I would rather repair one lace edge and keep the lacing visible than cover every panel with extra beads, bows, and flowers.
Frequently Asked Questions
Do I need sewing experience to upcycle a corset?
Not every project requires advanced sewing. The plant-pot cover and desktop organiser mainly need a suitable inner container and careful lacing. The cushion and tote are easier with a sewing machine, but beginners can apply one corset panel to a ready-made cover or canvas bag instead of constructing the whole item from the beginning.
Should I remove the boning before starting?
Keep sound boning when it helps a wall display, tote panel, or organiser hold its shape. Remove pieces that are broken, sharp, badly bent, or positioned inside a cushion where they would feel uncomfortable. Always reinforce the empty channel if removing boning leaves the fabric loose.
Can I wash an old corset before reusing it?
That depends on the fabric, age, lining, and metal components. Some modern corsets tolerate careful hand cleaning, while older pieces may shrink, rust, or lose shape. Test a hidden area, avoid soaking uncertain materials, and use surface cleaning when the construction cannot be safely washed.
What is the easiest corset upcycling project for a beginner?
Wrapping a corset around a firm desktop container is usually the simplest because it requires little cutting. A removable plant-pot cover is also manageable when a waterproof pot stays inside. Both ideas allow the lacing to adjust the fit and can be undone later.
Can a corset tote carry heavy items?
Only when a strong internal bag and reinforced handles carry the load. The corset should act as the decorative outer layer, not as the main support. Test the finished tote gradually and use it for lighter everyday items unless the lining and handle construction are genuinely robust.
How do I keep corset fabric from fraying after cutting?
Cut beyond the final stitch line, apply suitable interfacing, and enclose the raw edge inside a seam or binding. A narrow zigzag or overcast stitch may help on modern woven fabric, but test first because old satin and lace can pucker. Avoid cutting directly beside eyelets or boning channels without adding support.
Can fragile vintage corsets still be upcycled?
Yes, but decorative display is safer than a frequently handled object. Mount the corset on a fabric-covered board, use the backing for all hardware, and keep jewellery or papers light. This preserves the visible shape without forcing weak seams to carry repeated movement.
Give an Old Corset a Useful Place Beyond the Wardrobe
Learning how to upcycle a corset is less about forcing a garment into a completely different shape and more about recognising what it already offers. The stitched panels can bring structure to a tote, the lacing can become a cushion detail, and the eyelets can organise jewellery when a stronger backing handles the weight.
Begin with the project that matches the condition of your corset. Use sound modern pieces for bags and organisers, save delicate fabric for wall display, and keep water or sharp tools behind a proper protective layer. Once the practical support is in place, the original garment can provide the character without being asked to do more than it safely can.
Which forgotten corset would be easiest to reuse first: the one with the best lacing, the strongest panels, or the prettiest lace?