An old wooden crib can remain surprisingly useful long after a child has outgrown it. The tall end panels, strong corner posts, slatted sides, and broad rectangular frame already provide the bones of a storage unit, work station, or small household organizer. Throwing the entire piece away can feel wasteful, especially when the wood remains sound and the original shape still has plenty of character.
I especially like crib upcycling ideas that keep the recognizable frame instead of cutting it into so many pieces that its history disappears.
A crib can hold garden tools, children’s costumes, bathroom towels, pantry supplies, or craft materials with only a few carefully planned changes. The best conversion is not always the most complicated one. It is the project that suits the crib’s strength, fits the room, and remains easy to use once the excitement of the makeover has passed.
Before choosing a new purpose, look closely at the condition of the crib and the amount of weight the finished piece will need to carry. A decorative organizer and a loaded pantry shelf ask very different things from the same frame. Working with those limits makes the result safer, more practical, and much more likely to stay useful.
Inspect the Crib Before Choosing Its New Purpose
Cribs are built from several connected parts, and some pieces that look decorative may also keep the frame square. Check the entire structure before removing a side, adding shelves, or loading it with heavy objects.
· Tighten every visible bolt, screw, cam fitting, and corner connection before planning the conversion.
· Check turned posts, slats, rails, and end panels for cracks, loose joints, splinters, or signs of rot.
· Look underneath the base to see which rails support the original mattress platform and which parts can be removed safely.
· Reject wood that feels soft, swollen, badly split, or unstable, especially for projects that will hold jars, tools, or heavy baskets.
· Measure the crib and the intended location, including doorways, floor space, nearby cabinets, and room for people to move around it.
· Remove any old drop-side hardware, protruding brackets, or sharp metal pieces that could catch clothing or scratch hands.
· Decide whether the final piece needs wall anchoring, weather protection, or added bracing before buying finishing materials.
Gather Tools and Materials for Crib Upcycling
The exact supplies will change with the project, but most crib conversions use ordinary repair and woodworking tools. Preparing the basics first makes it easier to test each stage instead of stopping halfway through because one bracket or drill bit is missing.
· Mild cleaner, cloths, a small brush, scraper, wood filler, and sandpaper in suitable grits
· Screwdrivers, adjustable wrench, pliers, drill, drill bits, measuring tape, pencil, square, and level
· A hand saw, jigsaw, or circular saw when shelf boards or damaged rails need trimming
· Shelf boards, plywood, reclaimed timber, or sturdy panels suited to the expected load
· Wood screws, washers, corner brackets, cleats, reinforcement blocks, and construction adhesive where appropriate
· Primer, furniture paint, stain, or clear protective finish suited to indoor or outdoor use
· Woven baskets, hooks, hanging rods, jars, trays, or bins selected for the chosen function
· Eye protection, dust mask, gloves, and a stable cutting surface
Decide Which Original Crib Details Should Stay
A crib conversion usually looks more convincing when some of its original details remain visible. The arched end panels, turned posts, worn wood, and evenly spaced slats can become part of the new design rather than something to disguise.
· Keep both end panels when they provide strong side support and make the original crib easy to recognize.
· Preserve sound slatted sides when they can hold hooks, guide baskets, or stop stored items from falling.
· Reuse the mattress support or base rails when they can carry new shelf boards without sagging.
· Keep attractive aged wood visible when the surface is clean, smooth, and suitable for the new room.
· Remove only the hardware that interferes with the new use, then fill exposed holes or use them for new fixings.
· Simplify damaged areas rather than copying missing trim across the entire piece.
· Choose removable baskets and organizers when you may want to change the storage layout later.
Turn the Crib Into an Outdoor Potting Bench
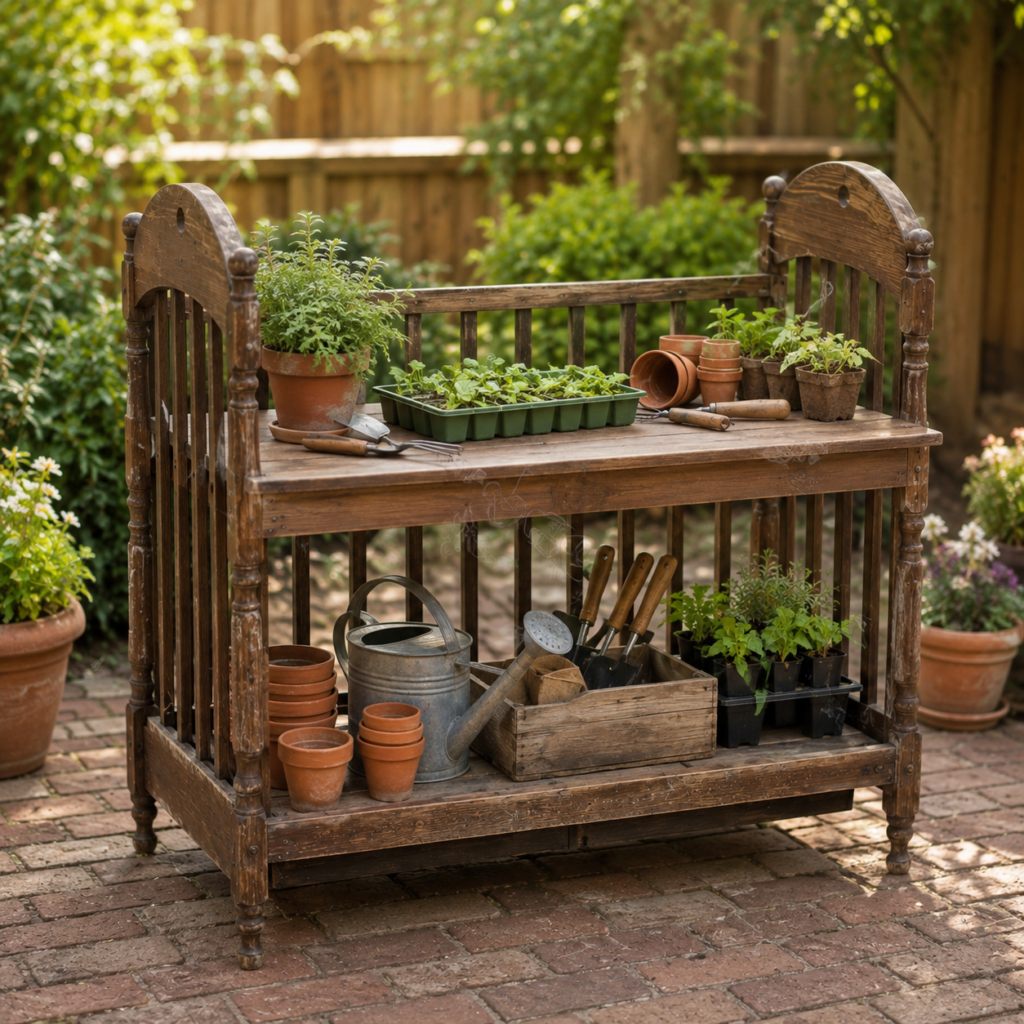
The crib’s upright ends and open lower frame make a natural starting point for a compact potting bench. A broad board across the upper section creates a comfortable work surface, while the lower base stores pots, watering cans, seed trays, and hand tools. Keeping the slatted sides helps contain the storage without making the bench feel like a solid cabinet.
What matters most here is weather resistance and working height. The top should sit at a level that allows potting without constant bending, and every surface exposed to rain or damp soil needs protection. A covered porch, greenhouse, or sheltered patio is easier on old wood than an open lawn.
Materials and Tools
· Structurally sound wooden crib with both end panels and lower support rails
· Strong board or joined timber for the worktop
· Optional lower shelf board or the original mattress platform
· Exterior screws, corner brackets, cleats, and reinforcement blocks
· Drill, saw, square, level, measuring tape, and clamps
· Outdoor-suitable wood finish, exterior paint, or protective sealer
· Terracotta pots, seed trays, tool box, hooks, and a watering can
· Outdoor feet, pads, or small blocks to keep the wood away from standing water
Steps for Making the Crib Potting Bench
1. Strip the crib back to a stable frame. Remove the mattress, fabric, and any moving hardware, then tighten the corner connections. Keep the end panels and enough side rails to stop the frame from twisting. If the original base is weak, replace it with fixed supports before adding storage.
2. Choose the height and fit the work surface. Measure a comfortable working level and mark it evenly on both end panels. Cut the worktop so it sits securely between or across the rails, leaving only a small overhang. Support it from beneath with cleats or brackets rather than relying on thin slats alone.
3. Create practical lower storage. Use the original mattress platform when it remains strong, or fit a new lower shelf between the base rails. Arrange the largest items first so the watering can, pots, and trays can be removed without catching on the side slats. Add a simple crate for hand tools instead of building several small compartments.
4. Prepare the crib for outdoor conditions. Clean off dust and old residue, smooth splinters, and seal exposed end grain and screw holes. Apply a finish suited to sheltered outdoor furniture, paying attention to the feet, underside, joints, and newly cut edges. Then allow the finish to cure according to its instructions before loading the bench.
5. Position and test the finished station. Set the bench on a level surface and press firmly on every corner to check for rocking. Load the lower shelf gradually, keeping heavy pots low and lighter trays on top. If the location is windy or uneven, secure the crib to a wall or add discreet stabilizing blocks.
One detail I wouldn’t skip is protecting the feet. Even a well-finished wooden frame can suffer when it sits in damp soil or puddled water. Small outdoor pads or a dry paved surface can make the conversion much easier to maintain.
A beginner can keep this version simple by using one solid top and the original crib base as the only shelf. For a smaller balcony, remove one slatted side and place the bench against a wall so the stored items remain easy to reach.
Reuse the Crib as a Children’s Dress-Up Wardrobe
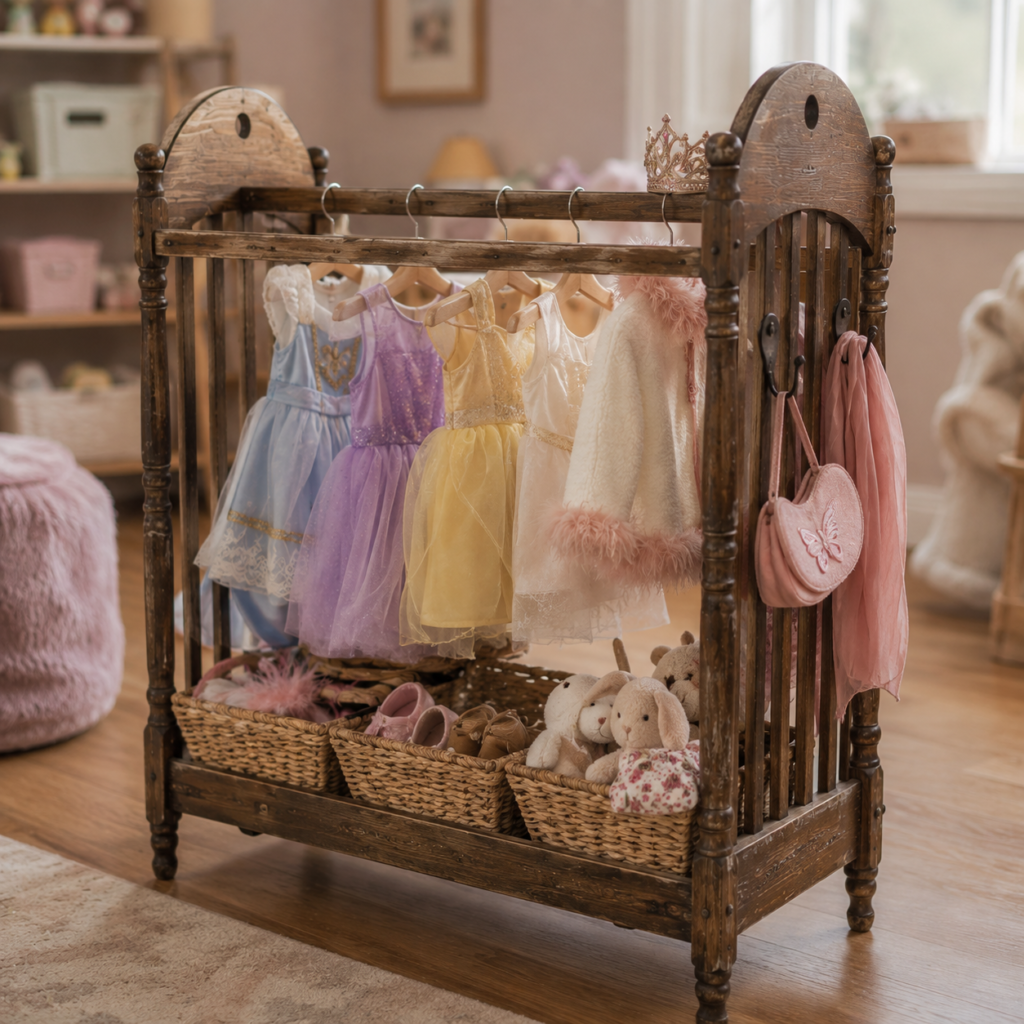
A crib frame can become a child-height dress-up wardrobe without needing full cabinet doors or complicated drawers. The upper rails support a short hanging rod for lightweight costumes, while baskets along the bottom hold shoes, hats, soft toys, and accessories. The open design lets children see what is available and return items without wrestling with a heavy wardrobe door.
This conversion should stay light and carefully anchored. It is storage for small costumes, not a climbing frame, and long scarves or cords need thoughtful placement. Rounded hooks and low baskets are usually more useful than many decorative fittings.
Materials and Tools
· Stable crib frame with smooth rails and securely fixed end panels
· Short wooden dowel or metal wardrobe rail
· Strong rail sockets, screws, and optional centre support
· Child-sized hangers and lightweight dress-up clothes
· Low woven baskets or fabric bins for shoes and accessories
· Rounded hooks for bags or hats
· Sandpaper, wood filler, paint or clear finish
· Anti-tip straps or wall brackets suited to the room
Steps for Creating the Dress-Up Wardrobe
1. Prepare a smooth child-safe frame. Remove the mattress base and any hardware that projects into the open storage area. Tighten every joint, fill unused holes, and sand rough edges around the rails and posts. Pay special attention to the height where small hands will reach for hangers and baskets.
2. Plan the hanging area before drilling. Hold the costumes against the frame and choose a rail height that keeps hems above the baskets. Mark matching positions on both end panels, then check that the hangers can turn without striking the side slats. Keep enough open space for children to slide clothing along the rail.
3. Install the rail and simple hooks. Fit the rail into secure sockets fixed to solid wood, not decorative trim. Add a centre support if the span feels flexible, even though the clothes are lightweight. Place only a few rounded hooks on the outer end panel so bags and hats do not crowd the hanging area.
4. Organize the lower section. Set shallow baskets along the original base or a fixed shelf and assign broad categories such as shoes, crowns, and soft accessories. Avoid deep containers that encourage children to climb or lean into the frame. Then test whether each basket can slide out without scraping the posts.
5. Anchor and check everyday use. Secure the wardrobe to the wall with appropriate anti-tip hardware, then load it gradually. Make sure no long scarves, cords, or straps create loops where a child could become tangled. Recheck the rail, hooks, and wall fixings regularly as the unit is used.
I know it can feel tempting to hang every costume at once, but a crowded rail quickly becomes frustrating. A smaller rotating selection is easier for children to manage, and the unused outfits can stay in a separate box until the next change.
For a simpler version, skip the hanging rail and use the crib as open basket storage for costumes only. A curtain is possible, but I’d rather keep the front open so the unit remains visible, accessible, and easier to supervise.
Convert the Crib Into Bathroom Towel Storage
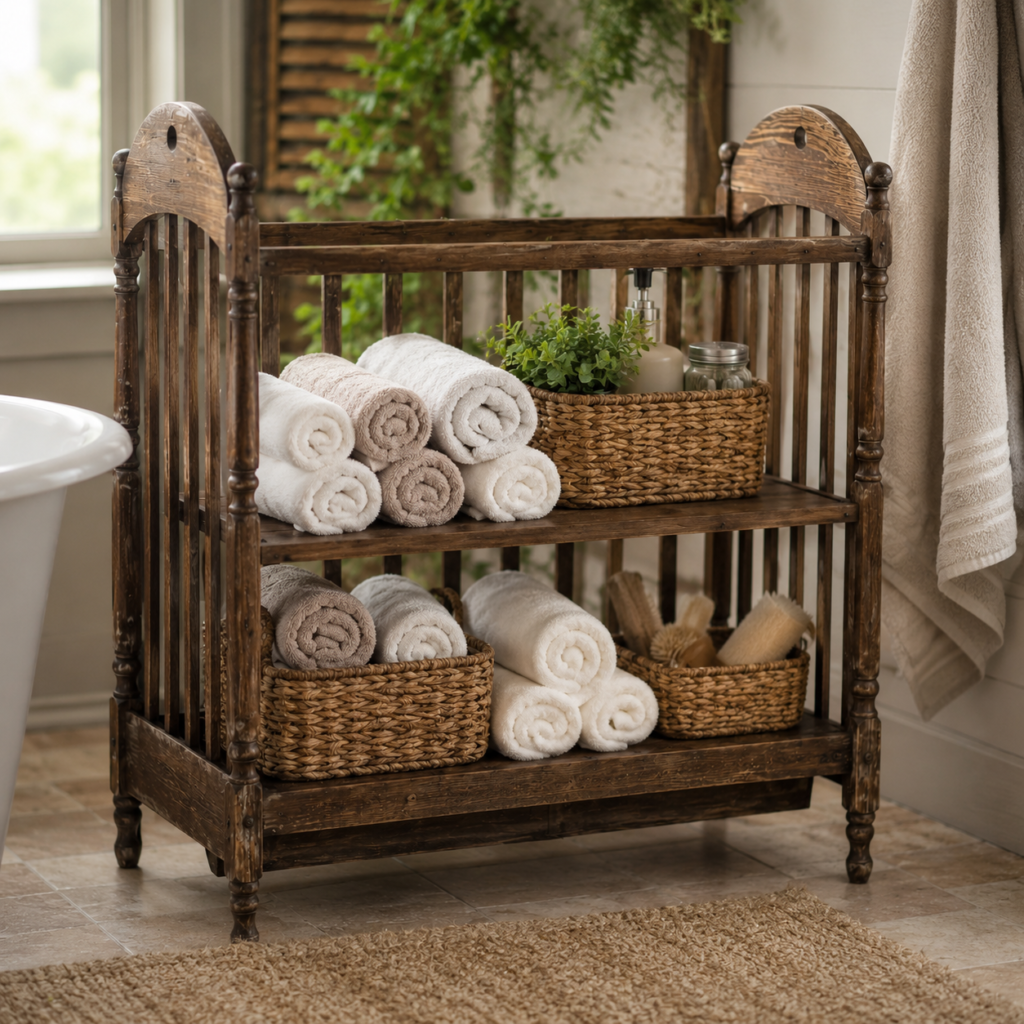
The crib’s narrow depth and tall end panels can work well as open bathroom storage when the frame fits the room. Two sturdy shelves hold rolled towels and baskets, while the slatted sides keep the piece visually light. The conversion offers more character than a basic flat-pack shelf, yet the storage remains easy to clean and rearrange.
Bathrooms introduce moisture, so the finish matters as much as the shelf layout. Solid wood in a well-ventilated room is the best candidate. Swollen manufactured board, flaking paint, or joints that already move should not be pushed into a damp environment.
Materials and Tools
· Sound crib frame suitable for a dry, ventilated bathroom
· Two or three shelf boards cut to fit between the end panels
· Wood cleats, brackets, screws, and reinforcement blocks
· Moisture-resistant primer or durable wipeable finish
· Sandpaper, cleaner, filler, drill, saw, level, and measuring tape
· Woven baskets or washable bins
· Rolled towels, bath brushes, jars, and pump bottles
· Anti-tip hardware when the shelf is tall or placed near a busy walkway
Steps for Building the Towel Shelf
1. Check the bathroom and crib together. Measure the available floor area, door swing, bath edge, and walking path before changing the frame. Decide how many shelves the room can use without making the unit top-heavy. Leave enough clearance for towels to be lifted from the top shelf without hitting a wall cabinet.
2. Fit strong shelf supports. Mark each shelf height on both end panels with a level. Attach cleats or brackets into solid rails and posts, keeping the fixings away from thin slats. Dry-fit the shelf boards and press on them firmly before finishing the wood.
3. Prepare every surface for moisture. Clean the crib, smooth rough areas, and repair small holes. Seal the shelf edges, underside, feet, and joints rather than treating only the visible front. A bathroom finish should tolerate regular wiping, but it still cannot correct damaged wood or poor ventilation.
4. Arrange towels and containers by weight. Place heavier baskets and folded towels on the lower shelf, then use the upper level for rolled towels and lightweight toiletries. Keep liquids in a removable tray or basket so a leak does not sit directly on the wood. Leave open space around the contents to allow air movement.
5. Stabilize and maintain the unit. Anchor the shelf if its height or location creates a tipping risk, then check that it does not rock on the bathroom floor. Wipe splashes promptly and lift the baskets occasionally to inspect the shelf beneath. If the room remains very damp, move the unit to a drier area instead of relying on more coating.
For me, the baskets are doing important work here. They keep small bottles from disappearing between rolled towels, and they can be removed for cleaning without emptying the whole shelf one item at a time.
A lower-risk alternative is to place the crib shelf in a hallway outside the bathroom for spare towels and unopened toiletries. That preserves the same function while keeping the old wood away from direct splashes and heavy steam.
Make a Kitchen Produce and Pantry Rack
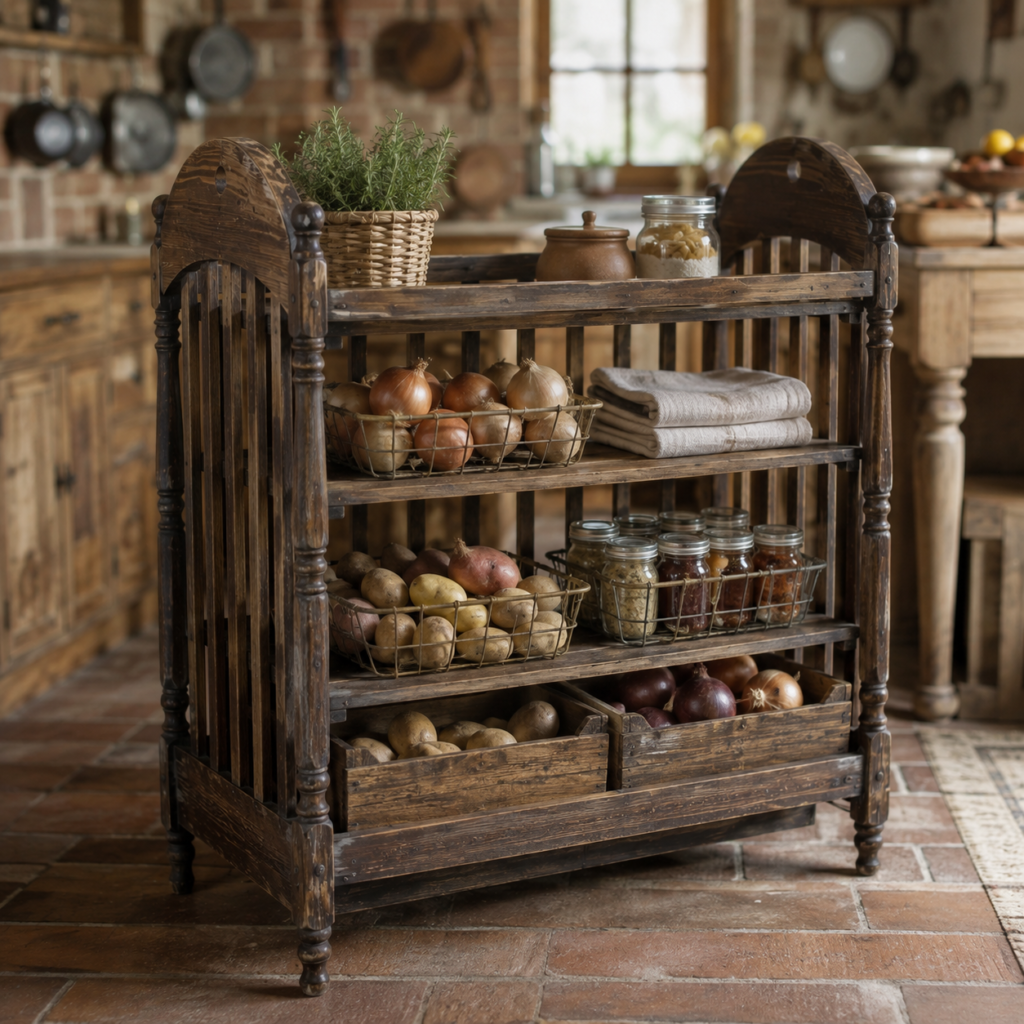
A crib can become a useful pantry rack because its slatted sides allow air to move around baskets and stored produce. Shelf boards create separate levels for onions, potatoes, jars, and folded kitchen cloths, while the lower frame can hold shallow wooden crates. The result works best as dry storage away from heat, direct sunlight, and cooking splashes.
Food storage needs a little restraint. Decorative paint should not touch unwrapped food, and closed jars should remain easy to inspect. Produce also needs separation, airflow, and regular checking rather than being packed into one deep box and forgotten.
Materials and Tools
· Strong crib frame with stable feet and intact side rails
· Shelf boards and optional shallow wooden crates
· Cleats, brackets, screws, drill, saw, level, and measuring tools
· Durable wipeable finish for the furniture surface
· Ventilated wire or woven baskets for produce
· Sealed jars or containers for dry pantry goods
· Removable trays or washable liners
· Anti-tip straps if the rack is tall or heavily loaded
Steps for Setting Up the Pantry Rack
1. Choose a cool dry position. Place the empty crib where it will not block cabinet doors or sit beside an oven, radiator, or strong sun. Measure the final width with baskets included, because handles often extend beyond the shelf. Check that the floor is level before adding any weight.
2. Build shelves for the intended loads. Plan wider spacing for produce baskets and closer spacing for jars or folded linens. Attach solid supports to the crib posts and rails, then fit shelf boards that cannot slide forward. Reinforce long spans so jars do not create a sag in the centre.
3. Finish and line the storage surfaces. Clean and sand the wood, then apply a durable finish to all exposed shelf areas and cut edges. Use removable trays or washable liners beneath baskets to catch soil and onion skins. Keep unwrapped food inside suitable containers rather than directly against painted or stained wood.
4. Separate produce and pantry items. Place potatoes and onions in different ventilated baskets, and keep sealed jars on a shelf where their lids remain visible. Store the heaviest baskets low, with linens or light containers higher up. Leave a little space between each basket so air can circulate and cleaning remains manageable.
5. Load gradually and create a checking routine. Add items in stages while watching for shelf movement or wobble. Rotate older produce to the front and remove anything spoiled before it affects the rest. Recheck the fixings and shelf level after the rack has carried weight for several days.
The part I would keep simple is the lower storage. Two removable crates are usually more practical than several fixed dividers because they can be lifted out, cleaned, and reorganized as the household’s needs change.
If you do not store much produce, use the lower baskets for reusable shopping bags, tea towels, or empty jars. A narrower crib section can also become a small coffee station, provided the shelf is strong and kept away from steam and spills.
Turn the Crib Into a Craft and Wrapping Station
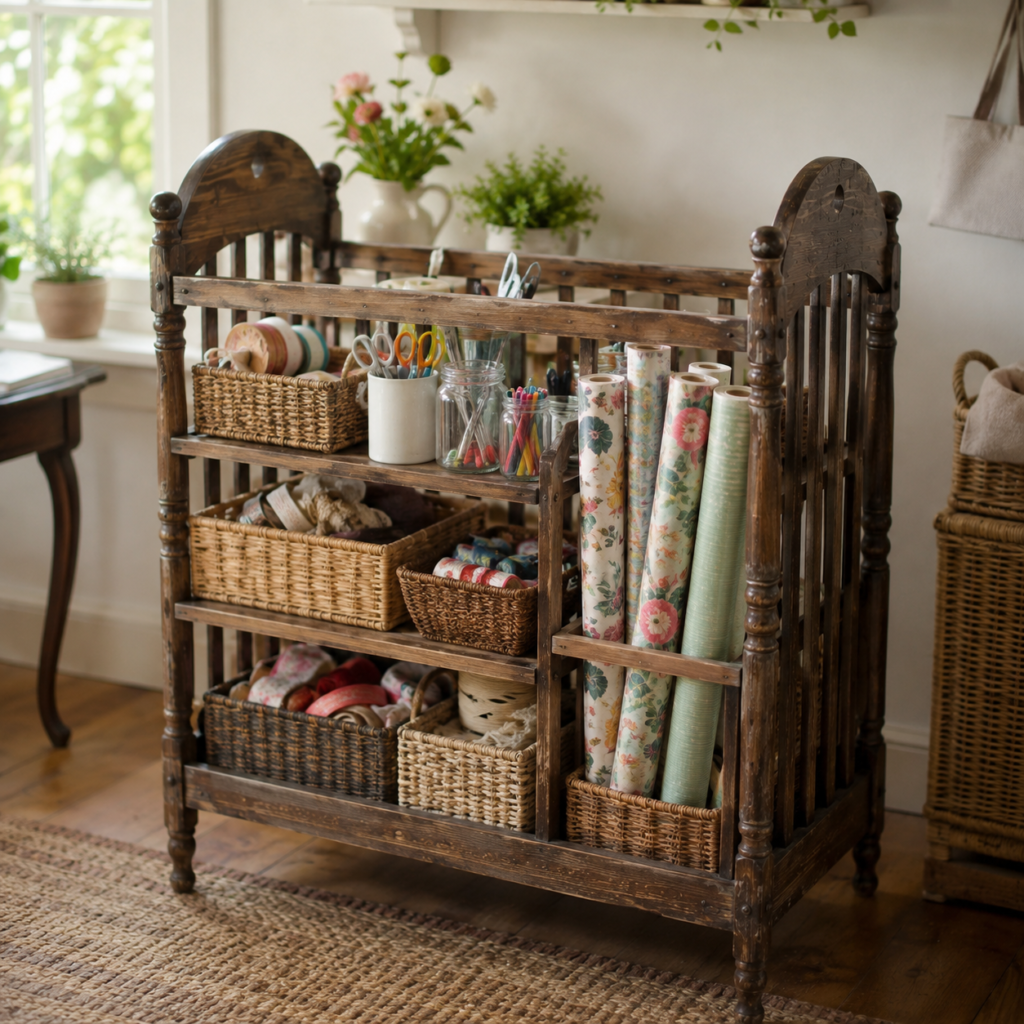
Craft supplies tend to spread because small tools, ribbons, paper, fabric, and unfinished projects all need different kinds of storage. A crib frame provides open shelves for baskets and jars, while one end can hold upright rolls of wrapping paper or fabric. The slatted construction keeps everything visible without requiring a complicated custom cabinet.
The main challenge is organization rather than construction. Too many tiny sections can become harder to use than a few flexible baskets. Start with the supplies you actually reach for, then leave some open space for future materials instead of filling every gap on the first day.
Materials and Tools
· Stable crib frame with intact end panels and base rails
· Shelf boards and narrow divider boards for upright rolls
· Wood screws, cleats, brackets, drill, saw, square, and level
· Woven baskets, jars, cups, and small trays
· Optional hooks or dowels for ribbon and tape
· Furniture finish or clear protective coating
· Labels only if they are useful inside removable baskets
· Anti-tip hardware for a tall station
Steps for Organizing the Craft Station
1. Sort supplies before building storage. Group the materials by how they are used rather than by color alone. Separate long paper rolls, frequently used hand tools, ribbon, fabric, and unfinished projects. Then measure the largest containers so the shelves fit real supplies instead of an imagined arrangement.
2. Add flexible shelf levels. Install two or three shelf boards on secure cleats attached to the crib posts and strong rails. Leave one area taller for jars or project baskets and another lower section for shallow trays. Test each shelf with filled containers before applying the final finish.
3. Create an upright roll compartment. Use a narrow end section for wrapping paper, wallpaper offcuts, or fabric rolls. Fit a low retaining board or basket so the rolls cannot slide across the floor, and add a side divider if they lean into the shelf. Keep the rolls upright without forcing them tightly together.
4. Arrange tools where they can be returned easily. Place scissors, pens, brushes, and rulers in stable jars or cups on an upper shelf, with heavy or sharp tools out of children’s reach. Use broad baskets for ribbon and fabric instead of several tiny boxes. Then leave one empty basket for the project currently in progress.
5. Secure the station and edit the contents. Anchor the frame if it could tip when a basket is pulled forward. Step back and remove duplicate containers or decorations that make the shelves feel crowded. A craft station should make starting and clearing away easier, not become another project that needs constant organizing.
I don’t think every spool or marker needs its own compartment. Broad categories are quicker to maintain, and a useful system is one you can restore in a few minutes after working rather than one that looks perfect only when nothing has been touched.
A smaller version could hold sewing supplies, gift wrapping materials, or children’s art tools rather than all three. You can also add a removable dowel for ribbon, but keep it simple enough to lift out when a roll needs replacing.
Crib Upcycling Errors That Can Weaken a Useful Conversion
Removing rails before understanding their purpose is one of the easiest ways to turn a solid crib into a twisted frame. The long side rails, base supports, and end connections often work together. Add replacement bracing before taking away several parts, and test the empty structure from every corner.
Another problem is treating every crib as strong enough for every idea. A lightweight costume station does not create the same load as pantry jars, wet soil, or stacked bathroom baskets. Match the project to the wood, joints, and base rather than choosing a demanding conversion simply because it looks appealing.
Using thin shelf boards across a wide span can cause sagging, especially in the pantry and potting bench. Support shelves with cleats, centre blocks, or stronger material. A shelf that looks straight when empty may behave very differently after it holds jars, pots, or several folded towels.
Skipping the hidden surfaces during finishing also causes trouble. Moisture reaches shelf edges, undersides, feet, and screw holes, not only the front face. Seal the areas most likely to collect dampness, and remember that a coating cannot make damaged indoor furniture suitable for constant outdoor rain.
Overloading the top while leaving the base empty makes tall conversions easier to tip. Keep heavy items low, anchor furniture where needed, and pull baskets out one at a time. This matters even more in children’s rooms, bathrooms, and narrow kitchens where people may grab the frame for balance.
Finally, too many decorative additions can hide the crib’s best feature: its useful open structure. Extra trim, dangling ornaments, and tightly packed containers make cleaning harder and can create snagging points. I’d rather keep the original posts and slats visible, then let the stored items provide the colour and texture.
Frequently Asked Questions
Can every old crib be upcycled?
No. The crib needs sound wood, secure joints, and a frame that remains square after unused hardware is removed. A damaged crib may still provide individual slats or panels for small decorative projects, but it should not become loaded furniture if the main structure is weak.
Do I need to sand the entire crib?
Most cribs need cleaning and at least light sanding so repairs and new finishes can grip. You may not need to remove every trace of the old finish when it remains stable, but rough edges, peeling areas, filler, and newly cut wood should be smoothed carefully.
Can a crib upcycle project remain outdoors?
A solid wood crib can work in a sheltered outdoor area after suitable preparation and finishing. Constant rain, damp soil, and strong sun are harder on old furniture, so a covered patio or greenhouse is usually a better location than an exposed garden bed.
How do I make a converted crib safer around children?
Remove protruding hardware, smooth every reachable edge, use rounded hooks, and anchor tall furniture to the wall. Avoid long loops, cords, unstable baskets, and anything that encourages climbing. Recheck the joints and fixings as the unit is used.
What type of wood should I use for new shelves?
Choose boards that are straight, stable, and thick enough for the planned load. Solid timber or good-quality plywood can work, but the shelf still needs proper support across a wide crib frame. Avoid relying on a thin decorative panel for heavy jars, wet pots, or large baskets.
Can I keep the crib’s original finish?
Yes, when the finish remains clean, secure, and appropriate for the new room. Smooth damaged areas and protect newly cut edges so the old and new surfaces work together. In bathrooms or outdoor locations, extra protection may be needed even when the original colour stays visible.
Which crib conversion is easiest for a beginner?
The dress-up wardrobe is often manageable because it uses lightweight clothing, baskets, and one secure hanging rail. The craft station can also remain simple with two shelves and removable containers. The potting bench and pantry rack require more attention to load, moisture, and reinforcement.
Give the Crib a Useful Life Beyond the Nursery
Learning how to upcycle a crib becomes much easier when the new purpose grows from the frame that already exists. The posts can support shelves, the slatted sides can contain baskets, and the broad shape can become a work station without losing the details that made the piece worth saving.
Begin with the crib’s condition, then choose the conversion that asks only what the wood can safely provide. A lightweight wardrobe may suit one frame, while a stronger crib can hold a potting surface, towels, pantry baskets, or craft supplies. Reinforce the important points, keep heavy items low, and add only the features that improve everyday use.
For me, a successful crib upcycle should still look familiar while solving a problem the home genuinely has. Which new purpose would help you most: a garden work station, dress-up wardrobe, towel shelf, pantry rack, or craft organizer?