Long-sleeve shirts often remain useful after they stop working as clothing. The cuffs may feel worn, the fit may have changed, or one area may carry a stain, yet the front, back, sleeves, buttons, pockets, and knitted sections can still provide plenty of fabric for decorative pillows.
I like projects that preserve the details that made the original garment recognisable. A button placket can become a practical pillow opening, a chest pocket can remain useful, and a cable-knit sweater front can add texture without needing extra decoration.
The condition and size of the shirt should guide the pillow design. A large button-up can cover a complete square insert, while several smaller shirts may work better as patchwork. A soft sweater can become a warm accent cushion, and a stretchy T-shirt can be turned into a simple no-sew pillow.
I don’t think every shirt needs to be cut into anonymous fabric squares. Keeping a collar, pocket, logo, cuff, or row of buttons often gives the finished pillow more personality and helps the original garment remain part of the new design.
Before You Cut the Shirt
Wash and dry the shirt according to its care label before measuring it. Fabric that has already been worn may contain stretched elbows, weakened underarms, loose buttons, or areas that change shape after cleaning.
Lay the shirt flat and inspect:
- The front and back panels
- The button placket
- The collar
- The pocket
- The cuffs
- The elbows
- The underarms
- The lower hem
- Printed, embroidered, or knitted details
- Stains, holes, fading, or weak fabric
Choose the pillow insert before cutting whenever possible. It is easier to shape the shirt around a real insert than to sew a cover first and hope that a suitable cushion fits later.
Leave enough fabric around the planned pillow size for seams. If the shirt fabric is thin, stretchy, loosely knitted, or worn, add a backing layer such as cotton, reclaimed denim, canvas, or lightweight interfacing.
Remove and restitch loose buttons. A decorative pillow will be handled, leaned against, and washed, so old button thread may not remain reliable even when the button appears secure.
Useful Materials and Tools
- Clean long-sleeve shirt
- Pillow insert or suitable filling
- Fabric scissors
- Seam ripper
- Measuring tape
- Tailor’s chalk or washable marker
- Pins or sewing clips
- Hand-sewing needle
- Strong coordinating thread
- Sewing machine, when available
- Iron and pressing cloth
- Cotton, denim, or canvas backing fabric
- Interfacing
- Zip, buttons, or hook-and-loop tape
- Fabric scraps for patchwork
- Yarn and crochet hook for knit repairs
- Optional embroidery, appliqué, ribbon, or labels
Keep scissors, pins, needles, loose buttons, and small decorations away from young children and pets. Test the iron and machine stitch on an offcut before working across delicate, synthetic, or loosely knitted fabric.
Make a Button-Front Memory Pillow
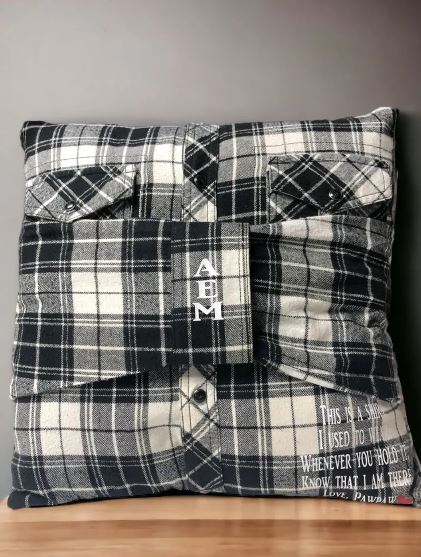
A button-front pillow keeps the most recognisable part of a shirt facing outward. The original placket provides a ready-made opening, while the pocket, fabric pattern, and buttons allow the finished cushion to retain its connection with the garment. The featured project was created from a shirt once worn by a loved one and turned into a keepsake that could be held and displayed.
This style works with cotton, linen, flannel, denim, and many ordinary woven button-up shirts. It is also one of the most manageable designs because the existing buttons reduce the need to install a zip.
Materials and Tools
- Button-up long-sleeve shirt
- Square pillow insert
- Measuring tape
- Fabric scissors
- Pins
- Sewing machine or hand-sewing needle
- Coordinating thread
- Lightweight backing fabric, if needed
- Interfacing for weak buttonholes
Sew the Pillow in Four Steps
- Position the pillow over the shirt front. Button the shirt and lay it flat with the placket centred or slightly to one side. Move the insert beneath the fabric until the pocket, label, embroidery, or other important detail sits where you want it.
- Mark and reinforce the cover. Trace around the insert and add seam allowance on every side. Strengthen worn buttonholes and thin fabric with interfacing or a soft backing layer before cutting the front and matching back panel.
- Sew the outer edges. Keep the shirt buttoned, place the front and back with the right sides together, and stitch around all four edges. Finish the raw seams so fraying does not continue inside the cover.
- Turn and insert the cushion. Open several buttons, turn the cover right side out, and push out the corners gently. Add the insert, close the buttons, and check that the placket lies flat without pulling apart.
The part I would check carefully is the button spacing. A cover can fit correctly at the corners and still gape across the centre if the insert is too full.
For a less sentimental version, use a bold striped or floral shirt and add contrasting buttons. A smaller pocket can hold a fabric note, remote control, or lightweight lavender sachet.
Preserve the Collar and Pocket on a Flannel Cushion
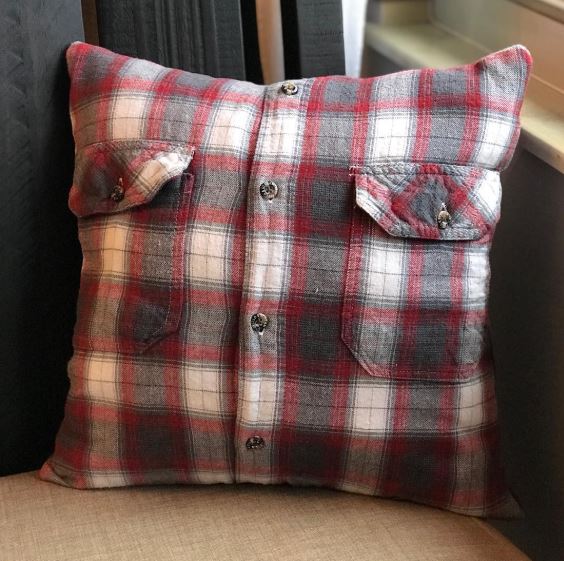
A flannel pillow feels softer and more casual than a sharply pressed cotton-shirt cover. The visible collar, button front, and pocket can remain part of the decorative surface rather than being removed during construction. The selected photo post shows a flannel shirt used directly as a pillow design.
The collar creates extra thickness, so it needs to sit flat or be secured lightly to prevent it from folding awkwardly. The shoulder area may also require backing because shirt yokes and pleats can create uneven layers.
Materials and Tools
- Flannel long-sleeve shirt
- Pillow insert
- Cotton backing fabric
- Interfacing
- Fabric scissors
- Pins or clips
- Sewing machine
- Strong thread
- Hand-sewing needle
- Optional decorative patch or label
Construct the Flannel Pillow in Four Steps
- Choose the visible shirt area. Arrange the insert beneath the buttoned front and decide whether the collar will remain fully visible or be partly cropped. Keep the pocket clear of the final side seams so it remains usable.
- Stabilise the softer fabric. Flannel can stretch and distort, especially when it has been worn for years. Baste it to a cotton backing panel before cutting, then reinforce the pocket corners and button placket.
- Control the collar and seams. Hand-baste the collar where you want it to lie so it does not shift while the cover is assembled. Sew the front to the back, keeping bulky shoulder seams and folded fabric away from the outer corners.
- Finish and shape the cushion. Turn the cover through the button opening, insert the pillow, and smooth the flannel across the front. Add a few hidden hand stitches beneath the collar when it continues lifting or twisting.
For me, flannel looks better when it remains slightly relaxed. Pressing every fold completely flat can remove the soft, familiar quality that makes the fabric appealing.
You could combine two coordinating flannel shirts, using one for the front and another for the back. A plain denim back also works well with checked flannel and adds extra strength.
Combine Several Shirts Into a Patchwork Pillow
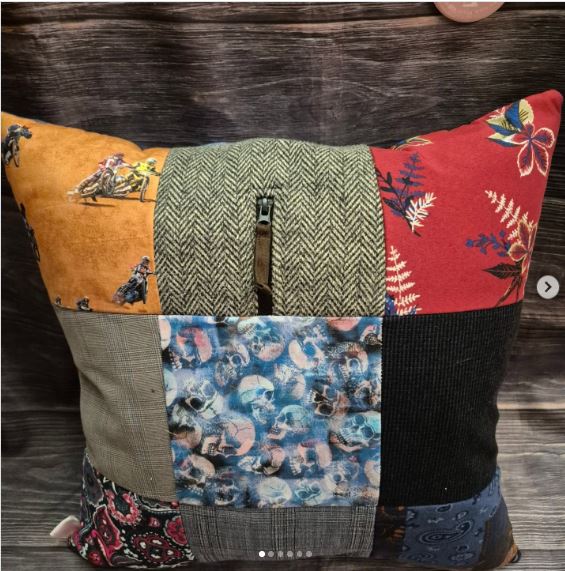
Patchwork is useful when no single shirt provides a large sound panel. It allows you to work around stained areas, worn elbows, damaged cuffs, and weakened underarms while keeping the strongest fabric.
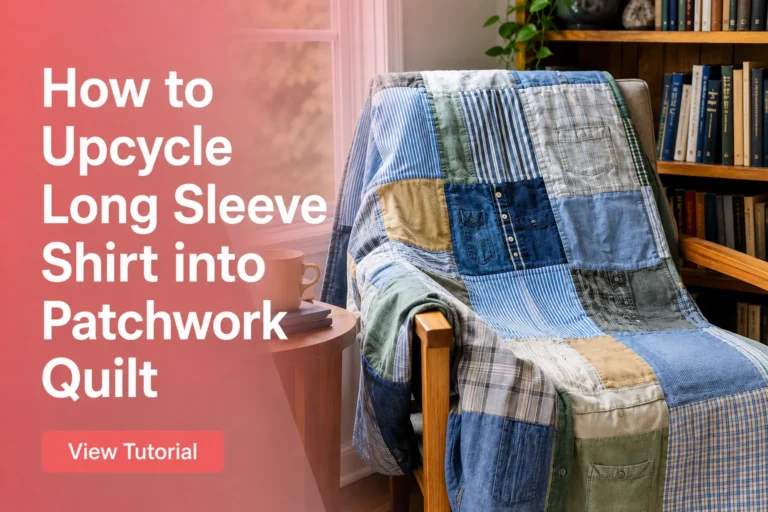
The selected project combines patterned clothing into patchwork cushions, showing how different prints and garment sections can become one decorative surface.
The main challenge is balance. Patchwork does not require every fabric to match, but repeating one colour, scale, or fabric type helps the final cushion feel deliberate.
Materials and Tools
- Sections from several long-sleeve shirts
- Paper for planning the layout
- Ruler
- Fabric scissors or rotary cutter
- Cutting mat, if available
- Sewing machine
- Coordinating thread
- Iron
- Backing fabric
- Pillow insert
- Optional batting for a lightly quilted finish
Make the Patchwork Front in Five Steps
- Sort the usable shirt sections. Remove buttons, bulky seams, collars, and damaged fabric. Group the sound pieces by colour, pattern, and weight so very thin fabric does not sit unsupported beside heavy denim or flannel.
- Plan the patchwork on paper. Choose squares, rectangles, strips, or a simple grid. Move the real fabric pieces across the pattern before cutting and place the strongest sections near the outer edges.
- Cut and join small groups. Sew the pieces into rows or blocks rather than trying to assemble the entire front in one seam. Press each join carefully and keep checking that the panel remains square.
- Add backing and optional quilting. Baste the finished patchwork to a plain fabric layer. Add a few straight or decorative quilting lines when the seams need extra support.
- Complete the pillow cover. Trim the panel to the required size and attach a plain back with a zip, envelope opening, or reused shirt buttons. Insert the cushion only after checking every patchwork join.
I know it can feel tempting to include every attractive scrap, but the layout often improves when one or two pieces are removed. A little plain fabric can give the stronger patterns more room.
For a quieter pillow, combine several blue, grey, or white shirts. For a brighter version, repeat one colour across checks, stripes, florals, and small geometric prints.
Turn a Long-Sleeve Sweater Into a Textured Pillow
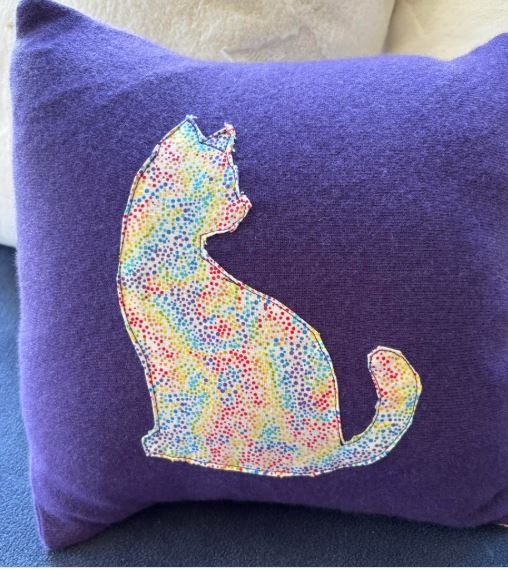
A knitted sweater provides texture that ordinary woven shirt fabric cannot. Ribbing, cables, colourwork, and soft yarn can turn a basic square insert into a warm decorative cushion.
The selected project uses vintage purple cashmere from a sweater to create a small pillow cover, preserving the fabric’s colour and knitted surface.
Knit fabric needs stabilising before cutting because the loops may stretch or unravel. A backing layer also helps the pillow retain its shape and prevents the insert from showing through open stitches.
Materials and Tools
- Clean long-sleeve sweater
- Pillow insert
- Cotton backing fabric
- Lightweight fusible or sew-in stabiliser
- Ballpoint or stretch needle
- Sewing machine
- Polyester thread
- Fabric scissors
- Clips
- Yarn and crochet hook or darning needle
- Zip or envelope-back fabric
Sew the Sweater Pillow in Five Steps
- Inspect and repair the knit. Check the sweater for moth holes, pulled threads, thinning elbows, and stretched ribbing. Mend any small weakness before deciding which section will become the pillow front.
- Stabilise the cutting area. Attach backing fabric or stabiliser behind the planned square. Stitch around the marked outline before cutting so the surrounding knitted loops remain controlled.
- Cut the front without stretching it. Keep the sweater flat on the table and cut through the secured area carefully. Avoid lifting the panel by one corner because its own weight may distort the shape.
- Add a supportive back. Use woven fabric or another stabilised sweater section for the reverse. A plain envelope back is often easier than placing a zip directly into a loose knit edge.
- Join, turn, and fill the cover. Sew with the knit supported beneath the machine, trim excess bulk, and turn the cover gently. Insert the cushion and adjust the knitted front without pulling individual stitches.
One detail I wouldn’t skip is supporting the knit while sewing. Letting a large sweater section hang from the machine can stretch it before the first seam is complete.
A cardigan front can preserve its buttons as the closure. Sweater cuffs can become small corner tabs, while narrow sleeve sections may provide matching fabric for a lumbar or neck pillow.
Sew a Two-Sided Cushion With Shirt Fabric and Denim
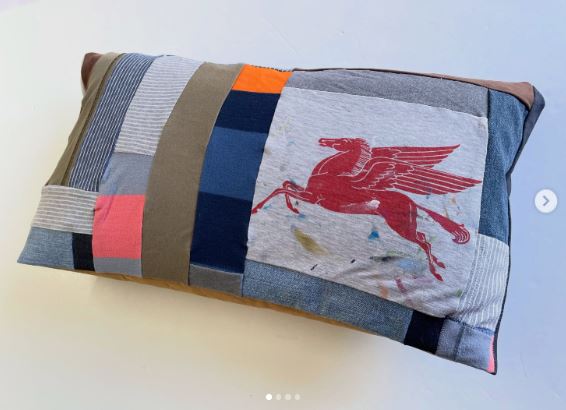
Combining shirt fabric with denim makes a useful two-sided pillow. The softer or more decorative material can face outward, while the denim provides structure, contrast, and a surface that suits regular handling.
The selected project uses upcycled T-shirts and denim in a two-sided patchwork pillow cover. This method is especially useful when a shirt panel looks attractive but feels too lightweight to support a complete cushion by itself.
Materials and Tools
- Long-sleeve shirt or T-shirt sections
- Reclaimed denim
- Pillow insert
- Fabric scissors
- Sewing machine
- Strong thread
- Pins or clips
- Interfacing
- Optional batting
- Zip, buttons, or envelope closure
- Hand-sewing needle
Make the Reversible Cover in Four Steps
- Prepare the softer shirt side. Cut one full panel or build a simple patchwork front from the strongest shirt sections. Back thin fabric with interfacing or cotton before trimming it to the final size.
- Cut the denim reverse. Use a broad section without thick original seams or worn knees. When one piece is not large enough, join several denim sections and press the seams open to reduce bulk.
- Add the opening. Install a zip, create an envelope overlap, or reuse a shirt button placket across one side. Keep the closure away from the thickest denim joins.
- Join and finish the pillow. Sew the front and back together, clip bulky corners, and turn the cover carefully. Add the insert and check that both sides sit smoothly when displayed.
For me, the contrast is what makes this pillow useful. One side can carry colour and pattern, while the denim side gives the room a calmer option.
You could use corduroy, canvas, or an old curtain instead of denim. A shirt pocket attached to the denim side can hold a small note or remote control.
Common Mistakes to Avoid
Cutting Before Choosing the Pillow Insert
A finished cover may not match the insert you already own. Place the real cushion over or inside the shirt before marking the cutting lines.
Using Worn Fabric at the Corners
Pillow corners and outer seams receive repeated pressure. Keep thin elbows, underarms, torn buttonholes, and stretched ribbing away from those areas.
Forgetting the Seam Allowance
A panel cut to the exact size of the insert may become too small after sewing. Add enough fabric around every edge for construction and finishing.
Overfilling the Pillow
An insert that is too large can pull the button placket open, distort knitwear, and strain patchwork seams. Use a size that fills the corners without forcing the cover apart.
Attaching Heavy Decorations to Thin Fabric
Large buttons, beads, or thick appliqué may pull through worn shirt fabric. Add backing and keep hard decorations away from areas where someone may rest their head.
Cutting Knitwear Without Stabilising It
Sweater loops can stretch or unravel after cutting. Stitch around the outline and add a supporting layer before separating the panel.
Leaving Old Buttons Unchecked
Buttons that survived years of wear may still have weak thread. Restitch them before treating the placket as the pillow opening.
Making Patchwork Without Pressing the Seams
Small alignment errors build quickly across several pieces. Press each row or block before adding the next one.
Relying on Fabric Glue for a Frequently Used Pillow
Glue may stiffen fabric or weaken through handling and washing. Stitch the main structural seams whenever possible, using adhesive only for suitable decorative details.
Frequently Asked Questions
Which long-sleeve shirt fabric is easiest for a pillow?
Firm cotton, linen, denim, and flannel are usually manageable because they hold their shape and accept ordinary seams. Stretchy T-shirt fabric and knit sweaters can work too, but they benefit from backing or stabilising.
Can I use the original shirt buttons as the pillow opening?
Yes. Centre or position the placket where it remains accessible, strengthen worn buttonholes, and choose an insert that does not pull the opening apart.
Do I need to remove the collar?
No. A collar can remain as a decorative feature when it sits comfortably and does not create excessive bulk. Hand-baste or tack it lightly when it refuses to lie flat.
Can I make a decorative pillow without a sewing machine?
Yes. A no-sew tied T-shirt pillow is one option, and a simple cover can also be stitched by hand with strong, closely spaced backstitches.
Should I use loose filling or a removable insert?
A removable insert makes the cover easier to wash and reshape. Loose filling may suit a permanently closed pillow or an unusual shape, but it requires a secure opening and evenly distributed stuffing.
How can I strengthen an old sentimental shirt?
Add lightweight interfacing or a soft cotton backing behind the visible panel. Repair weak buttonholes, tears, and pocket corners before assembling the cover.
What can I do with the leftover sleeves?
Sleeves can become small lumbar cushions, fabric ties, tassels, patchwork pieces, handle covers, or clean stuffing. Cuffs and pockets can also be saved for another fabric project.
Let the Shirt Details Become Part of the Pillow
Learning how to upcycle a long-sleeve shirt into decorative pillows begins with noticing which parts of the garment are still worth keeping. The button front can provide a closure, the pocket can remain useful, the collar can add shape, and the sleeves can supply fabric for smaller details.
Begin with a simple button-front cover or no-sew T-shirt pillow. Once you understand how the fabric behaves around an insert, you can try patchwork, sweater knit, denim backing, or a more detailed memory cushion.
The finished pillow doesn’t need to hide where its fabric came from. Keeping the recognisable features is often what gives an upcycled shirt pillow its warmth and character.
Which detail would you preserve first: the buttons, pocket, collar, graphic, or knitted pattern?