Old leggings often reach an awkward stage where they no longer feel suitable for wearing but still contain plenty of useful fabric. The knees may have faded, the waistband may have stretched, or a small hole may have appeared along one seam while the rest of the material remains soft and flexible.
I don’t think a worn knee should automatically send an entire pair of leggings to the bin. Stretchy jersey can become a fitted top, warm accessories, a practical bicycle-seat cover, or a completely refreshed pair of leggings with carefully placed appliqué.
The original fabric matters. Thick winter leggings can support mittens or a hat, while lightweight athletic material may suit a headband or layering top. Very thin sections can still become ties, elastic casings, small patches, or test pieces for your machine settings.
Stretch fabric behaves differently from ordinary woven cotton. It can curl after cutting, stretch beneath the sewing-machine foot, and form wavy seams if pulled too firmly. A little preparation makes a large difference, and most projects become easier once you stop trying to force the material to lie perfectly flat.
Sort the Leggings by Stretch, Damage, and Fabric Weight
Wash and dry the leggings according to their care label before measuring or cutting them. Fabric that has been worn repeatedly may change shape after cleaning, particularly around the waistband, knees, and seat.
Lay the leggings flat without stretching them and inspect:
- The waistband
- The inner-leg seams
- The crotch seam
- The knees
- The lower legs
- Printed or decorative areas
- Existing pockets
- Thin or shiny fabric
- Pilling
- Holes and pulled threads
- Areas where the elastic no longer recovers
Stretch a sound section gently and release it. Fabric that returns close to its original shape can usually be used for fitted accessories or clothing. Material that remains stretched may work better for patches, stuffing, or projects supported by another fabric.
Decide whether the leggings need to be cut apart. A pair with one damaged knee may be refreshed with appliqué, while leggings with a badly worn seat may provide two useful lower-leg tubes for mittens or a hat.
A ballpoint or stretch sewing-machine needle is often more suitable for knit fabric than a sharp woven-fabric needle. Test the selected stitch on an unwanted offcut and stretch the sample gently afterward. The seam should move with the fabric rather than breaking immediately.
I know it can feel tempting to increase the machine tension when jersey begins moving around, but that can make the seam gather even more. Supporting the material and testing a suitable stretch stitch usually gives you better control.
Useful Materials and Tools
- Clean old leggings
- Fabric scissors
- Seam ripper
- Measuring tape
- Tailor’s chalk or washable marker
- Pattern paper
- Ballpoint or stretch sewing-machine needle
- Polyester thread
- Sewing clips or fine pins
- Hand-sewing needle
- Lightweight knit interfacing
- Coordinating stretch-fabric scraps
- Appliqué patches
- Elastic
- Cotton or fleece lining
- Non-slip fabric for practical accessories
- Optional fabric glue for temporary positioning
Keep scissors, pins, needles, and small decorative pieces away from young children and pets. Avoid reusing fabric that remains heavily soiled, badly degraded, or unsuitable for its planned purpose.
Refresh Worn Leggings With Decorative Appliqué
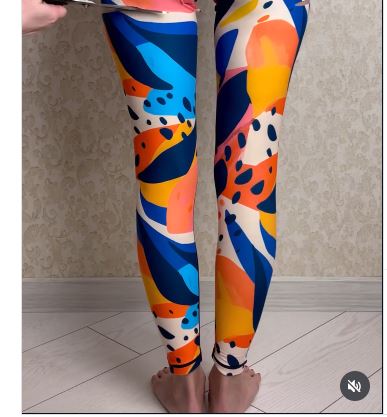
A pair of leggings does not need to become a different object when most of the fabric remains wearable. Decorative appliqué can cover small holes, stains, or thinning sections while making the repair look intentional. The selected leggings makeover uses sewn appliqué to update worn areas rather than hiding the alteration completely.
The placement matters because leggings stretch across the body. A stiff patch may feel uncomfortable over a knee or another area that bends frequently, so choose flexible appliqué or support only the weakest section.
Materials and Tools
- Leggings with localised damage
- Stretchy appliqué or soft fabric patch
- Ballpoint needle
- Polyester thread
- Fine pins or temporary fabric adhesive
- Small scissors
- Lightweight stretch interfacing, if required
- Hand-sewing needle
Repair and Decorate the Leggings in Four Steps
- Check the damaged area from both sides. Trim loose threads without enlarging the hole and place the leggings flat in their natural shape. If the surrounding fabric looks thin, support it from inside with a small piece of flexible interfacing or knit fabric.
- Test the appliqué placement. Pin or temporarily position the design while the leggings remain unstretched. Then try them on carefully to check whether the patch sits comfortably and covers the weak section when the fabric expands.
- Secure the appliqué with flexible stitching. Use a narrow zigzag or another stitch suited to stretch fabric. Sew slowly around the outer edge without pulling the leggings through the machine.
- Check the repaired area during movement. Bend the knee, sit, and walk while wearing the leggings. Reinforce any lifting edge, but avoid adding so many rows of stitching that the area becomes stiff.
For me, one visible repair often looks more convincing than several tiny decorations scattered around it. Let the patch solve the problem first, then decide whether the design needs a smaller matching detail elsewhere.
A beginner could use a simple heart, star, flower, leaf, or geometric patch. Several small holes can be connected with one larger flowing shape rather than repaired individually.
Turn Old Leggings Into a Tied Crop Top
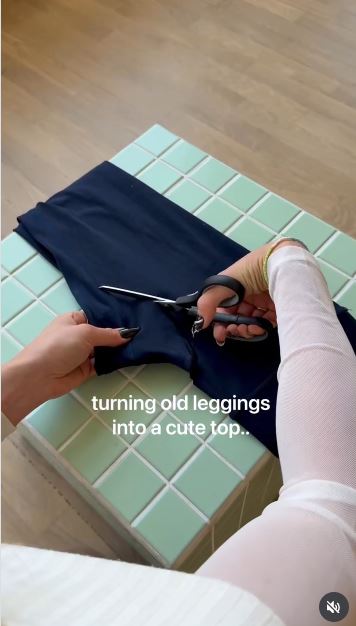
Stretchy leggings can provide enough fabric for a small fitted top, particularly when the legs remain sound and the material has good recovery. The selected refashion turns old leggings into a tied top by cutting and rearranging the existing fabric rather than using a conventional garment pattern.
This type of top works best as a light layering garment. The leggings fabric was originally designed for the lower body, so check its opacity carefully before deciding where and how the top will be worn.
Materials and Tools
- Full-length stretchy leggings
- Well-fitting stretch top for reference
- Pattern paper
- Fabric scissors
- Ballpoint or stretch needle
- Polyester thread
- Sewing clips
- Measuring tape
- Optional knit binding
- Optional lightweight lining
Make the Top in Five Steps
- Test the fabric for coverage and recovery. Stretch the leggings over a light and dark layer to see whether they become transparent. Use only sections that return to shape and feel comfortable against the upper body.
- Plan the top around the leg panels. Open the inner seams or cut the legs into the largest usable pieces. Arrange a simple top pattern over the material, keeping the direction of stretch across the body.
- Cut the main panels and ties. Add seam allowance before cutting the front and back. Use long narrow offcuts for side ties, shoulder ties, or a gathered centre detail.
- Join the top with stretch-friendly seams. Sew the main body without pulling the fabric and finish the neckline and arm openings with binding, folded elastic, or a narrow turned edge. Attach the ties through reinforced areas.
- Try the top on over another garment first. Adjust the ties and check the coverage while standing, sitting, and raising your arms. Shorten loose ends only after you know how much length is needed.
The part I would keep simple is the neckline. The fabric already creates a fitted shape, so a clean neckline and one set of adjustable ties may be enough.
A longer version could become a fitted camisole. You could also combine one legging panel with an old T-shirt back when the available fabric is too narrow for a complete top.
Make a Matching Beanie and Headband
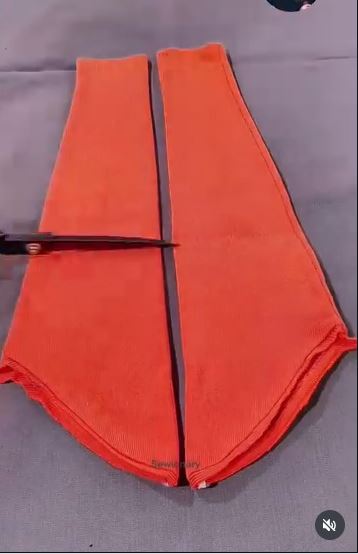
A beanie-and-headband set makes practical use of thicker leggings that no longer fit or have damage near the upper section. The selected project turns old stretch pants into a fitted hat and matching headband using simple paper patterns.
The lower-leg sections can be particularly useful because they already form tubes. Their existing hems may become a finished edge, depending on the size and direction of the pattern.
Materials and Tools
- Thick jersey or fleece-lined leggings
- Paper for patterns
- Well-fitting beanie for reference
- Measuring tape
- Fabric scissors
- Ballpoint needle
- Polyester thread
- Sewing clips
- Optional soft lining
- Hand-sewing needle
Sew the Accessories in Five Steps
- Measure without stretching the leggings. Compare the fabric width with a beanie or headband that already fits. Make a paper pattern rather than cutting directly around your head.
- Position the pattern on the strongest fabric. Avoid worn knees, thin inner seams, and stretched waistband sections. Use the existing leg hem as the lower beanie edge when it sits comfortably and matches the required size.
- Construct the beanie. Cut matching sections, join the curved seams, and close the crown neatly. Add a lining when the outer fabric feels thin, scratchy, or likely to show seam allowances.
- Create the headband. Cut a wide strip with the greatest stretch running around the head. Form a front twist or overlap, then join the back seam and check that the band lies smoothly.
- Test both pieces for comfort. Wear them for several minutes and check the ears, forehead, and back seam. Loosen or reshape any part that creates pressure.
I’d rather make a slightly relaxed beanie than stretch tired leggings fabric to its limit. A close fit may look neat at first but can place unnecessary strain on every seam.
Lightweight athletic leggings may suit a running headband instead of a winter hat. Small remaining pieces can become matching hair ties or a fabric flower.
Sew Soft Mittens From the Leg Panels
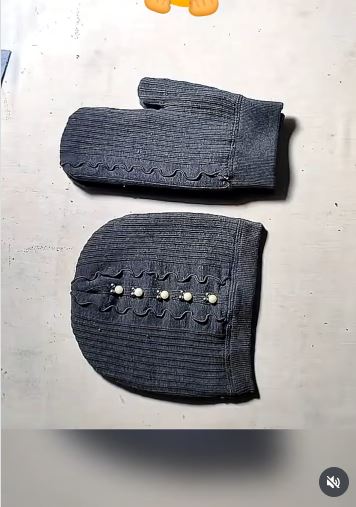
Fleece-lined or winter-weight leggings can become soft mittens when the lower legs remain intact. The selected sewing project begins by opening the leggings and reshaping the material around a mitten pattern.
Mittens receive pressure around the thumb and fingertips, so very worn or loosely stretched fabric should be supported or avoided. The material also needs enough crosswise stretch for the hand to enter comfortably.
Materials and Tools
- Thick or fleece-lined leggings
- Mitten pattern
- Paper and pencil
- Fabric scissors
- Ballpoint needle
- Polyester thread
- Sewing clips
- Soft lining fabric, if needed
- Ribbing or elastic for cuffs
- Hand-sewing needle
Make the Mittens in Five Steps
- Create a pattern with movement room. Trace around a mitten that fits or use a suitable paper pattern. Add seam allowance and enough width for the hand to pass through the wrist opening.
- Open and arrange the leg fabric. Cut along the inner seam and lay each section flat. Position the pattern away from worn knees and place the strongest stretch across the hand.
- Cut mirrored pieces. Make sure you have left- and right-hand sections rather than four identical pieces. Mark the thumb positions before moving anything from the cutting table.
- Sew the curved seams slowly. Join the thumb area first when the pattern requires it, then complete the outer mitten seam. Use short controlled stitches around tight curves and avoid pulling the fabric.
- Finish and test the cuffs. Reuse the original leg hem, add ribbing, or insert comfortable elastic. Put the mittens on and move each finger and thumb before reinforcing any strained area.
One detail I wouldn’t ignore is the thumb. Even a small alignment error can make the whole mitten twist, so match the notches and test one mitten before completing the second.
A simpler fingerless version needs less shaping and can work with lighter leggings. Contrasting cuffs can be cut from an old sweatshirt or sweater.
Protect a Bicycle Seat With a Leggings Cover
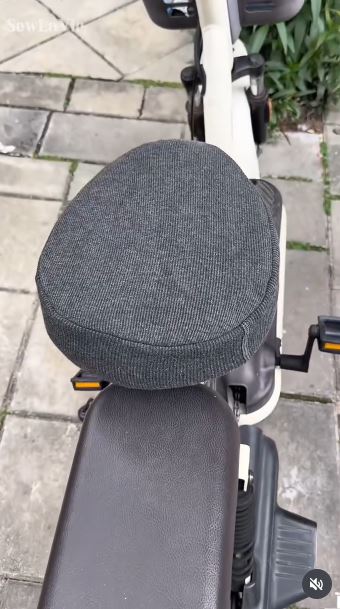
A bicycle-seat cover is an unexpected but practical use for leggings with a damaged upper section and sound lower legs. Stretch fabric can follow the saddle shape, while an elastic edge helps the cover remain removable. The selected project specifically repurposes old leggings as a bicycle-seat cover.
This cover should not interfere with the saddle rails, adjustment mechanism, reflectors, or safe use of the bicycle. Ordinary leggings fabric is also not automatically waterproof, so treat the project as a washable decorative or protective cover rather than guaranteed rain protection.
Materials and Tools
- Strong leggings fabric
- Bicycle saddle for measuring
- Paper
- Tailor’s chalk
- Fabric scissors
- Ballpoint needle
- Polyester thread
- Narrow elastic
- Safety pin or elastic-threading tool
- Optional non-slip backing
- Optional water-resistant outer fabric
Make the Saddle Cover in Four Steps
- Trace the saddle shape. Place paper over the seat and mark the top outline without disturbing the bicycle components underneath. Add enough depth around the edge for the cover to wrap beneath the saddle.
- Cut and test the fabric. Position the pattern on a strong legging section and keep the greatest stretch across the widest part of the seat. Drape the cut piece over the saddle before sewing.
- Create the elastic edge. Finish the outer edge with a casing or attached elastic, keeping the tension even. Leave enough stretch for the cover to pass over the saddle without tearing the seam.
- Check the fitted cover carefully. Confirm that no fabric or elastic reaches the rails, clamp, or moving parts. Remove the cover before transport when it could loosen, and wash it whenever it becomes dirty.
For me, the removable fit matters more than creating a perfectly smooth decorative surface. A cover that looks tidy but is difficult to remove will probably remain damp or dirty longer than it should.
For extra protection, use leggings fabric as the inner stretch layer and add a suitable water-resistant outer panel. A smaller offcut can become a matching handlebar accessory pouch, provided it is attached safely.
What Can Go Wrong When Reusing Stretchy Leggings
Using Fabric That No Longer Recovers
Leggings that stay stretched after being pulled may not hold the shape of a hat, top, or mitten. Use those areas for patches, stuffing, or projects supported by firmer fabric.
Cutting Without Checking the Direction of Stretch
Most leggings stretch more in one direction than another. Position patterns so the fabric expands where the body or object needs movement.
Pulling the Fabric Through the Sewing Machine
Stretching jersey while sewing can create rippled seams. Support the material and let the feed system move it naturally.
Using an Ordinary Sharp Needle Without Testing
A unsuitable needle may skip stitches or damage knit fibres. Test a ballpoint or stretch needle on an offcut before sewing the project.
Making Accessories Too Tight
Headbands, hats, cuffs, tops, and mittens should use the fabric’s stretch without relying on constant strain. Test the size before trimming seam allowances or closing openings permanently.
Expecting Thin Leggings to Carry Weight
Light athletic fabric may suit headbands and tops but not unsupported bags or heavily filled cushions. Add backing when the project needs structure.
Ignoring Worn Inner Seams
The inner legs and crotch often show more damage than the outer surface. Open and inspect the seams before placing a pattern over them.
Assuming a Stretch Cover Is Waterproof
A bicycle-seat cover made from ordinary leggings may absorb rain. Add an appropriate outer material when water resistance is needed and keep the cover away from the bicycle’s moving parts.
Frequently Asked Questions
Can leggings with holes still be upcycled?
Yes, when enough sound fabric remains. Work around large damaged sections or cover small stable holes with flexible appliqué and backing.
Which leggings are easiest to sew?
Medium-weight cotton jersey and stable athletic knits are often easier to control than very thin, slippery, or heavily compressed fabric. Always test the machine settings first.
Do I need a special sewing machine?
No. A standard machine may work when fitted with a suitable needle and stretch-friendly stitch. Avoid stretching the fabric as it passes beneath the presser foot.
Can these projects be sewn by hand?
Small repairs, appliqué, headbands, and some simple accessories can be hand sewn. Use flexible stitches and strong polyester thread rather than tight stitches that cannot move with the fabric.
What can I make from only one undamaged leg?
One sound leg may provide enough fabric for a headband, small hat panel, fingerless glove sections, patches, or a bicycle-seat cover, depending on its size.
Can compression leggings be reused?
They may work for fitted accessories, but dense high-stretch fabric can be difficult to cut and sew. Test it carefully and avoid creating anything that feels uncomfortably tight.
How should I wash the finished projects?
Follow the care needs of the most delicate material used in the project. Close fastenings, use gentle handling, and reshape stretch accessories after washing.
Keep the Stretch Fabric Working in a New Way
Learning how to upcycle leggings begins with identifying what the material can still do. A pair that has become unsuitable for exercise may still stretch well enough for a crop top, headband, hat, mittens, or removable saddle cover.
You don’t need to cut apart leggings that have only one damaged area. A carefully supported appliqué can extend their wearable life while adding a visible detail that feels more considered than an emergency repair.
Begin with the soundest fabric and the simplest realistic project. Test the stretch, practise the stitch on an offcut, and then make permanent cuts only after the layout feels right.
Which leggings upcycle would be most useful in your home: a repaired pair, fitted top, matching winter accessories, mittens, or a bicycle-seat cover?