Old teapots are often retired for reasons that have very little to do with their appearance. A lid disappears, the spout develops a chip, the handle feels unreliable, or the pot simply stops being used once a newer one arrives.
The rounded body, curved handle, narrow spout, and decorative surface can still make an old teapot useful outside the kitchen. It may hold herbs, flowers, miniature garden pieces, bird seed, lighting components, or hanging decorations, depending on its material and condition.
I don’t think every unused teapot needs to become a highly decorated ornament. A patterned ceramic pot may already have enough character to work as a planter or vase with very little added. A plain metal teapot, on the other hand, might suit a lamp or outdoor hanging project.
Before choosing the new purpose, check whether the pot remains structurally sound. A crack, sharp chip, loose handle, or damaged electrical conversion cannot be disguised safely with moss, flowers, or paint. The teapot’s condition needs to lead the project, even when the floral pattern is trying very hard to lead the conversation.
Check the Teapot Before Choosing a Project
Wash the teapot carefully and identify what it is made from. Ceramic, porcelain, metal, enamel, glass, and stoneware all respond differently to drilling, adhesive, paint, water, and outdoor weather.
Inspect:
- The handle attachments
- The spout
- The rim
- The lid
- The base
- Hairline cracks
- Sharp chips
- Rust
- Flaking enamel
- Loose decorative parts
- Old repairs
- Strong odours
- Staining
- Existing drainage holes
- The stability of the teapot when empty
Run a dry cloth around the rim and spout to identify rough edges without placing your fingers directly against a chip. Do not reuse a damaged teapot for serving food or drinks simply because the crack has been covered decoratively.
A loose handle makes the pot unsuitable for hanging unless the project uses a separate structural support. Decorative adhesive around the handle will not restore the strength of the original attachment.
Decide Whether to Drill the Teapot
Some projects benefit from holes for drainage, electrical cable, wire, or hanging components. Drilling ceramic, porcelain, glass, or enamel can crack the vessel when the wrong tool, pressure, or support is used.
Wear eye protection, stabilise the teapot, and use equipment intended for the material. Do not hold the pot in your lap or place pressure against unsupported curved walls.
When you are uncertain, ask an experienced craftsperson, electrician, glazier, or suitable repair professional to create the opening. A no-drill version is often possible:
- Use a nursery pot inside a teapot planter
- Run a lamp cable behind an open or adapted lid
- Attach a bird feeder to an external support
- Build a wind chime around the handle
- Use artificial flowers rather than wet floral foam
- Keep the project as a tabletop display
I’d rather adapt the design than risk breaking a sentimental teapot during the first five minutes.
Gather a Practical Teapot-Upcycling Kit
- Clean old teapot
- Protective gloves
- Eye protection
- Soft cleaning brush
- Clean cloths
- Mild cleaner suited to the material
- Fine abrasive pad when appropriate
- Painter’s tape
- Permanent marker
- Suitable drill and bit, if required
- Strong adhesive compatible with both surfaces
- Floral foam or reusable floral support
- Potting mix
- Small plants
- Moss
- Miniature garden pieces
- Strong chain or coated wire
- Old spoons or suitable chime pieces
- Saucer
- Lamp kit
- Lampshade
- Electrical components approved for the intended use
- Decorative paper
- Decoupage adhesive
- Clear protective finish when suitable
Keep food-use items separate from craft supplies. Once a teapot has been drilled, painted internally, fitted with electrical parts, or exposed to strong adhesive, it should remain a decorative object rather than returning to drink service.
Turn an Old Teapot Into a Herb Planter
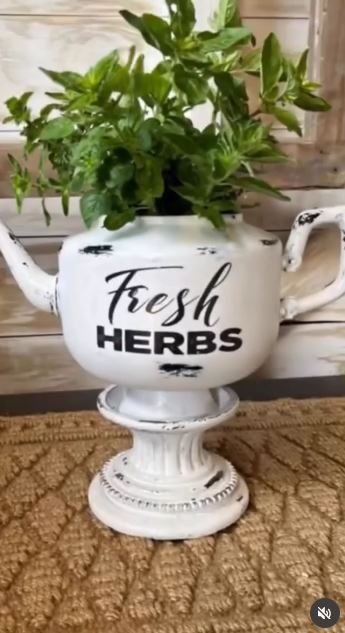
A teapot planter keeps the original shape almost completely unchanged. The opening provides space for a small plant, while the handle and spout make the container more distinctive than an ordinary flowerpot.
The main concern is drainage. Soil kept inside an undrained teapot can remain too wet, particularly when the plant receives generous watering.
Materials and Tools
- Clean teapot
- Small nursery pot, if using a no-drill method
- Potting mix suited to the plant
- Small herb or compact plant
- Drainage tray
- Ceramic or metal drill bit when appropriate
- Eye protection
- Small stones for stabilising an inner pot, if useful
Make the Teapot Planter
- Check the teapot for cracks. Fill it briefly with water over a sink and look for leaks around the base, spout, and handle attachments. Let it dry fully before adding soil or drilling.
- Choose the drainage method. Create a suitable drainage hole only when the material can be drilled safely. For a simpler method, place the plant inside a small removable nursery pot that fits within the teapot.
- Prepare the growing space. Add suitable potting mix around the plant without packing it firmly against the roots. Keep the soil below the rim so water and loose material do not spill every time the pot is moved.
- Position the plant carefully. Turn the fuller side of the plant towards the open area rather than pressing leaves beneath the handle. Then place the teapot on a tray or protected surface.
- Water according to the plant’s needs. Remove the inner nursery pot for watering when possible and let excess moisture drain before returning it. Check the soil rather than assuming a small container always needs more water.
For me, the spout should remain visible. It is the detail that keeps the planter looking like an intentional teapot upcycle rather than an unusually shaped flowerpot.
Trailing herbs, small ferns, young succulents, or compact flowering plants may suit different teapots. Match the plant to the available light and container depth rather than choosing it only by colour.
Convert a Vintage Teapot Into a Table Lamp
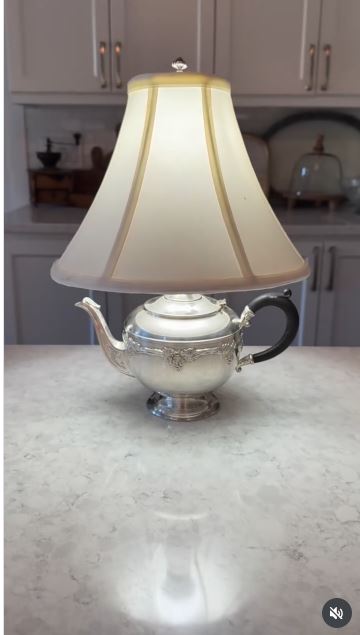
A teapot lamp works well when the vessel has enough weight and width to remain stable beneath the lampshade. Metal teapots may suit this project, although ceramic versions can also work when drilled and supported correctly.
Electrical safety is the most important part. Use a suitable lamp kit and follow its instructions, or ask a qualified electrician or experienced lamp maker to complete the wiring.
Materials and Tools
- Structurally sound teapot
- Compatible lamp kit
- Stable lamp stem or support
- Approved cable and socket
- Suitable lampshade
- Drill and bit intended for the teapot material
- Rubber grommet or cord protection
- Protective eyewear
- Non-slip pads for the base
Build the Teapot Lamp Safely
- Check the teapot’s balance. Place the intended shade above it temporarily and confirm that the base does not tip easily. A lightweight narrow teapot may need a hidden weighted insert or a smaller shade.
- Plan the cable route. Decide whether the cable will pass through a professionally drilled opening or another approved route. Every edge touching the cable must be smooth and fitted with suitable protection.
- Install the structural lamp components. Secure the lamp stem and socket according to the kit instructions. The electrical parts should not depend on the lid sitting loosely in place.
- Complete or commission the wiring. Follow the approved lamp-kit directions exactly or have the work completed and checked by a qualified person. Do not improvise connections inside the teapot.
- Add the shade and test the stability. Use a suitable bulb within the lamp fitting’s requirements, attach the shade, and place the lamp on a firm surface. Check the cable, socket, and base before regular use.
The lampshade should match the scale of the teapot rather than covering it completely. The base is the interesting part, so I’d let at least the handle and spout remain easy to see.
A no-drill decorative lamp may be possible with an external support built around the teapot. The teapot can also become a base for a cool battery-operated decorative light, provided the components are designed for that use.
Fill an Antique Teapot With a Dried Floral Arrangement
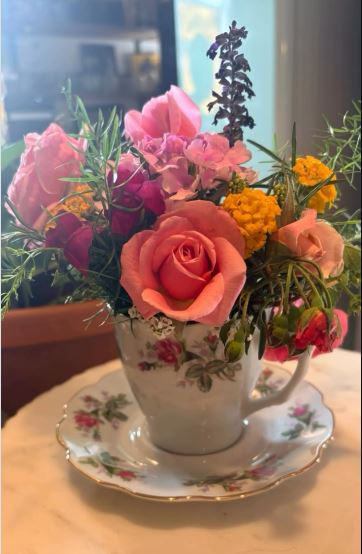
A dried floral arrangement is one of the gentlest ways to reuse a teapot. It does not require drainage, electrical work, or permanent attachment, which makes it suitable for sentimental or delicate pieces.
The handle, spout, lid opening, and floral pattern all contribute to the arrangement. The flowers should rise above the vessel without becoming so wide that the teapot disappears beneath them.
Materials and Tools
- Clean teapot
- Dried or preserved flowers
- Dried foliage
- Floral foam or reusable support
- Protective inner liner
- Floral wire
- Wire cutters
- Moss or soft finishing material
Arrange the Flowers
- Protect the inside. Add a removable liner when the teapot is valuable, porous, or likely to be used differently later. Fit the floral support inside without forcing pressure against the walls.
- Establish the main height. Place one or two taller stems first, slightly away from the centre. Turn the teapot as you work so the arrangement looks balanced from the intended viewing direction.
- Add the broader shapes. Insert medium flowers and foliage around the main stems. Keep some space between the materials so each texture remains visible.
- Fill the lower gaps. Use smaller flowers, moss, or short foliage near the rim. Avoid packing material tightly into the spout or around a fragile handle.
- Finish and display it. Trim visible wires and remove loose plant material. Keep the arrangement away from damp areas, strong heat, and direct conditions that may fade or damage the dried materials.
For me, the arrangement should respond to the shape of the teapot. A tall narrow pot can take an upright display, while a low round teapot usually suits softer outward movement.
Fresh flowers can be placed in a separate watertight container inside the teapot. Artificial stems are another option when the display needs to remain in a darker room.
Create a Miniature Fairy Garden Inside a Teapot
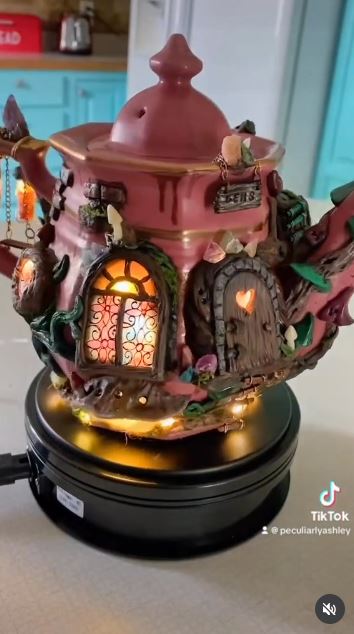
A shallow miniature scene can make use of a teapot that is too delicate for drilling or outdoor hanging. Moss, miniature plants, tiny paths, and a small doorway turn the vessel into a contained display.
Decide whether the garden will use live plants or artificial materials. Real plants need drainage, suitable light, and enough root space, while an artificial arrangement can remain completely dry.
Materials and Tools
- Old ceramic teapot
- Protective liner
- Floral foam or suitable planting medium
- Moss
- Tiny plants or artificial greenery
- Miniature doorway or house
- Small stones
- Tweezers
- Craft adhesive
- Small brush
Build the Miniature Scene
- Choose a live or dry design. Inspect the teapot and decide whether it can safely hold soil and moisture. Use a removable waterproof liner for a live arrangement or dry floral foam for an artificial display.
- Create the main landscape. Add the planting medium or foam below the rim and shape a gentle slope. Keep the spout and handle visible rather than burying the entire vessel beneath moss.
- Place the largest miniature feature. Position the doorway, house, or focal object before adding tiny details. Test several angles because the first arrangement rarely ends up being the final one.
- Add plants and pathways. Tuck greenery around the main feature and use small stones to suggest a path. Leave some open space so the scene does not become an indistinguishable collection of tiny objects.
- Secure and maintain the display. Attach only the lightweight artificial pieces that need support. Water live plants carefully and remove any material that begins pressing against the rim or handle.
I don’t think a miniature garden needs five fairies, three benches, a bridge, and a washing line. One small doorway and a clear path can suggest far more than a crowded collection.
A broken lid can become a stepping stone or background feature. A matching saucer may also hold an extended path, moss bed, or separate miniature seating area.
Hang Old Spoons Beneath a Teapot Wind Chime
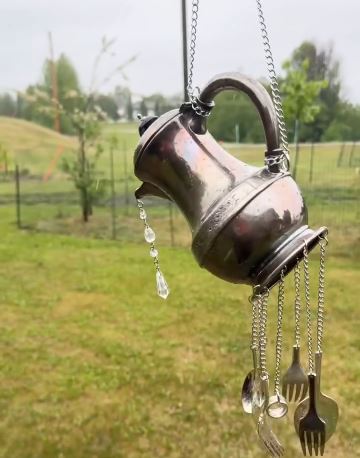
A metal teapot can form the top of a wind chime, while old spoons, keys, bells, beads, or other suitable pieces hang beneath it. The teapot provides a central visual shape and may also amplify some of the movement and sound.
This project needs reliable support. Outdoor wind creates repeated pulling, so decorative string and a loose handle are not enough.
Materials and Tools
- Sound metal teapot
- Old spoons or suitable metal pieces
- Strong coated wire or chain
- Split rings
- Drill and metal bit, if required
- Protective eyewear
- Pliers
- Beads or lightweight decorations
- Strong hanging hook
- Weather-resistant support
Assemble the Wind Chime
- Check every supporting point. Inspect the handle, lid, base, and any existing holes. Build a separate support through strong metal when the handle is decorative or weak.
- Prepare the hanging pieces. Clean the spoons and remove sharp edges. Create suitable holes only with safe metalworking tools and wear eye protection during drilling.
- Arrange the lengths before attachment. Lay the chime pieces on a table and vary their positions so they can move freely. Avoid placing heavy pieces where they will strike fragile enamel or ceramic decoration.
- Connect the chimes securely. Use coated wire, chain, or dependable rings rather than ordinary thread. Test every join by pulling it gently before attaching the next piece.
- Hang it in a suitable position. Choose a secure hook away from doors, windows, and areas where people may walk into it. Inspect the wire and metal parts periodically for rust, loosening, or sharp wear.
The sound should remain pleasant rather than becoming a full cutlery drawer in a storm. Begin with a few pieces, then add more only when the movement and balance genuinely improve.
A tabletop hanging stand can support the chime in a sheltered area. Smaller teapots can also become quiet decorative mobiles using lightweight beads and non-metal ornaments.
Teapot Upcycles That Need More Than a Pretty Surface
Ignoring Hairline Cracks
A fine crack can widen during drilling, hanging, or outdoor temperature changes. Inspect the teapot in bright light and avoid structural projects when the vessel is damaged.
Trusting a Loose Handle
The handle may look substantial while its attachment has weakened. Use a separate structural hanger for bird feeders and wind chimes rather than relying on appearance.
Using Indoor Adhesive Outside
Moisture and temperature changes can weaken unsuitable glue. Choose a product compatible with the materials and intended environment.
Planting Directly Without Drainage
A decorative teapot can hold too much water around the roots. Add a suitable hole or use a removable nursery pot.
Returning a Craft Teapot to Drink Service
Paint, adhesive, drilled holes, floral foam, soil, and electrical components can make the pot unsuitable for food use. Keep converted teapots permanently separate from kitchen serving pieces.
Drilling Without Supporting the Curved Surface
Teapots can shift, crack, or spin when pressure is applied. Stabilise the vessel and use tools intended for the material, or have the work completed professionally.
Hiding Electrical Connections Inside the Pot
A teapot lamp still needs approved components, protected cable routes, and dependable assembly. Decorative concealment should never replace safe wiring.
Using Wet Foam Against Vulnerable Metal
Moisture can encourage corrosion inside an old metal teapot. Use a protective liner or choose a dry arrangement.
Overloading a Miniature Garden
Too many objects can make the arrangement difficult to clean and maintain. Begin with one focal point and a few supporting details.
Making a Bird Feeder Difficult to Clean
Dense decoration and inaccessible seed areas can trap moisture and spoiled food. Keep the feeding surfaces open and removable where possible.
Hanging Heavy Chimes From Weak Wire
Repeated movement creates strain even when each spoon feels light. Use suitable outdoor supports and inspect them regularly.
Painting Over Rust or Flaking Enamel
Loose coatings cannot support a new finish reliably. Remove unstable material safely and assess whether the remaining teapot is suitable for reuse.
Frequently Asked Questions
What is the easiest way to upcycle an old teapot?
Using it as a dried-flower vase or artificial arrangement is usually the simplest option. It requires no drilling and allows the teapot to remain largely unchanged.
Can I use a cracked teapot as a planter?
A minor crack may still leak or widen under soil pressure and moisture. Place a separate nursery pot inside rather than filling the damaged teapot directly.
Does a teapot planter need a drainage hole?
Live plants generally need a way for excess water to escape. A removable inner pot provides a practical no-drill alternative.
Can a ceramic teapot be drilled safely?
It may be possible with the correct bit, support, protective equipment, and technique, but ceramic can crack. Ask an experienced person to drill it when you are uncertain.
How do I make a teapot safe for outdoor use?
Choose a structurally sound vessel, outdoor-compatible adhesive, weather-resistant support, and dependable hanging hardware. Inspect it regularly because moisture and temperature changes can weaken materials.
Can I make a teapot lamp without doing the wiring myself?
Yes. Prepare the visual design and have a qualified electrician or experienced lamp maker install and check the electrical components.
What can I do with a missing teapot lid?
The pot can still become a planter, vase, lamp base, miniature garden, feeder, or hanging decoration. A small plate, saucer, reclaimed knob, or separate insert may also become part of the new design.
Let the Teapot Keep Its Most Recognisable Details
Learning how to upcycle a teapot begins with working around the handle, spout, lid opening, and rounded body rather than hiding them.
A small herb planter may need little more than a removable inner pot. A dried floral arrangement can preserve a delicate antique, while a sound metal teapot may support a lamp or wind chime after proper preparation. Bird feeders and miniature gardens offer outdoor possibilities, provided the structure and materials suit the new purpose.
Begin with the safest manageable project. Clean the teapot, inspect every attachment, and decide whether the transformation really requires drilling or permanent adhesive. Then let the original shape remain visible, because that is what makes the finished project feel like a thoughtful reuse rather than an ordinary container with extra decoration.
Which old teapot would you rescue first: the patterned ceramic one for herbs, the silver pot for a lamp, or the lidless teapot waiting for a small garden?