An old button-up shirt often has more usable fabric than its place at the back of the wardrobe suggests. The collar may feel dated, the sleeves may be too long, or the fit may no longer work, yet the shirt still offers strong seams, finished hems, buttons, cuffs, pockets, and broad fabric panels.
I like beginning with those existing details rather than cutting everything apart immediately. A button placket can become the front of a dress, skirt, tote bag, apron, or memory pillow. Sleeves can provide ties, handles, ruffles, straps, or smaller accessories. Even the collar may be reused as a decorative feature.
The right project depends on the shirt’s size, fabric, condition, and personal meaning. An oversized cotton shirt provides enough room for clothing alterations, while a smaller or sentimental shirt may suit a bag or cushion better.
I don’t think every shirt needs a complicated transformation. Sometimes removing the sleeves, adjusting the fit, or adding one well-placed ruffle is enough. What matters is planning before cutting so the strongest and most recognisable parts of the original garment remain useful.
Before You Cut the Shirt
Wash and dry the shirt using a method suitable for its fabric. This prevents dust, storage marks, or later shrinkage from affecting the finished project.
Lay it flat and inspect:
- The front and back panels
- The underarms
- The elbows and cuffs
- The button placket
- The collar and collar stand
- The pocket
- The side seams
- The lower hem
- Any stains, tears, thinning, or previous repairs
Check the fibre label when it is still attached. Cotton and linen shirts usually press and sew differently from polyester, silk, or blended fabrics. Test the iron on a hidden section before pressing synthetic or delicate material.
Measure the usable fabric rather than the overall shirt. A stain on the front may prevent you from using the entire panel, but the back, sleeves, pocket, cuffs, and buttons may still be suitable for another project.
Photograph the original shirt before taking it apart. I know that sounds like a small thing, but it can help you remember where a pocket, pleat, cuff, or button once sat after the separate pieces begin looking like an unusually formal fabric puzzle.
Useful Materials and Tools
- Clean button-up shirt
- Fabric scissors
- Seam ripper
- Measuring tape
- Tailor’s chalk or washable marker
- Paper for patterns
- Pins or sewing clips
- Hand-sewing needle
- Coordinating thread
- Sewing machine
- Iron and pressing cloth
- Elastic
- Lining or backing fabric
- Interfacing
- Buttons, ties, or a zip
- Reclaimed fabric for contrasting details
Keep scissors, needles, pins, buttons, and small fasteners away from young children and pets. Support large garments on the table while sewing so their weight does not pull against the machine.
Refashion a Plain Shirt Into a Ruffled Cropped Blouse
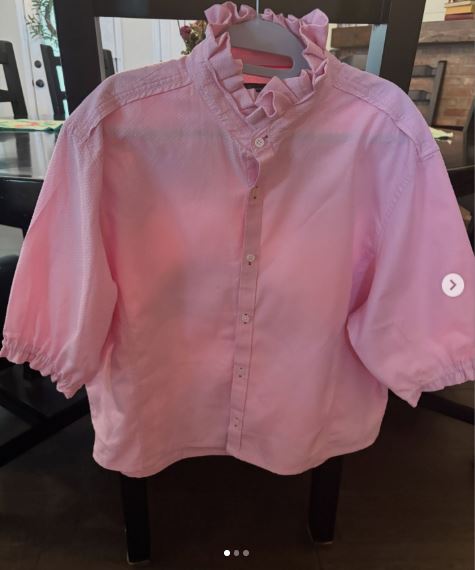
This makeover keeps the main body of the shirt but changes its proportions by cropping the hem, shortening the sleeves, adding sleeve elastic, and introducing a ruffled collar.
It is a useful approach when the shirt already fits through the shoulders and chest but feels too long, plain, or formal. Most of the original construction remains intact, which reduces the amount of sewing compared with making an entirely new garment.
Materials and Tools
- Button-up shirt
- Fabric scissors
- Seam ripper
- Measuring tape
- Elastic
- Bias binding or fabric strips
- Sewing machine
- Coordinating thread
- Pins
- Iron
- Optional contrasting fabric for the ruffle
Refashion the Blouse in Four Steps
- Mark the new hem while wearing the shirt. Decide where the finished blouse should sit and add allowance for the hem. Remove the shirt before cutting and use a ruler to keep the front and back level.
- Shorten and gather the sleeves. Cut the sleeves to the preferred length, finish the raw edges, and create a casing for elastic. Measure the elastic comfortably around the arm so the finished sleeve gathers without leaving pressure marks.
- Prepare the collar ruffle. Cut a long fabric strip from the removed lower section or sleeves, join pieces when necessary, and finish one long edge. Gather the opposite edge until it fits around the collar or neckline.
- Attach the ruffle and finish the blouse. Pin the gathers evenly, sew them securely, and press the seam away from the neckline. Hem the lower edge, check the button spacing, and reinforce any area changed by the new shape.
The part I would keep restrained is the ruffle depth. A wide ruffle can look attractive on the table and then cover the entire upper chest once worn.
You could replace the collar ruffle with lace, eyelet fabric, a contrasting print, or a narrower gathered strip. The removed shirt hem can also become waist ties rather than being discarded.
Sew a Tote Bag While Keeping the Shirt Pocket and Buttons
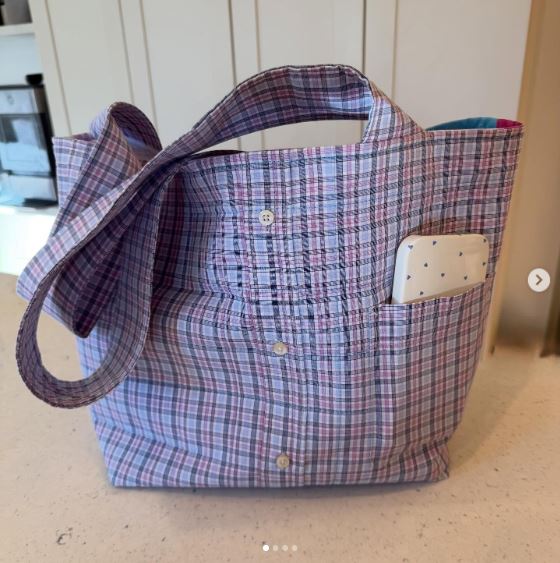
This tote combines a button-up shirt with reclaimed sheet fabric and keeps the original buttons and pocket visible. Those existing details give the bag useful storage and allow the original garment to remain recognisable.
Shirt fabric is often lighter than ordinary bag canvas, so a lining or backing layer helps the finished tote hold its shape. The handles should attach through reinforced fabric rather than relying only on the thin shirt panel.
Materials and Tools
- Button-up shirt
- Reclaimed sheet, denim, or firm cotton
- Fabric scissors
- Sewing machine
- Strong thread
- Interfacing
- Pins or clips
- Webbing or fabric for handles
- Lining fabric
- Optional snap or zip
Construct the Tote in Five Steps
- Choose the front design. Position the shirt pocket and button placket where they will remain visible on the finished bag. Cut a rectangular front panel only after checking that the buttons sit away from the side seams.
- Back the shirt fabric. Attach interfacing or place the shirt panel over a firmer reclaimed fabric. Baste the layers together so the thin outer fabric cannot stretch while the bag is assembled.
- Cut the remaining panels. Prepare a matching back, lining pieces, and optional base or side panels. Add an internal pocket before sewing the lining together.
- Assemble and reinforce the bag. Sew the outer panels with strong seams and box the corners if a wider base is wanted. Attach the handles through several layers and stitch a reinforcing rectangle at each connection.
- Insert the lining and finish the top. Enclose the raw upper edges with a facing, binding, or turned lining. Add a closure if desired and test the bag gradually before carrying heavier items.
For me, keeping the shirt pocket is more than decoration. It gives the original detail a real purpose and provides a convenient place for keys or another small item.
Sleeves can become handles when they are reinforced with webbing or interfacing. Small cuffs may also be used as decorative handle wraps or closure tabs.
Turn a Button-Up Shirt Into a Practical Apron
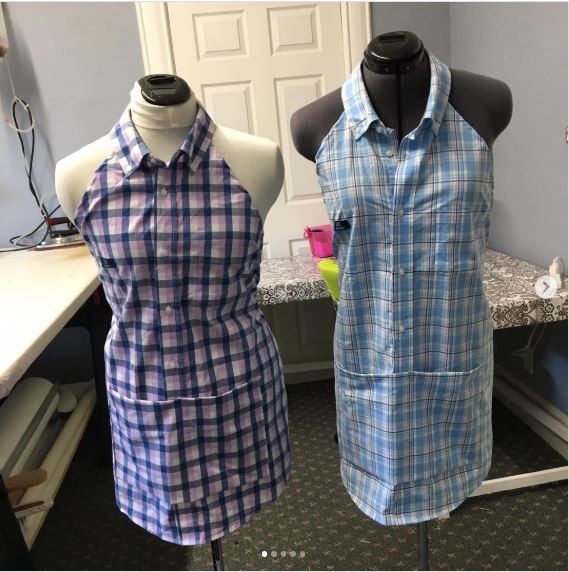
A button-up shirt already includes many of the details an apron needs. The broad front protects clothing, the pocket can hold light tools, and the sleeves provide long strips for neck and waist ties. This project shows several shirts repurposed as aprons while preserving their patterns and button fronts.
A firm cotton shirt is usually easier to manage than very sheer or slippery material. If the fabric is lightweight, adding a backing or second shirt layer can make the apron more practical.
Materials and Tools
- Button-up shirt
- Fabric scissors
- Seam ripper
- Sewing machine
- Thread
- Bias binding
- Pins
- Iron
- Optional second shirt or backing fabric
- Reused buttons
- Optional extra pocket fabric
Make the Apron in Four Steps
- Create the main apron panel. Remove the back, collar, and sleeves while keeping the buttoned front intact. Shape the upper sides gently from the chest towards the waist, leaving enough coverage across the body.
- Finish the shaped edges. Enclose the raw sides with bias binding or strips cut from the shirt back. Press the binding carefully so the curved edges lie flat.
- Make the straps and waist ties. Open the sleeves and cut long strips, joining them when more length is needed. Fold, stitch, and turn each strip, then attach the neck strap and ties through reinforced sections of the apron.
- Strengthen the pocket and closure. Keep the original shirt pocket or add a larger one from the back fabric. Stitch the button placket closed in areas where you do not need it to open, preventing gaps while the apron is worn.
One detail I’d check is the neck-strap length. An apron that hangs too low can feel awkward even when the waist ties fit properly.
For a gardening or craft apron, add several divided pockets across the lower front. A contrasting shirt can provide brighter bindings, ties, and pocket sections.
Make a Keepsake Pillow From a Meaningful Shirt
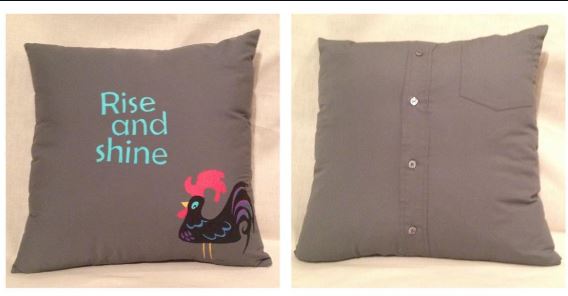
A shirt does not always need to become another item of clothing. A meaningful garment can be turned into a cushion cover that keeps its fabric, pocket, buttons, and familiar appearance in everyday view. The original project uses a recycled men’s shirt as a throw pillow and adds hand-painted decoration.
The button placket can function as the pillow opening, which reduces the need for a zip. A lining or backing may help when the shirt fabric is thin, worn, or especially important to preserve.
Materials and Tools
- Button-up shirt
- Pillow insert
- Fabric scissors
- Measuring tape
- Sewing machine
- Thread
- Lightweight backing fabric
- Interfacing for weak areas
- Pins
- Optional fabric paint, embroidery, or appliqué
Sew the Pillow in Four Steps
- Position the shirt details. Place the pillow insert over the buttoned shirt and decide whether the pocket, label, embroidery, or other familiar feature should sit in the centre. Mark the final square with seam allowance.
- Stabilise weak fabric. Add interfacing or backing behind thin sections, worn buttonholes, and the pocket area. Repair loose buttons before closing the pillow cover.
- Cut and sew the cover. Keep the shirt buttoned while cutting the front and prepare a matching back from the remaining fabric or another reclaimed textile. Sew around the edges with the right sides together, then trim and finish the seams.
- Turn and fill the pillow. Open several buttons, turn the cover right side out, press the edges gently, and insert the cushion. Close the buttons and check that the placket remains flat rather than pulling open.
I’d keep alterations modest when the shirt has strong sentimental value. The recognisable pocket, buttons, and pattern may matter more than adding several new decorations.
A small shirt can cover only the front of the cushion while plain fabric forms the back. Sleeves can become a matching heart, small sachet, or fabric tie around the finished pillow.
Common Mistakes to Avoid
Cutting Before Planning Every Piece
A sleeve that appears unnecessary may later provide the exact length needed for a strap, waistband, or handle. Mark the main pieces first and save every sound offcut until the project is finished.
Ignoring the Original Grain Direction
Shirt panels may hang differently when turned sideways. Keep garment pieces aligned appropriately unless a deliberate diagonal effect is part of the design.
Using Worn Fabric in High-Stress Areas
Underarms, elbows, cuffs, and buttonholes can weaken over time. Avoid placing those sections at bag handles, waistbands, shoulder seams, or other points that receive pulling.
Forgetting Seam Allowances
A pattern that fits exactly within the shirt panel may become too small after sewing. Add enough fabric around every edge before cutting.
Keeping Buttons Without Reinforcement
Original buttons can remain useful, but old thread may break. Restitch buttons and strengthen worn buttonholes before relying on them as closures.
Stretching Fabric While Sewing
Lightweight shirt fabric can become wavy when pulled. Support it on the table and guide it through the machine without forcing it.
Choosing a Project That Needs More Fabric Than the Shirt Provides
Measure the pattern pieces and usable shirt areas first. Combine two shirts, add reclaimed plain fabric, or choose a smaller accessory when the available material is limited.
Removing Recognisable Details Too Early
The pocket, placket, cuffs, collar, yoke, and hem can all become design features. Decide whether they can be reused before cutting them away.
Frequently Asked Questions
Which button-up shirts are easiest to upcycle?
Firm cotton or cotton-blend shirts are often manageable for beginner sewing projects because they press and hold their shape reasonably well. Very slippery, sheer, or stretchy fabrics may require more careful handling.
Can I upcycle a shirt without a sewing machine?
Yes. Simple alterations, fabric belts, decorative patches, and some hand-sewn accessories can be completed without a machine. Larger garments and load-bearing bags usually benefit from stronger machine stitching.
What can I make from a shirt that is too small?
A smaller shirt may provide enough material for a cushion front, tote panel, pouch, apron section, collar accessory, pocket, or children’s garment. Combining it with another reclaimed fabric increases the options.
Should I remove all the buttons before cutting?
Only remove the buttons that interfere with cutting or sewing. Keeping the placket intact can provide a useful closure for dresses, skirts, bags, aprons, and cushions.
How can I stop lightweight shirt fabric from losing its shape?
Add interfacing, lining, or a firmer backing fabric where structure is needed. This is especially helpful for tote bags, waistbands, straps, and cushion covers.
Can two shirts be used in one project?
Yes. Combining shirts can provide additional width, contrasting sleeves, a different collar, stronger lining, or enough material for a larger garment. Arrange the colours and patterns before cutting so the combination feels deliberate.
What should I do with the leftover cuffs and collars?
Cuffs can become closure tabs, small pockets, handle wraps, or decorative bands. Collars may be reused as detachable accessories, bag details, or neckline decorations.
Let the Existing Shirt Details Guide the New Piece
Learning how to upcycle a button-up shirt becomes much easier when you stop viewing it as one complete garment and begin noticing its useful sections.
The front can become a dress, skirt, apron, tote, or cushion. Sleeves can provide ties, ruffles, handles, and small accessories. The pocket may remain practical, while the original buttons can continue working as closures.
Begin with a transformation that keeps most of the shirt intact, such as a cropped blouse or apron. Then move towards more involved projects once you feel comfortable measuring, reshaping, lining, and reinforcing the fabric.
Which detail would you save first from an old button-up shirt: the pocket, the buttons, the collar, or the full front panel?