A sewing machine is useful, but it isn’t the only way to change clothes that no longer earn their place in the wardrobe. A loose T-shirt can become an off-shoulder top with careful cutting. A faded graphic tee can be tied at the front, while a small hole in jeans may only need a needle, strong thread, and a little patience.
The important part is choosing a method that suits the fabric. Stretchy jersey can curl neatly after cutting, but a loosely woven shirt may fray. Fabric adhesive can hold a decorative patch, yet it may not be the best choice for a seam that stretches every time the garment is worn.
I don’t think the lack of a sewing machine should send a useful shirt, hoodie, or skirt straight to the donation bag. Sometimes the simplest change is enough. Shortening a hem by hand, removing an uncomfortable hood, or reshaping an oversized top can make an old garment feel easier to wear again.
You still need to measure carefully. Scissors have a rather unhelpful habit of making every decision permanent.
Choose the Right Method for the Garment
Upcycling clothes without a sewing machine can mean several different things.
Some projects require no stitching at all. They rely on cutting, tying, knotting, folding, fabric adhesive, or iron-on bonding tape.
Others use a small amount of hand sewing. A basic running stitch, backstitch, whipstitch, or simple darning pattern can repair and reshape clothing without electrical equipment.
The best method depends on how much stress the finished area will receive.
Cutting and Tying
Cotton jersey T-shirts are useful for no-sew transformations because the cut edges often curl rather than producing long loose threads. This makes them suitable for tied hems, fringes, wider necklines, and cut-out details.
Even so, the fabric can stretch while you cut. Lay it flat and use sharp scissors rather than holding it in the air.
Fabric Adhesive
Fabric adhesive can secure patches, trims, appliqués, and some folded hems. Choose a product intended for washable textiles and follow its specific drying and laundering instructions.
Aleene’s advises prewashing garments without fabric softener, testing the adhesive first, applying an even layer, and allowing it to cure before washing. Its Fabric Fusion product is designed to remain flexible after drying.
Glue is not automatically suitable for every area. Avoid relying on it alone for tightly fitted seams, heavily stretched waistbands, or damaged sections that support the garment’s weight.
Fusible Web and Hem Tape
Iron-on adhesive can join two fabric layers or create a folded hem without stitching. HeatnBond describes its hem tape as a no-sew option for fabric adjustments, but the fabric must tolerate the required iron setting. Prewashing and testing are also recommended because surface treatments can interfere with bonding.
Do not use an iron-on product on fabric that may melt, distort, scorch, or lose a decorative coating.
Hand Sewing
Hand sewing takes longer than using a machine, but many clothing changes only need a short seam. A running stitch works for gathering and temporary joins, while a backstitch creates a stronger line for areas that need more support.
A small repair does not need to look invisible. Contrasting thread can turn the mended section into part of the design.
Prepare the Clothes Before Cutting
Wash and dry the garment before beginning, unless its care label requires another cleaning method. Clothing may shrink slightly, and fabric softener, body oils, or surface treatments can interfere with glue and fusible products.
Preparation may include:
- Checking the care label
- Washing without fabric softener
- Drying the garment fully
- Repairing loose seams
- Removing lint
- Testing glue on a hidden area
- Testing an iron setting
- Trying the garment on
- Marking the intended length
- Checking front and back alignment
- Measuring both sides
- Protecting printed graphics
- Keeping seam allowances where needed
- Placing cardboard between fabric layers
- Using pins or clips before hand stitching
Inspect the fabric closely. Thin areas, small ladders, stretched necklines, and weak seams may widen after cutting.
Put the garment on before making major changes. Mark where you want a neckline, crop, tie, or opening to sit, then take it off and lay it flat. Clothes rarely hang on the body exactly as they appear on a table.
Gather the Basic Tools
- Sharp fabric scissors
- Small thread scissors
- Seam ripper
- Hand-sewing needles
- Strong thread
- Embroidery thread for visible repairs
- Safety pins
- Straight pins or fabric clips
- Flexible measuring tape
- Ruler
- Tailor’s chalk
- Washable fabric marker
- Fabric adhesive
- Fusible web or hem tape
- Iron and ironing board
- Pressing cloth
- Cardboard
- Paper for templates
- Small crochet hook, if useful
- Buttons, ribbons, or fabric ties
- Leftover fabric scraps
- Thimble
- Protective cutting mat
Keep the seam ripper covered when it is not in use. Its pointed end is small enough to disappear under fabric and sharp enough to make its presence known later.
Turn an Old T-Shirt Into an Off-Shoulder Top
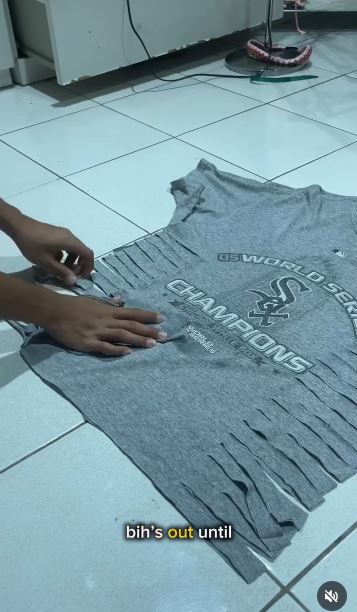
A T-shirt with a tight or unflattering neckline can feel completely different once the opening sits lower across the shoulders. This no-sew transformation uses the stretch of jersey fabric rather than adding zips, buttons, or new panels.
The reel demonstrates turning a regular T-shirt into an off-shoulder top without sewing.
Choose a shirt with enough room across the chest and shoulders. A fitted top may become uncomfortable if too much neckline fabric is removed.
Materials and Tools
- Clean cotton jersey T-shirt
- Fabric scissors
- Flexible measuring tape
- Tailor’s chalk
- Well-fitting top for reference
- Ruler, if useful
Shape the New Neckline
- Try the shirt on and mark the lowest point. Decide whether you want one shoulder exposed or a wider neckline across both shoulders. Mark the position lightly at the front, back, and sides before taking the shirt off.
- Fold and align the garment. Lay the shirt flat and make sure the shoulder seams sit evenly. Fold it in half only if the design should be symmetrical, keeping the sleeves and side seams aligned.
- Cut a shallow neckline first. Remove the original collar with a smooth curved cut, staying above your final mark. Open the shirt and try it on before taking away more fabric.
- Refine the shoulders and sleeves. Widen the opening a little at a time until it sits correctly. You may also shorten the sleeves or make small ties, but keep enough fabric around the shoulder seams to prevent distortion.
- Stretch and inspect the cut edge. Pull the jersey gently so the raw edge curls inward. Trim only obvious uneven points and check that the neckline does not continue dropping while worn.
I know it can feel tempting to cut directly to the final line, but necklines often stretch more than expected. A smaller first cut is much easier to adjust.
A simpler version can expose only one shoulder. You could also tie one side of the hem with a narrow strip cut from the removed collar.
Turn an Oversized Graphic Tee Into a Tie-Front Top
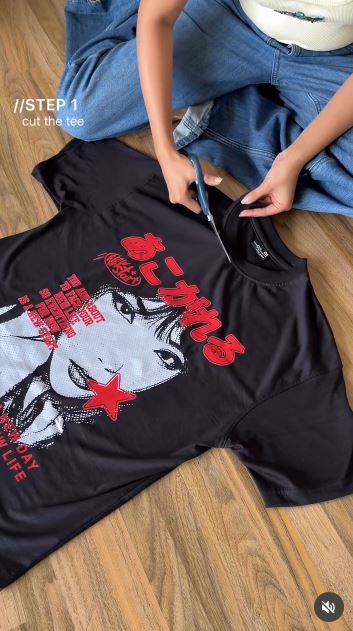
A graphic T-shirt often becomes unworn because of its shape rather than its artwork. The shoulders may still fit, and the printed front may still be worth keeping, but the long square body feels difficult to style.
The reel turns an oversized graphic T-shirt into a tie-front summer top using a short cutting process.
The position of the graphic matters. Check where the new hem will sit before cutting, especially when the printed design extends towards the bottom.
Materials and Tools
- Oversized graphic T-shirt
- Fabric scissors
- Tailor’s chalk
- Measuring tape
- Ruler
- Fitted top for comparison
Form the Front Ties
- Decide the finished length. Try the shirt on and mark where the back hem should sit. Leave the front slightly longer because that extra fabric will form the ties.
- Flatten and mark the shirt. Lay the garment with the side seams aligned. Draw a level cutting line across the back and side sections, then mark two longer front panels beneath the graphic.
- Cut the back and sides. Remove the unwanted fabric carefully without cutting through the front tie sections. Round the corners where the side edges meet the longer panels.
- Separate the front ties. Cut vertically between the two front panels, stopping below the printed design. Stretch each strip gently so the cut edges curl and become easier to knot.
- Tie and check the fit. Knot the two panels loosely at first, then adjust the height and tension while wearing the top. Trim only if the ties remain too long after a comfortable knot.
For me, the graphic should remain the main feature. Extra slits, fringe, and shoulder cuts can make the shirt feel busy when the print already has plenty to say.
A longer T-shirt can become a hip-length tie top instead of a crop. If you prefer more coverage, wear it over a fitted vest or dress.
Repair a Hole in Jeans With Hand Stitching
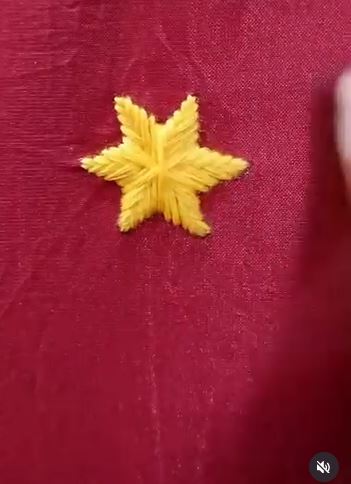
Repair is one of the most useful forms of clothing upcycling. It keeps the original garment recognisable and directs the work towards the exact area that prevents it from being worn.
The reel demonstrates repairing a hole in jeans or trousers with a needle and thread, without a sewing machine or extra fabric.
This method suits small holes where the surrounding denim remains reasonably strong. A large worn area may need a patch behind it because the existing fibres no longer provide enough support.
Materials and Tools
- Clean jeans or trousers
- Strong hand-sewing thread
- Hand needle
- Embroidery hoop, if useful
- Tailor’s chalk
- Small scissors
- Thimble
- Cardboard or small jar for support
Close and Reinforce the Hole
- Inspect the weakened area. Look beyond the visible opening and find where the denim begins to feel thin. Mark a repair boundary that includes stronger fabric around the damage.
- Support the fabric. Place a small jar, cardboard shape, or embroidery hoop behind the hole so the area stays flat. Avoid stretching the denim into a shape it does not hold naturally.
- Build the first stitch direction. Sew parallel lines across the hole, anchoring each line in sound fabric. Keep the tension firm enough to close the gap without gathering the jeans.
- Cross the first stitches. Work a second set of lines in the opposite direction, weaving through the first threads where possible. This creates a small hand-built structure over the missing fibres.
- Secure and test the repair. Knot the thread on the inside and trim the ends. Bend and gently pull the denim to check whether the repair holds without creating a hard ridge.
I don’t think every repair needs matching blue thread. A contrasting colour can make the mended area look intentional, especially on casual jeans.
For larger holes, place a scrap of lightweight denim behind the damage and hand stitch around it. Keep thick patch edges away from areas that rub against the skin.
Reshape an Old Skirt With Simple Hand Stitching
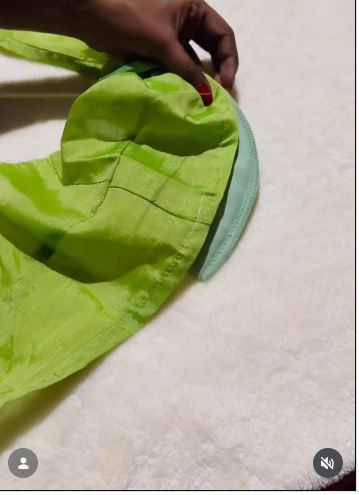
A skirt may stop being worn because its length, width, or silhouette no longer feels right. Hand stitching makes it possible to reshape selected areas instead of dismantling the whole garment.
Akhila Alaika’s reel shows an old skirt being cut, opened, and reconstructed using hand stitching rather than a sewing machine.
Begin with a skirt that has enough fabric for the intended change. A very fitted skirt offers less room for error than a gathered or flared style.
Materials and Tools
- Clean old skirt
- Fabric scissors
- Seam ripper
- Measuring tape
- Tailor’s chalk
- Hand-sewing needle
- Strong matching thread
- Pins or clips
- Safety pin
- Optional elastic or ribbon
Reshape the Skirt
- Decide what prevents you from wearing it. Check the length, waist, side seams, and overall volume. Mark only the areas that genuinely need changing.
- Open an existing seam where possible. Use a seam ripper instead of cutting through the middle of the fabric. An existing side or back seam gives you cleaner edges to work with.
- Pin the new shape. Fold, gather, overlap, or narrow the opened section and secure it temporarily. Try the skirt on carefully before making permanent stitches.
- Hand sew the altered area. Use backstitch for a strong seam and finish loose woven edges with small overcasting stitches. Keep the thread tension even so the fabric does not pucker.
- Check the movement and hem. Sit, walk, and bend slightly while wearing the skirt. Adjust any tight area before trimming excess fabric or finishing the new edge.
For me, the fit test matters more than making the inside look perfectly tidy. A neat seam is not useful if the skirt becomes impossible to sit down in.
A beginner can shorten the skirt, create a small side slit, or add a hand-gathered section instead of completely changing its shape.
Common Mistakes to Avoid
Cutting Before Trying the Garment On
Clothes hang differently on the body than they do on the floor. Mark the garment while wearing it, then check the position again once it lies flat.
Removing Too Much Fabric at Once
A neckline, crop, or slit may stretch after cutting. Begin conservatively and make the opening larger only after another fitting.
Using Blunt Household Scissors
Blunt scissors drag and twist fabric, creating uneven edges. Use sharp fabric scissors and keep them for textiles.
Assuming Every Raw Edge Will Stay Neat
Jersey may curl, but woven fabric can fray quickly. Finish woven edges with adhesive, fusible tape, hand stitching, or binding.
Using Fabric Glue on High-Stress Seams
Glue may work for trims, appliqués, and some hems, but shoulders, waistbands, and tight seams often need stitching. Test the adhesive and consider how the garment moves.
Ironing Without Checking the Fabric
Synthetic fibres, printed graphics, sequins, and coated fabric may react badly to heat. Check the care label and test through a pressing cloth.
Pulling Hand Stitches Too Tight
Over-tightened stitches gather the fabric and can make the repaired area uncomfortable. Match the stitch tension to the way the garment naturally lies.
Repairing Only the Visible Hole
The fabric around a hole may also be weak. Anchor repair stitches in stronger material or add a supporting patch behind a large worn area.
Forgetting the Inside of the Garment
Knots, glue, rough crystals, and bulky folds can rub the skin. Turn the item inside out and inspect every altered section.
Copying a Shape Without Checking Your Own Fit
A cut that suits one T-shirt or body shape may sit differently on another. Use the reel for inspiration, but fit the garment to the person who will actually wear it.
Washing Too Soon
Adhesives and fabric products need their stated curing or setting process. Follow the manufacturer’s instructions before laundering the item.
Frequently Asked Questions
Can I really upcycle clothes without sewing?
Yes. T-shirts can be cut, tied, knotted, painted, or altered with suitable fabric adhesive. Some projects still benefit from a few hand stitches, even though no sewing machine is required.
Which fabrics are easiest for no-sew clothing projects?
Cotton jersey is one of the easier options because it stretches and its cut edges often curl. Woven fabric may fray and usually needs an edge-finishing method.
Is fabric glue strong enough for clothes?
A washable fabric adhesive can work for patches, trims, appliqués, and certain hems. It may not be suitable as the only support for heavily stretched or weight-bearing seams.
Can fusible tape replace sewing?
Fusible tape can create hems and join suitable fabric layers, provided the material tolerates ironing. Always follow the product directions and test it before altering the full garment.
What is the strongest simple hand stitch?
Backstitch creates a stronger hand-sewn line than a loose running stitch and can work for short seams. The surrounding fabric must still be strong enough to hold the thread.
How can I stop cut T-shirt fabric from stretching too much?
Lay the garment flat, use sharp scissors, and avoid pulling the fabric while cutting. Make a smaller opening first, then try it on before cutting more.
Can I wash hand-upcycled clothes normally?
That depends on the fabric, adhesive, paint, and embellishments used. Follow the care instructions for the most delicate material and wash gently when you are unsure.
Begin With the Change the Garment Actually Needs
Learning how to upcycle clothes without a sewing machine is not about avoiding every stitch. It is about using the simplest method that makes an old garment useful again.
A T-shirt may only need a wider neckline or two front ties. A large scarf can become a loose jacket with two short hand-sewn seams, while worn jeans may return to the wardrobe after one careful repair. Even a hoodie or skirt can be reshaped with a seam ripper, a needle, and time.
Begin with clothing you already understand. Try it on, identify the part that stops you from wearing it, and change only that section first. Then step back before adding another cut, knot, or decoration.
Which item would you rescue first: an oversized T-shirt, an uncomfortable hoodie, a damaged pair of jeans, or a skirt that has been waiting quietly at the back of the wardrobe?