How to Upcycle CDs
Old CDs seem to linger in homes long after anyone stops using them. They sit in drawers with outdated computer accessories, they gather in boxes of mixed media, or they remain tucked inside old album cases simply because throwing them away feels wasteful. I completely understand that hesitation.
A compact disc is not a soft, obviously reusable material like fabric, and it is not as immediately practical as a jar or tin. Yet once you begin looking at the shape, the sheen, and the sturdiness of the disc, it becomes much easier to imagine a second life for it.
I think CDs are one of those upcycling materials that reward a little imagination. They already bring a clean circular form, a reflective rainbow finish, and a lightweight but firm base.
That means they lend themselves well to decorative home projects, small giftable ideas, and practical crafts that do not need expensive supplies. Some of the best results come from using the disc exactly as it is, while other projects work better when the CD is broken down into mosaic-like fragments and used almost like mirror tile.
The final eight ideas selected for this article feel especially realistic, which matters to me. They are not strange novelty crafts that look good in a single photo but are awkward to recreate or impossible to use. Instead, they are simple, believable, and genuinely attractive: coasters you could leave on a coffee table, a miniature wreath that suits a cosy interior, a mosaic frame for family photos, a bright suncatcher, a reflective planter, a painted wall hanging, a keepsake ornament, and a mosaic candle holder that looks lovely once the light catches it. Each one uses old CDs in a slightly different way, which is exactly what makes the collection useful for readers with different tastes and skill levels.
Prepare Old CDs Properly Before You Start
A little preparation makes almost every CD craft easier. Some discs are glossy and smooth, some still have old printed labels, and some may be scratched, cracked, or slightly warped. Taking a few minutes to sort and clean them first saves a great deal of frustration once glue, yarn, paint, or mosaic work is involved.
· Wipe each CD with a soft cloth to remove dust, fingerprints, and sticky marks.
· Set aside any discs with major cracks or dangerously sharp breaks rather than forcing them into a project.
· Separate whole CDs from discs you are happy to break into shards for mosaic ideas.
· Test paint, glue, and cord on one spare CD before using your best pieces.
· Keep a small container nearby for fragments, beads, or other small embellishments so the work area stays organised.
· If children are helping with a safe, simple project, keep the sharp-breaking and heavy adhesive stages for the adult to manage.
Match the Upcycle Idea to the Disc’s Natural Strengths
A CD is not just a flat piece of plastic. It has a central hole, a shiny surface, and a neat circular silhouette, and those qualities can be used in different ways depending on the project. I think the most successful ideas are the ones that let the material do part of the design work on its own.
· Use whole CDs when the round shape is helpful, such as for coasters, ornaments, suncatchers, or painted hangings.
· Use broken CD pieces when you want an iridescent mosaic effect on frames, planters, or glass holders.
· Use the reflective surface as a feature rather than covering it when the rainbow sheen adds charm.
· Cover the disc with twine, yarn, or paint when a warmer, softer, or more decorative finish suits the idea better.
· Choose lighter embellishments for hanging crafts so the disc does not tilt or twist too heavily.
· Think about placement in the home — table items need stability, while window items need good light and secure hanging points.
Keep the Finished Project Practical and Durable
Pretty photographs are lovely, but the best upcycled craft should still work once it leaves the worktable. A coaster needs to sit flat, a hanger needs a dependable loop, and a candle holder must be made in a way that still feels sensible and safe. When I am deciding whether an upcycled project has really succeeded, this is always the test I return to.
· Allow adhesives to cure fully before hanging, planting, or using the finished piece.
· Add backing where necessary so practical items feel less slippery or scratchy in everyday use.
· Keep sharp mosaic edges controlled and well secured, especially on objects that will be handled often.
· Avoid overcrowding decorative details if they make the project feel heavy, awkward, or visually cluttered.
· Try the item in its intended place before calling it finished — on the table, in the window, on the wall, or beside a plant.
· If the first version feels too busy, remove a few extras and let the shape and surface of the CD do more of the work.
CD Yarn-Wrapped Coasters
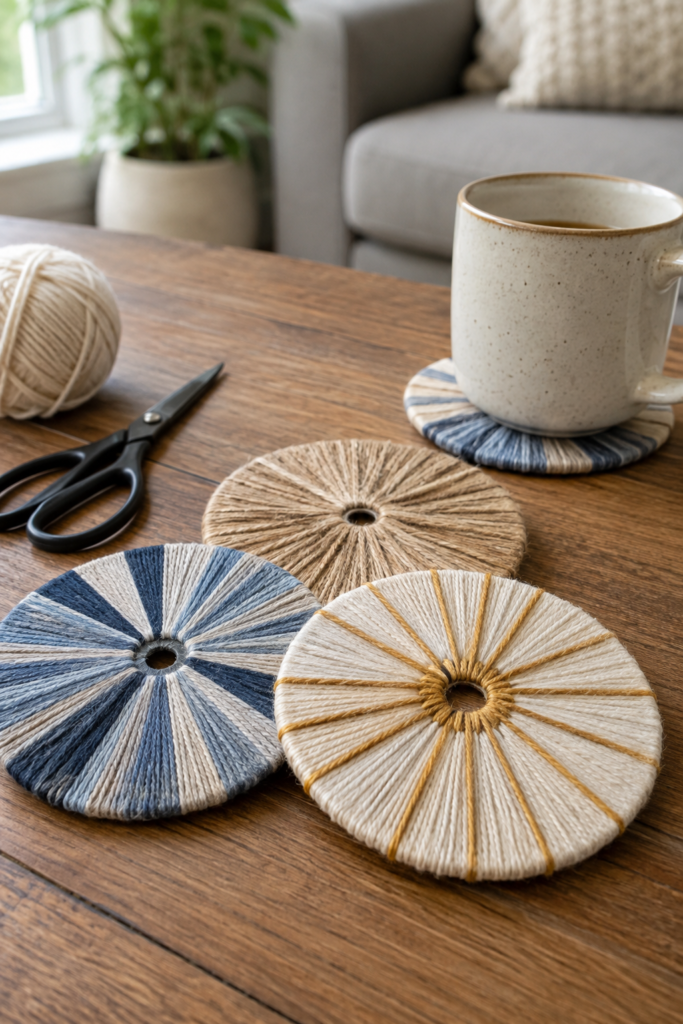
This is one of the most practical and approachable ideas in the set because the CD already provides the right size and shape for a coaster. Once you wrap the disc in yarn, the cold shine disappears and the whole piece takes on a softer, more homely look. That change is what makes the project work. It no longer feels like an old digital object sitting under a mug; it feels like a thoughtful handmade table accessory.
The selected image also proves that simple colours are enough. Soft neutrals, muted blues, and natural jute tones keep the coasters calm and stylish, which is much more appealing than trying to force too many contrasting colours into a small space. If you want a beginner-friendly project that still looks polished, I think this is probably the best place to start.
Materials and Tools
· Old CDs
· Yarn, cotton cord, or jute twine
· Strong craft glue
· Scissors
· Optional felt, cork, or non-slip backing
Steps
- Clean the CD and decide on the wrapping style before you start. Some people like a full spiral from the centre outward, while others prefer wedge-like sections that create a sunburst effect. It is much easier to keep the pattern tidy when you make that choice first.
- Anchor the starting end securely with a dot of glue and begin wrapping slowly. Keep the yarn close and even rather than pulling it too loosely, because small gaps become surprisingly noticeable on a round surface.
- Once the top surface is fully covered, secure the final end on the underside and trim it neatly. If you want a more durable coaster, add a thin felt or cork backing so the coaster grips the table and protects delicate surfaces more effectively.
- Repeat the process to build a small coordinated set. A group of four or six nearly always feels more useful than a single coaster, and the repeated palette gives the final result a much more intentional look.
What I like most here is the balance between reuse and practicality. The CD disappears just enough to become useful, but its original shape still quietly supports the design.
Twine-Wrapped CD Wreath with Dried Florals
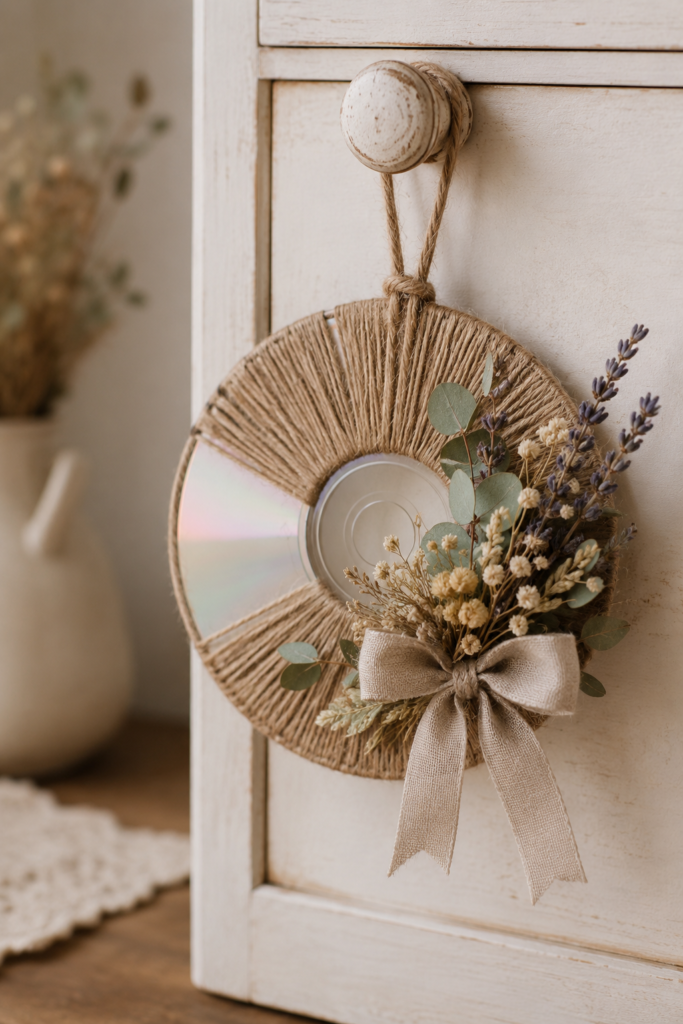
A compact wreath is a really smart use for a CD because the shape already does half the work. By wrapping the disc in jute or twine, you immediately turn something modern and glossy into something textured and rustic. Then, with just a small cluster of dried flowers and a soft ribbon bow, the piece becomes decorative enough to hang on a cabinet knob, wall peg, peg rail, or small seasonal display.
I especially like this idea because it feels achievable even if you do not have a large collection of floristry materials. Tiny leftover dried stems, bits of eucalyptus, small grasses, or faux sprigs can all work beautifully on a project this size. The finished piece feels gentle and decorative rather than overdone.
Materials and Tools
· Old CD
· Jute twine or natural cord
· Strong glue
· Dried flowers or faux florals
· Ribbon for the bow and hanger
· Scissors
Steps
- Begin by deciding how much of the CD you want to cover. You can wrap the entire disc for a fully rustic finish, or leave one section exposed if you like the contrast between natural twine and a hint of reflective surface.
- Attach the twine carefully and wrap it in close, neat lines. Because the disc is small, a messy wrap shows quickly, so take your time and press the cord into place as you move around the circle.
- Make a small hanging loop before adding the floral details. Then build a modest dried arrangement on one side or lower section of the wreath. I find it helps to keep the florals slightly asymmetrical so the little wreath feels more natural and less forced.
- Finish with a ribbon bow that suits the overall style. Linen, cotton, or hessian ribbon keeps the project looking soft and simple. Once dry, hang the wreath somewhere it can be appreciated at eye level or near a decorative vignette.
This is a lovely example of an upcycle that feels more decorative than crafty. It uses the disc’s shape intelligently and proves that even a very small item can become a charming piece of home décor.
CD Mosaic Photo Frame
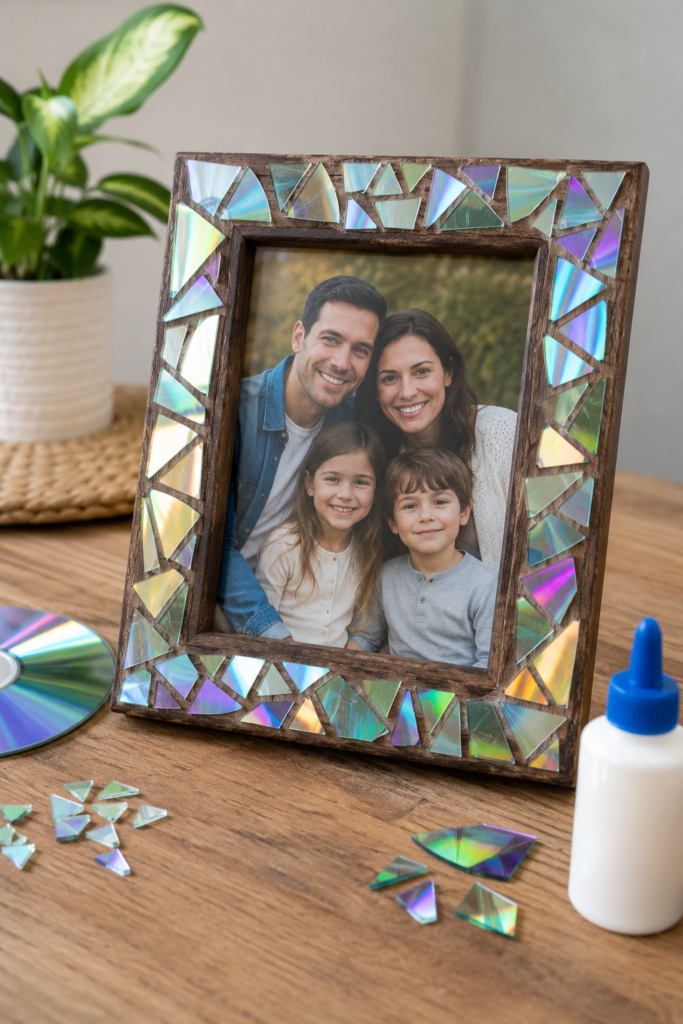
A photo frame is one of the best places to use broken CD pieces because the reflective fragments behave almost like tiny mirror tiles. They catch the light beautifully, but they also carry a subtle rainbow sheen that ordinary mirror mosaic does not. In the selected image, the wooden frame beneath the shards remains visible enough to ground the design, which keeps the project feeling warm and personal rather than cold or overly flashy.
This is also a very satisfying project for using damaged CDs that are no longer attractive as whole discs. Instead of discarding scratched or outdated media, you can break them down into something bright and meaningful around a family photograph or favourite printed memory.
Materials and Tools
· Old CDs to break into shards
· Wooden or sturdy photo frame
· Protective gloves and eye protection
· Cloth or towel for controlled breaking
· Strong glue
· Optional filler or grout
Steps
- Wrap the CDs in a cloth before breaking them so the shards are easier to control. Sort the broken pieces afterward, keeping the nicest medium-sized fragments for the most visible front edges of the frame.
- Lay the frame flat and test the arrangement before gluing. Begin with the corners and larger open stretches, because these areas determine whether the border will feel balanced once the smaller pieces are added.
- Glue the shards individually, leaving narrow gaps between pieces so the mosaic pattern stays clear. I think this project looks best when the fragments are varied in shape but still arranged with a sense of rhythm rather than pure randomness.
- Allow the frame to dry thoroughly and only then insert the photograph. If you want a more finished look, you can use a little filler or grout between pieces, but it is perfectly fine to leave the wood visible if you like the contrast.
This is one of those upcycles that can easily feel special enough to gift. The combination of a favourite photo and handmade mosaic detail gives the frame genuine keepsake value.
CD Beaded Suncatcher
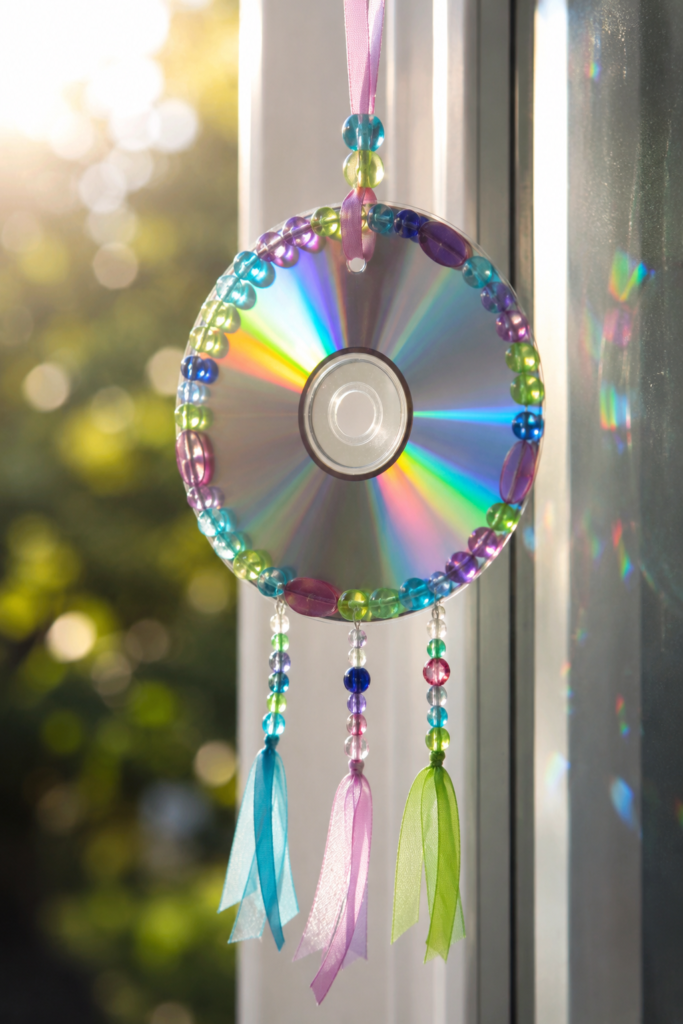
A suncatcher is one of the most natural projects for a CD because the disc already reflects light so beautifully. A few added beads and soft hanging ribbons are enough to turn that built-in shine into something much more decorative. The selected image gets the balance right: it is colourful and cheerful, but still simple enough to look believable as a homemade window craft rather than a bulky hanging object.
This is also a very flexible idea. You can use bright rainbow beads for a playful look, pastel tones for a child’s room, or clear and iridescent beads if you want something slightly more delicate. The basic structure stays the same, which makes the project easy to adapt.
Materials and Tools
· Old CD
· Ribbon or line for hanging
· Colourful beads
· Strong glue or a method for attaching strands securely
· Scissors
· Optional extra ribbon tails
Steps
- Clean the disc first because window light exaggerates fingerprints and smudges. Attach the top hanging ribbon before anything else so you know exactly how the piece will sit once suspended.
- Arrange the beads around the edge in a pattern that feels balanced. You can glue them directly, or attach them through a method you are comfortable with, but the main thing is to keep the spacing intentional so the disc still feels elegant.
- Add a few hanging strands or ribbon tails below if you want more movement. Three light strands, as in the selected idea, are usually enough to make the piece feel finished without turning it into a heavy mobile.
- Hang the suncatcher in a bright window and observe how it moves and catches the light. If one side pulls too much, rebalance the tails or trim them slightly so the disc hangs more neatly.
I think this is a lovely family-friendly idea because it uses the natural beauty of the CD rather than hiding it. It feels cheerful, low-cost, and easy to personalise.
CD Mosaic Planter Pot
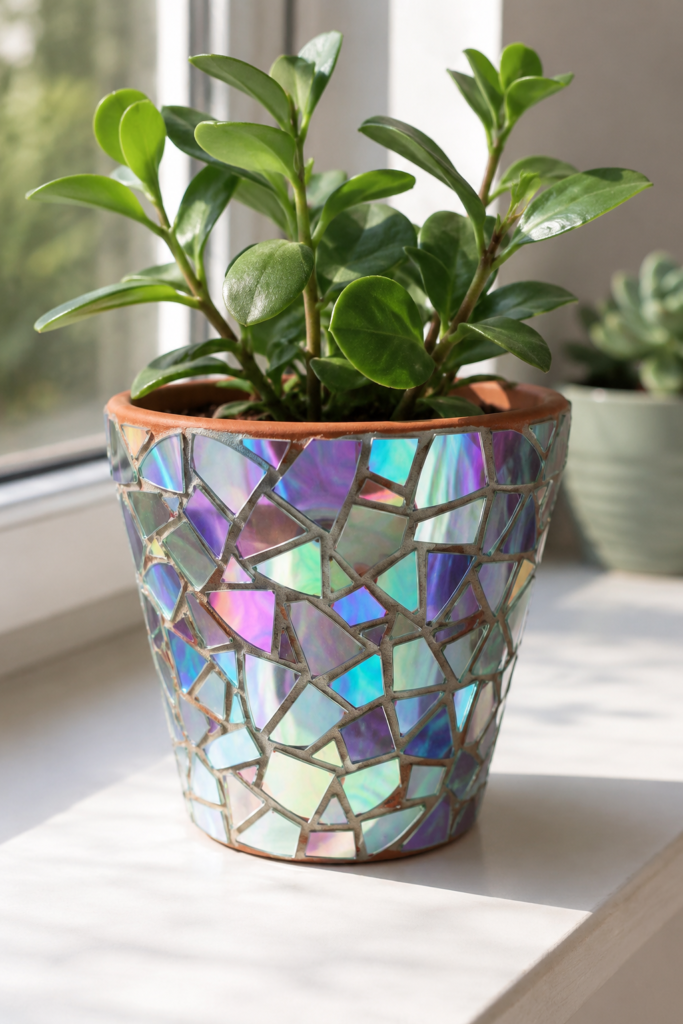
A mosaic planter is a brilliant way to make a simple pot feel much more decorative. The broken CD pieces add a reflective surface that changes with the light, so even a very ordinary houseplant starts to feel a little more special. The selected image works well because the pot itself is still recognisable and the plant remains the star, while the mosaic adds texture and sparkle around it.
This is a strong project for people who like home décor that feels bright but still practical. The pot can sit on a windowsill, shelf, or side table, and the mosaic surface gives it enough character that it reads as part of the styling rather than just a functional container.
Materials and Tools
· Broken CD shards
· Terracotta or ceramic planter
· Strong adhesive suited to hard surfaces
· Protective gloves
· Optional grout or filler
· Small plant or succulent
Steps
- Wipe the planter clean and decide how much of the pot you want to cover. Full coverage gives more impact, but a partial mosaic band can be easier if you are trying this technique for the first time.
- Prepare a good selection of CD fragments before gluing. It helps to have a mix of medium and small pieces so you can work around the planter’s curve without leaving large awkward gaps.
- Glue the shards on gradually in sections, turning the planter as you work. Try to keep a similar spacing across the surface so the pattern feels cohesive from every angle rather than dense in one area and sparse in another.
- Let the adhesive cure fully before planting or watering. If you want to refine the finish, add a little filler between shards, but be careful not to dull the iridescent effect that makes the mosaic so appealing.
This is one of my favourite CD upcycles because the result feels genuinely decorative in the home. It is a strong example of using waste material to upgrade something useful rather than making a purely novelty craft.
Painted CD Mandala Wall Hanging
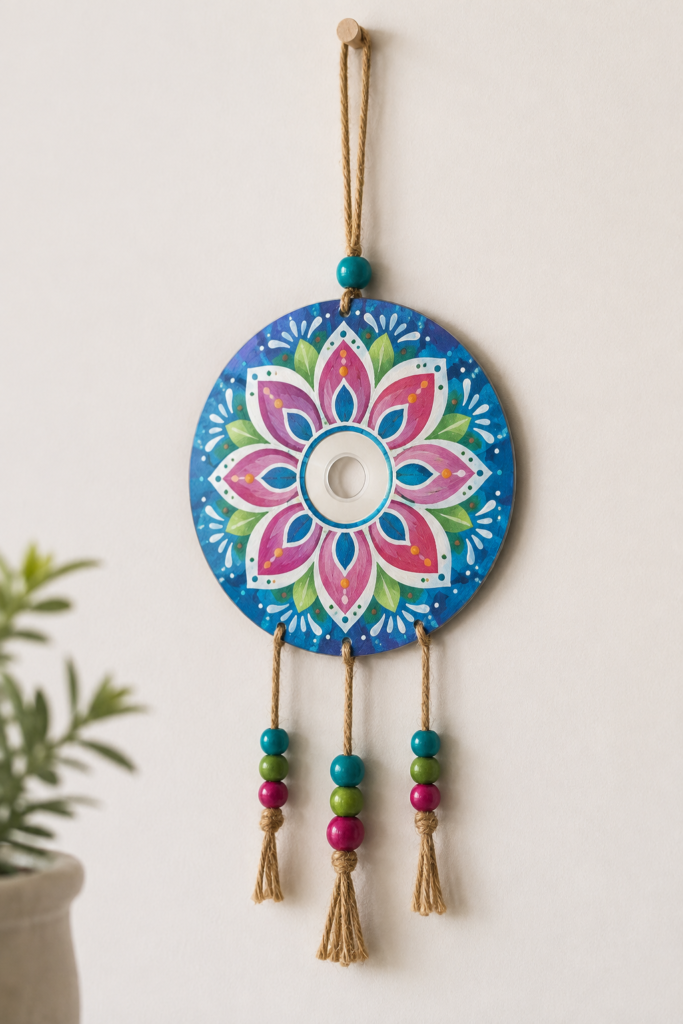
If you enjoy painting, a CD can become a surprisingly satisfying little circular canvas. The round format naturally suits mandalas, floral motifs, and symmetrical painted patterns because the shape helps guide the composition. In the selected image, the bright painted design is paired with beaded hanging cords, which gives the finished piece enough presence to work as a mini wall hanging rather than just a painted disc.
This project is especially useful when you have discs that are better covered completely. Printed labels, mismatched branding, or scratched surfaces become irrelevant once the CD is primed and painted. That makes it a very forgiving upcycle for less attractive materials.
Materials and Tools
· Old CD
· Acrylic paint
· Paintbrushes in fine and medium sizes
· Primer or base coat if needed
· Cord or twine for hanging
· Beads and tassels or knots for the lower strands
Steps
- Prepare the disc with a base coat if necessary so the paint has a better surface to grip. Let this dry fully before planning the decorative design.
- Sketch or imagine the mandala from the centre outward. Working in rings usually makes circular painting much easier, and repeating the same colours in each section helps the pattern feel more harmonious.
- Paint the main design first, then add smaller dots, outlines, or decorative details once the larger petals or geometric shapes are dry. Because the surface is small, fine details have a strong visual impact.
- Attach a top hanger and a few lower strands with beads or tassels to extend the shape visually. Hang the finished piece against a simple wall where the colours can stand out clearly.
This is a good option for anyone who wants to personalise the final result more freely. The disc becomes a blank circular base for your own colour choices and decorative style.
CD Keepsake Photo Ornament
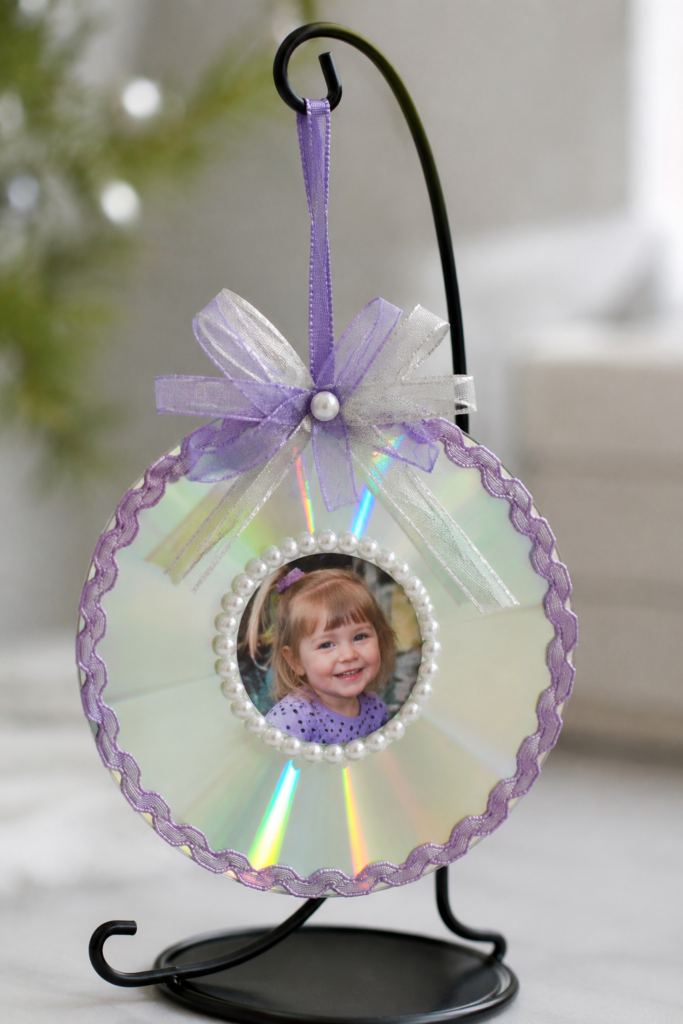
A keepsake ornament built from an old CD is such a sweet idea because the round shape already lends itself to a framed memory piece. By placing a small photo in the centre and surrounding it with pearls, trim, ribbon, or lace, you turn the unused disc into something much more sentimental. The selected image has a lovely soft, delicate feel, which suits the keepsake idea perfectly.
This is the sort of project that works beautifully for baby photos, school portraits, small festive gifts, or handmade memory ornaments. Because the ornament is lightweight, it can be displayed on a stand, hung from a hook, or even used as a Christmas decoration if the style suits.
Materials and Tools
· Old CD
· Small printed photograph
· Ribbon for hanging
· Decorative trim such as pearls, lace, or ric-rac
· Strong glue
· Scissors
· Optional cardstock backing
Steps
- Choose and trim the photograph so it fits neatly in the centre area. If the photo paper feels thin, mount it onto a small piece of cardstock first so it sits flat and feels more durable.
- Glue the photo in place and build a decorative border around it. Pearls, ribbon loops, or soft trim work especially well because they complement the circular shape and make the piece feel more keepsake-like.
- Add a hanging ribbon at the top and keep the outer edge decoration relatively balanced. I would avoid overloading the CD with too many heavy trims, because the photograph should remain the clear focal point.
- Display the finished ornament on a stand, hook, or festive tree branch. If you are giving it as a gift, a simple protective tissue wrap will help prevent the decorative trim from being crushed.
This project feels particularly personal, which is why it stands out. It is not just a craft; it becomes a memory object, and that gives the old CD a genuinely meaningful second life.
CD Mosaic Candle Holder
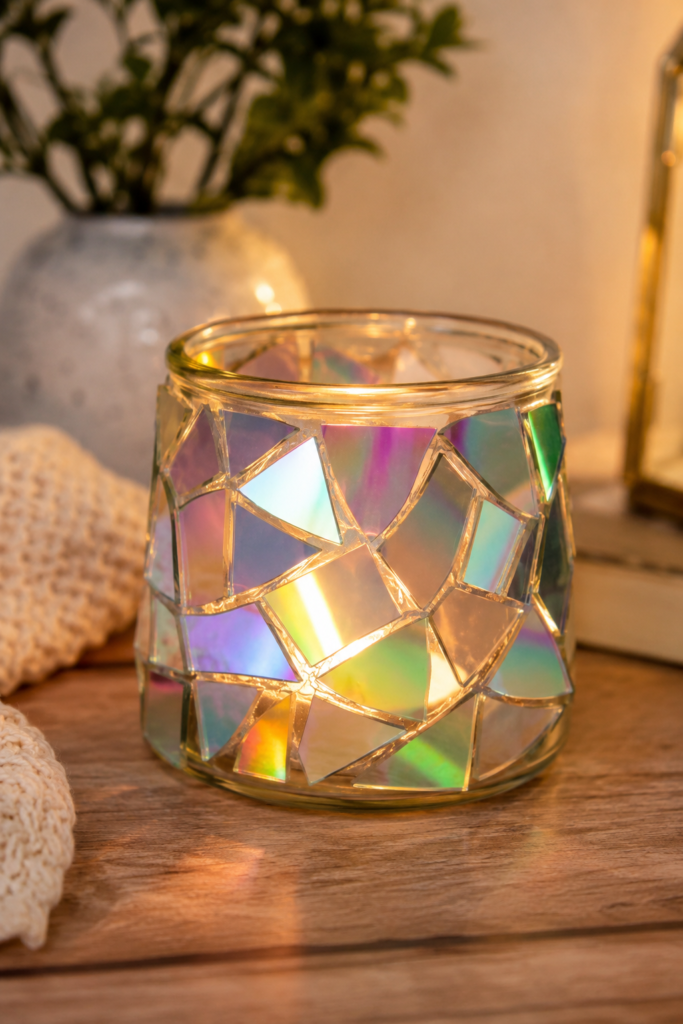
A mosaic candle holder is a beautiful way to use leftover CD fragments, especially if you have already broken discs for other projects and want to make sure the remaining pieces do not go to waste. The selected image shows the shards applied to the outside of a glass holder, which is exactly the right approach. The glass keeps the candle contained, while the CD fragments add a glowing reflective layer around it.
What makes this project especially rewarding is how different it looks by day and by evening. In daylight, the mosaic feels cool and iridescent. At night, once a candle or tea light is glowing inside, the same fragments pick up a warm shimmer and the holder suddenly feels much richer and more atmospheric.
Materials and Tools
· Broken CD pieces
· Glass candle holder or jar
· Strong glue suitable for glass
· Protective gloves
· Tea light or LED candle
· Optional filler for gaps
Steps
- Wash and dry the glass holder thoroughly, because any grease or dust will make the shards harder to attach securely. Sort the fragments first so you have a usable mix of shapes for the curved surface.
- Glue the pieces onto the outer wall of the holder, working in sections. Leave narrow gaps between shards so the mosaic pattern remains visible and the light has room to play between the reflective pieces.
- Allow everything to cure fully before placing a candle inside. If you are using a real tea light, make sure the holder remains stable and that all decorative material is only on the exterior surface.
- Test the finished piece with either a tea light or an LED candle and see how it behaves in the room. This is often the moment the project really comes alive, because the glow transforms the mosaic into something much more atmospheric.
I think this is a wonderful closing idea for the collection because it shows how even leftover fragments can still become something elegant, useful, and very pleasing to look at.
Common Mistakes to Avoid When Upcycling CDs
One mistake I see quite often is treating all CDs as if they are equally suitable for every project. In reality, some are better used whole, some are more useful broken into mosaic pieces, and some are simply too damaged to be worth the trouble. Choosing the right disc for the right idea makes the entire process smoother.
Another common issue is rushing the glue stage. CDs have a smooth surface, and that means decorations can slide or lift if they are handled too quickly. Whether you are wrapping yarn, setting beads, or building mosaic work, patience is part of the finish. Allowing each stage to dry properly almost always leads to a cleaner-looking project.
Sharp edges are also worth mentioning again because they are easy to underestimate. Broken CD shards can be surprisingly sharp, especially when small triangular pieces are involved. Protective handling matters during the making stage, and secure fixing matters just as much once the project is complete.
Finally, I would avoid overdecorating. The circular form and reflective character of a CD already bring something distinctive to the project. If you add too many trims, too many colours, or too many competing textures, the piece can quickly lose its charm. A more restrained design often looks more beautiful and lasts longer stylistically as well.
Frequently Asked Questions
What can I do with old CDs instead of throwing them away?
Old CDs can be turned into a wide range of upcycled projects, including coasters, wreaths, mosaic planters, photo frames, ornaments, suncatchers, painted wall hangings, and candle holders. The best option depends on whether you want to use the disc whole or break it into reflective fragments.
How do I break CDs safely for mosaic projects?
Wrap the disc in an old towel or cloth before applying pressure, and wear protective gloves and eye protection. This helps contain the fragments and makes the whole process safer and easier to control.
Do I need to prime a CD before painting it?
Not always, but it often helps. If the disc is very glossy, scratched, or covered in distracting print, a primer or base coat usually gives you a much better painting surface and helps the colours look more even.
Are CD upcycles good for beginners?
Yes, many of them are. Yarn-wrapped coasters, simple suncatchers, and painted hangings are especially suitable for beginners. Mosaic work takes a little more care, but it is still very manageable if you work slowly and plan the arrangement first.
Can I use a real candle in a mosaic CD candle holder?
You can, provided the CD pieces are fixed to the outside of a stable glass holder and the holder itself is suitable for heat. If you prefer a simpler or safer option, a battery tea light still gives a lovely glowing effect through the mosaic.
What kind of glue works best for upcycled CD crafts?
That depends on the project. Strong craft glue works well for lightweight decorations, while mosaic work on frames, glass, or planters may need an adhesive better suited to hard surfaces. When in doubt, test on a spare piece first.
Old CDs Can Still Become Something Useful, Beautiful, and Worth Keeping
What I enjoy most about these eight CD upcycle ideas is that they do not all rely on the same trick. Some celebrate the CD’s reflective surface, some soften it with yarn or twine, some use it as a painted base, and others turn it into mosaic material. That variety is exactly what makes old CDs more usable than they first appear. Instead of becoming clutter, they can become part of the home in ways that feel decorative, personal, and sometimes even practical.
If you have a small pile of unwanted discs at home, I would suggest starting with the idea that best matches the materials you already have. A few balls of yarn naturally lead to coasters. Broken shards left from another project point toward mosaic work.
A bright window makes a beaded suncatcher feel irresistible. Once you make one project successfully, it becomes much easier to look at the remaining CDs and imagine what else they could become. That, to me, is the real pleasure of upcycling: seeing possibility where there used to be waste.