Cardboard has an awkward habit of piling up faster than we expect. A delivery box looks useful for a day or two, a cereal carton feels too sturdy to throw away, and suddenly there is a stack leaning against the wall waiting for a decision. I don’t think every piece needs to become a craft project, but the clean, strong pieces are worth looking at twice before they leave the house.
One of the things I enjoy most about practical upcycling is finding a second job for a material that already has the shape, strength, or surface I need. Cardboard is especially forgiving because you can cut it, fold it, layer it, reinforce it, paint it, and start over without feeling as though you have wasted expensive supplies. It can become something useful for a desk, a drawer, a child’s play area, a windowsill, or a shelf.
The best cardboard projects are not the ones with the most decoration. They are the ones where the material is chosen carefully, the structure makes sense, and the finished item genuinely solves a small everyday problem.
Before You Start: Sort Cardboard by Strength and Condition
The first step in upcycling cardboard is deciding which pieces are actually worth keeping. A box that has been crushed, soaked, stained with food, or softened by repeated folding will rarely become a strong organizer or toy. I’d rather recycle damaged cardboard and save the clean, flat sections that still feel rigid when you hold them by one edge.
Corrugated shipping boxes are the most useful choice for projects that need structure. The fluted layer between the outer sheets gives the board stiffness, which is helpful for desk organizers, file holders, toy structures, and dividers. Thin packaging board from cereal boxes or small product cartons is easier to bend and cut, so it works better as a liner, decorative facing, template, or lightweight insert.
Look at the direction of the corrugation before cutting. The channels running through the cardboard affect how easily a piece bends. If a panel needs to stay rigid, orient the flutes so they support the longest direction of the piece. If you need a controlled fold, scoring across the surface first can give you a neater crease than forcing the board by hand.
Remove loose tape, shipping labels, and staples before you begin. Tape can prevent glue or paint from bonding well, while hidden staples are an unpleasant surprise for scissors and craft knives. If a label tears the surface slightly, that is usually fine for an interior panel. Save the cleanest faces for the outside of the project.
It also helps to flatten boxes as soon as you decide to keep them. Flat sheets are easier to measure, store, and compare. I know it can feel tempting to keep whole boxes because they might be useful “as they are,” but a tidy stack of flat material is much easier to work from later.
Plan the Structure Before You Reach for the Glue
Cardboard is light, but a good cardboard project still benefits from the same basic planning you would use with wood or fabric. Before cutting anything important, sketch the finished shape and note which panels will carry weight, which ones only divide space, and where the joins will be hidden. A quick plan often prevents the most common problem: discovering halfway through that two pieces are the same size when one needed to overlap the other.
For organizers, decide what you want to store first. Pens need narrow upright sections. Scissors need more height. Cables are easier to manage in a wider compartment. Notebooks need enough depth that they do not tip the holder forward. Designing around the objects you actually use is much more effective than building a box and hoping everything fits afterward.
When a project needs strength, layering is usually more useful than adding excessive glue. Two pieces of corrugated board with their flute directions crossed can create a firmer panel. Small triangular braces inside corners can stop tall sides from leaning. A second strip along the top edge can prevent a file holder from becoming floppy after repeated handling.
Dry-fit the project whenever you can. Hold the panels together with clips, removable tape, or simply your hands and check the proportions. Then adjust before committing. The first arrangement rarely needs to be the final one, and cardboard is much easier to trim before the adhesive is involved.
For cutting, a metal ruler and sharp craft knife can give the cleanest long lines, but scissors are often enough for thin board and rounded shapes. Always cut away from your body, protect the surface underneath, and keep craft knives out of children’s reach. If children are helping with a project, an adult can handle the structural cutting while they take over safer jobs such as painting, arranging, or decorating.
Choose the Join to Match the Job
Not every cardboard seam needs the same kind of attachment. A small decorative flap may only need double-sided tape, while the base of a file holder benefits from a broad glued surface and an internal reinforcement strip. If a joint will be pushed, pulled, or handled repeatedly, think about how the force reaches the seam rather than simply adding more adhesive. A narrow butt joint is usually weaker than a join that includes an overlapping tab or corner brace.
Tabs are especially useful because they increase the area available for glue. Instead of cutting two panels that meet edge to edge, extend one panel slightly, score the extension, and fold it behind the neighboring piece. The tab disappears inside the project but gives the seam much more support. On a desk organizer, this can make the difference between a divider that stays upright and one that slowly leans after a few weeks of use.
Tape can also be structural when used thoughtfully. Kraft paper tape or strong paper-based tape works well along long seams because it bends around corners and spreads the load. Clear plastic tape can be useful, but it is harder to paint or glue over later. If you know you want a natural kraft finish, choosing a paper tape from the beginning usually keeps the project easier to finish.
Clamping does not require special tools either. Binder clips, clothespins, books, and small boxes can all hold cardboard in position while glue sets. Protect visible surfaces with scrap paper if a clip might leave a dent. I’d rather spend an extra minute supporting a straight corner than spend much longer trying to disguise a wall that dried at an angle.
Make Cardboard Look Cleaner and Last Longer
A practical cardboard upcycle does not have to hide the fact that it is cardboard. In fact, plain kraft brown can look calm and intentional when the cuts are tidy and the edges line up. Still, a few finishing choices can make the difference between a useful handmade object and something that looks temporary.
Start with the edges. Ragged corrugated edges can catch on paper, collect dust, or make a small organizer feel unfinished. You can cover exposed edges with narrow strips of paper, kraft tape, fabric tape, or thin card. For a natural look, I often prefer leaving some corrugation visible while tidying only the most handled areas.
Paint works best when applied in light coats rather than saturating the surface. Cardboard absorbs moisture, so too much wet paint can cause warping. If you want color, a thin craft paint layer, paper wrap, leftover wallpaper, or decorative fabric can all work. For children’s projects, choose finishes appropriate for the intended use and allow everything to dry fully before play.
Adhesive choice matters too. White craft glue works well for many paper-to-paper joins but may need clamping while it sets. Hot glue can grab quickly on structural seams, though it requires care because of the heat. Strong double-sided tape is useful for neat decorative layers. Whatever you choose, there’s no need to flood the joint. Too much adhesive adds moisture, mess, and drying time without necessarily adding strength.
Finally, keep expectations realistic. Cardboard is not waterproof furniture, and it does not need to pretend to be. Keep indoor organizers away from wet areas, replace seed-starting tubes once they soften, and retire a child’s cardboard toy when the walls become crushed or torn. Upcycling works best when the new use suits the material rather than fighting against it.
Keep a Small Cardboard Supply Without Creating More Clutter
Saving cardboard only helps if you can actually find and use it. I like the idea of keeping a limited working supply: a few large flat corrugated sheets, some medium panels, and a small envelope or box for useful offcuts. That gives you enough variety for most household projects without turning an upcycling habit into a second recycling pile.
Flatten boxes and store them vertically behind a cupboard, under a bed, or beside a craft shelf where they stay dry. If a panel is unusually strong, keep it whole until you know what you need; otherwise trim away damaged flaps so the stored pieces are easier to compare. Small rectangles are useful for reinforcement tabs, wheel discs, dividers, and test cuts, but scraps smaller than your typical project needs are rarely worth keeping indefinitely.
It also helps to separate clean decorative card from structural corrugated board. Thin printed cartons can be useful for templates, labels, drawer liners, or covering exposed edges, while strong shipping board deserves its own stack. When everything is mixed together, the best material tends to disappear under pieces that are easier to recycle than reuse.
Before starting a new project, pull from this saved supply first. You may discover that a narrow offcut already fits the divider you need or that an old box flap is just the right width for a reinforcement strip. That is where cardboard upcycling becomes genuinely practical: you are not keeping material for a vague future craft; you are giving useful pieces a reasonable chance to solve the next small problem.
Build a Tiered Cardboard Desk Organizer
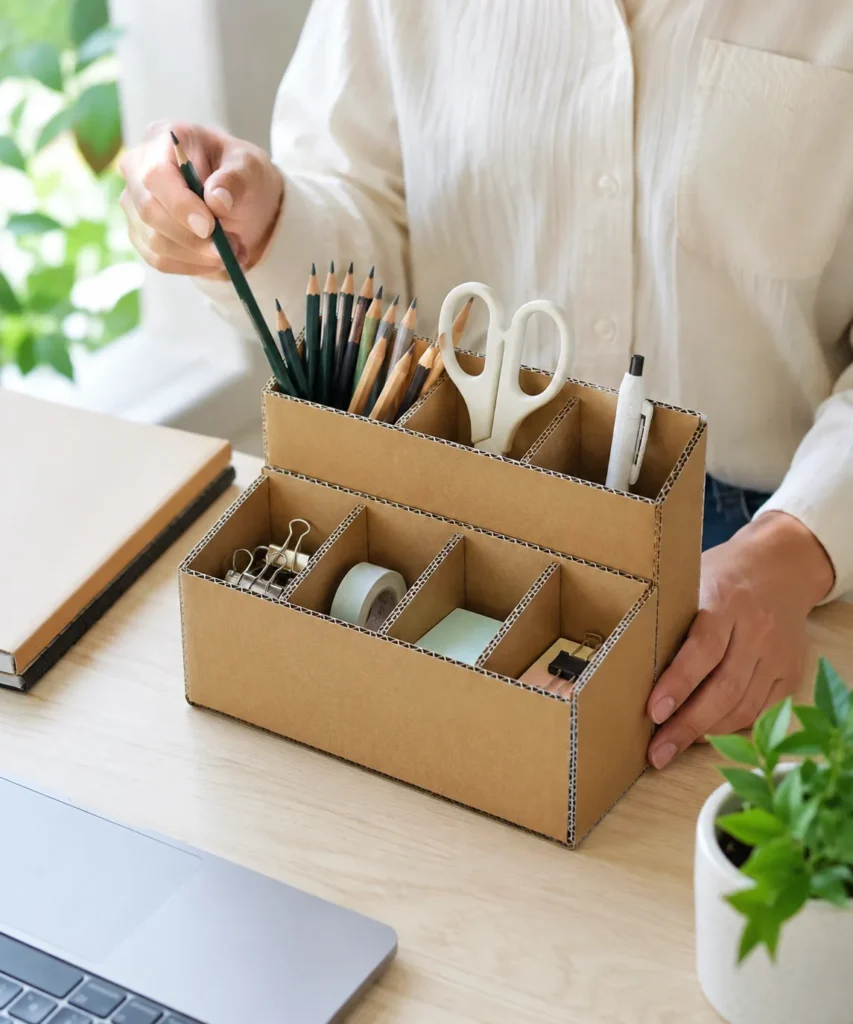
A desk organizer is one of the most useful ways to reuse corrugated cardboard because the finished object does not need to carry much weight, but it does need structure. The tiered version here uses taller compartments at the back for pencils and scissors, with shorter sections in front for clips, tape, sticky notes, and small office items. That change in height is what makes the design work: you can see what is stored instead of digging through one deep box.
The project is also easy to adapt. A narrow version can sit beside a laptop. A wider version can hold brushes, craft tools, or sewing supplies. If your desk tends to collect charging cables, one front compartment can be left open and broad rather than split into tiny sections.
The part I like most is that the organizer relies on shape more than decoration. Clean brown cardboard, straight edges, and repeated compartment widths already create a tidy look. You can cover the front with paper or paint if you want, but I don’t think decoration should come before getting the proportions right.
Materials and Tools
· Clean corrugated cardboard from a shipping box
· Pencil and ruler
· Cutting mat or scrap board to protect the table
· Craft knife for adult use, or sturdy scissors for suitable pieces
· White craft glue, tacky glue, or another cardboard-friendly adhesive
· Binder clips or masking tape for temporary support
· Optional kraft paper, fabric, paint, or decorative paper for finishing
A Practical Way to Build It
1. Measure the items you actually want to store. Place your tallest pencils, scissors, and markers together and estimate the height of the rear section from them. Then group smaller items such as clips and sticky notes so the front compartments can be shallow enough to reach easily. This small planning step keeps the finished organizer from becoming a collection of random boxes.
2. Cut the base, back, sides, and internal dividers. Use one firm piece of corrugated board for the base and cut the back wall tall enough to support the rear compartments. Make the side panels step down toward the front if you want the tiered profile to show from the sides. Then cut dividers slightly shorter than the surrounding walls so the top edges remain clean and comfortable to handle.
3. Build the main shell before adding small compartments. Glue the back and sides to the base, checking them against a square object such as a book so they do not lean while drying. Add a horizontal strip or shelf where the higher rear row begins. Once the shell feels stable, then position the internal dividers rather than trying to assemble every small cell at once.
4. Dry-fit the objects and adjust the spacing. Put the pencils, scissors, tape, and notes into their intended areas before the glue on the dividers is fully committed. If a section feels cramped, move the divider now. I know it can be tempting to make everything symmetrical, but a slightly wider scissors slot or cable section usually makes the organizer more useful in everyday life.
5. Reinforce and finish the handled edges. Add narrow cardboard strips inside any corners that feel flexible, especially where the rear section meets the base. Cover rough top edges with paper or kraft tape if they catch your fingers. Then leave the cardboard plain or add a light decorative finish, keeping wet paint coats thin so the panels stay flat.
One Detail I Would Not Skip
Check the balance once the organizer is filled. Tall scissors and heavy pens can pull a narrow organizer backward, so the base needs enough depth to keep it stable. If it wobbles, add a second layer of cardboard under the base rather than making the walls unnecessarily thick.
A desk organizer should also be easy to clean. Loose pencil shavings and paper dust collect in small compartments, so do not glue decorative fabric deep inside areas you cannot reach. A plain paper lining or uncovered cardboard is often more practical.
Variations That Still Keep It Simple
You could make a craft version with wide slots for paintbrushes and a shallow front tray for erasers or clips. A child’s homework version might include sections for pencils, crayons, glue sticks, and flash cards. If you prefer a softer look, wrap only the front panel in leftover wallpaper or fabric and leave the inside kraft brown.
For an especially quick build, use the bottom half of a sturdy small box as the main shell and add only the dividers. That saves cutting time and uses existing corners that are already square. It is not cheating; it is sensible reuse.
Make Custom Cardboard Drawer Dividers
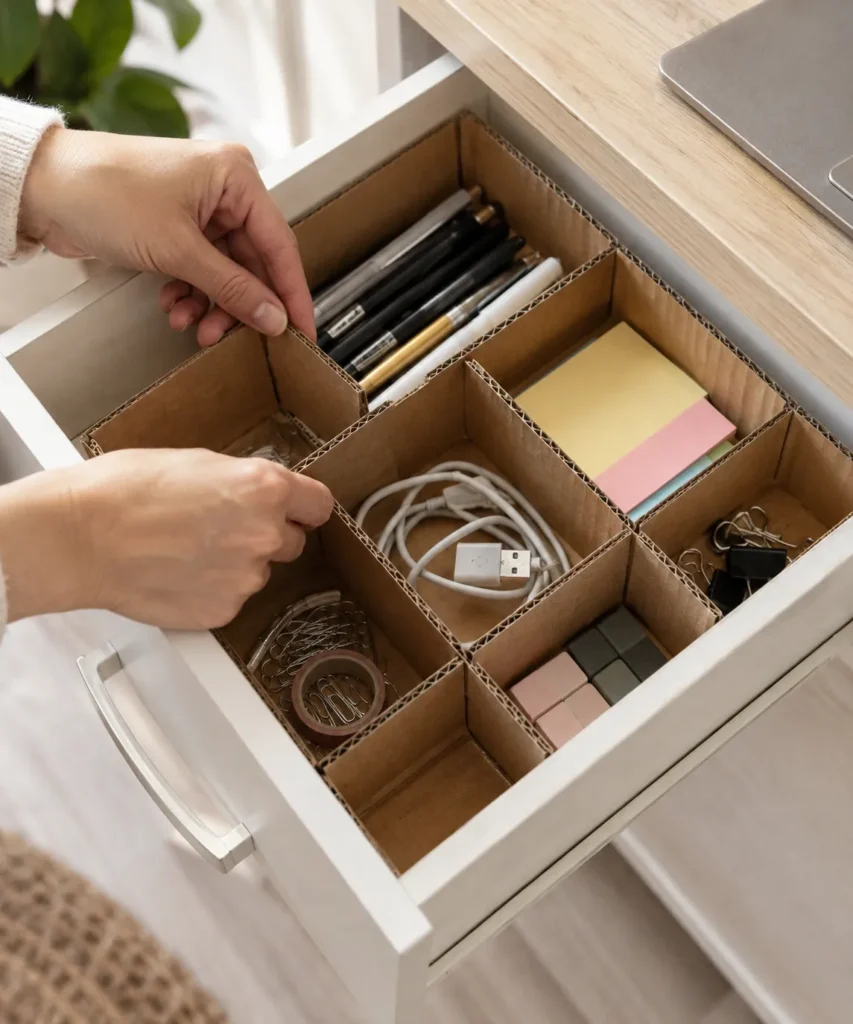
Drawer dividers are one of those cardboard projects that can look almost too simple to count as upcycling, yet they solve a problem immediately. Store-bought trays are often the wrong size for a particular drawer, especially when you need to fit a mix of pens, charging cables, clips, sticky notes, and small tools. Cardboard lets you build around the drawer instead of trying to make the drawer fit an organizer.
The key is to work with the drawer’s real dimensions. A few millimeters of extra height can prevent the drawer from closing, while dividers that are too low may let items spill from one section into another. Rather than guessing, measure the depth and then test one strip before cutting all the rest.
This design uses simple intersecting walls to create compartments. You can glue them permanently, but a slotted system is often even better because it can be rearranged later. That matters in a workspace where the contents change over time.
Materials and Tools
· Corrugated cardboard or firm single-wall box board
· Measuring tape or ruler
· Pencil
· Scissors or craft knife for adult use
· Cutting surface
· Optional white glue or double-sided tape
· Optional thin paper for lining the compartment floors
How to Fit the Dividers to the Drawer
1. Empty and measure the drawer carefully. Measure the internal width, depth, and usable height rather than the outside of the drawer unit. Check for screws, rails, or curved corners that reduce space. Then decide which objects deserve their own compartment, because a divider layout should respond to the contents rather than creating tiny empty squares for the sake of appearance.
2. Cut the long divider strips first. Make strips a little lower than the drawer’s usable height so they do not scrape the underside above. Test one strip across the drawer and trim it until it sits flat without bowing. Use that successful piece as a reference for additional strips running in the same direction.
3. Create interlocking slots for a removable grid. Where two dividers cross, mark the intersection and cut a slot halfway through each piece. One slot comes down from the top, while the matching slot comes up from the bottom. Slide the pieces together so they lock into a cross. Then repeat only where you need intersections instead of building a completely uniform grid.
4. Arrange the compartments around your things. Put cables, pens, notes, clips, and small stationery into the drawer and move the dividers until each category has enough room. Once the layout works, you can leave the pieces friction-fitted or add a tiny amount of adhesive at selected joins. I’d keep the system removable if you expect the drawer contents to change.
Why Removable Can Be Better
Permanent glue feels tidy on the day you finish, but drawers have a way of changing jobs. A home-office drawer may later need to hold sewing tools, batteries, or craft supplies. Removable slotted dividers can be pulled out, recut, or replaced without damaging the drawer itself.
If the cardboard slides on a smooth drawer base, add a thin nonslip liner under the entire grid or use small rolls of removable tape beneath a few corners. That is usually enough to stop movement without committing the layout forever.
Useful Variations
For a shallow drawer, thin packaging board may be enough and gives you more usable space between sections. For deeper kitchen or craft drawers, double-layer corrugated dividers are stronger. Keep cardboard away from drawers where it will regularly encounter water, oil, or damp cleaning cloths; another washable material will make more sense there.
You can also line individual sections with scrap paper so light-colored objects are easier to see. Just avoid covering every surface before you have tested the layout. Cardboard is wonderfully easy to adjust, and it would be a shame to lose that advantage too soon.
Turn a Large Box Into a Cardboard Playhouse
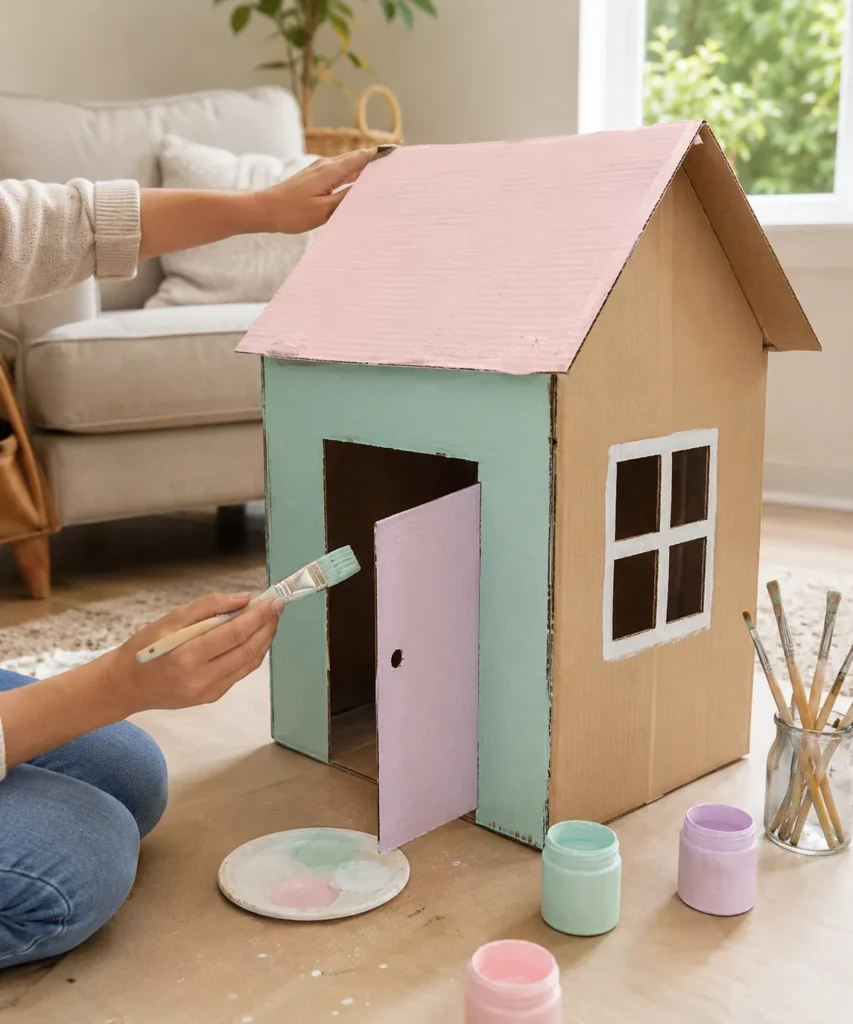
A large cardboard box already contains most of the structure needed for a playhouse, which is why this project is more achievable than it first appears. The box becomes the walls, additional flat panels form a pitched roof, and a carefully cut opening creates a doorway. You can stop there or add simple window frames and a little color.
For me, the most important word here is “simple.” A child does not need complicated architectural trim for a cardboard house to feel like a house. A roof shape, an opening to crawl through, and enough room inside to sit or play are usually the parts that matter. Extra decoration should stay light so it does not make the cardboard harder to repair or recycle later.
Because this is a children’s item, safety matters more than a polished finish. Adults should handle cutting, remove all staples, cover or trim sharp edges, and keep the structure on a flat indoor floor. Cardboard is not a climbing frame, and the roof should be decorative rather than load-bearing.
Materials and Tools
· One large clean corrugated box
· Additional flat cardboard for roof panels and optional trim
· Pencil and ruler
· Craft knife for adult use
· Cutting mat or protected floor surface
· Strong paper tape, kraft tape, or cardboard-friendly adhesive
· Optional child-appropriate craft paint or paper for decoration
· Optional lightweight cardboard strips for window frames
Building a Simple, Sturdy Version
1. Choose a box that is roomy but still firm. Remove staples, loose tape, and damaged flaps before deciding which side will be the front. Sit the box on its intended base and press gently on the walls to check for weak corners. Reinforce soft seams from the inside with tape or extra cardboard strips before cutting large openings.
2. Mark the door and windows before cutting. Draw a doorway that leaves enough cardboard along both side edges to keep the front wall stable. If you want a working flap door, leave one vertical edge uncut so it acts like a hinge. Keep window openings moderate in size; cutting away too much wall can make the whole house sag.
3. Create the roof from separate panels. Cut two broad pieces for the roof slopes and join them along the ridge with strong tape so they can fold like a book. Set the roof over the box and trim only after you have checked the overhang. Then secure it to the upper walls with tape or adhesive, keeping the roof light and flexible rather than building a heavy structure overhead.
4. Add lightweight finishing details. Use thin cardboard strips around windows, paint selected panels, or add paper shapes once the structure is stable. Keep paint coats thin to reduce warping. Then inspect every cut edge and cover any rough areas that hands may touch frequently.
5. Check the house before play and keep checking it later. Press the walls gently, make sure the doorway has not created a weak corner, and remove any loose trim. Children should not climb on the roof or walls, and the playhouse should stay away from heaters, candles, and damp areas. Retire or repair the structure when panels become crushed enough to lose their shape.
Keep the Design Playable
It can feel tempting to cover every wall with color, stickers, curtains, and tiny details, but a cardboard playhouse is more fun when children still have room to make it their own. A plain wall can become a pretend shop one day and a reading den the next. I’d rather provide a few removable paper signs or lightweight decorations than permanently define every part of the house.
If the box is too small for a full playhouse, the same construction idea can become a dollhouse, toy garage, puppet theater, or pet-free pretend shop. The scale changes, but the principle is the same: keep the frame simple, preserve strong corners, and cut away only what you need.
A Note on Paint and Decoration
If you paint the outside, use light coats and let each side dry flat enough that it does not curl. Painting both sides heavily can make the board flexible before it dries. Paper wrapping is another option, especially if you have leftover gift wrap or wallpaper scraps.
Avoid heavy embellishments that could fall off or become small loose parts around young children. The charm of a cardboard playhouse comes from the big shape, not from turning every surface into a craft-store display.
Reuse Cardboard Tubes as Seed Starters
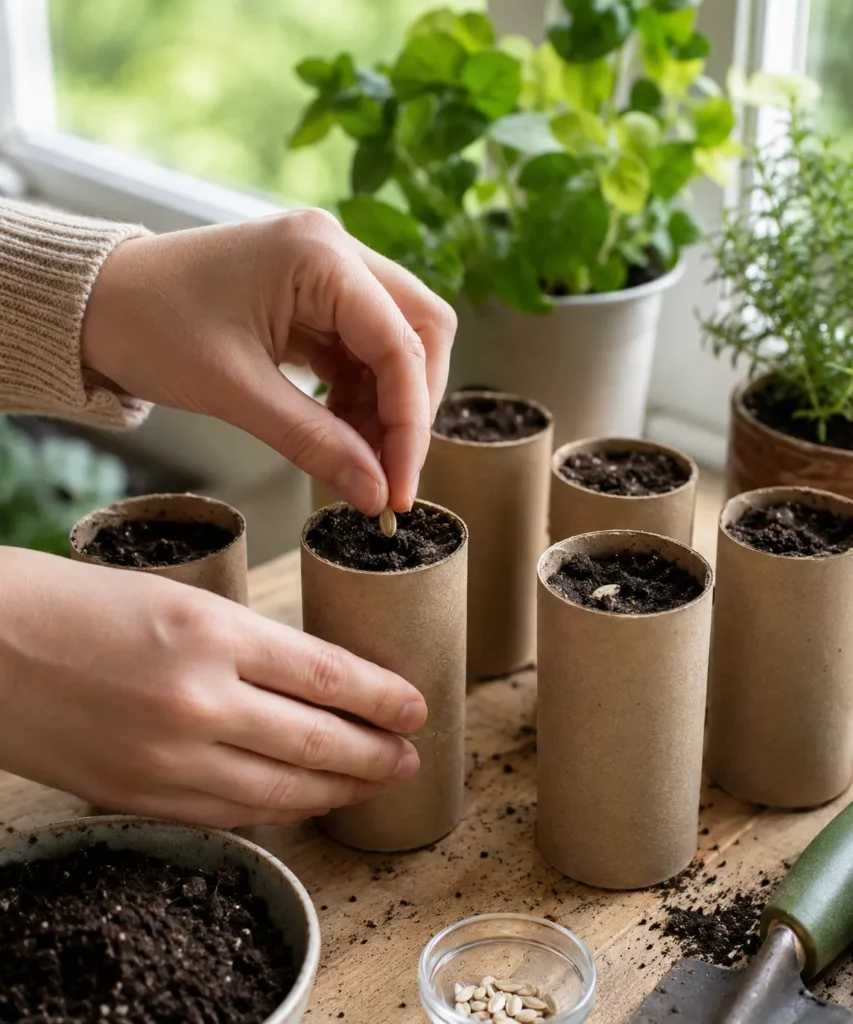
Short cardboard tubes from bathroom tissue or paper products are already shaped like tiny plant pots, so they need very little alteration. Filled with seed-starting mix and grouped on a tray, they can hold individual seeds while seedlings get established. It is a useful example of choosing a new purpose that matches the material: the tube only needs to last for the early stage, not for years.
This project does need realistic expectations around moisture. Cardboard softens when it stays wet, and that is normal. The goal is not to make a permanent planter. Keep the tubes upright in a tray, water carefully, and move seedlings on when the plants and the cardboard indicate that it is time.
I also like this method because individual tubes make it easier to separate seedlings than one shared container. Still, not every seed needs its own tube, and not every gardener needs to save dozens. Use the amount that fits your windowsill and your actual planting plans.
Materials and Tools
· Clean cardboard tubes
· Seed-starting or suitable potting mix
· Seeds appropriate for your growing plan
· Shallow waterproof tray or repurposed container to catch moisture
· Spoon or small scoop
· Watering bottle or small jug
· Optional plant labels made from scrap card or wooden sticks
Turning the Tubes Into Temporary Pots
1. Prepare a protected growing area. Set a waterproof tray near suitable light before filling anything. Stand the cardboard tubes upright and check that they do not tip easily. If a tube is tall and unstable, cut it shorter with scissors so the base is wider relative to the height.
2. Fill the tubes without packing the soil too tightly. Spoon the growing mix into each tube and press it lightly so large air gaps disappear while the mix still stays loose enough for roots. Leave a small space at the top for watering. If soil falls from the bottom, place the tubes closely together on the tray or set them on a thin layer of paper until the mix settles.
3. Plant and identify the seeds. Make a small planting hole according to the needs of the seed you are using, then cover it gently. Add a simple label if you are growing more than one type. There’s no benefit in guessing later which sprout is which, especially once several green shoots start looking suspiciously similar.
4. Water gently and watch the cardboard as well as the plants. Add enough moisture for the growing mix without soaking the tube walls every time. Keep the tray dry enough that the cardboard is not sitting in standing water. As seedlings develop, monitor both root growth and the strength of the tube, then move the plant to its next container or planting place at an appropriate stage.
What I Would Watch Closely
Overwatering is the quickest way to turn a neat row of cardboard pots into soft, collapsing cylinders. I’d rather water carefully and check the soil than pour enough to saturate the entire tray. If the tubes begin to lean, place them closer together or support the group with a low-sided box.
Do not assume every cardboard tube is suitable simply because it is cardboard. Avoid tubes that are heavily coated, greasy, contaminated, or covered with material you do not want in contact with damp soil. Plain, clean paperboard is the most sensible choice.
Variations for Small-Space Growing
You can place several tubes inside a shallow repurposed food tray, a cut-down cardboard box lined with a waterproof layer, or an old plant saucer. For tiny windowsills, use fewer tubes and stagger planting rather than creating a crowded tray.
If you prefer a sturdier pot, fold small square seed pots from corrugated offcuts instead of using tubes. The same basic idea applies: use cardboard as a temporary container, protect the surface beneath it, and expect moisture to shorten its useful life.
Make a Cardboard Magazine and Notebook Holder
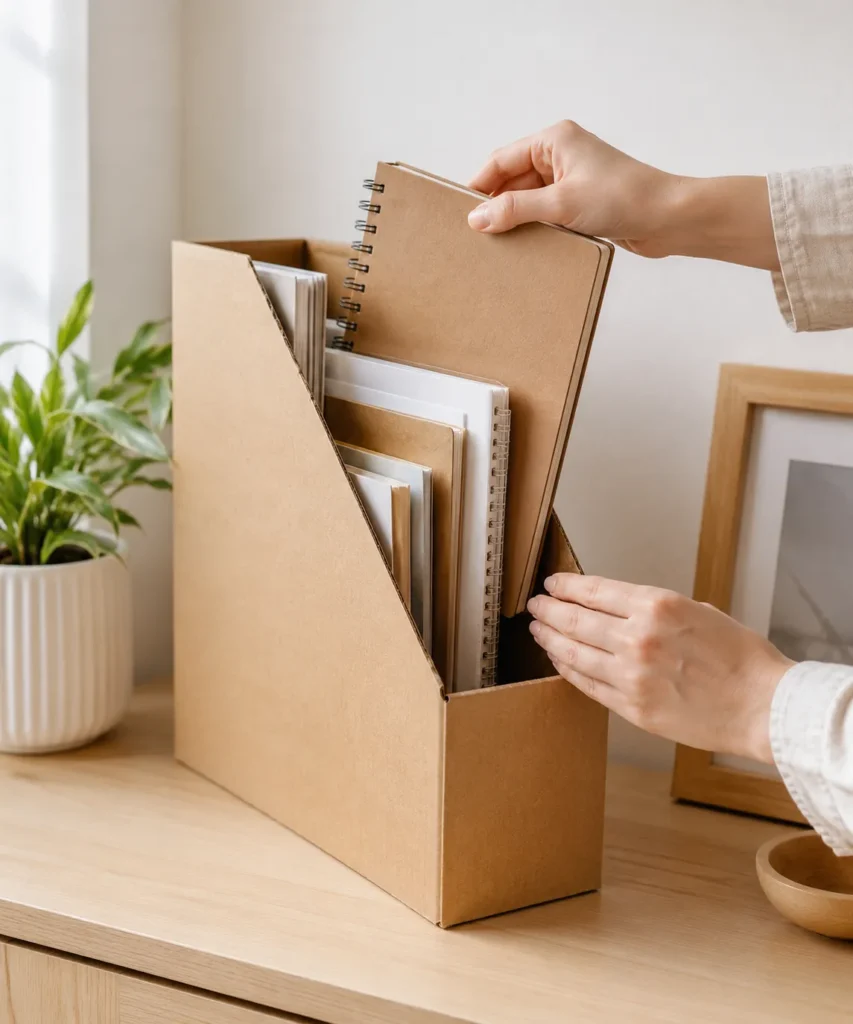
A magazine or notebook holder is a smart project for cardboard because its shape is simple, the contents are relatively light, and the broad side panels make good use of large box sections. The angled front edge lets you see and grab notebooks easily while the tall back keeps them upright.
The biggest design mistake is making the holder too narrow or too tall for the material. A very tall single-layer cardboard holder can bow outward once filled. A base that is too narrow can tip when you pull out a heavy notebook. Keeping the proportions modest and reinforcing the bottom solves most of those issues.
This is also one of the easiest projects to make look calm enough for a home office. Plain kraft card works well beside wood and neutral walls. If you prefer a decorative version, one wrapped outer panel is usually enough. The notebooks themselves add plenty of visual detail.
Materials and Tools
· Large corrugated cardboard panels
· Pencil and ruler
· Craft knife for adult use or strong scissors where suitable
· Cutting surface
· Cardboard-friendly glue or strong paper tape
· Extra cardboard strips for reinforcement
· Optional paper, fabric, or wallpaper offcuts for the outside
A Reliable Construction Method
1. Measure the notebooks or folders you want to store. Stand a few together and note their height, width, and thickness as a group. Plan a holder wide enough to accept the group without squeezing it. Leave the back high for support while marking a lower front edge so you can reach the contents comfortably.
2. Cut two matching side panels. Draw one side profile with a tall back, lower front, and sloping upper edge. Cut it carefully, then trace it onto a second piece so the sides match. If the cardboard bends too easily, laminate a second layer onto each side before assembly, crossing the flute direction when possible.
3. Add the base, front, and back panels. Cut these to the same internal width and attach them between the side panels. Work on a flat surface so the base stays level, and use books or small boxes as temporary supports while the glue sets. Then add a narrow reinforcement strip inside the lower back corner if the holder feels flexible.
4. Test with real notebooks before finishing. Fill the holder gradually and watch the side walls. If they spread, add another internal strip along the upper back or reinforce the base. Once the structure feels right, cover rough edges and add any decorative paper to the outside rather than inside where it may rub against notebook covers.
The Part I Would Keep Simple
Do not make the front wall unnecessarily high. The point of the angled profile is easy access, so a tall front defeats the shape. At the same time, leave enough material at the lower front corners to keep the side panels connected and strong.
If you have several categories of paper, make two or three narrower holders instead of one huge box. Separate holders are easier to move and less likely to sag under the combined weight of notebooks, folders, mail, and every mysterious piece of paper that seems to arrive on a desk.
Ways to Adapt the Holder
A short version can organize mail near an entryway. A wide version can hold coloring books in a child’s art area. A narrow version works for cutting mats, lightweight folders, or pattern sheets in a craft room. You can also label the front with a removable paper tag instead of writing directly on the cardboard, which makes the holder easier to repurpose again later.
For extra durability, add a second cardboard layer only to the base and lower side sections where the weight sits. Reinforcing the whole structure often adds bulk without much benefit.
Build a Simple Cardboard Toy Car
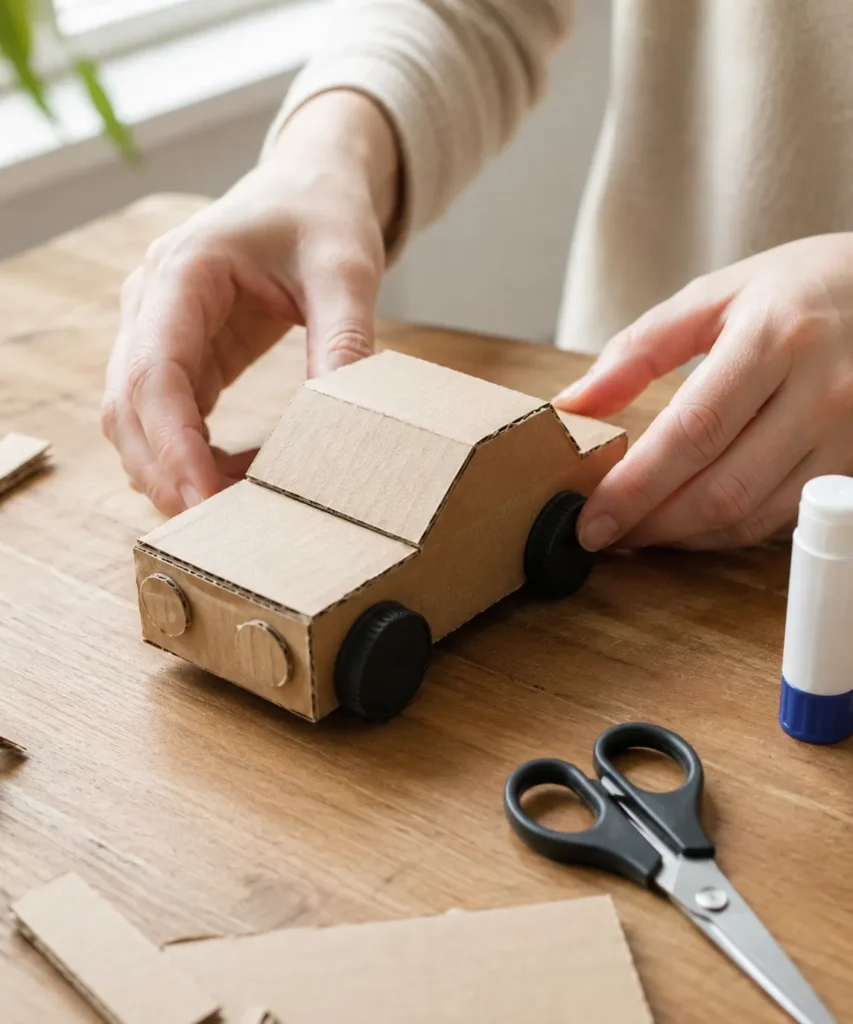
A small toy car is a good destination for cardboard scraps that are too small for organizers. The body can be made from a few rectangles, the roof from a folded piece, and the wheel shapes from sturdy discs or safe reused components. Unlike the desk projects, this one is less about storage and more about building something with shape and movement.
The design does not need realistic automotive details. A clear front, a raised cabin, four wheels, and a simple roof are enough to make the object read as a car. That simplicity is useful for a beginner project because children can decorate it without the adult construction stage becoming complicated.
If the car will be handled by a child, pay attention to the wheels and fasteners. Small loose parts can be a choking hazard, so this is not a suitable toy for very young children unless the construction is specifically adapted and closely supervised. Adults should also handle craft-knife work and any hot glue.
Materials and Tools
· Small corrugated cardboard offcuts
· Pencil and ruler
· Scissors and, if needed, an adult-used craft knife
· Cardboard-friendly glue
· Four sturdy wheel discs or suitable safe reused wheel pieces
· Wooden skewers, paper straws, or rolled-card axles if making moving wheels
· Optional paper circles for headlights
· Optional child-appropriate paint or markers for decoration
Making a Basic Boxy Car
1. Build the body from simple rectangles. Cut a long base panel, two side panels, a front, and a back. Glue them into a shallow box shape, keeping the sides as square as possible. If the cardboard is thin, add a second layer under the base because this is where the axle area and handling pressure will concentrate.
2. Add the raised cabin and roof. Cut two smaller side pieces for the cabin and join them with a folded roof panel. Keep the cabin centered enough that the car does not look front-heavy. Then attach it to the body only after checking that the wheel positions will still have clearance beneath the sides.
3. Decide whether the wheels need to roll. The simplest craft version can use fixed cardboard circles glued securely to the sides. For rolling wheels, an adult can make aligned axle openings and pass a safe axle through a straw or reinforced channel so it turns freely. Check every component for secure attachment and suitability for the child’s age before play.
4. Add minimal details and test the structure. Paper circles can suggest headlights, and a light coat of paint can define the roof or body. Then roll or gently push the car on a flat surface and watch for loose wheels, rubbing edges, or a base that bends. Reinforce weak points before handing it over for play.
A Better Craft Is Often the Simpler Craft
I know it can feel tempting to add windows, bumpers, spoilers, tiny mirrors, and every detail a real car might have. Most of those pieces make a cardboard toy more fragile, not more enjoyable. I’d keep the body strong and let color, marker lines, or removable stickers suggest the details.
If moving wheels feel too complicated, make a shelf model instead. Fixed wheels are completely acceptable for a craft object, and the project still teaches measuring, folding, balance, and reuse. A cardboard bus, van, truck, or little train carriage can use the same construction method with different proportions.
What to Do With the Smallest Offcuts
Save a handful of clean scraps while cutting. They can become headlights, wheel hubs, a small seat shape, or reinforcement tabs inside the body. This is one project where very small pieces can be genuinely useful.
Once the leftover pieces become too tiny or glue-covered to use well, let them go. Upcycling does not require turning every last shred into something. The goal is thoughtful reuse, not a lifetime commitment to a box of cardboard crumbs.
Cardboard Upcycling Mistakes That Make Projects Flimsy or Frustrating
Cardboard is forgiving, but a few habits make projects harder than they need to be. Most failures are not caused by a lack of crafting skill. They come from choosing weak material, skipping a test fit, adding too much moisture, or asking the finished object to do a job the cardboard was never suited for.
Using Damaged Cardboard for Structural Parts
A panel that already bends along old creases will keep trying to bend there after you turn it into an organizer. Soft corners, damp patches, and crushed corrugation reduce strength in ways that glue cannot fully fix. Use damaged pieces for templates, labels, decorative layers, or small non-load-bearing parts instead. Save firm sections for bases, sides, roofs, and dividers.
Cutting Everything Before Testing One Piece
Batch cutting feels efficient until the first strip turns out to be slightly too tall for the drawer. Then you have six matching pieces that are all wrong. Cut one divider, one side panel, or one roof piece first and test it. Once that reference part fits, use it as the template for the rest.
Adding Too Much Glue
More glue does not automatically mean a stronger joint. Thick wet adhesive can soak into paper fibers, warp large panels, squeeze out along visible edges, and take longer to set. Apply enough to cover the joint, press the surfaces together evenly, and use clips or temporary tape when the pieces need help staying in place.
Ignoring the Direction of Corrugation
Corrugated cardboard has a grain-like structure created by its internal flutes. A long side panel can feel much stronger in one orientation than another. If a piece bends too easily, rotate your template or laminate a second layer with the flutes running differently. That simple change can improve stiffness without adding a complicated frame.
Decorating Before the Structure Works
Paint, patterned paper, and fabric can make cardboard look finished, but they cannot rescue a poor layout. Build and test the organizer, holder, car, or playhouse first. Then decorate only the surfaces that still make sense to cover. This order also prevents you from damaging a carefully finished surface while trimming a panel that should have been smaller.
Forgetting How the Finished Item Will Be Used
A desk organizer needs reachable compartments. A drawer divider must let the drawer close. A playhouse needs stable walls and safe edges. A seed starter must tolerate some moisture but not sit in water. A toy car must survive handling. If the finished object is inconvenient or unsafe, a neat glue line does not make it successful.
Expecting Cardboard to Behave Like Plastic or Wood
Cardboard is light, recyclable in many ordinary forms, and easy to modify, but it is still paper-based. It does not belong in constantly wet locations, and it will eventually wear at high-friction points. Design around those limits. Reinforce the base of a file holder, keep seed pots temporary, and repair a child’s cardboard structure before damage becomes severe.
Saving More Material Than You Can Realistically Use
One of the quieter mistakes in upcycling is turning “I might reuse this” into a storage problem of its own. Keep a reasonable selection of flat, clean cardboard in useful sizes and recycle the rest. I’d rather have six good sheets I can reach than thirty bent boxes creating guilt in a corner.
Frequently Asked Questions
What type of cardboard is best for upcycling projects?
Clean corrugated shipping cardboard is the most versatile choice for organizers, file holders, play structures, and other projects that need stiffness. Thin packaging board is useful for liners, decorative layers, templates, and small details. Avoid damp, greasy, moldy, or badly crushed cardboard, especially for anything that needs to hold its shape.
Do I need a craft knife to cut cardboard cleanly?
Not always. Strong scissors work for thin card, small pieces, and many curved cuts. A sharp craft knife with a metal ruler usually gives cleaner long cuts through corrugated board, but it should be used by an adult on a protected surface and always cut away from the body.
Which glue works best for cardboard?
White craft glue or tacky glue can work well for many cardboard-to-cardboard joints, especially when the pieces can be held or clipped while setting. Hot glue can give a quick grab on structural seams but requires care because of heat. Strong double-sided tape is useful for decorative layers. The best choice depends on whether the joint needs immediate hold, flexibility, or a clean surface.
Can I paint cardboard without making it warp?
Yes, but keep the paint layers light. Cardboard absorbs moisture, so heavy wet coats are more likely to curl or soften the surface. Apply thin coats, let the piece dry on a flat surface, and consider paper wrapping or decorative offcuts if you want color without adding much moisture.
How can I make a cardboard organizer stronger?
Reinforce the areas that carry weight rather than doubling every panel. A second base layer, an extra strip inside a tall corner, or crossed corrugation on a flexible side can make a noticeable difference. Also keep the organizer proportionate; very tall narrow designs are more likely to tip or bow.
Is cardboard safe for children’s craft projects?
Cardboard itself is useful for many children’s crafts, but the tools and small parts need adult judgment. Adults should handle craft knives, hot glue, staples, and difficult cutting. For toys, remove sharp edges, use finishes suitable for the intended use, secure loose pieces, and avoid small detachable parts around children who may put them in their mouths.
Can cardboard seed pots be planted directly into the garden?
Some people use plain cardboard pots that way, but conditions vary, and thick or coated cardboard can break down slowly. A cautious approach is to remove or open the cardboard if it still feels firm enough to restrict roots when transplanting. Use clean, uncoated material and avoid making assumptions about heavily printed, laminated, or treated tubes.
Keep Useful Cardboard in Circulation a Little Longer
Upcycling cardboard works best when the new object makes sense for the material. A strong box panel can organize a desk or shelf. Thin strips can divide a drawer. A large box can become an indoor playhouse. Small tubes can hold seedlings for a short stage, and leftover pieces can become a simple toy. None of those projects requires cardboard to become something it is not.
That is the part I enjoy about these ideas. The material already exists, the tools are often basic, and you can adjust the project as you work. If a divider is too wide, trim it. If an organizer leans, reinforce the base. If a playhouse gets crushed after weeks of use, repair the weak panel or let the cardboard move on to its next appropriate destination.
If you are new to upcycling cardboard, begin with the project that solves the most obvious problem in your home. A drawer divider or file holder takes less commitment than a large playhouse and gives you a good feel for cutting, fitting, and reinforcing. Then save the next clean box with a purpose in mind rather than simply adding it to a pile.
Which cardboard item around your home would be most useful if it had a second job instead of becoming clutter?