Cargo pants often wear out in very specific places. The inner seams may become thin, the knees may fade, or the waistband may stop fitting comfortably while the pockets, lower legs, and heavier fabric remain surprisingly strong.
Those useful sections deserve more than a quick trip to the discard pile. Cargo trousers already contain reinforced seams, oversized pockets, belt loops, zips, snaps, and sturdy panels that can become the starting points for bags, skirts, vests, jackets, or a refreshed pair of wearable pants.
I’m Stella Eve Louise, and I don’t think every cargo-pants upcycle needs to hide what the garment used to be. The pockets are often the most useful and recognisable feature, so keeping them visible can make the finished piece more practical as well as more interesting.
The important part is matching the project to the condition of the fabric. A worn seat may rule out a fitted skirt, but the lower legs could still become a sling bag. A damaged waistband may need replacing, while the broad pocket panels remain strong enough for a vest or tote. Let the sound fabric decide what happens next.
Examine the Cargo Pants Before Cutting
Wash and dry the cargo pants according to their care label. Working with clean fabric makes it easier to identify permanent stains, weakened fibres, stretched seams, and areas that should not be reused.
Turn the trousers inside out and examine:
- Inner-leg seams
- Seat and crotch area
- Knees
- Waistband
- Belt loops
- Pocket corners
- Zips and snaps
- Lower hems
- Reinforced panels
- Decorative stitching
- Drawstrings
- Elastic sections
- Rivets and metal hardware
Hold the fabric towards a bright window. Thin areas often allow more light through than the surrounding material and may tear when used for bag handles, fitted clothing, or other high-stress sections.
Test every pocket before planning around it. Place your hand inside, pull gently at the corners, and check whether the lining remains attached. Cargo pockets may look strong from the outside while the hidden fabric has started separating.
Save usable hardware as you work. Zips, buckles, D-rings, drawstrings, buttons, and belt loops can return as closures or attachment points, but remove rusty, sharp, or damaged pieces.
Choose the Project According to Fabric Strength
Heavy cotton twill and denim cargo pants can support bags, structured vests, skirts, and outerwear. Lightweight cargo fabric may work better for decorative panels, loose garments, pocket details, or lining.
Use the strongest areas for:
- Bag bases
- Handles and straps
- Waistbands
- Shoulder seams
- Pocket attachments
- Closures
- Fitted garment panels
Use thinner but still serviceable areas for:
- Linings
- Decorative patches
- Paint experiments
- Small pockets
- Fabric labels
- Internal dividers
Cut away fabric that is brittle, badly stretched, chemically stained, or worn almost transparent. I’d rather make a slightly smaller project from dependable material than build a large one that begins opening at the seams after two uses.
Gather the Main Sewing Supplies
- Clean cargo pants
- Sharp fabric scissors
- Small thread scissors
- Seam ripper
- Measuring tape
- Long ruler
- Tailor’s chalk
- Washable fabric marker
- Paper for templates
- Pins or strong fabric clips
- Sewing machine
- Heavy-duty or denim needle when needed
- Strong thread
- Hand-sewing needle
- Interfacing
- Lining fabric
- Reclaimed denim or canvas
- Zip
- Magnetic closure
- Buckles or D-rings
- Cotton webbing
- Bias binding
- Fabric paint
- Paintbrushes
- Pressing cloth
- Iron suited to the fabric
Metal rivets, thick pocket seams, and multiple layers can damage a standard machine needle. Stitch slowly near bulky sections and avoid forcing the machine over hardware.
Turn Cargo Pants Into a Multi-Pocket Tote Bag
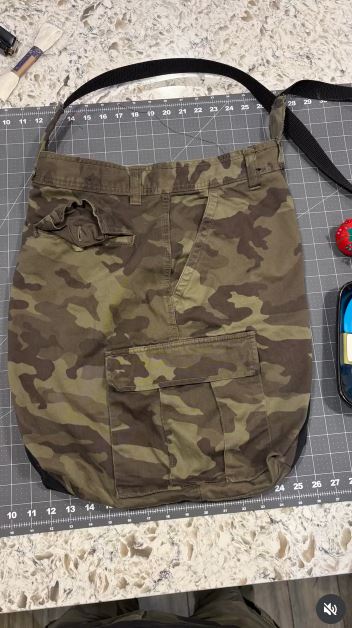
A tote bag makes excellent use of cargo pockets because the garment’s original storage can remain functional. The strongest leg and pocket panels can form the outside, while lining and interfacing help the bag hold its shape.
This version combines old cargo denim with additional fabric scraps. You could use reclaimed cotton, leftover lining, old leather sections, or another sturdy garment instead of buying several new materials.
Materials and Tools
- One or two pairs of cargo pants
- Strong lining fabric
- Interfacing
- Reclaimed fabric scraps
- Fabric scissors
- Seam ripper
- Strong thread
- Sewing machine
- Handles or cotton webbing
- Optional zip or magnetic closure
Construct the Cargo Tote
- Remove the useful panels carefully. Unpick the largest cargo pockets rather than cutting closely around them. Open the legs along the easiest seams and mark all weak areas before deciding the final bag size.
- Plan the front and back panels. Arrange the cargo pockets, denim sections, and contrasting fabric on a flat surface. Keep the pockets away from the bottom seam and leave enough clear space around their edges for construction stitching.
- Reinforce and join the outer fabric. Apply interfacing where the cargo fabric needs extra stability, then sew the arranged pieces into complete front and back panels. Press bulky seams carefully and topstitch them when additional strength is useful.
- Build the bag and lining. Join the outer panels, shape the base, and construct a separate lining with one or two internal pockets. Add a zip or another closure before joining the lining to the outer shell.
- Attach dependable handles. Use layered cargo fabric, reclaimed leather, or cotton webbing. Extend each handle well below the upper edge and reinforce the attachment with several rows of stitching.
For me, the cargo pockets should remain genuinely usable. Sewing them down as decoration wastes the strongest feature of the original trousers.
A smaller version can become a work bag or craft tote. One intact trouser leg may also provide enough material for a narrow bottle bag or lunch carrier.
Refresh Old Cargo Pants With Dye and Hand-Painted Details

Not every pair needs to be dismantled. Cargo pants that still fit and remain structurally sound can be refreshed with controlled colour, fabric paint, patches, or embroidery.
This approach suits trousers with uneven fading, small permanent marks, or a colour that no longer feels wearable. It does not repair weak fibres, so worn knees and opening seams still need mending first.
Materials and Tools
- Clean cargo pants
- Fabric dye suited to the fibre, if used
- Fabric paint
- Small paintbrushes
- Cardboard inserts
- Tailor’s chalk
- Fabric patches
- Needle and thread
- Protective gloves
- Covered work surface
Create the Wearable-Art Finish
- Repair the pants before decorating. Close open seams, reinforce thin pocket corners, and patch small holes from the inside. Decoration should sit on stable fabric rather than becoming a temporary cover for damage.
- Plan the colour placement. Decide whether the trousers need complete dyeing, partial colour, or only painted details. Test the selected products on an inside seam or saved offcut before changing the visible fabric.
- Protect the inner layers. Place cardboard inside each leg and behind the pockets so paint cannot transfer through the fabric. Mark the main shapes lightly with tailor’s chalk.
- Build the design gradually. Apply the broadest colours first, then add smaller leaves, lines, symbols, or abstract marks. Keep some plain fabric visible so the pockets and seam details do not disappear beneath one continuous painted surface.
- Finish according to the product instructions. Let each layer settle properly and complete any required heat setting or curing. Wash the finished trousers gently and inspect the painted areas before regular wear.
I know it can feel tempting to cover every faded mark, but a few visible changes in the original fabric can work with the painted design rather than against it.
A beginner can paint only one pocket flap or add a small motif near the knee. Fabric patches, visible mending, or embroidery can replace paint when a softer textile finish suits the trousers better.
Reconstruct Cargo Denim Into a Mini Skirt With Removable Pocket Bags
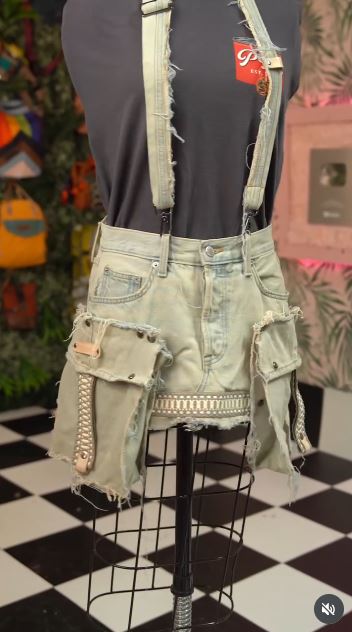
Turning cargo trousers into a skirt keeps the original waistband, front closure, and upper fit while removing damaged or unwanted leg sections. Detachable cargo pockets add another use because they can remain on the skirt or be carried separately.
The attachment points must be reinforced. A pocket filled with a phone, keys, or wallet places more strain on the fabric than an ordinary decorative patch.
Materials and Tools
- Cargo or denim pants
- Seam ripper
- Fabric scissors
- Tailor’s chalk
- Strong thread
- Sewing machine
- Extra denim for inserts
- D-rings or secure clips
- Bias binding
- Optional lining
- Optional zip for pocket bags
Build the Convertible Skirt
- Mark the skirt length while wearing the pants. Allow space for the finished hem and comfortable movement. Remove the trousers and compare both legs before cutting across them.
- Open the inner-leg seams. Unpick the seams through the crotch area and lay the fabric flat. Overlap or reshape the front and back until the former trouser legs create a smooth skirt line.
- Fill the centre gaps. Use saved leg fabric to create front and back inserts where needed. Pin the skirt completely before sewing, then check that the hem hangs evenly.
- Prepare the removable pockets. Reinforce the cargo pockets and add dependable clips, loops, or rings. If they will function as bags, add secure closures and small straps rather than relying on the original flap alone.
- Finish and test the garment. Hem the skirt, reinforce the attachment points, and try it on with the pockets empty. Then add light contents gradually and watch for pulling around the waistband and side seams.
The part I would check carefully is the pocket position while sitting. A removable pocket may look balanced while standing but become uncomfortable when placed too close to the hip or back of the thigh.
For an easier version, keep the cargo pockets permanently attached. A longer skirt can be made by inserting wider leg panels or contrasting reclaimed fabric.
Make a Compact Sling Bag From Cargo Trousers
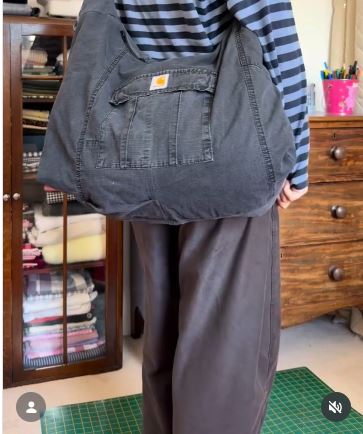
A sling bag needs less fabric than a large tote, which makes it useful when only the lower legs and several pockets remain sound. The original cargo pocket can sit across the front as a practical compartment.
Because the bag rests against the body, bulky seams and metal parts need careful positioning. Avoid placing rivets, thick pocket corners, or rough zip ends where they will rub against clothing.
Materials and Tools
- Cargo trouser panels
- One strong cargo pocket
- Lining fabric
- Interfacing
- Zip
- Adjustable webbing strap
- Buckle or slider
- D-rings
- Strong thread
- Sewing machine
- Fabric clips
Sew the Sling Bag
- Choose a simple bag shape. Draw a curved or rectangular template that fits inside the strongest leg panels. Mark the zip opening, pocket position, and strap attachments before cutting.
- Prepare the exterior pocket. Remove the cargo pocket with enough surrounding fabric for a stable seam. Reinforce the back of the new bag panel before stitching the pocket into place.
- Construct the outer and lining shells. Apply interfacing, insert the zip, and join the cargo panels around the bag shape. Build a separate lining and keep bulky original seams away from the curved edges.
- Add the adjustable strap. Reinforce the upper and side attachment points with extra fabric. Use dependable webbing, rings, and a slider so the bag can sit comfortably across the chest or back.
- Finish and test the bag. Join the lining, check the zip, and inspect every strap seam. Begin with lightweight belongings and make sure the bag does not twist when worn.
I don’t think the sling needs several exterior pockets simply because the trousers provide them. One useful front pocket is often easier to reach and keeps the bag from becoming too bulky.
A belt bag can be made from the same basic pattern. Shorter webbing and two belt loops will create a smaller hands-free option.
Cargo-Pants Upcycles That Fail at the Stress Points
Cutting Off Pockets Without Enough Fabric Around Them
A closely trimmed pocket can be difficult to attach securely. Leave a border of surrounding fabric, then reduce it only after deciding how the pocket will join the new piece.
Using Thin Knees for Bag Handles
Knee fabric often looks strong until it is pulled. Reserve dependable waistband, lower-leg, denim, or webbing sections for handles and straps.
Sewing Through Hidden Metal Hardware
Cargo trousers may contain rivets, snaps, and thick fasteners beneath folded fabric. Check each seam path before sewing to avoid damaging the needle or machine.
Building the Design Before Checking Fit
Pockets, patches, and painted details may land in uncomfortable positions after a garment is reshaped. Fit the main skirt, vest, or jacket before completing the decoration.
Keeping Weak Pocket Linings
A strong outer pocket is not useful when the inner layer has holes. Replace or reinforce the lining before attaching it to a new bag or garment.
Adding Too Many Heavy Pockets
Cargo pockets add several fabric layers before anything is placed inside them. Limit the number and distribute them across strong areas.
Ignoring the Direction of the Fabric
Cargo twill may stretch differently across the grain and bias. Keep major bag and garment panels aligned so the finished item does not twist.
Using Ordinary Thread on Thick Seams
Multiple cargo layers can place heavy strain on weak thread. Match the needle and thread to the fabric weight and sew slowly through bulky joins.
Leaving Raw Edges Inside Bags
Cargo fabric can fray during use. Add lining, binding, enclosed seams, or another dependable finish.
Painting Over Damaged Fabric
Paint changes colour, not strength. Mend tears and reinforce thin sections before adding artwork.
Making Detachable Pockets With Weak Clips
Pocket bags carrying keys or a phone need reinforced attachment points. Use hardware suited to the load and test it gradually.
Throwing Away the Lower-Leg Scraps
Narrow sections can become straps, belt loops, closures, patches, zip tabs, key holders, or reinforcement behind pocket corners.
Frequently Asked Questions
What is the easiest way to upcycle cargo pants?
Refreshing a wearable pair with patches, paint, or shortening is usually simpler than complete reconstruction. A small sling bag is also manageable when the lower legs remain strong.
Can cargo pockets be reused separately?
Yes. Remove them with enough surrounding fabric for secure attachment, inspect the lining, and reinforce the corners before placing them on a bag or garment.
Are cargo pants suitable for making bags?
Heavy cotton, twill, and denim cargo pants can work well for bags. Lining and interfacing may still be needed, particularly around the base, zip, and handles.
Can I make a cargo-pants upcycle without a sewing machine?
Small repairs, painted details, and simple hand-sewn projects are possible. Structured bags, fitted skirts, vests, and jackets are easier to strengthen with a sewing machine suited to heavier fabric.
How should I sew through thick cargo seams?
Use a strong needle suited to the material, increase the stitch length when appropriate, and sew slowly. Avoid stitching directly through rivets, snaps, or very bulky seam intersections.
What can replace cargo pants when I need extra fabric?
Old jeans, work trousers, canvas bags, jackets, upholstery remnants, and other strong woven fabrics may work. Compare the fabric weights before joining them.
Can cargo pants be turned into a skirt without removing the waistband?
Yes. Keeping the waistband and front closure can preserve the original fit, provided those sections remain comfortable and structurally sound.
Let the Pockets Lead the Transformation
Learning how to upcycle cargo pants begins with noticing that the garment is more than two trouser legs.
The pockets can become storage on a tote, sling bag, skirt, vest, or jacket. The lower legs can provide dependable panels, while the waistband, belt loops, zips, and drawstrings may return as closures or reinforced details.
Begin with the strongest section rather than the most damaged one. Decide what the cargo fabric can safely support, plan the full project, and then cut only after every important piece has been marked.
Which transformation would suit your old cargo pants best: a pocket-covered tote, a painted wearable pair, a convertible skirt, or a compact sling bag?