A Scandinavian home usually feels calm before you notice any single piece of furniture. The floor is easy to move across, useful objects have sensible places, and the colours do not compete for attention. There may be white walls and pale wood, but those details alone are not enough. A room can be completely beige and still feel awkward if the storage is poor, the lighting is harsh, or every surface is crowded.
I prefer approaching this style through the things a home already needs. Hidden key storage can quiet an entryway. Cane doors can soften a basic shelving unit while covering visual clutter. An old lamp and a wide ceramic vase can create a warmer pool of light without replacing two usable objects.
The most convincing Scandinavian rooms also avoid looking like matching furniture catalogues. They combine clean shapes with wood grain, woven texture, soft fabric, practical storage, and a few personal pieces. I don’t think you need to empty the room or buy an entirely new set. Begin with one area that feels noisy, dark, or difficult to use, then make a change that improves both its appearance and its everyday job.
Begin With the Room, Not a Shopping List
Stand in the doorway and look at how the room is actually used. Notice where bags are dropped, which items never make it back into a cupboard, where evening light feels too sharp, and which furniture blocks movement. Those small problems are more useful than a mood board because they tell you what the room needs.
Scandinavian style is often associated with restraint, but restraint does not mean removing every sign of life. It means giving each object enough space to be useful and noticed. Keep what supports the room, move what belongs elsewhere, and repair strong pieces before replacing them.
· Choose two or three main colours, then allow wood, metal, pottery, plants, and textiles to provide natural variation.
· Keep walking routes clear and avoid placing storage where doors, drawers, or chairs need to move.
· Use closed storage for visually busy items and open shelves for a smaller group of things you genuinely enjoy seeing.
· Check old furniture for loose joints, damaged fixings, sharp edges, and unstable bases before decorating it.
· Test paint, stain, adhesive, and cleaning methods on a hidden area before committing to the complete piece.
· Work in a ventilated area when using paint, stripper, spray products, strong adhesive, or protective finishes.
· Anchor tall or wall-mounted storage with fixings suitable for the wall and the expected load.
Hide Everyday Clutter Behind Framed Artwork
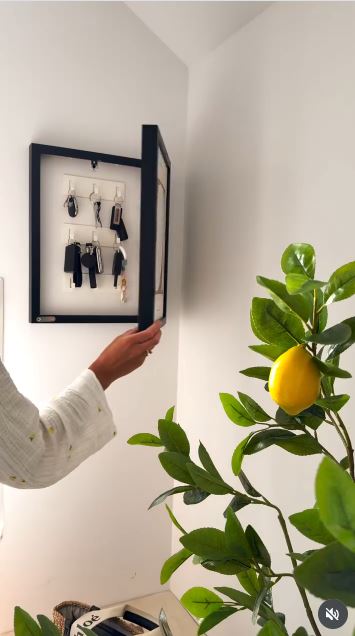
Small entryways often lose their calm because the objects are small, not because there are too many large pieces. Keys, access cards, dog leads, sunglasses, and spare batteries gather on the nearest surface. A shallow cabinet disguised as framed artwork keeps those items close to the door without making storage the first thing you see.
The project uses two simple frames connected like a book. One frame becomes the fixed back and storage area; the second acts as a hinged front. The finished piece works especially well in a Scandinavian room because it combines a clean rectangular shape, useful concealed storage, and artwork that can be changed without rebuilding the cabinet.
Materials and Tools
· Two matching or compatible picture frames
· Two small hinges with screws suited to the frame material
· Screwdriver or drill with a fine bit
· Wall fixings suitable for the wall type
· Small hooks, magnetic strip, or shallow key rail
· Pencil, tape measure, and level
· Felt pads or small magnetic catch
· Lightweight artwork or prints
· Eye protection
Build the Storage Without Making the Frame Bulky
1. Decide what the cabinet needs to hold. Lay the keys and small items on a table and measure their deepest point. The storage must remain shallow enough for the front frame to close without pressing against the contents. I’d keep this project for lightweight everyday objects rather than wallets, tools, heavy key bundles, or anything valuable that needs secure locking.
2. Check the frames and plan the hinge side. Remove the glazing if it makes the back frame too heavy or prevents hooks from fitting. Place the frames face down, align the outer edges, and test whether the front can open without scraping the wall. Mark hinge positions away from weak corners, hanging hardware, and any decorative moulding that may split.
3. Join the frames carefully. Make fine pilot holes when the material allows, then attach the hinges with short screws that cannot break through the visible face. Open and close the frames several times before tightening everything fully. If the front drops or twists, correct the alignment now rather than relying on a magnetic catch to pull a crooked door into place.
4. Add the internal storage and closure. Fit small hooks, a narrow rail, or another shallow organiser to the fixed frame. Space the hooks so key rings do not overlap and stop the front from closing. Add felt pads to soften contact and, if needed, a light magnetic catch that holds the artwork closed without requiring force.
5. Mount, level, and load it gradually. Use fixings that suit the wall and the combined weight of both frames. Check the cabinet empty, then add one item at a time while watching for movement at the hinges and wall fixings. The front should open smoothly without swinging into a door, mirror, or person entering the room.
The part I like is that the artwork can remain very simple. A line drawing, botanical print, family photograph, or piece of reused wallpaper is enough. The storage already does the clever work; the picture does not need to shout about it.
For a rental-friendly version, place a shallow lidded box or small wooden tray inside an existing console drawer and hang ordinary artwork above it. You keep the same visual calm without adding a wall-mounted structure.
Give Basic Storage Warmth With Cane Doors
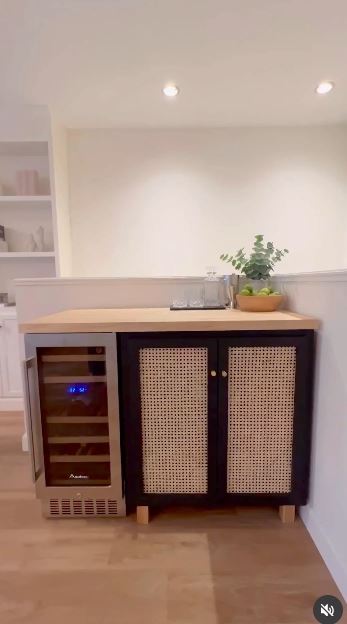
Flat-fronted storage can be useful but visually heavy, especially when every compartment is open. Adding legs, light timber frames, and woven cane doors changes the balance. The unit still holds the same objects, yet the raised base creates space beneath it and the cane allows texture to replace a wall of visible bottles, cables, books, or household supplies.
This method suits a living room cabinet, dining-area bar, hallway unit, or craft cupboard. What matters is not copying one particular piece. It is using a natural material to break up a simple shape while keeping the contents easy to reach.
Materials and Tools
· Sound cube shelving or low cabinet
· Furniture legs and suitable mounting plates
· Straight timber for door frames
· Cane webbing or another woven panel
· Hidden or surface-mounted hinges
· Small knobs or pulls
· Saw, drill, screwdriver, and measuring tools
· Staple gun or another suitable fixing method
· Sandpaper and optional clear finish
· Eye protection and work gloves
Add Natural Texture While Keeping the Doors Square
1. Strengthen and level the original unit. Empty the cabinet, tighten all fixings, and check that the body is square. A door fitted to a leaning unit will never sit evenly. Confirm that the base can safely accept legs; thin panels may require internal blocking or a stronger mounting method rather than four screws driven into weak board.
2. Plan the door frames around the real openings. Measure each opening separately because flat-pack units are not always perfectly identical after years of use. Cut the frame pieces, lay them on a flat surface, and check both diagonals before joining them. Leave a small, even clearance so the doors can open without rubbing against the cabinet or one another.
3. Prepare and attach the cane. Soften natural cane according to the supplier’s guidance when required, then pull it evenly across the rear of each frame. Fix the centre of each side first and work toward the corners so the weave remains straight. Do not stretch one edge so tightly that the finished door bows as the cane dries.
4. Fit hinges and test the movement. Support each door at the correct height with spacers while marking the hinges. Make pilot holes where appropriate and attach one door before completing the rest. Open it fully, check the gap, and adjust the hinge position before repeating the process across the cabinet.
5. Finish the piece and organise what stays inside. Sand rough timber and apply a compatible clear finish or quiet paint colour if needed. Add the handles only after confirming their height feels comfortable. Then return the contents in groups, using trays or baskets inside so the new doors do not simply hide an unmanageable pile.
I know it can feel tempting to add cane to every door, drawer, and panel once you see the texture working. I’d stop after the main front. The woven surface looks calmer when it has plain wood or a simple painted body around it.
A beginner-friendly alternative is to fit cane or linen behind an existing glass door rather than building new frames. Removable fabric panels can give a similar softened look when cutting timber is not practical.
Make a Rounded Wood Side Table From Simple Pieces

Scandinavian furniture often uses straightforward forms rather than complicated decoration. A small table built from round wooden pieces demonstrates that clearly. The curved base feels lighter than a solid box, and the circular top leaves fewer sharp corners in a tight living room or reading area.
The source idea combines simple IKEA wooden pieces into a compact table. A similar version could use thrifted salad bowls, an unwanted round board, or offcuts from another project, provided every component is sound and suitable for furniture use. This is where appearance must follow structure: a table should not wobble simply because the stacked shape looks pleasing.
Materials and Tools
· Two compatible wooden bowls or curved base pieces
· Circular wooden board or sturdy turntable top
· Wood adhesive suited to the materials
· Clamps, weights, or a stable temporary support
· Tape measure, ruler, and pencil
· Fine and medium sandpaper
· Optional dowel, screws, or internal connector for added strength
· Wood filler when appropriate
· Clear oil, wax, or another furniture-safe finish
· Eye protection and dust mask for sanding or drilling
Build the Table Around Balance and Safe Joinery
1. Dry-stack the pieces and test the proportions. Place the bowls in the intended orientation and rest the top above them without adhesive. View the shape from several sides, then press lightly at the edges to see where it wants to tip. A broad top on a narrow base may look elegant in a photograph but become irritating beside a sofa, so change the proportions before joining anything.
2. Prepare every joining surface. Remove labels, wax, glossy coating, and dirt from the contact areas. Sand only enough to create a clean, flat surface for the chosen adhesive or mechanical fixing. Mark the centre of each circle with crossing lines; a few millimetres of drift can make the completed table look tilted even when the floor is level.
3. Join the base and keep it aligned. Apply adhesive in a controlled layer and connect the curved pieces around the centre marks. Use a support or clamps that hold the shape without crushing thin bowl walls. Wipe away squeeze-out before it hardens, then leave the base undisturbed according to the adhesive instructions rather than moving it to see whether it is ready.
4. Attach the top with suitable reinforcement. Set the top in position and test the edge overhang. A hidden dowel, internal block, or carefully selected screw may strengthen the joint when the materials allow; thin bowls should not be split by oversized fixings. Check the underside so no sharp point or metal edge remains exposed.
5. Finish and load-test it modestly. Sand rough transitions and apply a finish that suits indoor furniture. After the finish has cured, test the table with light, non-breakable objects before using a lamp or ceramic vase. Keep it as a side table, not a stool, step, or support for heavy equipment unless the construction was specifically designed for those loads.
For me, the wood grain is the decoration here. A quiet clear finish usually suits the shape better than painted stripes, mouldings, or several contrasting colours.
You could also paint the base and leave the top natural, or use a reclaimed timber top that already carries small marks. Those signs of earlier use can stop a simple room from feeling too newly purchased.
Combine an Old Lamp and Ceramic Vase for Softer Light

A Scandinavian room needs more than daylight. In the evening, several low sources usually feel gentler than one bright ceiling light. A ceramic lamp beside a chair, on a dresser, or at the end of a console introduces warm light and a solid handmade-looking form without adding busy ornament.
This project places an existing lamp inside a wide vase rather than drilling and wiring the ceramic. That can make the change more approachable, but the fit must be stable and the bulb, shade, cable, and ventilation still need careful attention. Electrical parts should remain intact unless a qualified person is carrying out the work.
Materials and Tools
· Sound table lamp narrow enough to fit inside the vase
· Wide, stable ceramic or stoneware vase
· Lampshade compatible with the lamp fitting
· Appropriate bulb or rechargeable light source
· Non-slip pads or removable spacers
· Tape measure
· Dry cloth and small brush
· Optional removable filler or support that will not trap heat
· Cable clips when a cord remains in use
Create a Stable Light Without Damaging the Ceramic
1. Check the vase and lamp separately. Reject a vase with cracks, a narrow unstable foot, or a mouth that presses against the lamp body. Inspect the lamp cable, plug, fitting, and switch for damage. The lamp should work safely before it enters the vase; the container is decorative support, not a repair for faulty electrical parts.
2. Measure the fit and plan the cable route. Place the lamp beside the vase and compare the height, width, and position of the switch. If the corded lamp cannot sit inside without crushing the cable or lifting unevenly, use another combination. A rechargeable bulb or cordless lamp may simplify placement, but it still needs the correct fitting and safe clearance.
3. Stabilise the lamp with removable supports. Lower the lamp into the vase slowly and keep it centred. Use non-slip pads or another removable, heat-safe support only where needed to stop movement. Do not pack the vessel tightly with fabric, paper, foam, or loose material that could trap heat or make the lamp difficult to inspect.
4. Fit the shade and test the proportions. Attach a shade designed for the lamp fitting and check that it sits level. The shade should not touch the bulb, vase rim, wall, curtain, or shelf above. Switch the lamp on while you remain nearby and check for wobbling, unusual heat, smell, or strain on the cable.
5. Place it where the light supports an activity. Use the lamp beside reading, conversation, or evening storage areas rather than treating it as a decorative object with no purpose. Keep it away from water, busy edges, children’s pulling reach, and unstable furniture. Dust the vase and inspect the lamp periodically because the outer shell can hide movement or cable wear.
The part I would keep restrained is the shade. Linen, plain paper, or another softly textured neutral surface lets the ceramic base feel substantial without making the lamp formal.
A small bowl or plant pot can create a similar visual weight around a rechargeable puck light, but it should not imitate a wired lamp unless the components are designed for that use. Safety is more important than hiding every modern detail.
Strip Back a Sound Dresser Instead of Replacing It

Wood is often what gives a pale Scandinavian room enough warmth to feel lived in. A solid dresser with a damaged or dated coating may already contain the right material; it simply needs careful preparation. Stripping, sanding, and refinishing can reveal grain that paint has hidden, while restrained hardware keeps the front easy to read.
The source makeover uses a darker stain and decorative trim. For a lighter Scandinavian interpretation, the same preparation can lead to a pale clear finish, soft soap-treated look, white-tinted oil, or quiet painted body with a natural top. The finish must suit the actual wood and the product instructions rather than a colour imagined from a photograph.
Materials and Tools
· Structurally sound wood dresser or chest
· Screwdriver and containers for hardware
· Scraper suited to the existing coating
· Paint or finish remover when genuinely needed
· Medium and fine sandpaper or electric sander
· Dust mask, gloves, and eye protection
· Wood glue and clamps for repairable joints
· Chosen stain, oil, wax, paint, or protective finish
· Simple replacement handles when needed
· Drop cloths and ventilation
Reveal the Wood Without Rushing the Preparation
1. Confirm what the dresser is made from. Inspect drawer edges, the underside, back, and any chipped area to distinguish solid wood, veneer, and fibreboard. A thin veneer can be damaged quickly by aggressive sanding. Tighten joints, repair drawer runners, and address wobbling before spending time on the visible finish.
2. Remove hardware and clean the complete piece. Label drawers so they return to the same openings, then store screws and handles together. Clean away polish, grease, dust, and residue before stripping or sanding. Old coatings can contain substances that need cautious handling, so use suitable protective equipment and seek specialist advice when the age or material is uncertain.
3. Remove the failed coating in controlled stages. Work on one panel at a time with a scraper, remover, or sanding method suited to the surface. Keep the tool flat and stop if the grain begins to tear or veneer thins. The goal is not to force every mark out; it is to create an even, sound base without removing more wood than necessary.
4. Refine the surface and test the new finish. Sand through appropriate grades, following the grain, and remove dust from corners and drawer details. Apply the proposed finish to a hidden area or the back of a drawer first. Check the colour after it settles, because some clear products deepen wood far more than expected.
5. Finish, reassemble, and allow normal use gradually. Apply thin, even coats according to the product guidance and keep drawers open enough to prevent sticking while the finish cures. Refit the original handles if they suit the calmer look, or choose simple replacements that use the same holes. Return heavy contents only after the surface and repaired joints are ready.
I don’t think every dent needs filling. A few honest marks can sit comfortably in a Scandinavian room, especially when the drawers move properly and the surface is clean and protected.
A simpler version can leave a sound painted body in place and refinish only the top. You could also change nothing but the handles, clear the surrounding clutter, and let the existing dresser work more quietly in the room.
Carry the Same Calm Through the Rest of the Home
The projects above work because each one deals with a real household need. You can use the same approach in rooms that do not need a complete DIY makeover.
Use Colour to Connect, Not Flatten
Choose warm white, soft grey, muted green, clay, faded blue, or another restrained group that suits the light in your home. Repeat one or two tones across walls, textiles, and small painted pieces, but allow wood and handmade objects to vary. A room with several close natural shades usually feels less flat than one colour repeated on every surface.
Layer Texture Where the Palette Is Quiet
Linen curtains, wool throws, woven baskets, cane, unfinished pottery, and visible wood grain keep pale rooms from feeling clinical. Use fewer textures in larger areas rather than a collection of tiny decorative samples. One substantial woven cabinet front or textured rug can do more than ten small baskets competing on a shelf.
Leave Breathing Space Around Useful Objects
Do not fill every corner simply because a plant stand or small chair fits. Empty floor and wall space helps people move, opens sightlines, and gives the objects you keep more presence. This is especially useful in narrow homes where additional furniture can make cleaning and daily movement harder.
Use Several Low Lights Instead of One Harsh Centre
A table lamp, reading light, and small light near dining or storage can create softer evening zones. Choose safe fittings and keep lamps connected to actual tasks. Warm-looking rooms are not created by dimness alone; they need enough light to read, cook, walk, and find things comfortably.
Where a Scandinavian Room Can Lose Its Calm
Using White Without Any Warm Material
White walls, white furniture, pale flooring, and cool lighting can make a room feel bare rather than peaceful. Add wood, woven fibre, pottery, fabric, or a muted colour so the room has depth without needing more objects.
Leaving Everything on Open Shelves
Open storage looks light only when the contents remain limited and organised. Daily supplies, cables, packaging, toys, and mixed bottles usually create visual noise. Use doors, baskets, or drawers for busy groups and reserve open shelves for a smaller selection.
Buying a Matching Set All at Once
A complete matching set may create order, but it can also remove the sense that the home developed naturally. Keep one or two sound older pieces, change their finish when necessary, and let different woods or ceramics share a related colour or shape.
Mixing Cold and Warm Undertones Without Checking the Light
A cool grey wall can make a warm cream sofa look yellow, while a pink-beige paint may clash with blue daylight. Move samples around the room and look at them morning and evening before painting large areas or buying textiles.
Treating Minimalism as a Reason to Remove Comfort
A room still needs curtains that manage light, seating that supports the body, and storage near the activity it serves. Do not remove a useful lamp, side table, or blanket simply because an empty photograph appears cleaner.
Adding DIY Details Before Fixing the Furniture
Cane, trim, paint, and new handles cannot correct a leaning cabinet, weak base, loose wall fixing, or damaged electrical component. Repair structure first, then add decoration. The finished piece should remain safe after the novelty of the makeover has passed.
Repeating the Same Texture Everywhere
Cane on the cabinet, baskets, headboard, lampshade, and wall panel can quickly turn one useful material into a theme. Repeat it once or twice, then let plain surfaces give the texture room to stand out.
Frequently Asked Questions
Do Scandinavian homes have to be white?
No. White is useful for reflecting light, but Scandinavian rooms also use muted greens, blues, greys, warm neutrals, black accents, and natural wood. The palette usually feels connected and restrained rather than limited to one colour.
Can I create this look with secondhand furniture?
Yes. Solid secondhand furniture often provides the wood, practical storage, and simple shape the style needs. Check its structure first, then clean, repair, refinish, or change only the hardware rather than assuming the whole piece needs paint.
How do I stop a neutral room from feeling boring?
Use texture, varied natural materials, warm lighting, art, and a few personal objects. Change the scale as well: one large textile or wooden piece usually feels calmer than many small decorations scattered across the room.
Is open shelving necessary for Scandinavian style?
No. Closed storage often makes the style easier to maintain because it keeps visually busy items out of sight. A balanced room may use one open shelf for books or pottery and closed doors for daily supplies.
Which wood finish works best?
The answer depends on the timber, existing coating, room light, and intended use. Clear or lightly tinted finishes can preserve grain, while paint may suit mixed materials or damaged surfaces. Test the finish on a hidden area before covering the complete piece.
Can a small or rented home feel Scandinavian?
Yes. Focus on clear movement, concealed storage, useful lighting, and a restrained palette. Freestanding organisers, removable textile panels, framed art, and repaired secondhand furniture can create the effect without permanent construction.
How much decoration should I keep?
Keep enough to make the room personal but not so much that every surface becomes storage. Group related objects, leave gaps between them, and rotate seasonal or sentimental pieces rather than displaying everything at once.
Let Practical Changes Shape the Scandinavian Look
Learning how to create a Scandinavian home is less about copying a pale room and more about making the home easier to use. Concealed key storage calms the hallway. Cane doors hide busy shelves. A rounded table supports a chair without crowding it, and a reused ceramic lamp brings the light down to a comfortable level.
Begin with one daily frustration and use the materials already available where they remain safe and sound. Repair the dresser, organise the cabinet, or soften one corner with a useful lamp. Then live with the change before adding another project. A calm home usually grows through small decisions, not one enormous shopping trip.
Which part of your home needs the first quiet improvement: the entryway, a crowded storage unit, a dark reading corner, or a tired wooden piece that still has years of use left?