Old polo shirts rarely wear out evenly. The collar may curl, the colour may fade around the shoulders, or the fit may stop feeling right while the lower body, button placket, sleeves, and embroidered details remain completely usable.
That combination of knitted fabric and structured details makes a polo shirt unusually useful for upcycling. The main panels can become a summer top, tote bag, cushion cover, or small accessories, while the collar and button opening can be kept as recognisable features.
I don’t think every polo shirt needs to be taken apart completely. Sometimes removing the sleeves or changing the hem is enough to make it wearable again. A shirt with more damage may be better divided into smaller pieces, especially when the strongest fabric sits away from the underarms and side seams.
The first decision should not be about colour or decoration. Check the condition of the knit, test how much it stretches, and identify which areas can still withstand sewing and regular use. Once that is clear, the shirt usually suggests a much more practical second purpose.
Check the Polo Shirt Before Cutting
Wash and dry the shirt according to its care label. Working with clean fabric helps reveal permanent marks, twisted seams, weakened fibres, and areas that may shrink or change shape.
Turn the polo inside out and examine:
- Collar and collar stand
- Button placket
- Shoulder seams
- Underarms
- Sleeve hems
- Side seams
- Lower hem
- Embroidered logo
- Chest pocket
- Areas around buttons
- Fabric beneath the collar
- Any previous repairs
Hold the shirt towards a bright window. Areas that allow much more light through may be too thin for bag handles, fitted garments, cushion seams, or other places that will receive regular pressure.
Stretch the fabric gently in both directions. Some polo knits return quickly to their original shape, while others remain stretched or curl at the cut edge. That difference affects how the fabric should be cut, stabilised, and finished.
Do not rely on fabric adhesive alone for structural clothing seams, tote handles, or cushion openings. It may help with decorative pieces or temporary positioning, but dependable stitching is usually more suitable for parts that will be pulled or washed.
Decide Which Details Are Worth Keeping
A polo shirt already includes several finished elements that can reduce the amount of new work.
The button placket can become:
- A front detail on a top
- A cushion opening
- A tote-bag closure
- A decorative strip
- A small pocket flap
The collar may become:
- Part of a redesigned neckline
- A decorative pocket edge
- A removable accessory
- A small bag handle wrap
- Scrap material for another project
An embroidered logo can remain centred on a garment or become part of a cushion, bag pocket, patch, or fabric label.
Sleeves may provide enough material for headbands, ties, pocket panels, ruffles, or handle sections. Keep them until the main project has been assembled because small missing pieces have a habit of becoming urgently important after the scraps have been discarded.
Gather the Main Materials and Tools
- Clean polo shirt
- Sharp fabric scissors
- Small thread scissors
- Seam ripper
- Measuring tape
- Ruler
- Tailor’s chalk
- Washable fabric marker
- Pins or fabric clips
- Sewing machine
- Ballpoint or stretch needle when appropriate
- Hand-sewing needle
- Thread suited to the fabric
- Stretch stitch or narrow zigzag option
- Lightweight interfacing
- Clear elastic, if useful
- Bias binding
- Lining fabric
- Reclaimed denim or canvas
- Paper for templates
- Iron and pressing cloth
- Safety pin
- Elastic
- Optional buttons or zip
Test pressing on a hidden area. Some performance polo fabrics and synthetic blends may not tolerate the same heat as ordinary cotton.
Add a Ruffle Collar to Refresh a Plain Men’s Polo
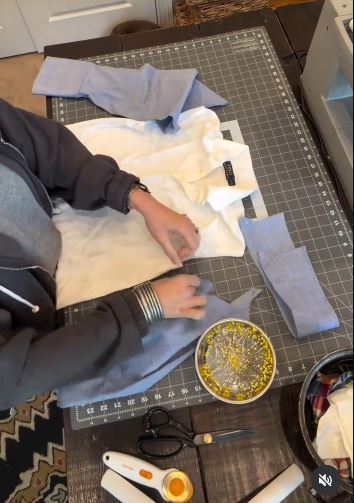
A plain polo can feel completely different once its traditional collar is replaced with a soft gathered edge. This works especially well when the body fits comfortably but the collar has curled, stained, or lost its shape.
The new ruffle may come from a sleeve, the removed lower hem, another old shirt, or a lightweight fabric scrap. It should be soft enough to gather without creating a thick, uncomfortable neckline.
Materials and Tools
- Polo shirt with a sound body
- Seam ripper
- Fabric scissors
- Lightweight fabric strip
- Gathering thread
- Pins or clips
- Sewing machine
- Bias binding, if needed
- Matching thread
Replace the Collar
- Remove the existing collar carefully. Use a seam ripper rather than cutting through the neckline. Keep the collar stand or original seam allowance intact when it can support the new finish.
- Prepare the fabric strip. Cut a long strip from a sleeve or another lightweight fabric. Join shorter pieces when necessary, finish the visible outer edge, and sew one or two rows of gathering stitches along the attachment edge.
- Gather and arrange the ruffle. Pull the gathering threads gradually until the strip fits the neckline. Distribute the fullness evenly and place any joining seam at the back or another less noticeable position.
- Attach the new collar. Pin the ruffle to the neckline and sew it securely without stretching the polo fabric. Cover the raw join with binding when the original collar seam cannot enclose it neatly.
- Check the neckline. Try the polo on and make sure the ruffle lies comfortably without pulling the button placket open. Reinforce any area where several fabric layers meet.
For me, the ruffle should change the neckline without taking over the entire shirt. A moderate amount of gathering usually looks more balanced than a very deep, stiff collar.
A smaller gathered strip can be added only around the back and shoulders. You could also replace the collar with flat contrast binding for a simpler finish.
Make a Reusable Tote From a Strong Polo Shirt
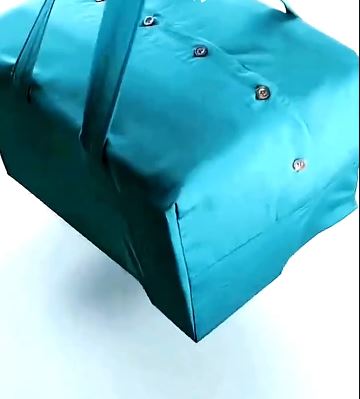
A polo shirt can become a light tote, but knitted fabric needs support. Without lining or reinforcement, the bag may stretch lengthways and allow heavier objects to gather at the bottom.
The button placket can remain on the front as a decorative feature or closure. Stitch it closed when the original buttons are not strong enough to control a filled bag.
Materials and Tools
- Large polo shirt
- Strong lining fabric
- Lightweight interfacing
- Reclaimed denim, canvas, or webbing
- Fabric scissors
- Ruler
- Tailor’s chalk
- Strong thread
- Sewing machine
- Optional magnetic closure
Build the Polo Tote
- Select the strongest body area. Cut away the collar, sleeves, underarms, and any thin sections. Mark matching front and back rectangles, keeping an embroidered logo or button placket centred when desired.
- Stabilise the knit. Apply lightweight interfacing to the wrong side of the polo panels without stretching them. Cut matching lining pieces and prepare stronger material for the handles.
- Sew the outer bag. Join the side and base seams, then add boxed corners when a wider bottom is useful. Reinforce the base with reclaimed denim or canvas if the tote will carry more than very light items.
- Make and attach the handles. Use webbing, layered polo fabric with strong reinforcement, or strips cut from another sturdy garment. Extend each handle well below the top edge and stitch across a broad attachment area.
- Add the lining. Construct the lining separately, include a pocket when useful, and join it around the bag opening. Topstitch the upper edge so the polo fabric does not roll outward.
I don’t think a soft polo tote should be treated like a heavy grocery carrier. It is better suited to clothing, yarn, a light picnic, or everyday items unless the base and handles have been strengthened carefully.
A no-sew knotted bag is possible with a thick T-shirt-style polo, but the cut fringe may curl and stretch. A stitched and lined version will generally keep a cleaner shape.
Turn a Knitted Polo Into a Cushion Cover
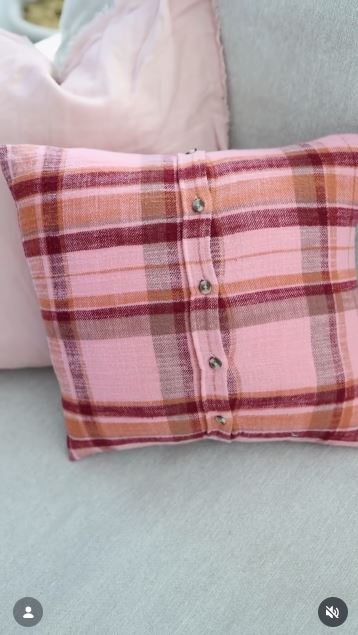
A polo shirt can make a personal cushion cover because the collar, embroidered logo, and button placket remain recognisable. This can also preserve a sentimental school, sports, workplace, or family shirt without leaving it folded in storage.
Knitted fabric should be stabilised before it is stretched tightly around a cushion. Too much tension can distort the placket and make the buttons gape.
Materials and Tools
- Clean knitted polo shirt
- Cushion insert
- Measuring tape
- Fabric scissors
- Pins or clips
- Lightweight interfacing
- Backing fabric, if needed
- Sewing machine
- Stretch-friendly thread
- Optional button reinforcement
Sew the Cushion Cover
- Position the cushion on the shirt. Button the polo and place the insert over the front. Centre the collar, logo, or placket, then mark a square with enough fabric for seams and comfortable fullness.
- Stabilise the front panel. Apply lightweight interfacing around the button placket and any thin embroidered area. Stitch the placket closed below the intended opening when the buttons would otherwise pull apart.
- Cut the backing. Use the shirt back or another sturdy fabric to create the rear panel. An envelope-style back can be easier than relying entirely on the polo buttons as the closure.
- Join the cover. Pin the front and back with the correct sides together and sew around the edges. Reinforce each corner, trim excess bulk, and turn the cover carefully.
- Insert and shape the cushion. Ease the insert inside rather than stretching the opening forcefully. Work the corners into place and check that the button placket lies flat.
The collar can remain upright, be lightly secured, or lie naturally across the cushion. I’d avoid attaching heavy decoration near it because the original shirt details already tell the story.
Two smaller polos can be combined into a patchwork cushion. The shirt front can also be mounted over a firm backing for a framed textile display when a washable cushion is not needed.
Polo-Shirt Upcycling Problems Hidden in the Knit
Cutting Without Testing the Stretch
Two polo shirts that look similar may behave very differently. Test the fabric in both directions before choosing the pattern or seam finish.
Using Worn Underarm Fabric
Underarm sections often weaken before the shirt body. Remove them rather than placing them inside a fitted top, tote handle, or cushion seam.
Treating Knit Like Stable Woven Fabric
Knitted fabric can curl, stretch, and grow while sewing. Use suitable needles, stabilisation, and stitches instead of pulling it through the machine.
Cutting the Neckline Too Deep
The opening may become larger after binding or wear. Begin with a smaller shape, test the fit, and enlarge it gradually.
Stretching the Fabric While Sewing
Pulled seams can remain wavy after the garment is finished. Support the fabric and let the machine feed it naturally.
Using the Collar as a Load-Bearing Handle
A polo collar is designed to sit around a neckline, not carry weight. Reinforce it heavily or use stronger material for bag handles.
Leaving the Button Placket Unsupported
The placket may gape on a cushion, tote, or fitted top. Add interfacing and reinforce the stitching around the buttons and opening.
Making a Tote Without Lining
Soft polo fabric may stretch under the contents. Add a stable lining and strengthen the base and handles.
Ignoring the Embroidered Logo Placement
A logo can end up partly inside a seam or awkwardly close to an edge. Mark the complete pattern before cutting around it.
Adding a Heavy Ruffle to a Lightweight Neckline
A thick gathered strip can pull the neckline outward. Use lighter fabric or reduce the amount of gathering.
Throwing Away the Sleeves Too Early
Sleeves can provide headbands, ties, pockets, binding strips, and reinforcement patches. Keep them until the main project is complete.
Using Fabric Adhesive on Structural Seams
Glue may help position decorative details, but clothing seams, bag handles, and cushion edges need a method suited to regular pulling and washing.
Frequently Asked Questions
What is the easiest polo-shirt upcycle?
Shortening the shirt or removing the sleeves is usually simpler than complete reconstruction. A headband or small accessory is also manageable when only part of the fabric remains usable.
Can I upcycle a performance polo shirt?
Yes, but synthetic performance fabric may stretch, slip, or react differently to heat. Test sewing, pressing, paint, and adhesive on a hidden section first.
Which needle should I use for polo fabric?
A ballpoint or stretch needle may suit many knitted polo fabrics because it moves between the fibres rather than cutting through them. Match the needle to the actual fabric weight and machine guidance.
Can a polo shirt become a tote bag?
Yes, although soft knit usually needs interfacing, lining, and stronger handles. Keep the intended contents light unless the bag has been reinforced thoroughly.
How do I stop polo fabric from stretching while sewing?
Use an appropriate stitch and needle, avoid pulling the fabric, and add lightweight stabilisation where needed. Test the machine settings on a scrap before sewing the main project.
Can I keep the collar and button placket?
Yes. They can remain as useful design features on tops, dresses, bags, and cushion covers, provided the surrounding fabric remains strong.
What can I make from small polo-shirt scraps?
Small pieces can become headbands, fabric ties, patches, key loops, pocket details, stuffing, labels, or reinforcement behind buttons and seams.
Let the Polo’s Best Details Stay Recognisable
Learning how to upcycle a polo shirt begins with deciding which parts still deserve to be seen.
The collar and button placket can shape a redesigned top, dress, cushion, or bag. The broad body panels provide useful fabric, while the sleeves and leftover strips can return as handles, ruffles, ties, or headbands.
Begin with one clean shirt and one manageable transformation. Test the stretch, mark every weak area, and plan around the details you want to keep before making the first cut. Then save the scraps until the finished project has been sewn and tested.
Which old polo shirt would you reuse first: the oversized one for a summer top, the sentimental one for a cushion, or the sturdy cotton polo waiting to become a tote?