A leather purse often reaches an awkward stage long before the material itself has finished being useful. The corners may look grey, the body may have collapsed in storage, or one stain may make an otherwise sound bag feel too tired to carry.
Leather also remembers every treatment it receives. A harsh cleaner can lift colour, an unsuitable conditioner can darken the surface, and dye or paint can be difficult to remove once it settles into the grain. That is why a good makeover begins with identifying the material and choosing the least permanent method that can solve the actual problem.
I don’t think every worn purse needs a dramatic transformation. Sometimes cleaning, reshaping, and conditioning reveal the bag you liked in the first place. When the colour is badly stained or the original finish has already failed, a careful re-dye or a more artistic redesign may make better sense.
The three projects here stay closely connected to real leather-bag transformations: a thorough restoration, a complete colour refresh, and a woven redesign for a purse that needs more than surface treatment. Each method requires patience, testing, and a willingness to stop before the leather tells you that enough is enough.
Identify the Purse Material Before Choosing a Makeover
Empty the purse, remove detachable straps and charms, and examine every panel in bright natural light. Look inside pockets and beneath flaps for a small area that has received less wear; this hidden section can show the original colour, texture, and finish.
Check the purse for:
· Cracked or peeling surface coating
· Dry leather that feels stiff rather than flexible
· Loose stitching around straps and handles
· Tears beside hardware or punched holes
· Sticky or powdery areas on the finish
· Colour transfer onto a clean white cloth
· Mould, a persistent musty smell, or water damage
· A lining that needs repair before the exterior work begins
· Hardware that is loose, corroded, or pulling through the leather
· An embossed logo, painted edge, or decorative finish that could be removed by cleaning
Do not experiment on a valuable designer, antique, sentimental, or heavily damaged purse. A professional leather restorer should assess rare materials, patent leather, suede, exotic skins, deep tears, mould, and structural handle damage.
Real leather, coated leather, suede, patent leather, and synthetic leather do not respond to the same products. A cleaner that works beautifully on an uncoated vintage bag may damage a modern coloured finish, while ordinary leather conditioner can permanently mark suede.
Test every cleaner, dye, paint, conditioner, and finish on a hidden spot. Let the test area dry fully before judging it. Wet leather often appears darker, and a product that looks harmless during application may leave a ring, shine change, or colour shift later.
Repair Function Before Changing Appearance
Check whether the zipper closes, the handle stitching holds, and the base supports the bag when it is lightly filled. Cosmetic work cannot compensate for a strap that is tearing away from the body or a lining that catches the zipper.
Make structural repairs first or ask a leather worker to complete them. I know the colourful part is more tempting, but paint applied over a weak seam only makes the eventual repair more complicated.
Restore a Dry and Misshapen Leather Purse
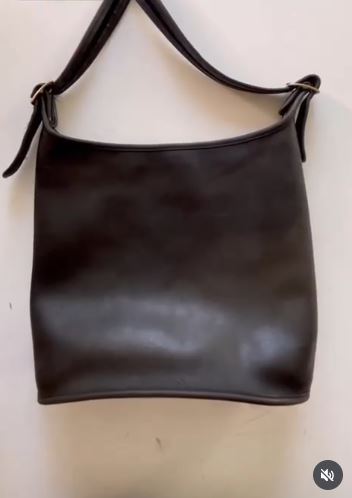
A full restoration is the best first choice when the purse is dirty, dry, and flattened but its original colour is still worth keeping. The transformation comes from several small improvements rather than one dramatic product: loose debris is removed, the surface is cleaned, the shape is supported, and the leather is conditioned gradually.
The aim is not to erase every mark. Creases, softened corners, and slight tonal variation can belong to the bag’s history. What matters is removing harmful dirt, restoring flexibility, and making the purse comfortable to use again.
Materials and Tools
· Soft handheld vacuum or narrow vacuum attachment
· Clean soft-bristle or horsehair brush
· Several white microfibre cloths
· Cleaner suitable for the specific leather
· Conditioner suitable for the specific leather
· Acid-free tissue or clean colourfast towels for shaping
· Cotton swabs for seams and hardware edges
· Small soft brush for lining and pockets
· Gloves, if recommended for the chosen products
· Separate metal polish only when it is safe for the hardware
Restore the Purse Step by Step
1. Empty and document the purse. Photograph the front, back, base, handles, lining, and hardware before you begin. Remove loose contents and detachable pieces, then note every weak seam, stain, and colour change so you can distinguish existing damage from anything that appears during cleaning.
2. Clean the interior without spreading debris. Open every pocket and use low suction to remove crumbs and dust, keeping the nozzle slightly above fragile lining. Brush seams and corners toward the opening, then wipe only with a method appropriate for the lining material; avoid soaking a fabric interior attached to leather panels.
3. Test and clean the exterior in small sections. Apply the leather-safe cleaner to a cloth or brush rather than pouring it directly onto the purse. Work gently from one panel to the next, paying attention to seams and corners, and stop immediately if colour transfers heavily, the surface becomes sticky, or the finish changes unevenly.
4. Reshape the bag while it dries. Fill the purse loosely with acid-free tissue or clean colourfast towels until the panels sit naturally without stretching the seams. Adjust the stuffing around corners and the base, then allow the bag to dry away from direct heat, strong sunlight, and radiators.
5. Condition gradually and check the result. Apply a very small amount of suitable conditioner with a clean cloth, spreading it thinly across one panel before moving on. Let the leather absorb the treatment, buff away excess, and repeat only if the surface still feels dry; too much conditioner can leave the bag greasy, dark, or overly soft.
The part I would watch most closely is the colour after conditioning. Some leather deepens naturally, but a sudden dark patch usually means too much product has collected in one place. Use several light applications rather than trying to restore years of dryness in a single afternoon.
A simpler variation focuses only on the interior, reshaping, and a light conditioning treatment. Leave scratches and edge wear visible when they are stable; a clean, supple purse with honest wear often looks better than one covered in a thick colour product.
Re-Dye a Stained or Severely Faded Leather Handbag
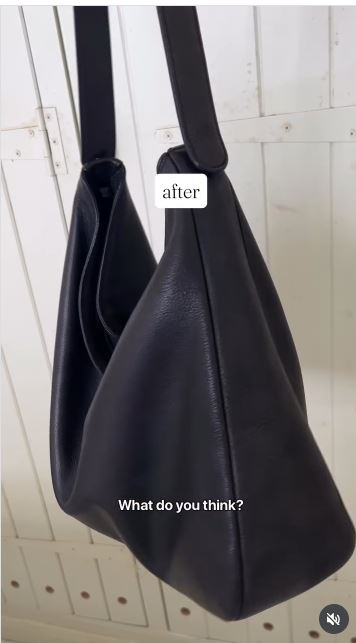
Re-dyeing is a much bigger commitment than conditioning because it changes the colour throughout the visible surface. It works most predictably when moving from a lighter or uneven shade to a darker colour and when the leather can absorb dye after its surface finish is prepared.
A dye cannot repair peeling synthetic coating, fill deep cracks, or make weak leather strong again. It may also colour stitching, edge paint, logos, and untreated hardware details, so the entire bag needs to be considered before the first coat.
Materials and Tools
· Leather purse that has passed a hidden-area test
· Cleaner and surface preparer suitable for the leather
· Leather dye selected for the material
· Protective finish compatible with the dye
· Gloves and protective apron
· Plastic sheeting or a non-porous work surface
· Small glass or disposable container
· Soft sponge, dauber, or lint-free applicator
· Fine brushes and cotton swabs for edges
· Clean cloths and tissue for stuffing the purse
· Low-tack tape for hardware only when safe
Recolour the Bag Carefully
1. Decide whether dye is appropriate. Test a hidden section with the cleaner and a tiny amount of dye, then let it dry completely. Confirm that the colour absorbs evenly, the leather stays flexible, and the original finish does not peel or become gummy; otherwise, stop and seek professional advice.
2. Prepare the bag and protect nearby details. Clean away dirt, oils, and old conditioner with a product suited to the leather, working gently around logos and painted edges. Remove detachable straps when possible, stuff the bag to hold its shape, and protect hardware without placing aggressive tape directly on a delicate finish.
3. Apply the first coat thinly and evenly. Load the applicator lightly and work in overlapping circular or crosswise motions across one complete panel. Keep the coat thin enough to see the grain, blend wet edges before they dry, and use a small brush around stitching and hardware rather than flooding those areas.
4. Build depth only after the colour has settled. Allow the first coat to dry according to the product instructions, then examine the purse in daylight. Add another light coat where the colour remains uneven, but avoid repeatedly rubbing half-dry dye because that can create streaks, lift earlier layers, or roughen the surface.
5. Seal, cure, and test for transfer. Apply a compatible protective finish in a thin, even layer once the dye is fully dry. After the complete system has cured, buff the surface with a white cloth and check the strap, corners, and back panel for colour transfer before carrying the purse against light clothing.
I would choose the darkest colour that works with the remaining stitching and edge finish rather than fighting to achieve a pale colour over stains. Moving dramatically lighter usually requires heavier coating, which can hide the grain and behave more like paint than dye.
For a lower-risk version, recolour only the scuffed corners, strap edges, or one damaged panel with a carefully matched repair colour. Keep the treatment local and blend outward gradually; do not coat the entire purse merely because one corner has faded.
Redesign Damaged Leather With Woven Strips or Lacing
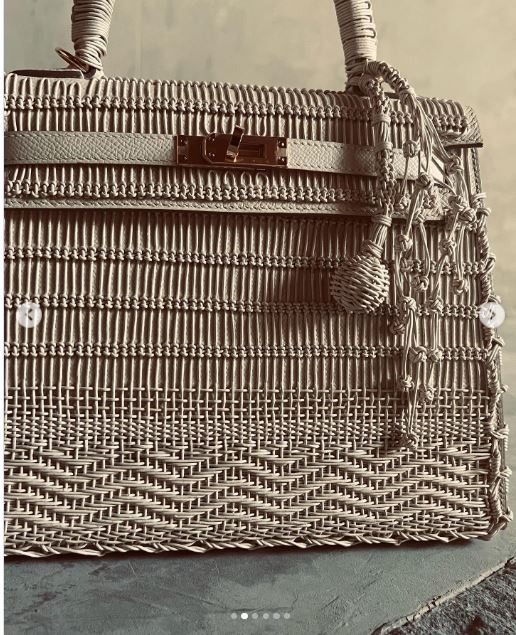
A woven redesign suits a purse whose surface damage cannot be solved by cleaning alone, especially when the main structure remains strong and there is enough usable leather for decorative strips. The woven layer can cover a worn front panel, rebuild a flap, or create a detachable feature made from leather offcuts.
This is the most advanced project here because cutting and punching weaken material permanently. It is better to weave a separate panel and attach it to the purse than to slice directly through a valuable or load-bearing bag wall.
Materials and Tools
· Structurally sound leather purse
· Leather offcuts from a damaged garment, strap, or unusable bag
· Cutting mat and metal ruler
· Sharp leather knife or rotary cutter
· Leather punch or stitching chisels
· Waxed thread or strong leather-lacing cord
· Leather needles
· Clips that do not pierce or crush the surface
· Paper or card for a full-size template
· Edge-smoothing tool or fine abrasive suited to leather
· Optional thin backing leather for a removable panel
Create a Woven Leather Feature
1. Choose a non-structural area and make a paper template. Place paper over the panel you want to cover and mark seams, hardware, folds, and the usable boundary. Reduce the template slightly so the woven feature will not interfere with the zipper, flap movement, or stress points around handles.
2. Prepare consistent leather strips. Cut the offcut leather into strips of equal width using a metal ruler and a sharp tool on a cutting mat. Keep the grain direction and thickness reasonably consistent, then smooth or seal raw edges if the leather sheds fibres or feels rough against clothing.
3. Weave the design away from the purse. Arrange the vertical strips on the template and interlace the horizontal pieces over and under them, checking the pattern after every few rows. Clip the edges temporarily and keep the tension even; pulling one strip too tightly can curve the whole panel.
4. Secure the woven panel to a backing. Place the completed weave on a thin leather or strong textile backing and stitch around the perimeter, catching each strip securely. Trim the edges only after the panel is stable, then add carefully spaced attachment holes outside the woven intersections.
5. Attach the feature without weakening the bag. Position the panel and hand-stitch it through existing seam allowances or another reinforced area when possible. Keep new holes away from handle anchors and stressed corners, protect the lining while sewing, and test the empty bag before adding normal contents.
For me, a smaller woven flap or front pocket is more convincing than covering every surface. The contrast lets the original purse remain visible and reduces the number of permanent holes made in the bag.
Beginners can recreate the texture as a removable bag charm, tassel, strap pad, or clipped-on front panel. Those versions use the same interlacing idea but keep scissors and punches away from the original purse.
Match the Upcycling Method to the Leather Finish
Uncoated or Lightly Finished Smooth Leather
This leather may respond well to gentle cleaning, conditioning, and carefully tested dye. Because it absorbs products, every application can darken the grain, so thin coats and hidden tests matter.
Heavily Coated or Corrected-Grain Leather
A surface coating may resist conditioner and dye or begin peeling when strong preparers are used. Painting may be possible with the correct system, but widespread peeling usually needs professional refinishing rather than a craft-layer cover-up.
Suede and Nubuck
These finishes need products designed for their raised fibres. Ordinary conditioner can flatten and darken the nap, while wet cleaning may create marks. Use a specialist brush and cleaner, and avoid the restoration and re-dye methods above unless a suede-specific system is confirmed.
Patent and Synthetic Leather
Patent leather has a glossy coating that can become sticky, cloudy, or cracked, and synthetic leather may peel from its backing. Conditioner cannot rebuild a separating surface. Small decorative panels or a removable cover may be safer than trying to strip and recolour the entire purse.
Leather-Purse Changes That Can Leave a Permanent Mark
Using One Cleaning Method on Every Bag
Vintage uncoated leather, modern coated leather, suede, patent leather, and synthetic materials need different care. Identify the surface and test first instead of copying a dramatic cleaning method from another type of purse.
Soaking a Bag Without Understanding Its Construction
Water can distort cardboard stiffeners, loosen adhesive, stain lining, and affect hardware. A method suitable for one unlined vintage bag may permanently damage another.
Applying Too Much Conditioner
Leather can become dark, greasy, overly soft, or unable to hold its shape. Use a thin layer, allow time for absorption, and add more only when the dry surface genuinely needs it.
Trying to Dye Over Dirt or Old Product
Dye settles unevenly where oils, polish, and conditioner remain. Clean and prepare the surface with a compatible method, then let it dry before judging whether it is ready.
Choosing a Lighter Colour Over Deep Stains
A pale finish may require opaque layers that hide the grain and still fail to cover every mark. A darker compatible colour or local decorative treatment usually gives a more even result.
Ignoring Stitching, Logos, and Edge Paint
Dye and preparer may change thread, remove printed details, or soften painted edges. Protect these areas where possible and include their final colour in the design plan.
Punching Holes Near Handle Attachments
New holes can create tear lines in already stressed leather. Keep decorative stitching and lacing away from handle bases, corners, hinges, and loaded seams.
Using Household Paint or Glue on Flexible Leather
Rigid coatings may crack when the purse bends, while unsuitable glue can soak through or leave hard ridges. Use materials intended for flexible leather and test the full layer system.
Treating Peeling Faux Leather Like Dry Real Leather
Peeling is usually a failure of the surface layer rather than a lack of moisture. Conditioner cannot reattach it, and rubbing may make the damage spread.
Changing a Valuable Bag Before Checking Its Worth
Painting, dyeing, cutting, and replacing original hardware can reduce collectable or resale value. Research the bag and consult a professional before making irreversible changes.
Frequently Asked Questions
How can I tell whether my purse is real leather?
Look for a material label, unfinished edges, natural grain variation, and a surface that does not peel like a thin film. None of these clues is perfect on its own, so ask a leather professional when the material is uncertain or the bag is valuable.
Can I clean every leather purse with saddle soap?
No. Saddle soap can be too strong or unsuitable for some modern finishes, coloured coatings, suede, and delicate leather. Test a hidden area and use a cleaner recommended for the specific surface.
Should I condition a purse before dyeing it?
Follow the dye-system instructions because excess conditioner may prevent even absorption. The leather may need cleaning and surface preparation first, with conditioning applied later as part of the chosen process.
Can a leather purse be dyed a lighter colour?
True dye is generally more predictable when moving darker. Going lighter often requires an opaque recolouring or paint system and careful preparation, so a professional result is harder to achieve at home.
How do I stop dye rubbing onto clothing?
Apply thin coats, allow each layer to dry fully, and use a compatible protective finish when required. Test the cured purse with a clean white cloth before carrying it against light fabric.
Can I paint over scratches and worn corners?
Small stable areas may accept a flexible leather repair colour or paint after proper preparation. Deep cracks, peeling coatings, and structural tears need repair rather than simply being covered.
What can I do with leather scraps removed during the makeover?
Use strong pieces for zipper pulls, tassels, strap keepers, woven charms, patch tests, or small reinforced tabs. Save at least one scrap for testing future cleaners and finishes that may be used on the completed purse.
Let the Leather Decide How Far the Makeover Should Go
Learning how to upcycle a leather purse begins with deciding whether the bag needs restoration, recolouring, or genuine reconstruction. Cleaning and reshaping preserve the original character, dye can solve permanent colour damage, and a separate woven panel can turn unusable offcuts into a deliberate feature.
The safest project is usually the least permanent one that solves the problem. Repair the strap before decorating the body, condition gradually before reaching for colour, and build a removable woven piece before punching holes into the purse itself.
A successful leather makeover should still feel like a bag rather than a craft sample. The handles need to remain comfortable, the closure must work, and the finish should tolerate normal movement without transferring colour or cracking.
Which purse would you begin with: the dry vintage bag that needs a careful clean, the stained handbag suited to a darker re-dye, or the damaged piece that could carry a small woven leather panel?