An old lampshade can look finished from across the room while hiding a surprisingly useful structure underneath. The outer fabric may be faded, stained, dented, or simply wrong for the room, yet the rings, spokes, lining, and fitting can still provide a sound base for a completely different surface.
The most important part of a lampshade makeover is not choosing the prettiest fabric or paint. It is checking how the shade manages heat, light, weight, and airflow. Heavy trim can pull a light frame out of shape, wet treatments can soften paper, and a dark painted interior may change the amount and colour of light the lamp gives off.
I don’t think every shade needs to be stripped to bare wire. A sturdy drum shade may only need a new fabric skin, while a damaged outer covering can justify rebuilding the surface from card or wallpaper. The right level of change depends on what remains strong.
The closely related projects below use an existing lampshade as the starting point. Each one keeps the useful structure, changes the visible finish, and includes detailed steps so you can plan before the glue, paint, or scissors make the decision permanent.
Inspect the Shade, Frame, and Fitting First
Unplug the lamp, remove the bulb, and take the shade off the fitting before cleaning or decorating it. Work on a large table where the shade can rest without being crushed. Photograph the top and bottom fittings so you can return everything to the same position later.
Check the lampshade for:
· A wire frame that is bent, loose, or badly rusted
· A fitting ring that no longer sits level on the lamp holder
· Paper or plastic lining that is cracked, scorched, or brittle
· Old adhesive that has become powdery or sticky
· Fabric pulling away from the top or bottom rings
· Decorative trim sitting too close to the bulb opening
· A shade that blocks vents or touches the bulb
· A surface that becomes soft when lightly dampened
· Enough space for the planned fabric, pleats, or trim
· A shape that remains balanced after the old covering is removed
Do not reuse a scorched, melted, brittle, or electrically damaged shade. Keep added fabric, paper, glue, fringe, and paint clear of the bulb and fittings, and follow the lamp and bulb manufacturer’s clearance instructions.
Clean a fabric shade gently with a soft brush or vacuum attachment held slightly away from the surface. Wipe metal frames with a dry cloth. Avoid soaking card-backed shades because hidden adhesive and paper layers can distort long before the outside looks wet.
Use a compatible low-heat bulb only when the lamp permits it, and never increase the bulb wattage after adding a new covering. The finished shade should sit level, remain open at the top and bottom as designed, and allow the bulb to stay well away from every new material.
Make a Small Material and Light Test
Hold fabric, wallpaper, or paint samples against the lit lamp from a safe distance before attaching anything. A colour that appears calm in daylight may become orange, muddy, or almost opaque when illuminated from behind. Patterns can also look much larger once they curve around the shade.
Test adhesive and paint on an offcut or hidden edge. Let the sample dry fully, then bend it gently and hold it near a lamp without touching the bulb. I know it is tempting to begin with the real shade, but a small test is much easier to forgive than a ring of visible glue around the front.
Rebuild an Old Frame With Wallpaper and a Scalloped Edge
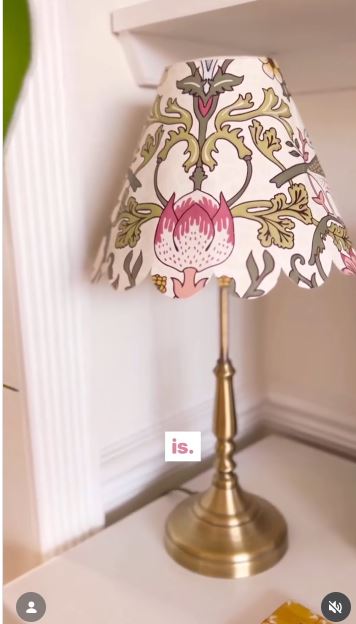
A shade with damaged or unattractive fabric can still provide the exact rings and supports needed for a new card covering. Patterned wallpaper works well because it gives a strong printed surface, while thin card underneath helps the scallops hold their shape.
This method changes more than the decoration. It rebuilds the outer shell, so the template, overlap, and connection to the frame must be planned carefully. Use only materials suitable for lampshade work and keep the new covering clear of the bulb and fitting.
Materials and Tools
· Sound lampshade frame
· Thin lampshade card or another suitable shade-making material
· Wallpaper sample or lightweight decorative paper
· Large sheet of plain paper for a template
· Pencil, ruler, and flexible tape measure
· Sharp craft knife or scissors
· Cutting mat
· Double-sided tape suited to the materials
· Clear adhesive used sparingly
· Clips or small pegs for holding edges
Build the Scalloped Shade
1. Strip the frame without changing its shape. Remove loose fabric, brittle lining, and old trim a little at a time. Keep any top or bottom binding until you understand how the original covering was attached, and stop if pulling the material begins to bend a ring or loosen a welded joint.
2. Create a full paper template. Wrap plain paper around the frame and mark the top edge, bottom edge, overlap, and positions where the supports meet the rings. Remove the paper, lay it flat, and check that it forms the correct curve before transferring it to card. Add a sensible overlap at the back rather than trying to make the two ends meet exactly.
3. Plan and cut the scallops. Draw a repeated scallop along the lower edge using a small card template so the curves remain consistent. Begin and end the pattern near the back seam, where a partial scallop will be less obvious. Cut slowly on a mat and smooth any sharp points that could tear the wallpaper.
4. Attach the wallpaper to the card. Apply double-sided tape or a thin, even layer of suitable adhesive, then lower the wallpaper gradually while smoothing from the centre outward. Keep the printed pattern straight relative to the top edge. Trim the excess after the bond is secure rather than trying to align two flexible layers perfectly in one movement.
5. Form the cylinder and secure it to the frame. Wrap the finished panel around the rings, close the back overlap, and clip it temporarily before gluing. Check that the scallops hang evenly and the fitting remains centred. Secure the top and bottom edges with appropriate lampshade tape or binding, then allow the shade to cure fully before returning it to the lamp.
For me, the scallop spacing matters more than making every curve identical. A steady rhythm around the lower edge will look intentional even if one curve is slightly fuller than the next.
A simpler version keeps a straight lower edge and uses wallpaper only as a new outer skin. You can also use a plain card base with a narrow wallpaper border when the full pattern feels too busy.
Cover a Drum Shade With Fabric and Add a Soft Ruffle

A drum shade gives you a straight, predictable surface for fabric. The main cover can hide stains or an unwanted colour, while a separate ruffle adds movement without changing the frame itself. The project works best when the base shade is firm and the new fabric is light enough not to sag.
Choose fabric that allows some light through and does not become overly dark when doubled at the seam. Very thick upholstery cloth, loose metallic threads, and heavy beadwork can add unnecessary weight and reduce the light too much.
Materials and Tools
· Firm drum lampshade in sound condition
· Lightweight cotton or similar fabric
· Extra fabric for the ruffle
· Fabric scissors and tape measure
· Iron and ironing surface
· Fabric-safe spray adhesive or suitable lampshade adhesive
· Hot glue used only in small controlled areas, if appropriate
· Piping, ribbon, or narrow trim
· Clips or pegs
· Plain paper for testing the wrap
Cover and Ruffle the Shade
1. Measure the shade and prepare a paper wrap. Measure the height and circumference of the drum, then make a paper rectangle with extra material at the top, bottom, and back seam. Wrap the paper around the shade to confirm that it lies smoothly. Mark the back so the fabric seam can face away from the main view.
2. Cut and press the main fabric panel. Place the fabric right side down and use the paper wrap as a guide. Keep the print level and add enough fabric to fold neatly over both rings. Press out creases before applying adhesive because every ridge becomes more visible once light passes through the finished shade.
3. Attach the fabric gradually. Work in a well-ventilated area if using spray adhesive and protect the table. Apply adhesive in manageable sections, roll the shade across the fabric, and smooth with clean hands from the centre toward the edges. At the back, fold under the raw edge and create one straight overlap instead of a thick double seam.
4. Make and position the ruffle. Cut a long strip, finish the visible lower edge by folding and pressing it, then create soft pleats or gathers along the upper edge. Pin or clip the ruffle around the shade first so you can adjust the fullness. Keep the gathering even and avoid adding so much fabric that the lower ring begins to look heavy or distorted.
5. Secure the trim and finish the rings. Attach the ruffle at the lower edge with small controlled dots of adhesive placed away from the visible front. Cover the attachment line with piping or ribbon, and finish the top edge in the same way if it improves the balance. Let every adhesive layer cure before fitting the shade back onto the lamp.
The part I would keep restrained is the ruffle depth. A short soft edge changes the silhouette, while a very deep ruffle can block light and make a small lamp look top-heavy.
Skip the ruffle for a cleaner beginner version, or add removable ribbon tied around the lower edge. A narrow fringe can work too, provided it remains well clear of the bulb and does not cover ventilation openings.
Warm Up a White Paper Lampshade With a Controlled Tea Stain

A stark white paper shade can feel cold beside older furniture or warmer wall colours. A light tea stain softens the surface without covering the paper grain, but the shade becomes vulnerable while damp. This project needs patience, very little liquid, and full support throughout drying.
Do not use the method on damaged, brittle, waxed, coated, or valuable paper shades. The result also cannot be predicted perfectly because paper, glue, and previous finishes absorb moisture differently. A replaceable inexpensive shade is the sensible place to experiment.
Materials and Tools
· Sound white or cream paper lampshade
· Tea bags and hot water
· Heatproof cup or bowl
· Soft wide brush
· Clean white cloth or paper towels
· Protective table covering
· Shade support or clean bowl that does not stretch the paper
· Optional paint for the separate metal stand or base
· Gloves if the tea may stain hands
Apply the Tea Stain Safely and Evenly
1. Test the paper and make a weak stain. Brew a light tea solution and allow it to cool completely. Brush a small amount onto a hidden area or a similar piece of paper, then let it dry. Judge the dried colour rather than the wet colour, because the surface often looks much darker before the moisture has evaporated.
2. Support the shade and remove the electrics. Take the paper shade off the lamp and place it on a clean support that holds its shape without pressing into the paper. Keep all electrical parts, bulb holders, and cords away from the work area. Cover the table because drips can mark both the shade and the surface beneath it.
3. Brush on one very light coat. Load the brush, remove most of the liquid on the side of the cup, and work in broad overlapping strokes. Do not scrub the paper or return repeatedly to a soft wet area. Rotate the shade instead of gripping the damp section, and blot a run immediately with the edge of a clean cloth.
4. Dry completely before deciding on another coat. Leave the shade supported in a dry, ventilated place away from direct heat. Do not use a hair dryer close to the paper because concentrated heat can warp the surface or soften adhesive. Once fully dry, inspect the colour in daylight and under the lamp before adding a second thin coat.
5. Reassemble and check the light. Return the dry shade to its fitting and confirm that the paper remains firm, smooth, and clear of the bulb. Use only the bulb type and rating intended for the fixture. Switch the lamp on briefly while supervised and check that no treated area smells unusual, sags, or moves toward the heat source.
I would stop one coat earlier than the colour you first imagine. A slightly uneven warm wash can look naturally aged, while repeated dark coats may make the lamp feel dull and reveal every brush mark.
A dry alternative is to use translucent craft paper, a removable inner liner, or a light wash made specifically for the shade material. Painting only the separate metal base can also warm the overall look without wetting the paper at all.
Paint a Checkerboard Pattern Inside a Plain Pendant Shade

Painting the inside of a shade creates a detail that appears gradually as you move around the room. A checkerboard pattern works well on a broad pendant because the alternating squares follow the curve and become visible beneath the rim. The exterior can remain simple or repeat one of the interior colours.
Use paint recommended for the shade material and apply thin coats. A painted interior will alter light output, so pale or mid-tone colours are easier to live with than a fully dark lining. Keep every painted layer away from the fitting and allow it to cure fully before use.
Materials and Tools
· Plain paper or paintable pendant lampshade
· Two compatible paint colours
· Small flat artist brushes
· Pencil and flexible ruler
· Paper strip for spacing marks
· Low-tack painter’s tape, if the surface tolerates it
· Dust cloth
· Protective work surface
· Clean stand or bowl to support the shade
Plan and Paint the Checkerboard
1. Clean the shade and test the paint. Remove dust with a soft dry cloth and inspect the surface for waxy or glossy areas that may resist paint. Apply a small sample near the back or on a matching offcut. Let it dry, then check adhesion by brushing it lightly with a clean fingertip rather than scratching it with a tool.
2. Create even vertical divisions. Measure the inner circumference and choose a number of columns that can repeat evenly around the shade. Make a paper spacing strip, transfer the marks to the top and bottom edges, and connect them with light pencil lines. On a tapered shade, allow the columns to widen gradually toward the bottom.
3. Mark the horizontal rows. Measure from the top rim to the lower edge and divide the height into balanced rows. Use a flexible ruler or paper guide to keep the marks level. Number or lightly dot alternating squares before painting so the pattern does not shift halfway around the curve.
4. Paint the interior in thin passes. Support the shade so both hands remain free, then fill every other square with a small flat brush. Work away from completed areas to avoid resting your hand in wet paint. Apply a second thin coat only after the first has dried, and keep paint off the fitting ring and seam adhesive.
5. Finish the exterior and inspect the glow. Paint the outside in one compatible colour if desired, using light coats that do not soak the shade. After full curing, fit the shade and view it with the lamp on and off. Touch up only obvious gaps; tiny variations usually disappear once the pattern curves around the light.
What matters here is the repeated spacing, not ruler-perfect corners. A consistent rhythm will read as a checkerboard from across the room even when the curved surface makes a few squares slightly different.
Stripes, wide arches, simple flowers, or a painted border are easier alternatives. You can also leave the outside untouched and place the full pattern inside for a quieter daytime appearance.
Choose the Makeover That Suits the Shade You Already Have
A Bare or Stripped Wire Frame
Rebuild the surface with proper lampshade card, fabric, or another suitable shade-making material. A frame without a stable lining is not ready for random paper, loose fabric, or decorative items simply wrapped around the wires.
A Firm Drum Shade
Use it for a fabric wrap, ruffle, ribbon, or carefully planned trim. The straight sides make measuring easier and reduce the distortion that can occur on a tapered shade.
A Lightweight Paper Pendant
Choose a very light paint or stain treatment and support the paper throughout the process. Avoid heavy fabric, thick glue, or decorations that can pull the shade out of shape.
A Shade With a Good Surface but Dated Colour
Painting, a removable fabric sleeve, or a narrow border may be enough. There is no need to strip a sound lining when a lighter, less destructive update solves the problem.
Lampshade Upcycles That Need More Than a Pretty Finish
Ignoring Scorching or Brittle Lining
A scorched or brittle shade has already been affected by heat or age. Decorating over it hides the warning without restoring the structure, so replace the shade or have the fitting assessed.
Adding Material Too Close to the Bulb
Fringe, loose fabric, paper, and glue must remain clear of the bulb and ventilation path. Keep the original openings unobstructed and follow the fixture’s required clearances.
Using Too Much Wet Adhesive
Heavy adhesive can soak through fabric, wrinkle paper, and create visible dark patches when the light is switched on. Apply the thinnest effective layer and test it first.
Forgetting That Dark Colours Reduce Light
A deep painted lining or dense fabric may turn a useful reading lamp into a decorative glow. Test the material with the lamp before covering the whole shade.
Making a Tapered Template as a Rectangle
A tapered shade requires a curved pattern. A straight rectangle will twist, wrinkle, or pull the seam out of line as it wraps around the frame.
Hiding the Back Seam in the Wrong Place
The overlap should face a wall or the least visible side. Mark the lamp’s usual position before gluing, especially when the shade or base has a clear front.
Loading the Lower Ring With Heavy Trim
Long fringe, beads, and thick ruffles can distort a lightweight frame. Use restrained decoration and support the attachment line evenly around the circumference.
Reassembling Before Paint or Glue Cures
A surface that feels dry may still contain moisture or solvent. Allow full curing in a ventilated space before returning the shade to electrical fittings or switching the lamp on.
Changing the Bulb to Compensate for a Dark Shade
Do not increase wattage to recover lost brightness. Use only the bulb type and rating permitted by the lamp, or choose a lighter shade treatment instead.
Frequently Asked Questions
Can I cover any lampshade with fabric?
No. The shade should have a sound frame and lining, and the fabric must not interfere with the fitting, ventilation, or bulb clearance. Very damaged, scorched, or brittle shades should be replaced rather than covered.
What fabric works best for a lampshade makeover?
Lightweight, tightly woven fabric is easier to smooth and usually allows more light through than upholstery cloth. Test the colour and pattern with the lamp before attaching it permanently.
Can I use ordinary wallpaper on a lampshade?
Wallpaper can decorate a suitable lampshade-card structure, but it should not be wrapped loosely around a bare frame or placed close to the bulb. Use materials and adhesives appropriate for lampshade construction.
Is hot glue safe for lampshade projects?
Use it sparingly and only where it remains well away from heat and electrical parts. A glue intended for the shade material may create a flatter, cleaner bond on larger areas.
Can I paint the inside of a lampshade?
Yes, when the shade material accepts paint and the coating remains clear of the fitting and bulb. Thin coats are better than heavy layers, and the colour will change the amount and tone of light.
How do I keep fabric from wrinkling around a tapered shade?
Create a curved paper template from the actual shade instead of cutting a rectangle. Roll the shade across the fabric while smoothing gradually, and keep the back seam aligned.
What should I do if the finished shade looks too dark?
Do not fit a higher-wattage bulb. Remove or lighten the covering if possible, use the lamp for ambient rather than task lighting, or replace the shade with a more translucent version.
Keep the Frame, Change Only What the Light Can Carry
Learning how to upcycle a lampshade begins with separating the useful structure from the tired finish. A sound frame can support a new scalloped shell, a firm drum can take a fabric cover, and a plain paper shade may need only a controlled wash or painted pattern.
The new surface still has to behave like a lampshade. It must remain stable, stay clear of the bulb, preserve the openings, and produce light that works in the room. That practical check matters more than adding one extra row of trim.
Begin with the least destructive method that suits the shade. Test the material, make a paper template, and view the sample with the lamp on before attaching anything permanently. Then you can build the design slowly instead of trying to correct heat, fit, or light problems after the makeover is finished.
Which old shade would you start with: a stripped frame ready for wallpaper, a plain drum suited to fabric, a white paper pendant, or a paintable shade waiting for a pattern inside?