Old high heels tend to disappear into the darkest part of a wardrobe for very specific reasons. The colour no longer works, the surface has become scuffed, a strap looks dated, or the pair simply feels too plain for the occasions when heels still make sense.
That does not always mean the shoes have reached the end of their useful life. A sound pair can be repainted, covered with crystals, softened with lace, finished with pearls, or rebuilt as a more theatrical statement shoe. The original shape is already there, which saves you from constructing footwear from the beginning.
I don’t think every heel makeover needs to become a head-to-toe glitter project. Sometimes the most useful change is a painted heel, a coloured sole, one embellished strap, or a carefully placed bow that covers an area you no longer like.
The first decision should not be about decoration, though. Check whether the shoes are still stable enough to wear. Loose heel tips, separating soles, cracked straps, damaged insoles, and unstable heel attachments need proper repair before any paint, pearls, or rhinestones are added.
Check Whether the Heels Are Safe to Upcycle
A decorative makeover can hide scuffs and outdated colour, but it cannot make an unsafe shoe structurally reliable.
Place both shoes on a level floor and inspect them from the front, side, and back. The heels should sit at the same angle without leaning unexpectedly. Press gently around the heel attachment, sole edge, straps, and upper to find movement that should not be there.
Look closely for:
- Loose or missing heel tips
- Separation between the sole and upper
- Cracked ankle straps
- Flaking synthetic material
- Deep splits near the toe
- Damaged buckles
- Weak stitching
- Exposed sharp hardware
- Uneven heel alignment
- A collapsed or uncomfortable insole
- Crumbling foam or lining
- Warping caused by heat or moisture
A cobbler may be able to replace heel tips, secure loose soles, repair straps, and reinforce stitching. Complete those repairs first. Adding decorations over a loose seam only makes the later repair more awkward.
Some pairs are better suited to display than wear. A heel with sentimental value but serious structural damage could become framed wall décor, a jewellery display, or part of a costume arrangement rather than footwear.
Match the Materials to the Shoe Surface
High heels can include leather, coated synthetic material, satin, suede, velvet, mesh, plastic, rubber, and several materials in one pair. Each surface reacts differently to paint and adhesive.
Smooth leather usually carries a protective factory coating. Before painting, that finish may need to be removed with a leather-preparation product so flexible acrylic leather paint can grip the surface. Angelus advises preparing the shoe before painting, using thin paint layers, and adding a compatible finish only after the colour work is complete.
Satin and fabric-covered heels need a lighter hand. Too much wet paint or adhesive can travel through the fibres and leave a dark ring. Test every product beneath the arch, inside a strap, or on another hidden section.
Suede requires particular care because ordinary paint can flatten its raised texture. Dye or a product intended for suede may be a better choice than coating it with standard acrylic.
Plastic and heavily coated synthetic surfaces can resist both paint and glue. A hidden adhesion test is essential. Apply the full preparation, colour, and finishing system to a small area, then let it settle before gently bending or rubbing the surface.
Prepare the High Heels Properly
Remove detachable straps, bows, clips, or ornaments when possible. Clean around seams and hardware where dust tends to collect.
Preparation may include:
- Removing surface dust with a soft brush
- Cleaning the upper with a material-appropriate product
- Wiping the sole edges
- Removing old loose glue
- Securing lifted insoles
- Replacing worn heel tips
- Preparing smooth leather
- Testing coated synthetic material
- Masking buckles and sole edges
- Filling the toe with clean paper
- Sketching the design on a photograph
- Arranging embellishments before gluing
- Protecting the worktable
- Wearing gloves
- Working in a ventilated space
Do not sand every shoe automatically. Sanding may help prepare certain smooth surfaces, but it can damage satin, thin synthetic coatings, suede, patent finishes, and decorative fabric.
Stuff the toes firmly enough to support the surface without stretching the shoe. This makes painting and embellishment easier, especially around curved toe boxes.
Gather the Basic Tools
- Sound pair of high heels
- Soft cleaning cloth
- Material-appropriate cleaner
- Leather preparer when required
- Flexible acrylic shoe paint
- Fine detail brush
- Small flat brush
- Cosmetic sponge
- Mixing palette
- Low-tack masking tape
- Removable pencil or chalk
- Clear flexible shoe adhesive
- Flat-back rhinestones
- Pearls or lightweight beads
- Tweezers or wax pickup tool
- Lace or fabric scraps
- Small sharp scissors
- Ribbon
- Decorative shoe clips
- Protective gloves
- Clean paper for stuffing
- Compatible finishing product
- Scrap material for testing
Keep the palette small until you know how the original surface responds. Buying six shades will not help if the first coat refuses to adhere.
Add Pearls and Crystals to Plain High Heels
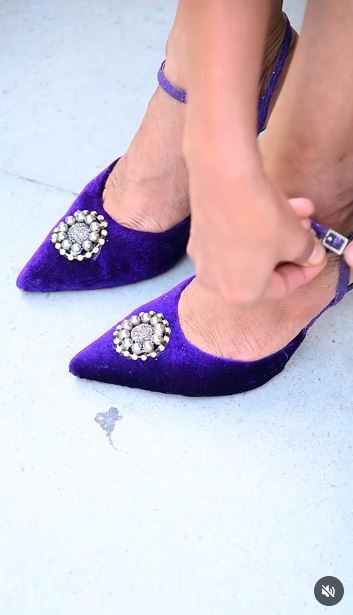
Pearls and clear crystals can update an old pair without requiring a full repaint. They are particularly useful around straps, toe edges, heel counters, and small areas where the original surface has become marked.
The makeover uses glue, pearls, and crystals to turn an unwanted pair into a more decorative shoe. The most practical part is the planned placement. Attaching the larger pieces first gives the smaller crystals a clear job: filling gaps rather than covering the shoe randomly.
Keep embellishments away from areas that rub directly against the foot. A pearl sitting beneath an ankle strap may look harmless on the table and become very noticeable after five minutes of wear.
Materials and Tools
- Clean high heels
- Flat-back pearls
- Flat-back crystals
- Clear flexible shoe adhesive
- Tweezers or pickup tool
- Small applicator
- Removable pencil
- Masking tape
- Protective gloves
- Scrap material for testing
Arrange the Embellishments
- Choose the decorated zones. Put the shoes side by side and decide whether the pearls will follow a strap, frame the toe, or form a cluster near the heel counter. Mark only the main boundaries rather than drawing every individual position.
- Test the adhesive system. Attach a spare pearl and crystal to a hidden section or similar scrap material. Check whether the glue remains clear, flexible, and secure on the specific shoe surface.
- Place the largest pearls first. Work in short sections and maintain enough space for smaller crystals. Press each piece gently without flooding its edges with adhesive.
- Fill the narrow gaps. Use smaller pearls or crystals to connect the main arrangement. Then turn the shoe at different angles to find accidental empty patches or areas that have become too crowded.
- Check the finished pair before wearing. Allow the adhesive to settle fully according to its instructions. Rub the surface gently with a soft cloth and remove or reinforce anything that moves.
I know it can feel tempting to use every pearl in the packet, especially when only seven are left. The shoe does not need to solve your storage problem.
A quieter version can use one pearl cluster on each toe or a narrow crystal line along the heel. Decorative shoe clips offer a removable option for heels that you may want to return to their original appearance.
Cover Evening Heels With Rhinestones
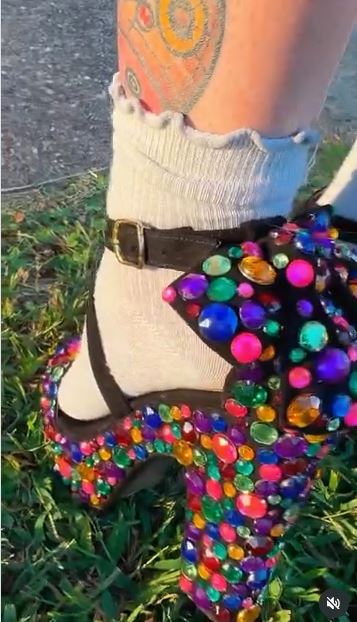
A full rhinestone surface creates more impact than a small pearl cluster, but it also adds weight and stiffness. This method suits heels reserved for occasional wear better than an everyday pair that bends, rubs, and travels in a crowded bag.
The reel focuses on shoes that have been completely stoned for a reflective finish. The arrangement appears continuous, but small variations in crystal size help close awkward spaces around curves.
Flat-back rhinestones are easier to position than beads with rounded backs. Angelus recommends planning the pattern before applying adhesive and working in sections so the glue does not dry before each piece is placed.
Materials and Tools
- Clean evening heels
- Flat-back rhinestones in compatible sizes
- Clear flexible adhesive
- Tweezers or wax pickup tool
- Small adhesive applicator
- Shallow sorting tray
- Removable marker
- Protective gloves
- Soft cloth
Build the Crystal Surface
- Plan the starting line. Decide whether to begin along a seam, the toe edge, or the base of the heel. A clear first row helps the later rows remain controlled.
- Sort the crystals by size. Keep the main size in one area and smaller fillers in another. Arrange a short sample without glue to see how the pieces sit around the shoe’s curve.
- Work in small adhesive sections. Spread only enough glue for a manageable row or cluster. Place the stones one at a time and press them gently without allowing adhesive to climb over their reflective faces.
- Adjust around seams and bends. Use smaller crystals near narrow straps, panel edges, and the heel base. Leave a little flexibility around severe crease areas instead of forcing a rigid sheet across them.
- Test every section after curing. Run a soft cloth over the stones and check for movement. Reinforce loose pieces before the shoes are worn outside.
The edges matter more than the centre here. A neat border makes the whole surface feel deliberate, even when the rows inside are slightly irregular.
You can cover only the heel shaft, toe panel, or ankle strap for a lighter version. Black, champagne, iridescent, or mixed neutral crystals can create a less bridal finish.
Give Black Heels a Painted Red Sole
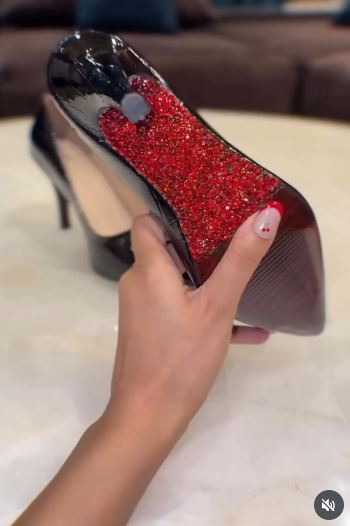
Painting the underside changes the appearance of a black heel without affecting the main upper. The colour appears while walking, crossing the legs, or lifting the foot, which makes it a useful option for someone who prefers a restrained front view.
The reel turns old black heels into a red-bottom style by building a pale base before adding red. That pale undercoat matters when a bright colour needs to show over a dark sole.
This is a decorative treatment, not a method for repainting the part of the sole that bears constant ground contact. Keep paint away from the main traction area unless the chosen system is specifically intended for outsole wear.
Materials and Tools
- Sound black high heels
- Sole cleaner
- Fine abrasive only when appropriate
- Masking tape
- Pale flexible base colour
- Red flexible shoe paint
- Small flat brush
- Detail brush
- Compatible protective finish
Paint the Visible Underside
- Identify the decorative area. Mark the section of the underside that remains visible but does not carry the main walking pressure. Clean it thoroughly and complete any material-specific preparation.
- Mask the upper and sole edges. Protect the black shoe, heel tip, and traction areas. Follow the curved boundary slowly so the red section looks balanced on both shoes.
- Apply a pale foundation. Build a thin white or light-coloured base where the red needs help covering the dark material. Keep the layer smooth and away from the floor-contact zone.
- Add the red colour. Apply several light coats rather than one thick layer. Then use a detail brush to refine the edge without widening the painted area unnecessarily.
- Finish and inspect the soles. Use a compatible protective product only where recommended. Place the shoes side by side and check that the red boundaries sit at the same height.
I’d keep the line simple rather than chasing every tiny curve around the bottom. Symmetry matters more than squeezing colour into a narrow section nobody will see.
The same approach can use cobalt blue, metallic gold, violet, or a colour matched to a dress or event. Painting only the heel underside offers an even smaller version.
Soften Old Heels With Lace and Pearls
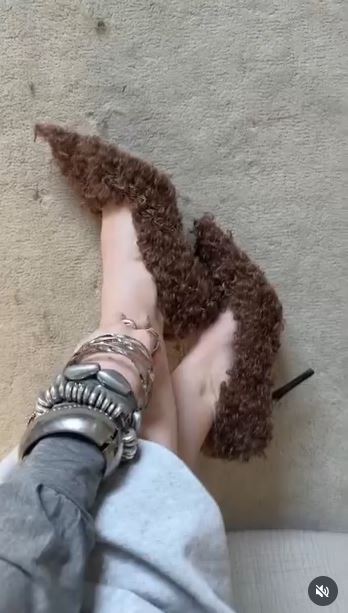
Lace can disguise a marked upper without creating the hard surface of a full rhinestone finish. Its open pattern also lets some of the original shoe colour show through, which can help the fabric feel connected to the base.
The reel combines lace and pearls in a custom high-heel transformation. The materials suit occasion shoes, costume heels, bridal footwear, or a pair that will be worn carefully rather than exposed to wet streets.
Choose lightweight lace with a stable edge. Delicate fabric that frays as soon as it is cut will become frustrating around buckles and curved toe panels.
Materials and Tools
- Clean high heels
- Lightweight lace
- Small sharp scissors
- Flexible clear adhesive
- Flat-back pearls
- Tweezers
- Paper for templates
- Removable fabric marker
- Small brush
- Decorative ribbon, if desired
Fit the Lace to the Shoes
- Create paper templates first. Cover the selected shoe panels with thin paper and mark their edges. Cut and adjust the templates until they sit smoothly without crossing important seams or moving parts.
- Transfer the shapes to the lace. Position the templates so the lace pattern looks balanced across both shoes. Cut carefully and leave a small margin where the fabric may need final adjustment.
- Attach the lace in sections. Apply a thin, even layer of compatible adhesive to one panel. Smooth the lace from the centre towards the edges without stretching its open pattern.
- Refine the borders and add pearls. Trim loose threads and secure lifted edges with a small brush. Then place a few pearls at joins, strap ends, or selected flower centres rather than scattering them everywhere.
- Check comfort and movement. Make sure the lace does not interfere with buckles, rub the foot, or restrict a flexible strap. Let the adhesive settle completely before trying the heels on.
One detail I wouldn’t ignore is the inside edge. Lace that looks neat outside can still feel scratchy against bare skin, and the foot will notice before anyone else does.
Black lace over nude heels creates stronger contrast, while lace close to the shoe colour produces a quieter surface. A removable lace bow or shoe clip is easier for a first attempt.
Rebuild Thrifted Platform Heels With Vinyl, Rhinestones, and Lights
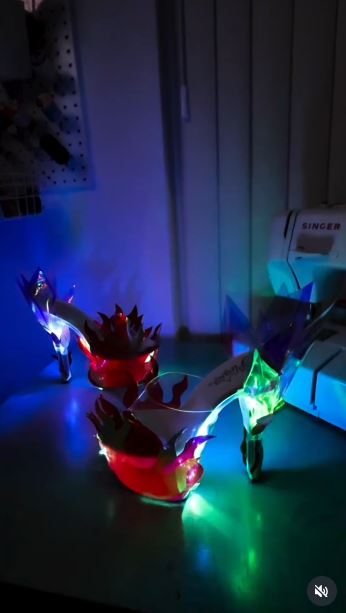
Platform performance heels provide more surface area than ordinary pumps, which makes them suitable for an elaborate makeover. The thick platform can hold lettering, reflective material, crystals, and decorative lighting without crowding the upper straps.
The reel starts with thrifted Pleaser-style heels and experiments with vinyl, rhinestones, and LED lights to produce a themed statement pair.
This is an advanced project. Lighting components must not create sharp edges, affect the shoe’s balance, interfere with straps, or sit where they can be crushed while walking.
Materials and Tools
- Structurally sound platform heels
- Flexible vinyl
- Cutting mat
- Craft knife or precision scissors
- Rhinestones
- Flexible clear adhesive
- Small battery-powered LED components
- Insulated low-voltage wiring
- Masking tape
- Paper templates
- Tweezers
- Protective gloves
Build the Statement Design
- Inspect the platforms carefully. Check the heel attachment, sole, straps, and balance before adding anything. Plan a display-only version when the shoes are not completely stable.
- Create templates for the vinyl. Use paper to map the platform sides and any lettering. Cut the vinyl slightly oversize at first, then refine it before applying adhesive or permanent backing.
- Attach the largest visual elements. Apply the vinyl smoothly and keep seams away from high-friction edges. Add lettering or broad shapes before placing small crystals.
- Add rhinestones and lighting carefully. Keep all components lightweight and avoid moving joints, foot-contact areas, and ground-facing surfaces. Secure the battery pack where it cannot rub the wearer or change the shoe’s balance.
- Test the completed pair safely. Examine every edge, wire, stone, and attachment before switching on the lights. Try the shoes only on a clean, level indoor surface and stop using them if any component affects stability.
For me, the advanced part is not making the shoe dramatic. The challenge is knowing when the decoration has started interfering with the footwear.
A simpler version can use reflective vinyl and rhinestones without electrical components. The same look could also be created on a display pair intended for photography, costume styling, or shelf décor.
Common Mistakes to Avoid
Decorating Heels That Are Structurally Unsafe
A loose heel, separated sole, or broken strap needs proper repair. Decorations can hide damage and make it harder to inspect later.
Using the Same Preparation on Every Material
Leather, satin, suede, vinyl, and plastic need different treatment. Test the complete system on a concealed area before preparing the whole shoe.
Applying Paint Too Thickly
Heavy paint may form ridges and crack when the upper flexes. Several controlled layers are safer than one heavy coat.
Placing Hard Embellishments Against the Foot
Crystals and pearls can rub through thin straps or sit against bare skin. Check the inside of the shoe as carefully as the outside.
Choosing an Adhesive Only Because It Dries Quickly
Fast-setting glue is not automatically flexible or suitable for footwear. Match the adhesive to both the shoe surface and the embellishment.
Gluing Before Arranging the Design
Lay out the main pearls, crystals, lace, or vinyl before attaching them. The first arrangement rarely becomes the final one, and that is much easier to accept before the glue is involved.
Covering Buckles and Moving Straps
Keep decorations away from buckle holes, stretch sections, hinges, and adjustable closures. The shoe still needs to function after the makeover.
Painting Ground-Contact Surfaces
Ordinary decorative paint may wear away quickly on the main outsole and can affect traction. Keep colour on visible, non-traction sections unless the product is designed for outsole use.
Adding Too Much Weight
Full rhinestone coverage, large bows, metal pieces, and electrical components all add weight. Keep the pair balanced and appropriate for its intended use.
Wearing the Heels Before Everything Has Settled
Paint and glue may feel dry before reaching their working strength. Follow the instructions for every product rather than relying on one general drying time.
Assuming a Protective Finish Will Fix Poor Preparation
A topcoat cannot repair oil beneath the paint, weak glue, loose lace, or an unstable shoe. The final finish only works when the layers underneath are sound.
Frequently Asked Questions
Can any pair of high heels be upcycled?
Most sound heels can be updated in some way, but the method depends on their material and condition. Shoes with structural damage should be repaired professionally or reused as display objects.
What paint should I use on leather high heels?
Use flexible acrylic paint intended for leather or footwear. Prepare the leather according to the paint manufacturer’s instructions so the colour can adhere properly.
Can I use ordinary craft paint?
General craft paint may become rigid or peel from flexible, coated surfaces. A product designed for the shoe material is a more reliable choice.
Do I need to sand high heels before painting?
Not always. Sanding may suit certain smooth surfaces, but it can damage satin, suede, patent material, thin coatings, and fabric-covered shoes.
What type of glue works for rhinestones?
Use a clear, flexible adhesive that is compatible with the shoe surface and the rhinestone backing. Test it first and avoid placing glue where it may touch the foot.
How can I make both heels look alike?
Repeat the main colour, pattern direction, and largest embellishments rather than copying every tiny detail. Work with both shoes side by side throughout the project.
Can I cover heels with fabric?
Yes, provided the fabric remains lightweight and the adhesive suits both materials. Make paper templates first and keep fabric away from buckles, moving straps, and ground-contact areas.
Can upcycled heels still be worn regularly?
That depends on the shoe condition and decoration. Light paint or small details may tolerate more use than heavy rhinestones, lace, large bows, or electrical additions.
How should embellished heels be cleaned?
Use a soft cloth or brush and avoid soaking the shoes. Strong scrubbing, heat, and harsh cleaners may loosen decorations or damage painted sections.
What can I do with heels that are no longer safe to wear?
They can become framed décor, photo props, jewellery holders, costume displays, or decorative objects. Remove sharp hardware and make sure the shoe is stable wherever it is displayed.
Let the Original Shape Lead the Makeover
Learning how to upcycle high heels starts with recognising what the pair still does well.
A comfortable black pump may only need a coloured sole. Scuffed occasion heels can take on a soft gold finish, while a plain pair may suit pearls, lace, or a narrow crystal border. More theatrical platforms offer space for vinyl, lettering, and reflective details, but they also need much more careful safety testing.
Begin with one manageable area. Clean the shoes, repair anything unstable, and test the paint or adhesive beneath the arch. Then place the pair side by side and decide whether the original colour should disappear or remain part of the finished design.
Which forgotten pair would you work on first: scuffed gold heels, plain black pumps, old bridal shoes, or platforms waiting for a much louder second act?