A chest of drawers can look far more tired than it actually is. Scratched paint, stiff runners, faded varnish, dated handles, or one damaged drawer front may make the entire piece feel unsuitable for the room, even when the main structure remains solid and useful.
I’m Stella Eve Louise, and storage furniture is one of my favourite things to reconsider because so much of the hard work has already been done. The cabinet exists, the drawers fit, and the proportions may suit the available wall better than anything currently sold in a shop.
The finish should follow the furniture rather than hiding every original feature automatically. A plain modern dresser can carry wallpaper or geometric paint, while an older wooden chest may look better with restrained colour, repaired wood, and simpler hardware. Decoupage can make a large piece feel playful, and lining the drawers adds interest without changing the outside dramatically.
I don’t think every chest needs to become a bold statement piece. Sometimes a clean white finish and smoother drawers are enough. What matters is making the furniture safe, practical, and suitable for the room you actually have.
Inspect the Drawers and Plan the Finish
Remove every drawer and place it near its original opening. Number the drawers discreetly with removable tape because older handmade furniture may not accept each drawer equally well in every position.
Check the full structure for:
- Loose joints
- Split drawer sides or bottoms
- Missing runners or stops
- Wobbly feet
- Damaged veneer
- Swollen edges
- Rusty screws
- Sticking drawers
- Peeling paint
- Woodworm holes or active damage
- Unstable handles
- A cabinet that leans when drawers open
Repair structural problems before painting. A decorative finish cannot correct a loose frame or drawer bottom that drops under weight.
A chest of drawers can tip when several drawers are opened or when someone climbs on it. The U.S. Consumer Product Safety Commission recommends anchoring furniture with drawers securely to the wall using suitable anti-tip hardware.
Treat old or unidentified paint carefully. Sanding, scraping, and heating lead-based coatings can release hazardous dust, so determine whether lead may be present and use appropriate lead-safe practices before disturbing an uncertain finish.
Clean the cabinet, drawer fronts, edges, handles, and inner frame before choosing a preparation method. Identify whether the piece is solid wood, veneer, laminate, particleboard, metal, or a combination. Each material may need different repair products, primer, adhesive, and paint.
General furniture-painting guidance recommends removing hardware, cleaning away dirt and grime, smoothing rough areas, removing loose coating, and following the selected product’s instructions for priming and recoating.
Useful Materials and Tools
- Screwdrivers
- Labelled containers for hardware
- Mild cleaner or suitable degreaser
- Clean cloths
- Sandpaper or sanding sponge
- Wood filler
- Filling knife
- Wood glue and clamps
- Material-appropriate primer
- Furniture paint
- Small brush and fine roller
- Painter’s tape
- Wallpaper or decorative paper
- Wallpaper paste or decoupage medium
- Craft knife and cutting mat
- Stencil or pattern template
- Replacement knobs or handles
- Drawer liner
- Protective topcoat when required
- Anti-tip furniture straps
- Gloves, eye protection, and suitable dust protection
Work in a ventilated area and protect the floor. Keep tools, paint, solvents, loose screws, and removed hardware away from children and pets.
Create a Layered Blue Chest With Painted Artwork
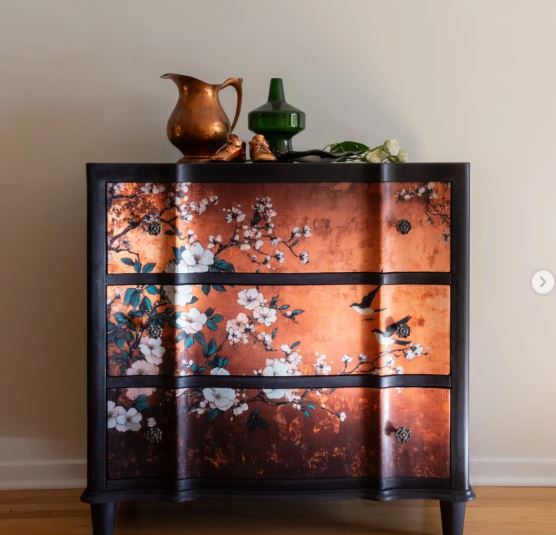
This four-drawer chest uses layered blue colour, a central stag motif, and a contrasting marble-style top. The design treats the drawer fronts as one continuous canvas rather than four unrelated rectangles.
The artwork works because it crosses the drawer divisions while the overall composition remains readable when the drawers are closed. That approach requires accurate alignment, especially around the spaces between drawer fronts.
Materials and Tools
- Sound chest of drawers
- Cleaner and sanding materials
- Suitable primer
- Several related blue paint shades
- Small artist brushes
- Fine furniture brush or roller
- Stag stencil or transferred outline
- Chalk or removable pencil
- Painter’s tape
- Topcoat suited to the chosen paint
- Replacement hardware, if needed
Build the Layered Finish in Five Steps
- Prepare and align the drawer fronts. Repair the cabinet and make sure each drawer closes in its correct opening. Lay the fronts together in order or keep them installed while lightly marking where the artwork should cross from one drawer to another.
- Create the blue background. Apply the required primer, then build the main colour with thin coats. Add lighter and darker blue sections gradually rather than mixing every shade across the whole surface at once.
- Transfer the central design. Position the stencil or drawing while the drawers remain properly aligned. Mark the important outlines across all fronts, then separate the drawers only after the placement is clear.
- Paint the detail in stages. Complete the largest shapes first and add smaller lines afterward. Return the drawers to the frame periodically so you can check whether the design still connects across the gaps.
- Protect and reassemble the piece. Apply a compatible protective finish when the paint system requires one. Refit the hardware, test every drawer, and install anti-tip straps once the chest reaches its final position.
For me, the artwork should remain strong from across the room. Very small details may disappear once handles and drawer gaps interrupt them.
A beginner could replace the animal design with a large leaf, circle, sunrise, or simple colour-block pattern. Using only two blue shades would also make the finish easier to control.
Add Botanical Decoupage to a Mint-Green Chest
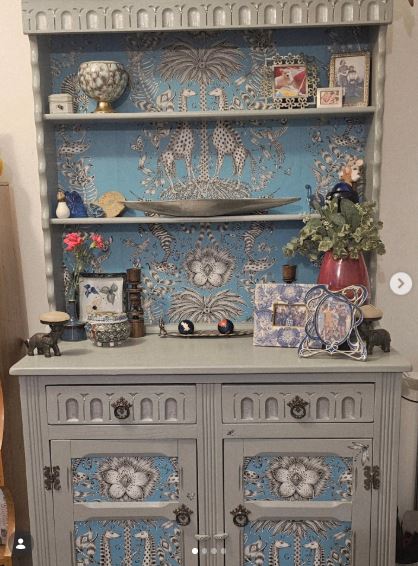
A textured mint-green finish, rustic stripes, and botanical decoupage give this handmade chest a layered appearance. The floral paper adds movement, while the quieter painted frame prevents the design from overwhelming the furniture.
Decoupage works especially well on flat drawer fronts, but the paper needs careful trimming around handles and edges. A poorly sealed corner may catch each time the drawer is opened.
Materials and Tools
- Chest of drawers with flat fronts
- Cleaner
- Sanding sponge
- Repair filler
- Primer
- Mint or muted green furniture paint
- Botanical decoupage paper
- Decoupage medium or suitable wallpaper paste
- Soft application brush
- Brayer or clean smoothing tool
- Craft knife
- Ruler and cutting mat
- Protective finish compatible with the paper
- Handles or knobs
Apply the Botanical Design in Five Steps
- Repair and paint the frame. Remove the drawers and handles, clean the cabinet, and correct dents or loose veneer. Paint the outer frame and any drawer areas that will remain visible around the paper.
- Plan the paper placement. Lay the drawer fronts in their correct order and decide whether the botanical design will continue across them or repeat individually. Mark each paper section on the back before cutting.
- Attach one panel at a time. Apply the adhesive evenly and position the paper from one edge, smoothing it gradually. Avoid rubbing aggressively because wet decorative paper can stretch or tear.
- Trim and seal the edges. Use a sharp blade after the adhesive has settled enough for clean cutting. Pay particular attention to the upper and side edges where fingers repeatedly contact the drawers.
- Add the remaining painted details. Introduce narrow stripes or distressed areas only after the botanical layout feels balanced. Refit the hardware through carefully opened holes rather than pushing screws directly through the paper.
The first paper position rarely ends up being the final one. I’d arrange every drawer front together before attaching anything, then check whether important flowers are about to disappear beneath handles.
A smaller botanical panel can be placed only on the top drawer. Fabric, maps, wrapping paper, book pages, or a copied family recipe may also work when the material and adhesive are suitable.
Cover Plain Drawer Fronts With Textured Wallpaper
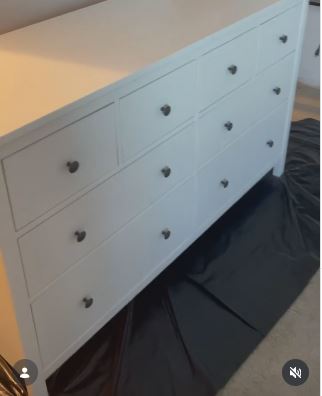
Wallpaper can change a plain modern dresser without requiring detailed hand painting. This makeover adds textured wallpaper to the drawer fronts, creating a beginner-friendly feature while leaving the cabinet structure relatively simple.
This method suits flat-front furniture, especially when the existing finish remains sound. The paper should finish slightly inside the drawer edges so it does not scrape against the cabinet during use.
Materials and Tools
- Plain dresser
- Textured wallpaper
- Primer when required
- Wallpaper paste or suitable adhesive
- Measuring tape
- Metal ruler
- Pencil
- Sharp craft knife
- Cutting mat
- Smoothing tool
- Small brush
- Clear edge sealer, when compatible
- Replacement knobs or handles
Wallpaper the Drawers in Four Steps
- Measure each drawer separately. Even matching drawers may vary slightly. Record the height and width of every front, then label each paper panel so it returns to the correct drawer.
- Cut the wallpaper slightly inside the edges. Use a sharp blade and ruler to create clean lines. Test the dry panel against the drawer before applying paste.
- Attach and smooth the paper. Apply an even layer of adhesive and lower the wallpaper into position gradually. Smooth from the centre outward so air and extra paste can escape without stretching the pattern.
- Finish the holes and edges. Let the covering settle, then reopen the handle holes neatly. Seal vulnerable edges only with a product compatible with both the wallpaper and existing furniture finish.
One detail I wouldn’t skip is testing the drawer movement after the first panel. If the paper catches the frame, correct the size before repeating the same mistake five more times.
Removable peel-and-stick wallpaper can provide a less permanent option, although its adhesion should still be tested. Grasscloth-style texture, small geometric print, linen effect, and quiet floral patterns can all suit simple furniture.
Add Bold Geometric Shapes to a Simple Dresser
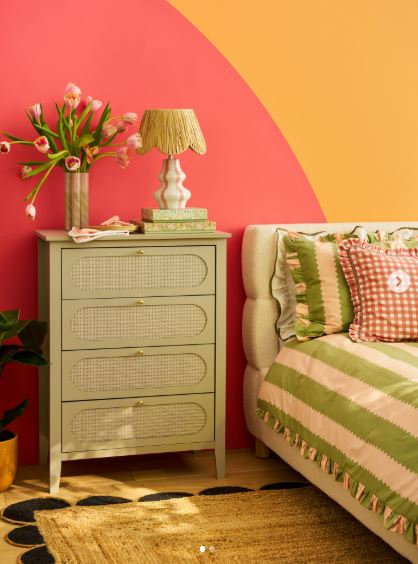
Large geometric shapes can make a basic dresser feel intentional without requiring detailed illustration. This project uses hand-painted forms to introduce colour across the drawer fronts.
The scale is important. Several tiny shapes may become visually busy around the handles, while one or two oversized forms can connect the separate drawers.
Materials and Tools
- Plain chest of drawers
- Cleaner and sanding sponge
- Suitable primer
- Base paint
- Two or three accent colours
- Painter’s tape
- Circular templates
- Pencil
- Fine roller
- Small artist brush
- Replacement hardware, if desired
Build the Geometric Layout in Four Steps
- Create a full-size paper plan. Measure the combined drawer area and sketch the shapes across it. Mark where the drawer gaps and handles will interrupt the design.
- Paint the background. Prepare the surface according to its material and apply the base colour. Keep the finish even because large plain areas will make roller marks easier to notice.
- Transfer and paint the shapes. Use plates, templates, tape, or measured pencil lines. Apply each accent colour separately and check the design with the drawers returned to the frame.
- Simplify the hardware. Choose pulls that support the design rather than competing with it. Reuse sound original knobs when their shape works, or paint them in one of the existing colours.
For me, two strong shapes often work better than six hesitant ones. The cabinet already provides plenty of horizontal lines through the drawer divisions.
Muted arches and half circles can create a softer finish. A child’s room might suit brighter colour blocks, while a hallway chest could use cream, rust, charcoal, and muted green.
Refresh a White Dresser and Line the Drawers With Floral Paper
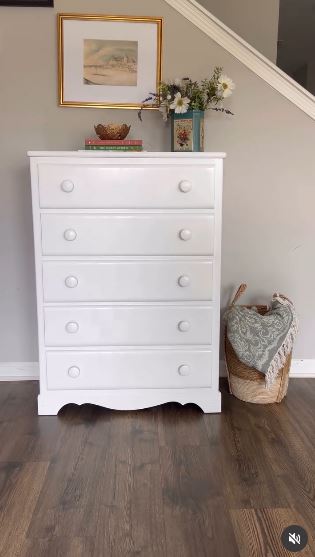
Not every upcycled chest needs pattern across the outside. This worn white dresser receives a cleaner painted finish, refreshed wooden knobs, and floral peel-and-stick paper inside the drawers.
The hidden pattern appears only when a drawer opens, which makes this approach useful for rooms that already contain strong colour or wallpaper.
Materials and Tools
- Worn painted dresser
- Cleaner
- Scraper and sanding sponge
- Filler for dents
- Suitable primer
- White or pale furniture paint
- Fine roller
- Existing wooden knobs
- Floral peel-and-stick paper
- Ruler and craft knife
- Drawer wax or runner treatment when suitable
- Anti-tip straps
Complete the Quiet Makeover in Five Steps
- Correct the worn exterior. Remove loose paint, fill dents, and smooth rough transitions. Avoid covering structural splits or damaged veneer with filler alone.
- Paint the cabinet and fronts. Use the primer and coating system suited to the existing surface. Apply controlled layers and keep excess paint away from drawer edges and runners.
- Refresh the wooden knobs. Clean and reuse the original hardware when it remains sound. Leave the knobs in natural wood, stain them, or paint them in a restrained contrasting colour.
- Line the drawer interiors. Clean each base and cut the floral paper accurately. Apply it from one side while smoothing gradually, then trim the corners with a sharp blade.
- Return the chest to safe use. Test every drawer, keep heavier items lower, and secure the cabinet to the wall using suitable anti-tip hardware.
The part I like here is the restraint. The floral paper adds personality, but it doesn’t force the whole room to coordinate with a patterned dresser.
A dark exterior with pale drawer lining would create more contrast. You could also line only the upper drawer, use leftover wallpaper, or add fabric panels secured to removable card inserts.
Common Mistakes to Avoid
Painting Without Repairing the Cabinet
Loose joints, split drawer bottoms, and broken runners will remain after the finish dries. Repair the structure and test every drawer first.
Mixing Up Uneven Drawers
Older handmade drawers may fit only one opening properly. Label them before removal and return each one to its original position.
Applying Paint Too Thickly Around the Edges
Heavy coating can make drawers stick. Keep paint controlled around the sides, runners, openings, and narrow gaps.
Sanding Unidentified Old Paint Carelessly
Unknown older coatings may contain lead. Determine whether lead may be present and follow appropriate safe-working practices before creating dust.
Covering Loose Veneer With Wallpaper
Wallpaper cannot stabilise veneer that is lifting underneath. Repair or remove unstable material before applying decorative paper.
Cutting Every Paper Panel to One Measurement
Drawer fronts and interiors may vary slightly. Measure each section and label every panel.
Adding Hardware Without Checking the Screw Length
A screw that is too long may project inside the drawer, while one that is too short may fail to hold the handle securely. Test the complete hardware before filling the drawers.
Forgetting Tip-Over Protection
A refinished chest should still be anchored securely to the wall, particularly in homes with children.
Frequently Asked Questions
Do I always need to sand a chest of drawers?
Not every surface needs aggressive sanding, but loose coating, rough repairs, and glossy areas may require preparation. Follow the instructions for the exact material, primer, and paint system you are using.
Can laminate drawers be painted?
They may be paintable with careful cleaning, adhesion preparation, and a primer intended for slick surfaces. Test a hidden area because laminate does not behave like bare wood.
Can I apply wallpaper directly to drawer fronts?
Only when the surface is clean, sound, and compatible with the adhesive. Repair loose veneer, peeling paint, and deep damage first.
How can I stop the drawers from sticking after painting?
Avoid heavy paint along the drawer sides and openings. Let the finish cure according to its instructions, then identify where the drawer rubs before making small adjustments.
Should I replace the original handles?
Not necessarily. Clean and reuse them when they remain secure and suit the new design. Replacement hardware is most useful when the existing pulls are broken, uncomfortable, or visually distracting.
Can a beginner upcycle a chest of drawers?
Yes. Begin with a sound piece and a straightforward finish such as one paint colour, new handles, or lined drawer interiors. Detailed artwork and continuous wallpaper patterns require more planning.
How should I maintain the finished furniture?
Use gentle cleaning products compatible with the finish, wipe spills promptly, and repair chips before they spread. Avoid overloading the drawers and check the anti-tip hardware periodically.
Keep the Storage and Change What No Longer Works
Learning how to upcycle chest of drawers furniture begins with recognising what is already useful. The cabinet provides storage, the drawers divide the contents, and the top offers a practical surface. The finish, handles, colour, and decorative details can change without discarding the whole piece.
Begin with the repairs and drawer movement. Then choose one clear design direction: layered paint, botanical decoupage, wallpaper, gingham, geometric shapes, or a quiet exterior with patterned interiors.
You do not need to use every technique on one chest. A well-repaired cabinet with one thoughtful change will usually feel more convincing than furniture carrying paint, paper, stencils, stripes, distressing, and new trim all at once.
Which part would you update first: the colour, drawer fronts, handles, or hidden interiors?