Garden crafts work best when the reused material still makes sense outdoors. A wheelbarrow can hold a small reflective pond, old guttering can become a narrow herb garden, and a weathered basket can support a cheerful scarecrow face without losing the marks that show where it came from. The garden gives these objects a useful setting, but it also exposes every weak join, blocked drainage hole, unsuitable finish, and unstable base.
I am Stella Eve Louise, and I like outdoor projects that let plants remain part of the design rather than treating them as an afterthought. These garden crafts ideas use containers, stones, labels, bottles, and old tools in ways that are decorative but still practical. I do not think every surface needs to look new. Rust, faded paint, mixed glass colours, and irregular stone shapes can stay visible when the material is clean, safe, and strong enough for its new purpose.
Before making anything, consider how rain, sun, wind, soil, and watering will change the finished piece. A project that looks balanced while empty may lean after wet compost is added, and a paint finish that feels dry indoors may not be ready for outdoor weather. Start with one manageable idea, prepare it properly, and let the growing plants provide some of the colour and movement.
Check Reused Outdoor Materials Before They Reach the Garden
Inspect each old object for the kind of damage that matters in its new role. A planter needs sound sides and drainage, a wheelbarrow pond needs stable legs and a watertight insert, guttering must be free from dangerous edges, and bottles must have no chips or fine cracks. Remove unknown residues, flaking coatings, rotted wood, loose fasteners, and anything that could contaminate soil or injure someone working nearby.
Clean materials in a way that suits them and allow hidden moisture to dry before painting or sealing. Keep natural age where it is harmless, but do not confuse character with structural weakness. If an object is sentimental, unusually old, or difficult to replace, use a reversible insert or create the garden version from a less important piece instead of drilling or permanently coating the original.
Plan Drainage, Weight, and Position Before Building
Outdoor craft projects become heavier than they appear. Wet soil, standing water, stones, and mature plants can place far more strain on brackets, fence panels, wheels, and narrow supports than empty containers do. Test the intended position first, identify solid fixing points, and make sure the finished object will not block a gate, narrow a path, or tip where a person or pet could reach it.
Drainage should be planned before planting, not added after roots begin to struggle. Decide where water will leave the container and where that runoff will go. A wall-mounted trough should not keep a timber fence permanently wet, while a water feature should sit where overflow cannot wash soil onto paving. Then match the plants to the amount of sun, shelter, and moisture the location actually receives.
Choose Weather-Ready Finishes and Work Safely
Paint, adhesive, sealant, and fasteners need to suit both the material and the outdoor conditions. Test products on a hidden area, use thin controlled coats, and allow the full curing time stated by the manufacturer before exposing the project to rain or filling it with soil. Keep decorative coatings away from surfaces that directly contact edible crops unless the product is specifically suitable for that use.
Wear gloves and eye protection when drilling, cutting metal, handling glass, or removing rust. Work in a ventilated space with spray finishes and strong adhesives, and keep tools, small pieces, water features, batteries, and breakable materials away from children and pets. A garden craft should make the space easier to enjoy, not introduce a hazard that has to be watched every time someone steps outside.
Scarecrow Hat Planter
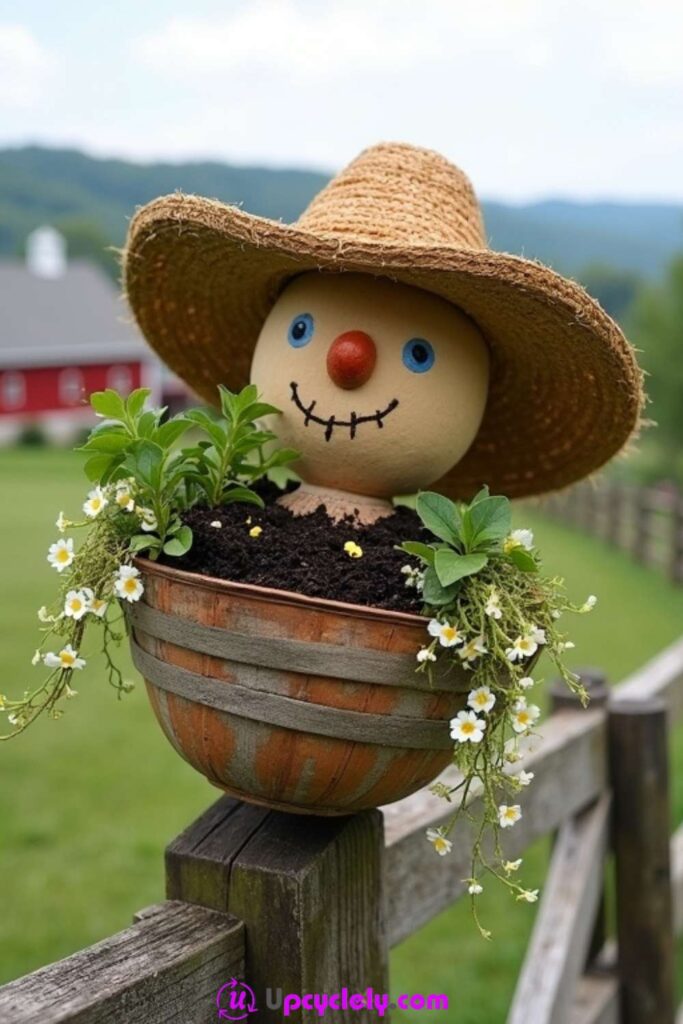
A scarecrow planter works because the planting and the character are joined rather than treated as two separate decorations. A round head sits above a weathered basket-style container, while the broad straw hat frames painted eyes, a warm red nose, and a stitched smile.
White flowers and trailing greenery spill around the rim like a loose collar, which softens the solid face and keeps the planter connected to the garden rather than making it look like a figure placed on top of a pot.
The visible charm is easy to understand, but the support underneath needs careful thought. A wet planter becomes much heavier after watering, and a large hat can catch the wind.
I would choose a sound container with drainage, a lightweight head that cannot absorb rain, and a fixing point strong enough for the final weight. The face can remain simple; clear eyes, one nose, and a relaxed smile are usually more effective than adding so many features that the planting disappears.
Materials and Tools
· A sturdy hanging basket, half-barrel planter, or reclaimed container with drainage holes
· A lightweight weather-resistant ball, hollow ornament, or sealed foam form for the head
· A straw hat in usable condition
· Outdoor-compatible paint or permanent markers for facial details
· A lightweight nose made from a wooden bead, cork, or sealed craft piece
· Exterior adhesive, wire, or another secure attachment method suitable for the materials
· Potting mix matched to the chosen plants
· Compact flowers and trailing plants that suit the site conditions
· A strong fence post, bracket, shelf, or level garden surface
· Gloves, small hand tools, and optional eye protection
How to Assemble the Scarecrow Planter
1. Check the container and decide how it will be supported. Inspect the planter for rot, cracks, loose bands, or sharp edges, then confirm that excess water can escape freely. Set it in the intended position while empty and decide whether it needs screws, a bracket, wire support, or a wider base. Do not rely on a narrow fence cap or a weak hook once soil and rainwater have added weight.
2. Prepare the head and facial details. Seal any porous head form before painting so it does not take in water. Mark the eyes, nose, and smile lightly before making them permanent, keeping the expression large enough to read from the garden path. Attach the nose securely and let every painted or glued area cure before placing the hat over it.
3. Join the character without blocking the planting space. Position the head behind or just above the planter rim so the flowers still have room to grow. Secure it to a hidden support rather than balancing it in loose soil, then fit the hat and fasten it discreetly against wind. Check that the brim does not funnel rain directly into the face or shade the plants more than intended.
4. Plant, water, and make the final stability check. Fill the container with suitable potting mix and arrange compact plants around the front, leaving taller growth away from the face. Water slowly, watch how the container drains, and then check the full structure for movement. I know it can feel tempting to add more straw, ribbons, or signs, but the plants should remain the part that changes and grows.
One detail I would watch through the season is the space between the face and the foliage. Trim only what blocks the eyes or restricts air movement; a little uneven growth makes the scarecrow feel more natural.
A smaller version can sit in a porch pot with a cork head and a child-sized hat. For a windy garden, paint the scarecrow face directly onto the container and attach the hat to a short central stake, reducing the amount of material above the soil.
Chalkboard Plant Labels
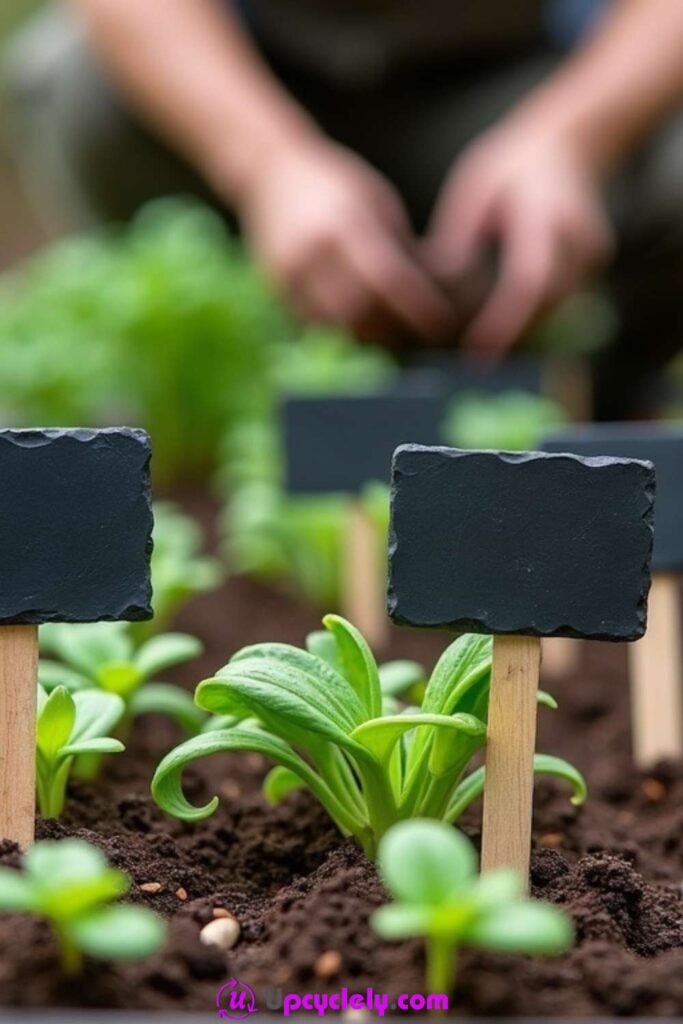
Black rectangular labels on plain wooden sticks create a strong contrast against young green leaves and dark soil. The shape is simple, but the rough slate-like edges give each marker a handmade quality that suits a vegetable bed or herb planter. Because the writing surface is larger than a narrow plant tag, there is room for a clear name, a sowing date, or a short care reminder without forcing the lettering into a tiny space.
Reclaimed timber offcuts, old slate coasters, damaged picture-frame backing, or existing wooden markers can all be adapted. What matters here is not making every label identical. The writing must stay readable, the stake must survive damp soil, and the join between the board and the stick must not loosen after repeated watering. I would prepare a few spare markers at the same time, because garden plans have a habit of changing just after the tools are put away.
Materials and Tools
· Small slate pieces, thin exterior-grade wood offcuts, or reusable plant-label blanks
· Wooden sticks, bamboo pieces, or narrow dowels for stakes
· Chalkboard paint when the label surface is not already dark and writable
· Exterior paint or sealer for the sides and back of wooden pieces
· Chalk, a chalk pencil, or a removable chalk marker
· Exterior adhesive, small screws, or weather-resistant wire
· Fine sandpaper for wooden edges
· Ruler and pencil for consistent spacing
· Clamps or masking tape to hold joins while they set
· Gloves and eye protection when cutting or drilling
Steps for Making Reusable Garden Labels
1. Cut and smooth the label pieces. Choose pieces large enough to read without crowding the plants. Smooth wooden edges and remove loose flakes from slate, then round any sharp corners that could catch a hand while weeding. Keep the boards reasonably light so the stakes do not lean after rain softens the soil.
2. Prepare the writing surfaces. Apply chalkboard paint in thin coats when needed, following the product instructions and allowing the surface to cure fully. Seal the back and edges of wooden labels without coating the writing face with a glossy finish. Before writing plant names, condition a new chalkboard surface if the chosen paint requires it.
3. Attach the stakes securely. Place each stake behind the label and test the total height in a pot or bed. Use a fixing suited to the material: exterior adhesive for lightweight pieces, a small screw for thicker wood, or wire through drilled holes where a removable join is useful. Then let the connection set flat so the label does not twist to one side.
4. Write clearly and place the markers carefully. Use large letters and leave enough blank space around the plant name for quick reading. Push the stake into the soil beside the root area rather than directly through it, and avoid forcing the marker into compacted ground. Wipe and rewrite the label at the end of the season, then store it dry if winter weather is severe.
For me, the most useful labels are the ones I can read while standing. Decorative lettering is welcome, but not when the word becomes a puzzle every time I water the bed.
A lower-cost version can use painted wooden clothes pegs clipped to short stakes. In a rental garden, freestanding labels are easier to move than signs fixed to fences or raised-bed walls.
Hanging Gutter Herb Garden
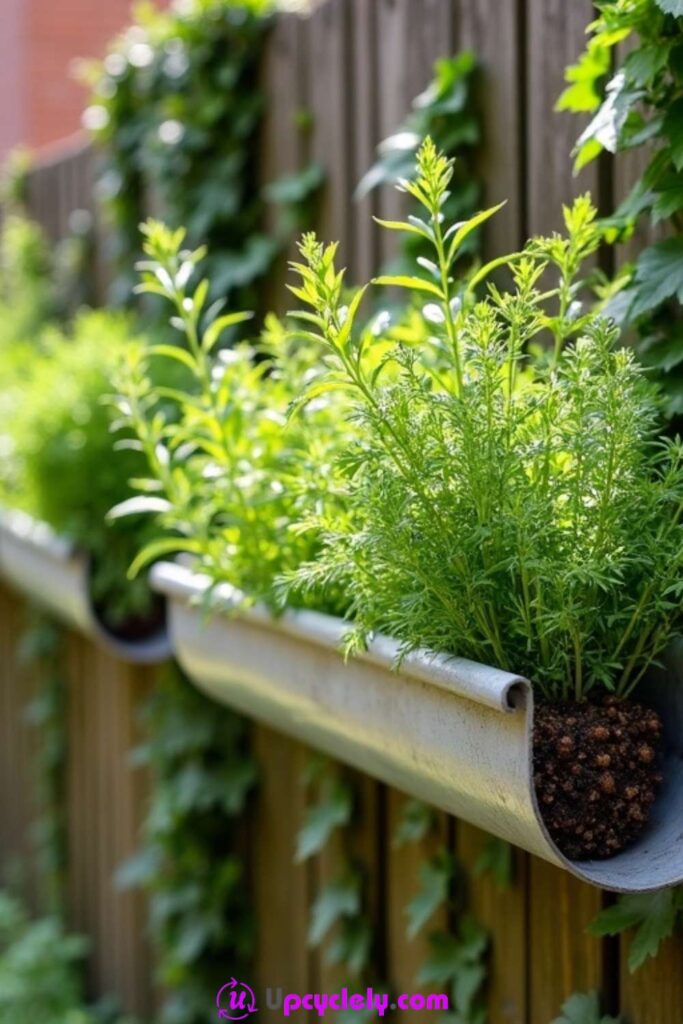
A row of old metal gutters mounted along a fence creates a narrow planting space without taking up the ground below. The curved trough holds herbs in a clean horizontal line, while the silvery surface sits quietly against timber and climbing greenery. This arrangement is especially practical for small gardens because the plants remain close to eye level and can be reached without stepping into a crowded bed.
The gutter itself may be reused, but it still has to function as a planter. End caps, drainage holes, sound brackets, and enough soil depth all matter more than the shine of the metal. I do not think a very long uninterrupted trough is the easiest option. Shorter sections are lighter, simpler to level, and easier to remove when the soil needs refreshing or the fence needs maintenance.
Materials and Tools
· Clean sections of sound guttering with no sharp or heavily corroded edges
· Matching end caps or another reliable way to close the ends
· Strong exterior brackets sized for the gutter
· Exterior screws and wall plugs or fixings suited to the fence or wall
· A drill with suitable bits and eye protection
· Small mesh pieces or crocks to cover drainage openings
· Free-draining potting mix
· Compact herbs with compatible light and watering needs
· A spirit level and measuring tape
· Gloves for handling metal edges
· Optional saucers or a lower drip strip where runoff could stain a wall
How to Turn Old Guttering Into Herb Planters
1. Inspect, clean, and shorten the guttering. Remove old debris and check the full length for splits, sharp cut edges, deep corrosion, and residues from roofing work. Cut the gutter into manageable sections if necessary, then smooth or cap every exposed edge. Test the end caps with water before adding soil so leaks can be corrected on the workbench.
2. Add drainage without weakening the trough. Drill several small drainage holes along the lowest part of each section, keeping them clear of the bracket positions. Cover the holes inside with mesh so soil does not wash out. A gutter planter should drain steadily, but it should not empty so fast that herbs dry out within hours on a hot fence.
3. Mount the brackets into sound structure. Mark a level line and locate posts, masonry, or another strong fixing point rather than fastening only into thin fence boards. Space the brackets closely enough to prevent the filled gutter from bowing. Set the empty trough in place, press on it gently, and correct any movement before loading it with wet compost.
4. Fill, plant, and manage watering. Add potting mix gradually, settle it around the brackets, and plant herbs with enough space for air and root growth. Group plants with similar needs instead of mixing a moisture-loving herb with one that prefers drier soil. Then water slowly and watch the runoff pattern so lower plants, timber, and neighbouring paths are not constantly soaked.
The part I would check most often is the bracket line. Soil settles, timber moves, and a gutter that looked perfectly level in spring can begin to sag once plants and rain add weight.
A simpler version can use one short gutter section outside a kitchen door. Plastic guttering is lighter for a weak fence, while a freestanding timber frame offers a useful alternative where wall fixing is not allowed.
Miniature Pond in a Wheelbarrow
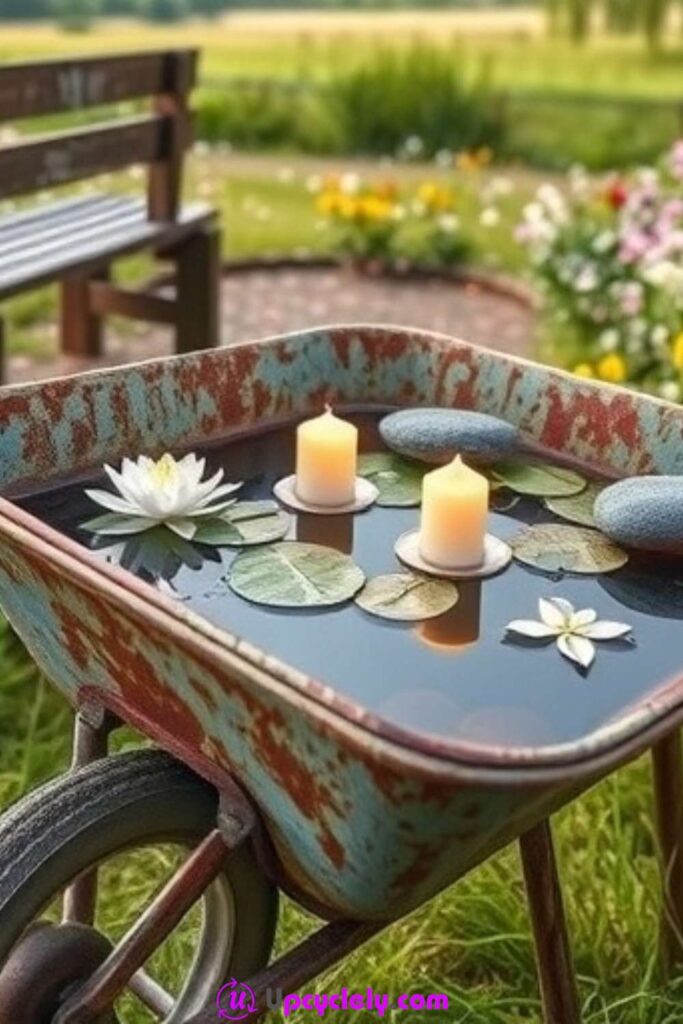
An old wheelbarrow becomes a compact water feature when its worn tray is filled with dark water, floating leaves, smooth stones, and one or two pale flowers. The rust and faded paint remain visible around the rim, so the original tool is still easy to recognise. That contrast is what gives the pond character: the metal looks hardworking and weathered, while the water surface feels calm and reflective.
This project needs more than a waterproof liner. Water is heavy, old wheelbarrows can be unstable, and even a shallow container requires sensible placement around children and pets. I would position it on level ground where it cannot roll, tip, or collect roof runoff. The decorative candles visible in this type of arrangement are better recreated with waterproof battery lights; an open flame beside dry plants or an unattended garden feature is not worth the risk.
Materials and Tools
· A structurally sound old wheelbarrow with stable legs and handles
· A pond-safe liner or rigid watertight insert sized to the tray
· Protective underlay or folded fabric to cushion the liner from rough metal
· Clean stones or gravel for weighting and decoration
· Small aquatic or floating plants suitable for a container pond
· Dechlorinated or rested water where appropriate for the plants
· Waterproof battery lights instead of open candles
· A small level and blocks or pavers for stabilising the wheelbarrow
· A fine net for removing leaves
· Gloves and a stiff brush for cleaning the tray
· Optional mesh cover where child or pet access is a concern
Steps for Building the Wheelbarrow Pond
1. Stabilise and inspect the wheelbarrow. Set the empty barrow on a level, firm surface and check the wheel, legs, handles, tray, and bolts. Repair looseness and block the wheel so the container cannot move. Remove sharp rust flakes and dirt, but there is no need to erase every mark; the aged finish is part of the appeal as long as the structure remains sound.
2. Fit a protected watertight liner. Cover rough areas with underlay, then press the liner or rigid insert into the tray without stretching it tightly across corners. Fold excess material neatly below the rim and test the setup with a small amount of water. Leave it for a while and check beneath the wheelbarrow before committing plants or decorative pieces.
3. Add water, weight, and aquatic planting. Place clean stones where they can hold the liner without trapping sharp edges against it, then fill the pond gradually. Add a limited number of suitable container-pond plants so the surface still has open water. Avoid garden soil, loose compost, and plants that will quickly outgrow the shallow tray.
4. Finish the feature and establish a care routine. Add waterproof lights only after checking their seals and battery compartments. Remove fallen leaves, top up evaporated water, and prevent the pond from becoming stagnant. If young children can reach the area, use a secure cover or choose a dry wheelbarrow display instead; decorative water should never be treated as harmless simply because the container is small.
I especially like leaving part of the rusted rim visible. Covering every edge with plants would hide the history that makes the wheelbarrow more interesting than a new pond tub.
A no-water alternative can use dark polished stones, metal lily pads, and solar lights to suggest a pond without leaks or maintenance. A large enamel basin can also work where the wheelbarrow frame is beyond safe repair.
Painted Garden Stones
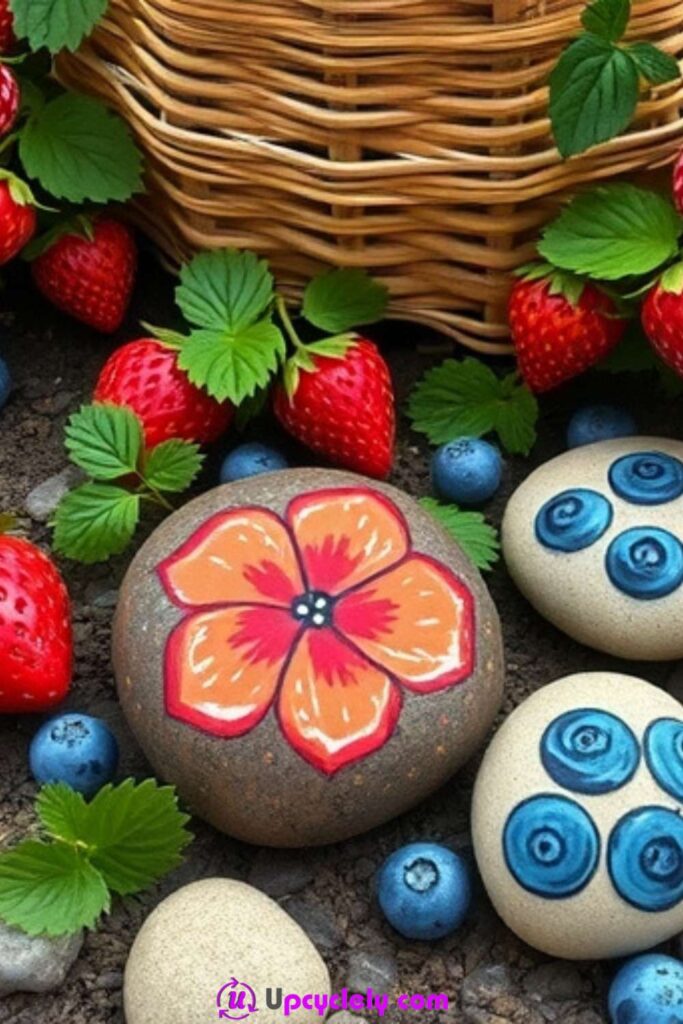
Smooth stones painted with bold flowers, berries, fruit shapes, or simple garden motifs add colour at soil level, where many decorations are easy to overlook. The rounded natural forms do part of the design work: a flatter stone can hold a wide flower, while a pale oval can become a cluster of blueberries or another repeated pattern. Placed among real leaves and fruiting plants, the painted surfaces create a playful contrast without needing posts, hooks, or permanent installation.
The best stones are stable enough to sit without rocking and smooth enough for a clean outline. I would not collect rocks from protected places or take more than a garden actually needs. Reused landscaping stones, old decorative pebbles, or pieces already on the property are better starting points. The paint system also needs to suit outdoor exposure, because a lovely design that flakes into the soil after one wet season is not a successful garden craft.
Materials and Tools
· Clean smooth stones in shapes that suit the planned motifs
· A mild brush and water for removing soil
· Outdoor-compatible primer when needed for the stone surface
· Acrylic or exterior craft paint in a limited colour palette
· Small flat and round paintbrushes
· A fine paint marker for outlines and small details when compatible
· Paper and pencil for practising motifs
· A clear exterior sealer suitable for painted stone
· Gloves and a protected, well-ventilated work area
· Small pads or scrap card to hold stones steady while painting
How to Paint Stones for Outdoor Display
1. Clean, dry, and test the stones. Scrub away loose soil and let the stones dry fully, including any damp held in small surface pits. Set each stone on a flat table to find its most stable side. Test a small patch of primer or paint on the underside, especially when the stone is very polished or has an unknown old coating.
2. Plan a motif that follows the natural shape. Sketch the main flower, berry cluster, fruit, or simple pattern on paper before drawing lightly on the stone. Use the widest area for the focal shape and leave a narrow border of natural stone where it helps the design breathe. The edges do not need to be perfectly symmetrical; the irregular outline often makes the painted motif feel more connected to the material.
3. Build the colour in controlled layers. Apply thin paint layers and let each one dry before adding shading, outlines, or highlights. Turn the stone rather than resting a hand on wet paint. For repeated berries or petals, vary the size slightly so the design feels lively, but keep the spacing deliberate enough that the shapes do not merge into one large patch.
4. Seal and place the stones thoughtfully. Apply an exterior-compatible protective coat only after the paint has cured, covering the sides as well as the face where appropriate. Let the finish set in a ventilated place, then position the stones where they will not become a trip hazard or be struck by a mower. Bring them under cover during harsh weather if the paint system is not intended for year-round exposure.
For me, a few well-placed stones have more impact than a full border of unrelated designs. Repeating one flower colour or one berry motif helps separate the project from ordinary painted-rock collections.
Children can help design the motifs, but an adult should manage sealers and any paint not intended for young users. For a quieter garden, use white line drawings on natural grey stones instead of filling every surface with bright colour.
Painted Rock Garden Markers
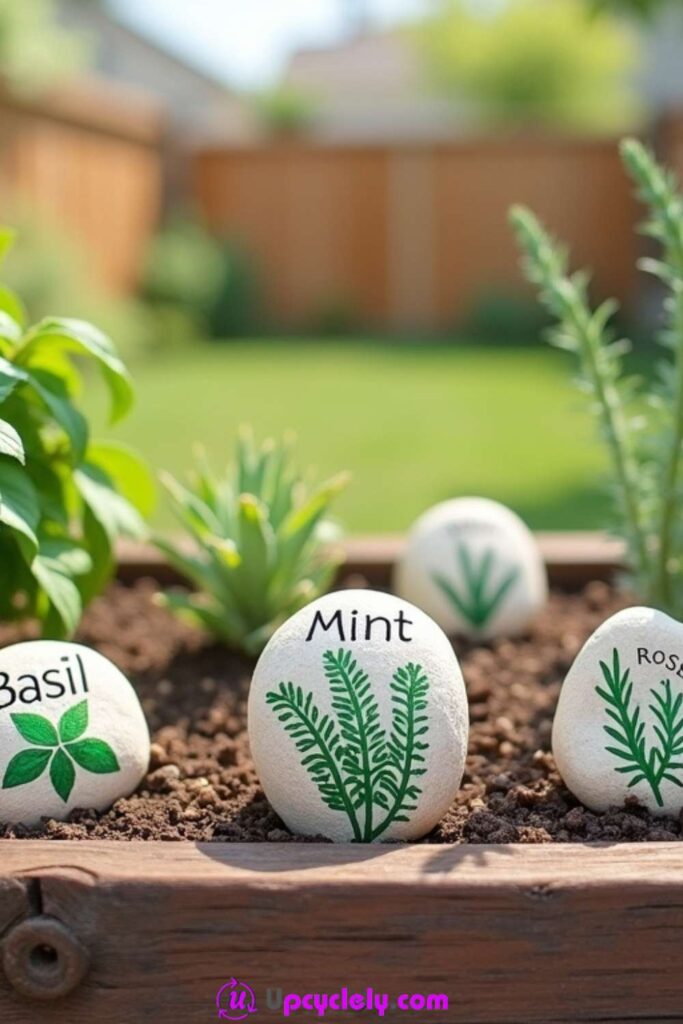
Painted rock markers combine identification and decoration in one low object. Pale upright stones carry clear names such as basil, mint, and rosemary, with small green sprigs painted beneath the lettering. Their rounded shape sits naturally inside a raised bed, and the white background keeps the words visible even when the surrounding herbs become dense.
These markers work best when the plant name remains the main feature. A recognisable leaf drawing is helpful, but it should not compete with the text or make a short word difficult to read. I would choose stones with a broad front and enough weight to resist wind, then decide whether they will stand partly buried or rest flat. That small decision affects where the lettering begins and how much of the finished design remains visible after watering and mulching.
Materials and Tools
· Medium smooth stones with a stable base or broad face
· A light-coloured exterior base paint when the natural stone is too dark
· Green and black exterior craft paint or compatible paint markers
· Small brushes for leaves and stems
· A pencil or removable marking tool
· Paper templates for spacing longer plant names
· A clear exterior sealer suitable for the paint system
· A brush and water for cleaning the stones
· Scrap card or a tray for keeping each stone upright while drying
· Optional coloured dots or symbols for crop groups
Steps for Creating Clear Herb and Plant Markers
1. Choose the viewing angle before painting. Place each stone in a shallow tray of soil and decide which face is easiest to read from the path. Mark the intended soil line lightly so the name is not painted where it will disappear underground. Clean and dry the stones, then add a light base only when it improves contrast.
2. Lay out the plant name first. Write the word on paper at roughly the same width as the stone, then transfer it lightly to the surface. Keep the letters simple and leave space below for the herb sprig or symbol. Longer names can curve gently with the stone, but the baseline should remain steady enough for quick recognition.
3. Paint the lettering and botanical detail. Build the letters with a fine brush or compatible paint marker, correcting uneven edges before the paint sets fully. Add a simplified stem and a few characteristic leaves rather than attempting a scientific illustration. Then step back and check that the plant name can still be read more easily than the drawing.
4. Protect and position each marker. Seal the dry design as required by the chosen materials and allow the finish to cure before placing the rock near edible plants. Set it beside, not on top of, the root crown and leave room for watering. At the end of the growing season, clean the surface gently and store the markers together so next year’s labels are easy to find.
One practical way to make a mixed set feel organised is to repeat the same lettering style and green paint, even when the stones vary in size. The natural differences then look intentional rather than mismatched.
A reversible version can use a small removable painted tag tied around a natural stone. Another option is to add a simple colour code on the back for herbs, vegetables, flowers, or plants that need special watering.
Rainbow Bottle Edging

Coloured glass bottles arranged in a long line create a strong border that catches low sunlight and turns an ordinary bed edge into a repeated pattern. Green, blue, amber, and red glass can be organised as a gradient or mixed rhythm, while the matching bottle shapes keep the colour changes from feeling chaotic. The effect is especially noticeable at sunrise or sunset, when light passes through the glass rather than simply reflecting from the surface.
This is the project where I would be most cautious about copying appearance without considering use. Exposed glass can break, open bottle necks can collect water, and a border beside a path may be struck by tools, feet, pets, or children. A safer version uses intact thick bottles with the necks buried and the rounded bases visible, or coloured plastic bottles in a low-traffic display bed. Do not use chipped glass, do not cut bottles for this purpose, and do not install the edging where people regularly step or mow.
Materials and Tools
· Intact thick-walled coloured bottles with no cracks, chips, or sharp edges
· Protective gloves and eye protection
· A shovel or narrow trenching tool
· Sand or fine gravel for levelling and drainage
· A board and spirit level for checking the border line
· Soil for firm backfilling
· Bottle caps or plugs when openings could otherwise collect water
· Optional landscape edging behind the bottles for extra soil control
· A sturdy box or crate for transporting glass safely
· Coloured plastic bottles as a safer alternative for family or high-traffic gardens
How to Install Bottle Edging More Safely
1. Choose a protected location and inspect every bottle. Keep the edging away from play areas, narrow paths, lawn-mower routes, and places where digging tools are used frequently. Wash the bottles and check them under good light, discarding any with chips, star cracks, or damaged rims. Plan the colour order on the ground before opening the trench.
2. Dig an even trench and prepare the base. Mark a gentle line and dig deeply enough to hold a substantial portion of each bottle. Add a shallow layer of sand or fine gravel so the glass can be levelled without pressing it against stones. The trench should support the bottles, not merely hide a small part of them while leaving the row easy to knock over.
3. Set the bottles with the vulnerable ends protected. For the safer arrangement, place bottles neck-down so the openings are buried and the rounded bases form the visible border. Align the heights with a board, then add soil gradually on both sides and firm it by hand rather than striking the glass. Do not glue bottles to one another; a damaged piece should be removable without disturbing the entire row.
4. Backfill, test, and maintain the border. Water the surrounding soil lightly to settle it, then press each bottle gently to check for movement. Add more compacted soil or hidden support where needed. Inspect the edging after frost, heavy rain, gardening work, or impact, and remove any broken bottle immediately while wearing protective equipment. In a garden used by children or pets, choose plastic or another non-breakable material instead.
The colour pattern does not need to be perfect. Repeating green and amber bottles with a few blue pieces can look more natural than searching for an exact rainbow set that may never appear.
A lower-risk alternative uses coloured plastic bottles filled partly with sand, painted terracotta pots set on their sides, or reclaimed ceramic tiles with smoothed edges. These options can keep the repeated colour effect without bringing exposed glass into a busy part of the garden.
Garden Craft Choices That Can Come Loose After the First Heavy Rain
Using damaged containers because the plants will hide them. Foliage cannot strengthen a cracked pot, rotten basket, corroded gutter, or unstable wheelbarrow. Wet soil and water add weight, so repair the structure first or choose another object. A hidden weakness usually becomes harder to reach after planting.
Treating every old coating as harmless. Unknown paint, roofing residue, oil, or chemical contamination may not belong near soil, water, pets, or edible plants. Clean and assess the material before use, and add a safe removable liner when the container itself should not touch the growing medium.
Forgetting where rainwater will go. A sealed planter can drown roots, while uncontrolled runoff can stain walls, rot fence boards, and wash soil across a path. Add drainage in the correct place, protect openings with mesh, and watch the project during its first thorough watering.
Fixing heavy planters only to thin fence boards. A gutter or basket may stay in place while empty and pull free after compost absorbs water. Fasten brackets into posts, masonry, or another sound structure, use enough supports to prevent sagging, and recheck the fixings through the season.
Using indoor paint or glue outdoors. Moisture and sunlight can soften adhesive, fade colour, and lift coatings from stone, metal, and wood. Choose products intended for the surface and exposure, test them first, and let them cure fully before placing the object outside.
Overfilling small containers with plants. A tiny trough or novelty planter may look lush at first but become crowded as roots and foliage expand. Choose compact plants, leave growing space, and avoid mixing species with very different watering or light needs.
Adding real candles to an unattended water feature. A small pond may appear to contain the flame safely, but wind, dry leaves, and nearby planting still create risk. Use waterproof battery or solar lights instead, and check that every electrical component is suitable for outdoor use.
Leaving garden glass where it can be struck. Bottle edging beside lawns, play areas, or narrow paths can break under tools, feet, frost, or impact. Use only intact glass in a protected location, bury it deeply with vulnerable ends covered, inspect it regularly, or choose a non-breakable alternative.
Placing labels directly through roots. Forcing a stake beside an established plant can damage roots or bulbs. Loosen the soil first, place the marker at the edge of the root area, and use a shorter freestanding stone marker when the bed is already densely planted.
Assuming one finished inspection is enough. Outdoor materials move and weather. Check brackets, liners, paint, glass, drainage, and plant growth after heavy rain, strong wind, frost, or garden maintenance. Early repairs are usually simple; ignored movement can turn a small craft into a much larger problem.
Frequently Asked Questions
Which garden crafts ideas are easiest for a beginner?
Painted garden stones, painted rock markers, and simple chalkboard labels are manageable starting points because they do not hold large amounts of water or soil. Begin with cleaning, layout, and a suitable outdoor finish before moving to mounted planters or water features.
Can I use any old container as a planter?
Only when it is structurally sound, clean, and able to drain. Containers with unknown chemical residues, sharp rust, rotten sections, or unstable bases should not be used around plants. A removable pot placed inside the decorative object is often safer than filling the object directly.
How do I protect painted stones and labels outdoors?
Use paint and a clear finish compatible with the surface and intended for exterior exposure. Let every layer cure fully, avoid placing the object in standing water, and bring it under cover during severe weather when the materials are not designed for year-round use.
What herbs grow well in a gutter planter?
Choose compact herbs that suit the available soil depth, sunlight, and watering routine. Group plants with similar needs and avoid species likely to become very large or develop roots that quickly fill the trough. Local growing advice can help with the final plant choice.
How can I stop a wheelbarrow pond becoming stagnant?
Keep the water feature clean, remove fallen leaves, avoid overcrowding it with plants, and refresh or circulate the water as needed. Place it where you can maintain it easily. Where mosquitoes or child safety are concerns, use a covered or water-free version instead.
Is glass bottle edging safe for every garden?
No. It is unsuitable for play spaces, pet routes, narrow paths, lawn edges, or areas where tools may strike it. Use intact bottles only in a protected display bed, bury them securely with openings covered, inspect them often, or replace glass with coloured plastic or another non-breakable material.
Can these projects stay outside through winter?
That depends on the material, fixing method, plants, and local weather. Water may freeze inside containers, liners can split, brackets can loosen, and paint can fail after repeated wetting. Empty, cover, move, or store vulnerable pieces before severe weather rather than assuming every garden craft is permanent.
Let Old Materials Earn a Place Among the Plants
The strongest garden crafts ideas do more than add colour. They give an old object a role that suits its shape: guttering holds a narrow row of herbs, a wheelbarrow supports a contained pond, stones become low markers, and a worn basket carries both flowers and a cheerful scarecrow face. The original material stays recognisable, while preparation, drainage, support, and weather protection make the new use practical.
Choose the project that fits the materials and garden space already available, then keep the first version simple enough to maintain. Check the structure, plan where water will move, use safe outdoor finishes, and allow plants to provide some of the final detail. Which of these garden crafts ideas would give a forgotten object the most useful place in your garden?