Flower pots are one of those household objects that seem to multiply quietly. A plant outgrows one, another cracks along the rim, and a few more end up stacked in a shed because they still feel too useful to throw away. I’m Stella Eve Louise, and that in-between stage is exactly what I find interesting: the pot may no longer be right for a plant, but its shape, weight, drainage hole, and simple clay surface can still solve plenty of everyday problems.
Terracotta is especially easy to repurpose because it already looks at home in kitchens, workspaces, bathrooms, patios, and gardens. A plain pot can hold tools, support a tabletop, shelter a small light, or become part of a decorative garden feature without needing complicated construction. Even chipped pots can be useful if the broken edges are handled safely. I don’t think repurposing has to mean disguising the original object completely. Often the nicest results still look unmistakably like flower pots, just used with a little more imagination and a clear purpose.
Why Old Flower Pots Are Worth Keeping
A flower pot already gives you several features that are surprisingly useful outside gardening. The wide opening makes it a ready-made holder, the flared rim gives the top a finished edge, and the heavier base helps it stay steady on a desk or counter. Terracotta also has a warm, slightly irregular surface that works well with wood, linen, metal, stone, and other natural-looking materials.
There is also something practical about starting with an object that has already done a job for you. A weathered pot does not need to be flawless to become a pencil cup or utensil holder. A broken pot can become the structure of a miniature garden, where the cracks actually help create levels and pathways. Reuse works best when you stop asking, ‘How do I make this look new?’ and ask, ‘What can this shape do well now?’
Before saving every pot in sight, be selective. Keep pieces that are structurally sound enough for their new purpose, or whose damage can become part of a decorative project. A deeply cracked pot is not a good base for a side table, for example, but it may still be useful for a small fairy garden. The new job should always match the condition of the old material.
Choose the Right Pot for the New Job
Size matters more than decoration at the beginning. A short, wide pot is usually steadier for brushes or desk tools, while a taller pot works better for wooden spoons. For a bird feeder, the pot and saucer need to feel balanced once they are suspended. A side table calls for sturdy pots with broad bases, while a lantern needs enough clay around each opening that drilling or punching holes will not weaken the wall too much.
Look at the drainage hole too. Sometimes it is exactly what you need: cord can pass through it for a hanging feeder, and a small light can sit beneath an inverted pot with the hole acting as extra ventilation. In other projects, such as a vanity holder, the hole may need a removable liner or a small disc inside so slim tools do not slide through.
I know it can feel tempting to choose the prettiest pot first, but function should make the first decision. Once the size and condition suit the project, then you can think about paint, texture, trim, or whether the original terracotta finish should stay visible. That order saves a lot of frustration later.
Prepare Clay Pots Before Repurposing
Old pots often carry dry soil, mineral marks, algae, dust, or flaking paint. Brush away loose material first, then wash the pot with mild soapy water if the project allows it. Let terracotta dry thoroughly before painting, gluing, or using it indoors; porous clay can hold more moisture than it appears to on the surface.
Run a hand carefully around the rim and base. Smooth rough spots with fine sandpaper, and do not ignore sharp chips simply because the project is decorative. If the pot will sit on a polished desk or bathroom counter, add felt pads or a cork disc underneath. For kitchen storage, use a clean pot that has not been exposed to questionable chemicals, and keep food itself in proper food-safe containers rather than directly against painted or unknown surfaces.
For any project that involves drilling terracotta, wear eye protection and work slowly. Clay can crack suddenly if too much force is applied. Candle projects also need sensible spacing from flammable materials and a stable surface. Preparation is not the glamorous part, but it is usually the difference between a repurpose that feels thoughtful and one that becomes annoying after a week.
Turn a Small Terracotta Pot Into a Desk Organizer
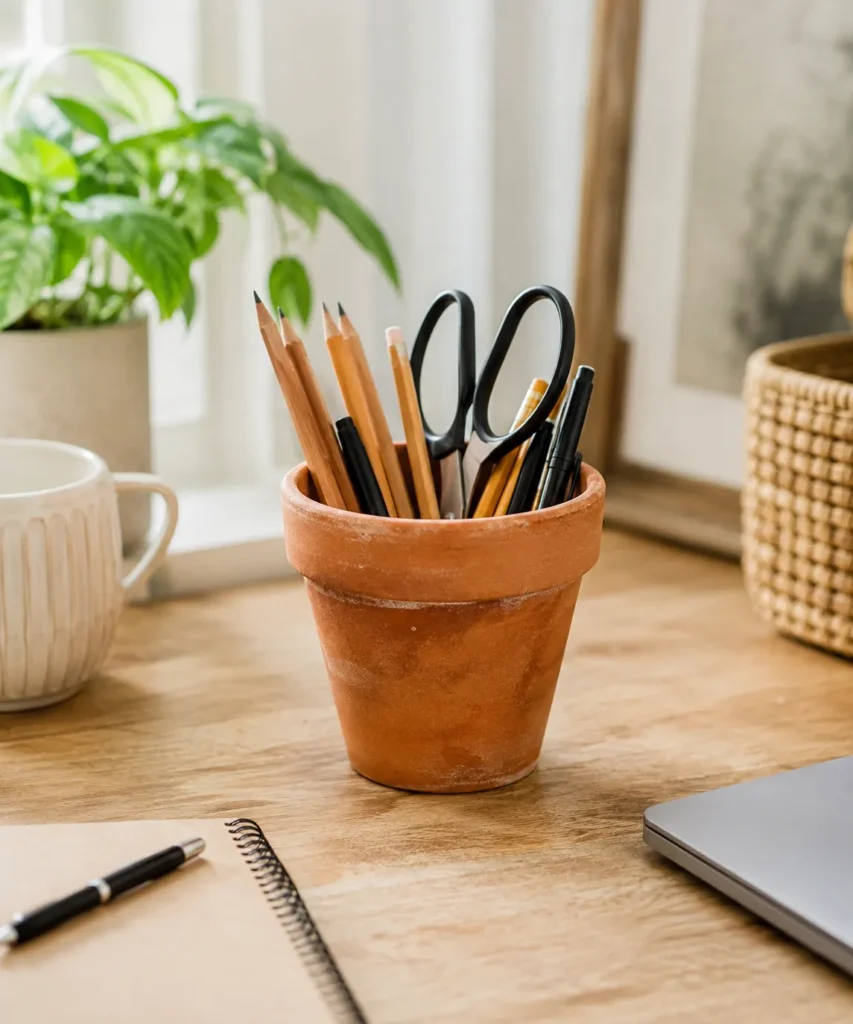
A small flower pot makes a surprisingly good desk organizer because the job asks almost nothing from the original object. The pot already has the right height for pencils, pens, small rulers, and scissors, and its weight helps stop it tipping over when one side gets fuller than the other. The unpainted terracotta version also suits a calm workspace because it looks more like a deliberate desk accessory than a leftover gardening item.
The part I like here is how little modification is needed. Instead of covering the pot in several layers of decoration, you can let the clay do most of the visual work. A thin felt or cork pad underneath protects the desk, while a small removable liner inside can stop narrow pencils from finding the drainage hole. If the pot is too deep for short tools, add a little clean cork, folded fabric, or a removable insert at the bottom rather than filling it with loose material that will be difficult to clean.
Materials and Tools
· Small clean terracotta flower pot
· Fine sandpaper for any rough rim
· Felt or cork for the base
· Optional removable liner or inner disc
· Pencils, pens, scissors, or other lightweight desk tools
A Practical Way to Make It
1. Clean and inspect the pot. Brush away old soil and wash the pot if necessary, then let it dry completely. Check the rim for chips that could catch your hand when you reach for a pen, and smooth only the rough areas rather than sanding away all of the natural clay texture.
2. Protect the work surface. Cut a felt or cork circle slightly smaller than the pot base and attach it underneath with a suitable adhesive or removable pads. If the drainage hole is large, place a fitted disc or small removable liner inside so narrow tools do not fall through.
3. Arrange tools by height. Put taller items toward the back and shorter pencils or pens toward the front. Do not pack the pot so tightly that scissors or sharpened pencils become difficult to remove safely; the organizer should make the desk easier to use, not turn into a tiny tool puzzle.
4. Adjust the finish only if needed. Leave the terracotta natural for a warm, understated look, or add a simple painted band if the desk needs a little color. Then let any finish cure fully before putting the organizer back into daily use.
A Small Detail I’d Keep in Mind
For me, the best version of this idea is the least complicated one. A flower pot already has a useful silhouette, so I would add only what solves a practical problem: a protected base, a blocked drainage hole if needed, and enough room to reach the tools comfortably.
Variations and Alternatives
Use a wider pot for paintbrushes, crochet hooks, or children’s coloring pencils. A shallow saucer can sit underneath to hold paper clips or erasers, and a removable fabric sleeve around the pot can change the look without permanently painting the clay.
Keeping It Useful Day to Day
Tip the organizer out occasionally and wipe the inside rather than letting pencil shavings and dust collect at the bottom. If you use a removable liner, lift it out and clean it separately. Terracotta can leave a faint dusty residue on some surfaces, so check the felt or cork pad now and then and replace it if grit becomes trapped underneath. Keeping only the tools you actually reach for also helps the pot stay balanced and makes the organizer feel intentional rather than crowded.
Beginner Shortcut
If you want the quickest version, skip paint entirely. Clean one small pot, cover the drainage hole with a removable cork disc, add felt pads underneath, and use it. The project can be finished without glue if you choose self-adhesive pads and a fitted inner disc.
Build a Hanging Bird Feeder From a Pot and Saucer
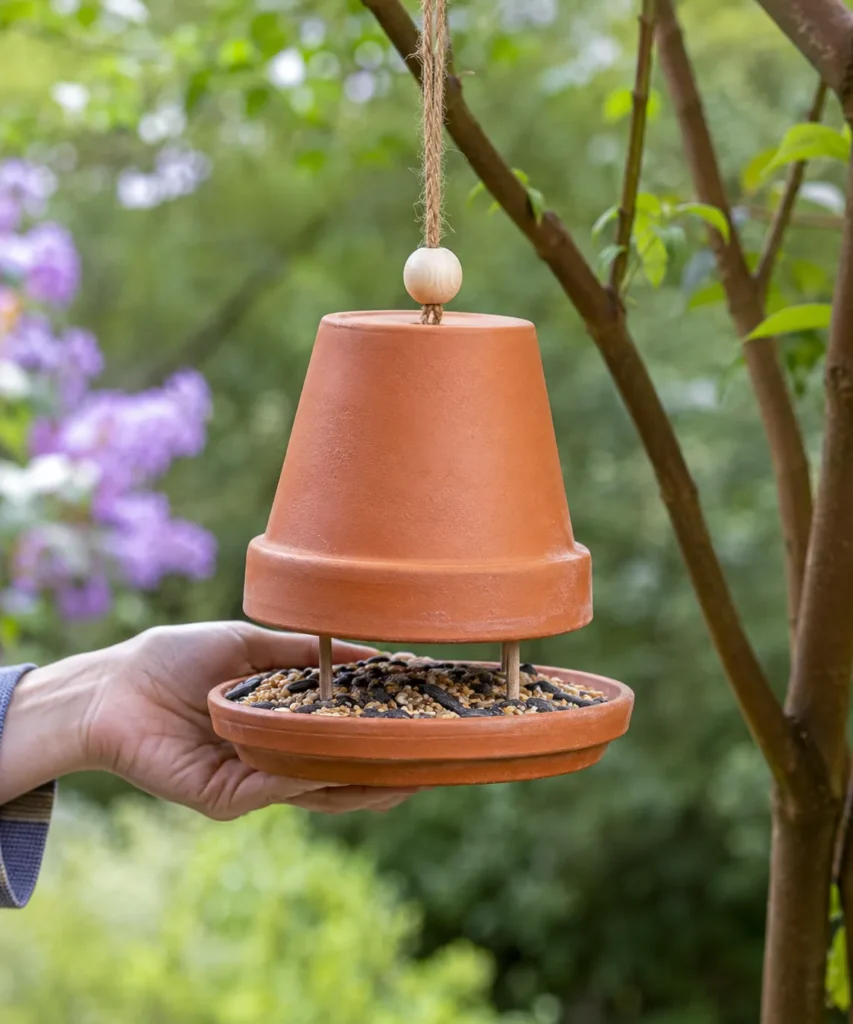
A pot-and-saucer bird feeder takes advantage of the drainage hole instead of trying to hide it. The pot can hang upside down above the saucer, creating a small roof, while the saucer holds seed below. The result keeps the recognizable terracotta shape and gives a forgotten pair of garden pieces a new outdoor role.
Balance is the main challenge. The hanging cord needs to pass through secure points so the saucer stays level, and the gap between the pot and saucer should leave enough room for birds to reach the seed. I would keep the construction simple and avoid adding heavy ornaments that could make the feeder swing unevenly. Outdoor cord, weather-resistant knots, and a solid branch or hook matter more than decorative extras.
Materials and Tools
· Terracotta flower pot with drainage hole
· Matching or slightly wider terracotta saucer
· Outdoor-safe cord or rope
· Large knot, wooden bead, washer, or other suitable stop
· Birdseed appropriate for local birds
· Optional small spacers or short dowels to maintain a gap
A Practical Way to Make It
1. Check both clay pieces. Make sure the pot and saucer have no spreading cracks, because hanging adds stress that a decorative tabletop project does not. Smooth sharp chips and confirm that the drainage hole is large enough for the chosen cord without forcing it.
2. Plan the hanging connection. Thread outdoor-safe cord through the pot and saucer using a secure stopper below each piece so they cannot slide together. If the design needs spacers to create a feeding gap, place them evenly so the pot roof remains centered over the tray.
3. Test the feeder before adding seed. Hang the empty feeder low over a soft surface first. Adjust the knots until the saucer sits reasonably level, then press lightly on different edges to check whether the assembly twists or tilts too easily.
4. Fill and position it thoughtfully. Add a shallow layer of seed rather than overfilling the saucer, then hang the feeder where you can monitor it and clean it easily. Keep it away from unsafe obstructions and refresh seed if it becomes wet or dirty.
Where Balance Matters Most
One detail I wouldn’t skip is the empty balance test. It is much easier to correct a crooked saucer before seed is scattered underneath the tree. The feeder does not need to hang with mathematical perfection, but it should not tip enough to lose its contents.
Variations and Alternatives
A painted exterior can help the feeder coordinate with a patio, but keep decorative coatings away from the seed-contact area unless they are suitable for that use. You can also use a wider saucer for a more open feeding platform or keep the clay completely natural so weathering becomes part of the look.
Keeping the Feeder Clean and Stable
Outdoor feeders need regular checking because rain, seed hulls, and wind can change how they perform. Empty old or wet seed, brush the saucer clean, and look at the cord and knots for wear before refilling. After strong weather, confirm that the pot still hangs centrally and that the saucer has not developed a crack. A feeder that is easy to lower, clean, and rehang will be used more consistently than one placed somewhere difficult to reach.
Beginner Shortcut
Keep the first version small and use one pot with one matching saucer. Avoid paint, beads, or complicated decorative hanging systems. A simple centered cord and a shallow seed tray make it easier to see whether the basic structure works before adding anything decorative.
Use a Broken Flower Pot to Make a Miniature Fairy Garden
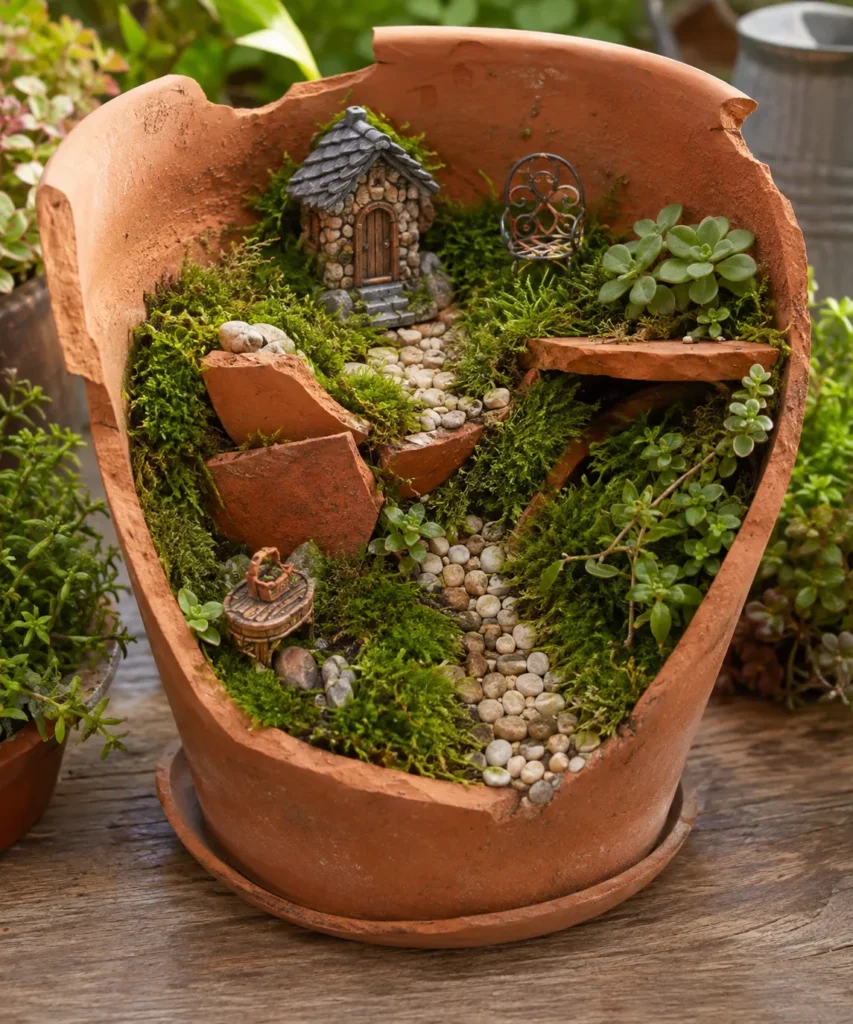
A broken flower pot is often more useful for a fairy garden than an intact one. Large fragments can form terraces, retaining walls, steps, or little planting pockets inside the remaining shell. The damage becomes part of the structure, which means you are not trying to disguise the break; you are using it to create depth.
The most convincing miniature gardens usually have a clear route for the eye. A pebble path can lead toward a tiny house or chair, while moss and small succulents soften the hard clay edges. I don’t think every gap needs to be filled. Small areas of exposed terracotta keep the design readable and remind you what the project started as.
Materials and Tools
· Broken terracotta pot with several usable fragments
· Potting mix suited to the selected plants
· Small succulents, groundcover, or moss where appropriate
· Pebbles or small gravel
· Miniature house, bench, or simple garden ornament
· Gardening gloves for handling broken clay
A Practical Way to Make It
1. Make the broken edges safe. Wear gloves and inspect every fragment before arranging the garden. Discard pieces that crumble easily, and soften dangerously sharp points with sandpaper or a suitable abrasive so normal watering and maintenance do not become risky.
2. Build the internal levels. Set the largest fragment inside the main pot to form a raised terrace, then add soil around it so the piece is supported rather than balancing loosely. Use smaller shards as edging or steps, keeping enough soil depth for the roots of your chosen plants.
3. Create one main visual route. Lay a small pebble path or stepped line from the front toward the focal feature. Then place the miniature house, bench, or ornament where it feels anchored by the surrounding levels rather than floating in the middle.
4. Plant and soften the structure. Add compact plants around the terraces, leaving room for growth. Tuck moss or fine gravel into awkward gaps, then water carefully so the soil does not wash down the new levels.
5. Edit before adding more. Step back and remove any accessory that makes the scene feel crowded. The little house, path, layered clay, and a few plants already tell the story; extra miniatures are optional, not a requirement.
Why Less Can Work Better Here
The part I would watch carefully is scale. A tiny chair can look charming, but five different miniature buildings in one small pot quickly turn the scene into storage for ornaments. Let the broken clay create most of the architecture.
Variations and Alternatives
Skip figurines entirely and make a natural rock-and-succulent landscape, or use the pot as a tiny herb terrace. If the broken pot is too unstable for soil, create a dry miniature scene with stones and preserved decorative materials instead of live plants.
Let the Miniature Garden Change Naturally
Live plants will slowly alter the proportions of the scene, which is part of the appeal. Trim spreading plants before they hide the path or tiny structure, remove fallen leaves, and top up gravel where soil has washed into the walkway. If one plant struggles in the chosen light, replace it rather than redesigning the whole garden. The clay fragments can remain in place while the planting changes with the season.
Beginner Shortcut
Use only one large broken shard to make a single raised level, then add a short pebble path and two compact plants. A miniature chair or small house can be the only decorative feature. This gives the layered effect without requiring several fragile terraces.
Stack Large Flower Pots Into a Small Patio Side Table
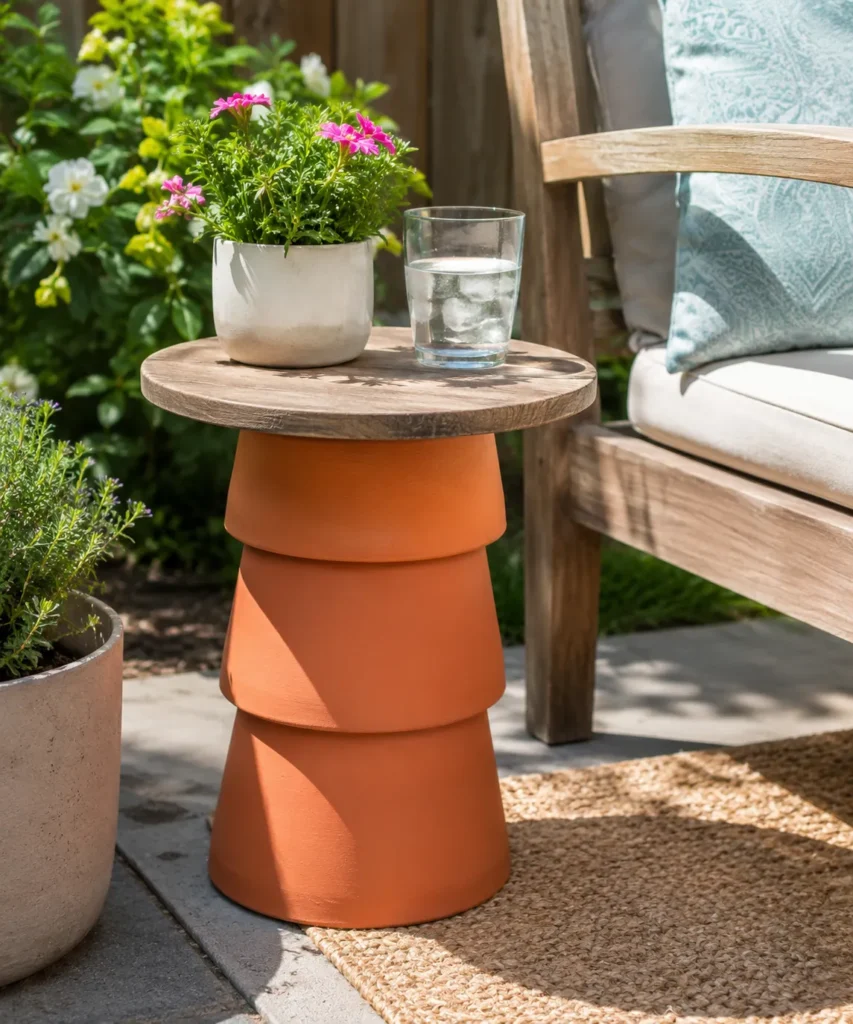
Large pots can do more than hold soil; their broad bases and tapered sides make useful building blocks for a lightweight patio table. Stacked upside down, several similar pots create a sculptural pedestal. A round wooden top then turns the column into a place for a drink, a small planter, or a book beside an outdoor chair.
This idea needs more structural judgment than a pencil holder. The pots must be sound, the stack must sit flat, and the tabletop needs enough support that a small accidental bump does not send everything sideways. I would treat it as a light side table, not as a seat or a stand for heavy objects. That distinction matters.
Materials and Tools
· Two or three sturdy flower pots of compatible sizes
· Round wood top or other suitable rigid tabletop
· Non-slip pads or exterior-rated adhesive if a fixed assembly is desired
· Outdoor-safe finish for wood if the table will stay outside
· Level surface for assembly
· Optional exterior paint for the pots
A Practical Way to Make It
1. Select only strong pots. Reject pots with cracks that travel through the wall or base. Set each pot upside down on a flat surface and check for wobble; slight handmade irregularity is normal, but the stack should not depend on a weak edge for support.
2. Dry-stack and test the proportions. Arrange the pots upside down from widest at the bottom to narrower above, or use matching forms if they nest safely. Place the tabletop on top without adhesive and check the height beside your chair before committing to the final arrangement.
3. Add grip or secure the stack. For a movable table, use thin non-slip pads between contact points to reduce sliding. If you choose a permanent assembly, use an adhesive suitable for the materials and outdoor conditions, following its instructions rather than guessing at cure time.
4. Prepare and attach the tabletop. Sand the wooden top smooth, seal it appropriately for its intended location, and center it carefully. Attach it only with a method that keeps the table stable without stressing a thin area of clay.
5. Use it as a light-duty surface. Place the finished table on a level patio and test it gently before normal use. Keep the load modest and move the table by supporting the base rather than pulling on the top.
A Practical Stability Check
I’d rather have a slightly shorter, steadier table than add another pot just for height. Once a stacked base begins to feel top-heavy, the design has stopped being practical. Stability should decide the final number of pots.
Variations and Alternatives
Paint all pots one muted color for a more furniture-like look, or keep the terracotta natural and use a weathered wood top. A large stone or concrete paver may work as a top only if the pot structure is genuinely strong enough for the weight; otherwise, stay with lighter materials.
Check the Table Before Each Season
Outdoor temperature changes and moisture can reveal weaknesses that were not obvious during assembly. At the start of a new season, check the pot walls, contact points, tabletop attachment, and any pads or adhesive. If the table begins to rock, stop using it until the cause is corrected. Move it by supporting the pot base and tabletop together rather than dragging or lifting from one point, which can put unnecessary stress on the clay.
Beginner Shortcut
Use two large, matching pots rather than three different sizes, and choose a lightweight pre-cut round wooden top. Dry-stack the base first and use non-slip pads so the project remains reversible. You can decide later whether a permanent attachment is actually necessary.
Turn an Inverted Terracotta Pot Into a Candle Lantern
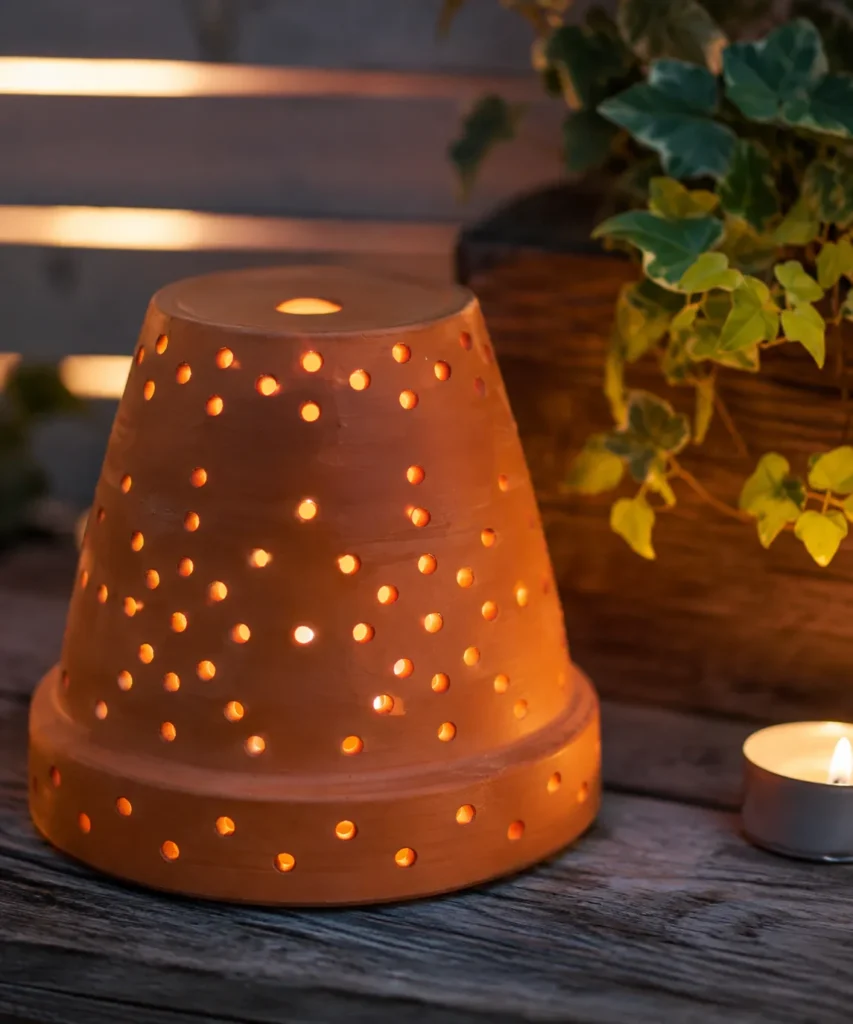
An upside-down flower pot can work as a soft lantern shade because terracotta blocks most of the light while small openings create pinpoints of glow. The drainage hole already gives the top an opening, and additional holes can form a loose pattern across the sides. The effect is especially nice at dusk, when the clay still reads as a familiar garden material.
The drilling is the part that needs patience. Terracotta can crack if a bit catches or too much pressure is used, so the holes should not be crowded too close together or too near the rim. For the light source, a battery-operated LED candle is the simplest option because it avoids an open flame under a clay cover. If a real flame is ever used, the setup needs much more ventilation, heat awareness, and distance from anything flammable.
Materials and Tools
· Terracotta flower pot
· Pencil or removable marker for hole placement
· Suitable drill and masonry or ceramic-compatible bit
· Eye protection and stable work support
· Fine sandpaper for rough drilled edges
· Battery-operated LED candle for the easiest setup
A Practical Way to Make It
1. Plan a loose hole pattern. Mark dots around the pot while leaving generous space between them and away from the rim. An irregular scatter often looks more natural than a dense grid, and fewer holes reduce the amount of stress placed on the clay.
2. Support the pot and drill slowly. Wear eye protection, place the pot on a stable padded surface, and use a bit suitable for the material. Apply light, steady pressure and let the tool do the work; forcing the drill is more likely to crack the pot than speed up the job.
3. Smooth and clean the openings. Brush away clay dust and lightly smooth rough edges around the holes. Wipe the pot clean and allow any moisture from cleaning to dry before placing a light inside.
4. Test with a cool light source. Set a battery-operated LED candle beneath the inverted pot and check the glow in low light. Make sure the pot sits securely and that the light source does not press against the clay or create an unstable base.
5. Place the lantern thoughtfully. Use it on a steady outdoor or indoor surface away from curtains, dry leaves, or other hazards. If you use any open flame instead of an LED, do not leave it unattended and ensure appropriate ventilation and heat clearance.
The Part I Would Take Slowly
This is where patience matters more than adding another tool. A few clean holes are better than a dense pattern that weakens the pot. I would stop as soon as the light effect feels balanced rather than drilling simply because there is empty space left.
Variations and Alternatives
Create a ring of holes near the top, a simple star pattern, or scattered constellations. You can also paint the outside a matte neutral color, though leaving some natural terracotta visible makes the small glowing points feel warmer.
Clean the Lantern Without Damaging the Holes
Clay dust and outdoor debris can settle in the drilled openings, so use a soft brush rather than poking hard objects through them. If the lantern is painted, wipe it gently instead of soaking it unless the coating is designed for that treatment. Store it somewhere protected from hard knocks, because drilled clay has more weak points than an untouched pot. Before each use, check that no crack has started between neighboring holes.
Beginner Shortcut
Use the pot’s existing drainage hole and drill only a small ring of extra openings near the upper third. Pair it with an LED tea light. You will still get a patterned glow without turning the pot into a demanding drilling project.
Reuse a Tall Flower Pot as a Kitchen Utensil Holder
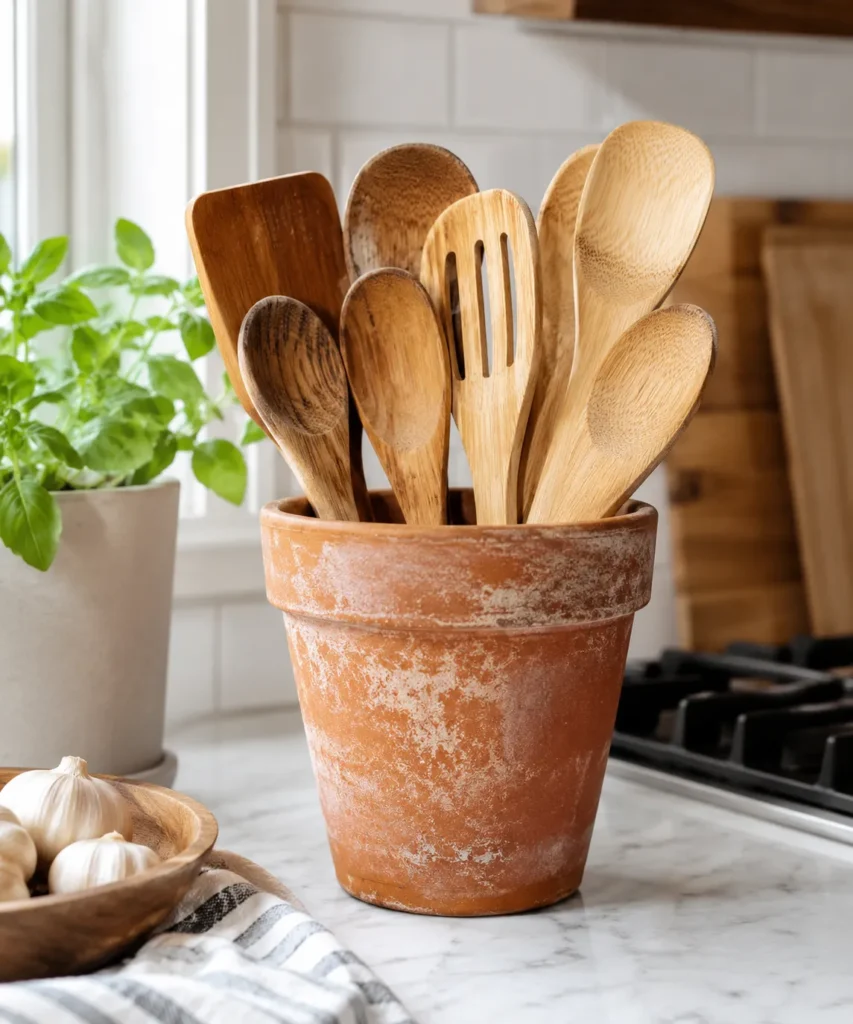
The tall, open shape of a flower pot is already close to a kitchen utensil crock. That makes this one of the easiest repurposes in the group: clean the pot thoroughly, protect the counter, and use it for dry wooden spoons, spatulas, or other long tools. A slightly weathered exterior can look intentional beside timber cutting boards and natural kitchen materials.
The important issue is cleanliness and intended use. The pot should be thoroughly cleaned and appropriate for indoor storage, and I would use it only for clean, dry utensils rather than direct food storage. If the drainage hole is large, a washable removable insert can prevent thin handles from slipping through and can make the interior easier to keep tidy.
Materials and Tools
· Tall clean terracotta flower pot
· Soft brush and mild soap for cleaning
· Felt, cork, or non-slip pads for the base
· Optional washable inner liner or removable disc
· Dry wooden spoons, spatulas, and similar utensils
A Practical Way to Make It
1. Choose a pot with the right proportions. Look for a pot tall enough to support long handles without swallowing shorter utensils. A broad base is helpful because a utensil holder can become top-heavy once several large spoons or spatulas lean to one side.
2. Clean it more thoroughly than a garden project. Remove every trace of old soil and residue, then wash and dry the pot completely. If the pot has previously held materials you would not want near kitchen tools, choose a different one rather than trying to make an unsuitable container work.
3. Protect the counter and drainage hole. Add felt or cork underneath so the terracotta does not scratch stone or timber. Place a removable inner disc or washable liner inside if small handles could slide through the hole.
4. Load the holder loosely. Group the utensils so frequently used pieces remain easy to grab. Leave enough space that damp tools are not packed together; ideally, put utensils away once they are clean and dry.
Keep the Kitchen Version Simple
What matters here is not making the pot look less like a pot. The shape is already right for the job. I would spend my effort on hygiene, a protected base, and a stable arrangement rather than covering the clay with unnecessary decoration.
Variations and Alternatives
A smaller pot can hold teaspoons or reusable straws away from the cooking area, while a wide pot can store pastry brushes and rolling tools. If the terracotta look does not suit the kitchen, paint only the exterior and keep the inside untouched and easy to inspect.
Keep the Holder Dry and Easy to Clean
Shake out crumbs or dust and wipe the interior periodically, especially if the pot has a rough unglazed surface. Do not put dripping utensils straight into the holder, because moisture can collect in the base or liner. If the pot sits close to the stove, clean the exterior before cooking residue builds up in the porous clay. A removable inner cup can be useful in busy kitchens because it can be washed more easily than the terracotta itself.
Beginner Shortcut
Choose a clean pot with a wide base and use a washable cup or liner inside it. That one insert solves the drainage-hole issue and makes maintenance simpler. Add felt feet underneath and the holder is ready without paint or permanent alteration.
Paint a Flower Pot for Makeup Brushes and Vanity Tools
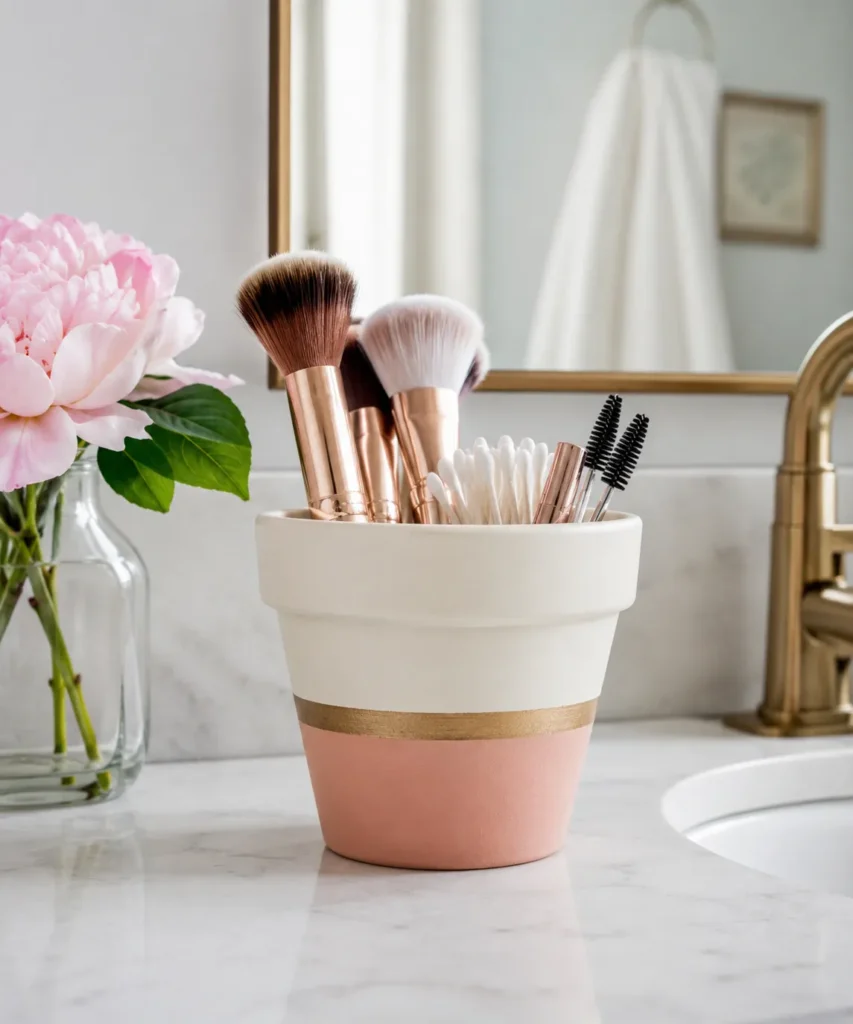
A flower pot works just as well on a bathroom vanity as it does on a desk, especially when the surface is given a cleaner decorative finish. A two-tone painted design with a narrow metallic band can make the pot feel more like a bathroom accessory while keeping the familiar shape. The wide rim helps larger makeup brushes spread out rather than bunching together.
Because bathrooms can be humid, the finish needs to suit the location and the pot should not sit in standing water. I would also keep brushes dry before returning them to the holder. If the pot is deep, a removable insert can lift shorter tools and stop cotton swabs or small applicators disappearing into the bottom.
Materials and Tools
· Small clean flower pot
· Fine sandpaper if the exterior is rough
· Paint suitable for the pot surface
· Painter’s tape for a clean color division
· Optional narrow metallic accent paint
· Felt or silicone pads for the base
· Makeup brushes and dry vanity tools
A Practical Way to Make It
1. Prepare the outside surface. Clean the pot and let it dry completely, then smooth only areas that would interfere with paint. Wipe away dust so the finish does not trap grit or loose clay beneath the first coat.
2. Plan the color blocking. Use painter’s tape to divide the pot into simple sections, such as a soft lower color, a light upper area, and a thin accent stripe. I know it can be tempting to add several decorative details, but a bathroom holder usually looks calmer when the pattern stays simple.
3. Apply the finish in light coats. Paint the exterior according to the chosen product’s directions and avoid flooding the rim or interior with unnecessary coating. Remove tape carefully at the appropriate stage, then allow the finish to cure fully before handling it as a daily-use item.
4. Protect the vanity surface. Add small pads underneath so the pot does not scratch the counter and moisture cannot sit trapped directly beneath the base. If needed, place a removable liner inside to block the drainage hole and make cleaning easier.
5. Organize only dry tools. Place clean, dry brushes upright with larger handles toward the back. Leave enough room for air circulation and clean the holder periodically so cosmetic residue does not build up around the rim.
A Finish That Still Feels Practical
For me, the narrow accent band is enough decoration. The shape of the pot is simple, and the brushes add plenty of visual texture on their own. I would rather have a finish that is easy to wipe than a heavily embellished surface that collects dust.
Variations and Alternatives
Use the same approach for hairbrushes, combs, manicure tools, or cotton pads stored in a separate removable cup. You can skip metallic paint entirely and use one solid matte color, or leave the rim in natural terracotta as a small reminder of the pot’s original purpose.
Keep Brushes and the Pot Cleaner
Makeup residue can collect quickly on a light-colored rim, so wipe the holder regularly with a method suitable for the finish. Wash brushes separately and let them dry completely before returning them upright. If water splashes frequently around the sink, move the pot a little farther back or place it on a small tray so moisture does not sit under the base. The simpler the painted surface, the easier this routine tends to be.
Beginner Shortcut
Instead of several paint sections, use one solid exterior color and leave the rim natural. Painter’s tape is only needed around the boundary if you want a crisp line. Add a removable liner and small base pads, then organize the brushes once the finish is fully cured.
Flower Pot Repurposing Mistakes That Can Spoil the Result
Repurposing flower pots is forgiving, but the material has limits. Most problems come from asking a damaged pot to do a structural job, rushing surface preparation, or adding decoration that makes the new use harder instead of easier. A few checks at the beginning can prevent most of those issues.
· Ignoring hairline cracks on load-bearing projects. A crack that is harmless in a decorative fairy garden may be a real weakness in a stacked side table or hanging feeder. Use structurally sound clay for any project that carries weight or hangs above the ground, and reserve damaged pots for low-risk decorative uses.
· Painting before the pot is truly dry. Terracotta is porous, so moisture can remain after the surface looks dry. Paint applied too soon may bond poorly or develop uneven areas. Clean first, let the pot dry thoroughly, and use coatings suited to the intended indoor or outdoor location.
· Forgetting about the drainage hole. The drainage hole can be useful, but it can also swallow pencil tips, brush handles, or small vanity tools. Decide early whether the new use needs the hole open, covered with a removable insert, or used as part of the construction.
· Making the stacked table too tall. Adding another pot can seem like an easy way to reach the desired height, but each layer can make the base less stable. Dry-stack first, test the proportions beside the chair, and stop when the structure feels steady rather than chasing a specific height.
· Drilling too many lantern holes. Dense hole patterns may weaken terracotta and increase the chance of cracking. Space openings generously, drill with light pressure, and accept a simpler light pattern if the pot feels thin or fragile.
· Using an open flame casually. A clay cover does not remove normal candle risks. Battery-operated LED candles are the easier choice. If a real flame is used, it needs ventilation, a stable surface, distance from flammable materials, and constant supervision.
· Overfilling organizers. A pot that holds every pen, spoon, or brush you own can become top-heavy and frustrating to use. Keep the container loose enough that items can be removed without dragging the whole bundle with them.
Frequently Asked Questions
Do I need to seal terracotta before using it indoors?
Not always. For a dry desk organizer or utensil holder, clean terracotta can be used as-is if you like the natural finish. Sealing may be useful when you want easier wiping or a painted finish, but choose a product appropriate for the location and keep decorative coatings away from surfaces that directly contact food.
Can cracked flower pots still be repurposed?
Yes, but the new use should match the damage. A cracked or broken pot can work well in a miniature garden where fragments become part of the design. Avoid using compromised clay for hanging projects, stacked furniture bases, or anything that could fail under weight.
What is the easiest flower pot repurpose for a beginner?
A desk organizer, utensil holder, or vanity brush cup needs very little construction. Clean the pot, smooth rough edges, protect the surface underneath, and deal with the drainage hole if necessary. Those projects let you focus on usefulness before trying drilling or structural assembly.
How can I stop a flower pot from scratching a table or counter?
Add felt pads, a cork circle, silicone feet, or another non-scratch barrier beneath the base. This also helps keep gritty clay dust away from polished surfaces. For bathrooms and kitchens, make sure moisture cannot stay trapped beneath the pot for long periods.
Can I paint a pot that will stay outdoors?
You can, but use a coating intended for the material and outdoor exposure, and follow the product instructions for preparation and curing. Terracotta expands and absorbs moisture, so exterior finishes need to tolerate those conditions better than ordinary indoor craft paint.
Is a real candle safe under an upside-down pot lantern?
A battery-operated LED candle is the simpler and lower-risk option. Real flames create heat and need ventilation, supervision, and distance from anything flammable. If you are uncertain about heat buildup or airflow, use an LED light instead.
What can I put inside a flower pot to cover the drainage hole without making it permanent?
A fitted cork disc, removable plastic liner, small silicone insert, or washable cup can work depending on the project. The goal is to block small objects while keeping the pot easy to clean and reuse later. Avoid permanent fixes unless the new function truly needs them.
Give the Pots You Already Have a Different Job
Learning how to repurpose flower pots is mostly about noticing what the object already does well. A pot can hold, support, shelter, stack, hang, or create a strong little container without needing to be turned into something unrecognizable. That is why simple projects like the desk organizer and utensil holder can be just as satisfying as the more involved bird feeder, side table, or lantern.
I would begin with the pot whose new purpose feels most obvious in your home. If you need desk storage, use the small one on the shelf. If a broken pot has been waiting in the garden, turn the fragments into a miniature landscape instead of throwing them out. Once you start matching the pot’s condition and shape to a practical new job, repurposing feels less like a craft challenge and more like sensible reuse.
Have a look at the flower pots you already own before buying materials for the next project. One of them may already be the organizer, feeder, table base, lantern, or vanity holder you need – it just has not been given that job yet.