Hollow-core doors are easy to overlook because they feel lighter and less substantial than old solid-timber doors. Once removed from a doorway, they often end up leaning in a garage or heading straight for disposal, even though their broad flat faces can still become useful cabinet fronts, decorative panels, shelving backs, or room features.
I think the best hollow-core door projects begin by respecting how the door is built. Most have thin outer skins over a lightweight internal core, with firmer timber only around the perimeter and in selected hardware areas. That construction makes them easy to move, but it also means you cannot treat every part of the slab like solid wood.
A successful reuse plan keeps heavy loads on added framing, reinforces every cut edge, and uses the wide surface for paint, moulding, pattern, or shallow storage. I don’t think a hollow-core door needs to imitate an antique solid door to earn another use. Its lightness can be the advantage, provided the project is designed around it rather than against it.
Before You Begin Work on a Hollow-Core Door
Remove handles, hinges, hooks, and any loose fittings, then lay the door flat on padded supports. Check both faces under side light for bubbles, soft areas, cracks, water swelling, and places where the skin has separated from the inner core. Press gently rather than leaning your full weight on the centre, because the thin face can dent even when the door still looks sound.
Work out what the finished object must carry before cutting anything. A painted decorative door asks very little from the structure, while shelves, mirrors, cabinet hinges, or paired-door hardware need solid fixing points. If the project needs screws where no timber exists, add a proper frame, blocking, or backer board instead of relying on the thin skin alone.
Locate the Strong Areas
The outer rails and stiles usually provide the strongest fixing zones. A stud finder, careful tapping, an exposed hinge recess, or a small test hole on a hidden edge can help you understand the internal layout. Mark these areas in pencil so later screws, shelf supports, and hinges land in reinforced material.
Plan Every Cut Edge
Cutting a hollow-core door exposes the lightweight interior. Before sawing, decide how each open edge will be closed with a glued timber strip or a purpose-made frame. This is where patience matters more than buying another decorative product: a neat reinforced edge makes the finished project feel intentional and prevents the skins from peeling away.
Set Aside Hollow-Core Doors With:
• Large water-swollen areas, crumbling skins, or persistent damp damage
• Widespread delamination where either face has lifted from the inner core
• A pronounced twist, bow, or sag that prevents the slab from lying flat
• Crushed hinge or latch edges that cannot hold new timber blocking securely
• Active mould, a strong musty smell, insect damage, or contaminated surfaces
• Fire-rating labels or a current safety function that would be lost by altering the door
• Large previous cut-outs that leave too little sound perimeter structure for the new project
• Old coatings that are flaking heavily and cannot be prepared safely without specialist advice
A door with local dents or small holes may still be useful for a painted panel or lightweight cabinet front. Extensive moisture, structural, or coating damage is different; decoration should never be used to hide a slab that has already lost its strength.
For a Hollow-Core Door Suitable for Repurposing, Inspect:
• Whether the slab is genuinely hollow-core, solid-core, or solid timber
• The flatness of both faces and the condition of the thin outer skins
• The width and soundness of the perimeter rails and stiles
• The hinge and latch blocks that may provide stronger fixing points
• Any bubbles, punctures, crushed corners, loose veneer, or water marks
• The existing paint, varnish, laminate, or factory-primed surface
• The exact height, width, and thickness available for the new use
• Where shelves, hinges, handles, mirrors, or decorative panels will be attached
• How every cut edge will be reinforced and closed
• How the completed piece will be anchored, supported, opened, or moved safely
Measure the planned location as carefully as the door itself. A narrow display unit needs clearance for shelves and wall anchors, while cabinet fronts need enough room to open without catching on the frame, floor, or neighbouring door.
Useful Materials and Tools
• Tape measure, pencil, straight edge, and carpenter’s square
• Stud finder or another careful method for locating solid internal blocking
• Fine-tooth saw and a clamped guide when the door must be cut
• Timber strips for closing cut edges and reinforcing hinges or shelf fixings
• Wood glue, clamps, suitable screws, and drill bits for pilot holes
• Lightweight filler and flexible sanding pads for repairing the door skins
• Cleaner, bonding primer, furniture or interior paint, brushes, and small rollers
• Painter’s tape, stencils, tracing paper, or templates for decorative finishes
• Shelf boards, narrow moulding, backer strips, hinges, knobs, or handles as required
• Wall anchors, anti-tip fittings, and brackets rated for the completed project
• Safety glasses, hearing protection, dust protection, and a stable cutting surface
Choose only the materials required by the specific project. A painted door makeover may need no cutting tools at all, while a shelving unit needs added timber structure before any shelf is expected to carry books, pottery, or plants.
Use Hollow-Core Door Sections as Bold Geometric Cabinet Fronts
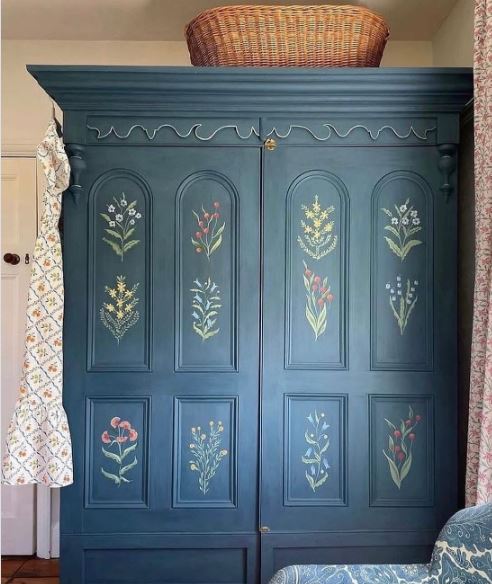
A tall storage cabinet with pale doors, bright orange frames, teal and blue motifs, and dotted borders shows how much visual structure paint can add to a flat surface. The design works because the pattern follows the shape of the doors and drawers instead of floating randomly across them. Simple round knobs sit at the centre, so the colour remains the main feature.
A similar look can be created from cut-down hollow-core door sections used as lightweight cabinet fronts. The wide flat skins provide an excellent painting surface, but every cut edge and hardware point needs reinforcement. The project is most suitable for a cabinet that will hold linens, clothing, craft supplies, or other ordinary household storage rather than very heavy workshop materials.
Materials and Tools
· Sound flat hollow-core door or reusable door offcuts
· Fine-tooth saw, straight cutting guide, clamps, and safety equipment
· Timber blocking for all cut edges, hinges, and handle locations
· Wood glue, pilot drill bits, screws, and lightweight filler
· Bonding primer and compatible paints in a restrained base plus accent colours
· Painter’s tape, stencil or paper template, ruler, and small detail brush
· Cabinet hinges and knobs fixed into reinforced areas
A Practical Way to Recreate the Look
1. Set the finished cabinet dimensions. Measure the cabinet opening and plan each front before cutting the door. Mark hinge and handle positions at the same time, because those points must contain solid timber rather than unsupported skin. Keep the fronts as large as practical; very narrow strips are more likely to flex.
2. Cut and close the hollow edges. Support the whole slab, clamp a straight guide, and make clean cuts with a suitable fine-tooth blade. Remove a small amount of the exposed inner core, then glue timber strips between the two skins. Clamp the edges flat until the repair is stable, and fill only the small gaps that remain visible.
3. Prepare a calm base for the pattern. Clean the faces, smooth repairs gently, and use a primer suited to the existing surface. Apply the base colour in thin coats, checking the repaired edges for ridges. A pale background gives bright geometry room to stand out without making the cabinet feel visually heavy.
4. Build the motif from the outside inward. Mark the main rectangles with a ruler and low-tack tape, then paint the largest orange or contrasting blocks first. Add the smaller blue and teal shapes once the larger areas are ready. Use one paper template repeatedly so the pattern stays consistent across both doors and the lower fronts.
5. Install hardware only into blocking. Drill pilot holes through the reinforced timber areas and fit hinges and knobs without overtightening. Hang each front, adjust the gaps, and open it several times before loading the cabinet. Then touch up only where necessary; repeated handling of fresh paint is a very efficient way to create work you did not ask for.
For me, the repeated border is what makes this design feel finished. A beginner could simplify it to one painted rectangle and a single central motif on each door. Wallpaper offcuts or removable vinyl can also supply the inner pattern, but the hinge and cut-edge reinforcement should stay exactly the same.
Turn a Hollow-Core Door into a Slim Display Shelf
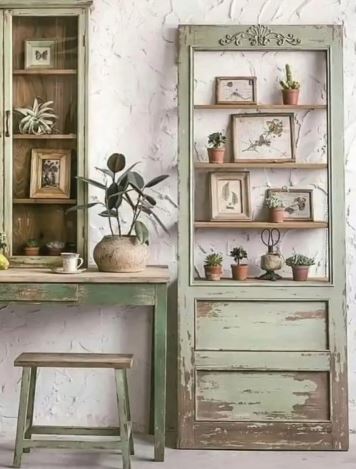
A full-height door makes a useful visual back for narrow shelving because it already provides one continuous vertical surface. The two versions here show the same basic idea styled differently: one has a warm distressed finish with a mirror-like centre and lower rack, while the other uses faded sage paint, shallow timber shelves, plants, and framed artwork. Retaining the lower door panels helps the finished unit still read as a repurposed door.
The important structural point is that shelves must not rely on screws driven only into a hollow face. Even small objects add up, especially when several shelves sit on the same slab.
A safer method is to add full-height timber battens along the back or sides, connect the shelf supports to those battens, and anchor the completed unit to wall studs or suitable masonry fixings.
Materials and Tools
· Full hollow-core door with a flat, sound perimeter
· Two full-height timber battens or a shallow supporting frame
· Narrow shelf boards and cleats sized for lightweight display objects
· Drill, pilot bits, screws, glue, square, clamps, and level
· Wall anchors or anti-tip brackets suited to the wall construction
· Cleaner, filler, primer, paint or stain, and optional decorative stencil
· Optional lightweight mirror panel, hooks, or lower rail supported by the added frame
A Practical Way to Recreate the Look
1. Decide whether the unit will stand or hang. A floor-standing display still needs anti-tip fixing, while a fully wall-hung version needs a continuous structural frame behind the door. Mark the shelf heights around the objects you intend to display. Keep heavy pottery, large books, and glass collections out of a shallow lightweight unit unless the frame has been designed for them.
2. Build the support before decorating. Attach full-height timber battens to the strong perimeter zones and, where possible, continue them behind the slab as a frame. Fix shelf cleats into this added timber rather than the thin door skin. Check the assembly for square and make sure the battens sit flat against the wall.
3. Repair and finish the door face. Clean the old coating, fill dents lightly, and prime any exposed or glossy areas. Apply a painted, stained, or deliberately worn finish without sanding through the thin outer skin. If you want a distressed look, add it in controlled places after the base is sound rather than scraping until the face becomes weak.
4. Fit shallow shelves and optional details. Cut the shelves to the same depth and smooth their front edges. Screw them into the supported cleats, then add a small stencil, narrow moulding, or a lightweight mirror panel if it suits the design. I know it can feel tempting to cover every empty area, but open space is what allows small objects to remain visible.
5. Anchor and load the unit gradually. Fix the frame to suitable wall structure, check it with a level, and test each shelf with light objects first. Keep the heaviest pieces near the bottom and leave enough clearance to lift framed art or plants without catching the shelf above. Recheck the anchors after the unit has been in use.
A narrower beginner version can use only two shelves and one lower hook rail. For a rental-friendly adaptation, build the door into a freestanding framed unit with a wide stable base, but still use an anti-tip strap where allowed. The door should provide the decorative back; the added timber frame should do the serious supporting.
Create a Glazed-Style Double-Door Feature Without Weakening the Core
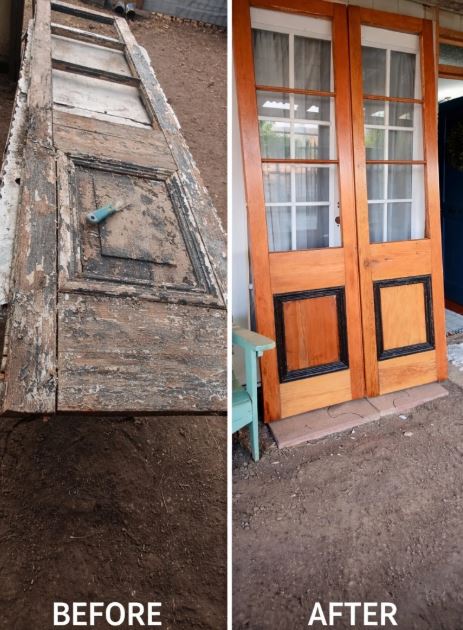
The before-and-after transformation from a heavily weathered door to warm paired doors with glazed upper sections is a useful reminder that damaged-looking joinery can sometimes be rebuilt rather than discarded. The finished doors balance clear rectangular panes with solid lower panels and dark trim, so the glazing feels ordered rather than fragile.
However, extensive real glazing is not a straightforward hollow-core alteration. Cutting away most of the centre can remove the structure that keeps the slab square. If a door is truly hollow-core, do not copy this look by opening large window spaces unless a skilled joiner rebuilds the leaf with a proper internal frame. A safer DIY version uses lightweight acrylic mirror, clear acrylic over a decorative backing, or faux muntins applied to the surface.
Materials and Tools
· Two matching hollow-core doors with sound edges, or solid doors for genuine glazing
· Timber perimeter reinforcement and paired-door hardware
· Lightweight acrylic, mirrored acrylic, or decorative panel material for a glazed-style effect
· Thin moulding for applied frames and muntins
· Drill, saw for moulding only, square, clamps, adhesive, and pilot screws
· Cleaner, filler, primer, wood-tone paint or stain effect, and dark accent paint
· Suitable track, hinges, catches, floor guide, or other hardware for the intended opening
A Practical Way to Recreate the Look
1. Confirm the construction before choosing the method. Inspect the top or hinge edge and identify whether the doors are hollow, solid-core, or solid timber. Reserve real cut-through glazing for doors with a sound rebuildable frame and appropriate professional input. For ordinary hollow-core slabs, plan the window effect as a lightweight surface treatment.
2. Repair and reinforce the paired edges. Close damaged corners, add timber blocking where hinges, catches, or a track will fix, and make both leaves the same size. Dry-fit the doors in the opening before decorative work. A pair that does not hang square will not be rescued by carefully painted trim.
3. Create the applied glazed panels. Cut lightweight acrylic or decorative inserts to sit on the face rather than removing the core. Frame each panel with thin moulding, keeping the layout symmetrical across both doors. Use adhesive compatible with the materials and add small mechanical fixings only where they enter blocking or applied timber.
4. Finish the doors as one composition. Prepare both leaves together and apply the same warm wood tone, painted grain effect, or solid colour. Paint the lower panel trim in a darker accent if you want the stronger outline seen in the finished pair. Step back frequently so the horizontal divisions continue cleanly from one door to the other.
5. Install and test the movement. Use hardware rated for the actual weight and opening type, then adjust the floor guides, catches, and meeting edges. Make sure no acrylic edge is exposed and that the pair cannot swing or slide into furniture. If the doors separate rooms, confirm that the chosen design does not interfere with privacy, ventilation, or required safety performance.
A simpler alternative is to paint faux window panes directly onto the doors and add narrow surface moulding. It gives the tall divided appearance without introducing transparent material. I’d rather keep a hollow-core slab structurally complete than force it to behave like a solid framed door.
Give a Plain Hollow-Core Door a Folk-Art Paint Makeover
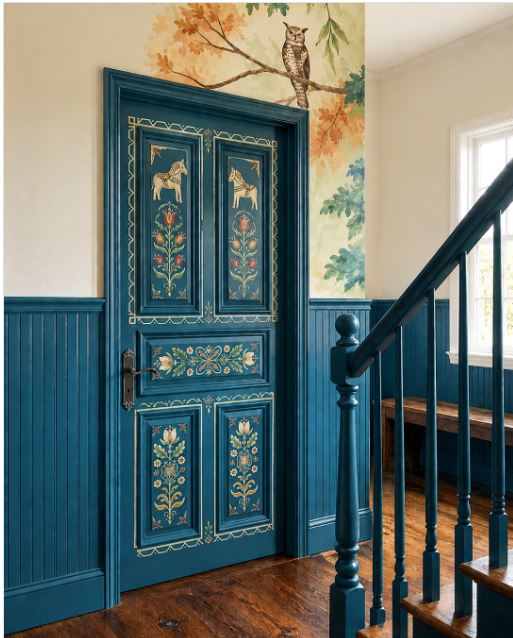
A deep teal door with floral borders, tulip panels, small animal figures, and fine cream linework shows the easiest way to repurpose a hollow-core door without changing its structure at all. The existing panel layout guides the decoration, while the wall panelling repeats the dark colour and makes the door feel connected to the room.
This approach suits a door that still opens properly but looks too plain or marked for its setting. Paint adds very little weight, requires no cut edges, and keeps the original hinge and latch blocks intact. The challenge is not construction; it is planning enough repetition to make the detailed design feel balanced.
Materials and Tools
· Sound hollow-core interior door with working hinges and latch
· Degreasing cleaner, fine abrasive pad, filler, and suitable primer
· Base paint and compatible detail paints
· Small flat and round brushes, pencil, ruler, and tracing paper
· Low-tack tape, reusable stencil, or paper templates for repeated motifs
· Optional clear protective finish compatible with the paint system
· Door wedges and a stable horizontal work surface if the door is removed
A Practical Way to Recreate the Look
1. Photograph and label the hardware. Check the door fit before removing it, then label hinges, screws, and the latch so everything returns to the same position. Clean the door thoroughly, especially around the handle. Repair small dents with a lightweight filler and avoid aggressive sanding that could cut through the face skin.
2. Apply an even base colour. Prime the prepared surface where required and use thin coats of a deep or muted colour that suits the room. Keep paint out of hinge recesses and off the latch edge. Let each face settle flat so roller marks and runs do not become part of the folk-art pattern by accident.
3. Plan the large motifs first. Use the raised or applied panel shapes as natural frames, then position the main animals, flowers, or central stems on paper before transferring them. Repeat the same baseline and border width across related panels. The drawings do not need to be perfectly identical, but they should share the same scale and direction.
4. Add borders and fine details in stages. Paint the broad floral shapes first, followed by stems, leaves, and fine outlines. Use a ruler or tape for geometric edges and a small brush for curves. Then pause and view the door from across the room; small gaps that feel obvious at arm’s length often disappear once the whole composition is visible.
5. Protect and rehang the door carefully. Add a compatible protective finish only if the paint system and level of handling require it. Refit the hardware after the surface is ready, check that the door closes without rubbing, and add small bumpers if painted faces meet the frame. Clean the finished artwork gently rather than using abrasive kitchen or bathroom products.
For a beginner, one floral border around the main panel can be enough. Another practical variation is to paint the door one strong colour and use removable vinyl motifs until you are confident about a permanent design. The most convincing version repeats colours already present in the wall, stair rail, rug, or nearby furniture.
What Can Weaken a Hollow-Core Door Upcycle
Treating the Centre Like Solid Timber
Screws driven into an unsupported face may feel tight at first and then pull through under shelf, mirror, or hinge weight. Add timber blocking, a continuous backer, or an external frame wherever the project carries a load.
Cutting Before Planning the New Edges
An exposed honeycomb core is difficult to finish neatly after the project has already been assembled. Mark the blocking size before cutting, leave enough skin for a clean glue joint, and close each edge while the panel is still easy to clamp flat.
Using Heavy Shelves on a Lightweight Back
A door-backed shelf can look like a cabinet without having the same structure. Keep shelves shallow, attach them to added vertical framing, anchor the unit, and reserve heavy books, stoneware, or large plants for furniture designed to carry them.
Sanding Through the Door Skin
The outer face may be thin hardboard or veneer rather than thick wood. Smooth only what is necessary, use flexible fine abrasives, and rely on a suitable bonding primer instead of trying to remove every trace of the factory finish.
Hanging Paired Doors on Weak Hardware Points
A hinge, track fitting, or handle needs more than a decorative skin. Reinforce the fixing zones, drill pilot holes, and use hardware suited to the completed weight. Test the movement before adding acrylic panels, moulding, or other finish layers.
Ignoring Wall Anchoring
Tall shelving and door-based display units can tip even when they appear broad and stable. Connect the supporting frame to suitable wall structure and keep the heaviest objects low. The door is the reused material, not a substitute for an anchor.
Frequently Asked Questions
Can every hollow-core door be repurposed?
No. A reasonably flat, dry door with sound skins and edges is a useful starting point. Doors with extensive swelling, delamination, mould, severe twisting, or a required fire-safety role should not be altered for an ordinary DIY project.
How do I know where the solid timber is inside the door?
Inspect the hinge and latch edges, tap carefully across the surface, or use a stud finder that can distinguish denser zones. The strongest areas are usually around the perimeter and hardware blocks, but the exact layout varies, so confirm it before drilling.
Can I cut a hollow-core door to make cabinet fronts?
Yes, provided each cut edge is reinforced with glued timber blocking and the hinge and handle positions are also strengthened. Keep the sections reasonably wide and support the whole door during cutting so the thin skins do not crack or separate.
Can shelves be screwed directly to the face?
Not for dependable storage. Fix the shelf supports into added battens, a full external frame, or confirmed internal blocking. The decorative face can remain visible, but the added structure should carry the load.
Do I need to remove the old paint before repainting?
Usually you only need to clean, repair, degloss, and prime a stable coating, but loose or unsafe old paint needs a more careful approach. Test an inconspicuous area and follow the preparation required by the chosen primer and paint rather than sanding aggressively by default.
Can a hollow-core door be converted into a real glazed door?
Large cut-through glazing can remove the structure that keeps the leaf square. It is better handled as a professional rebuild with a proper frame, or avoided by using surface-mounted lightweight acrylic, mirror panels, moulding, or painted faux panes.
How can I make a door-based shelving unit safer?
Build a structural frame behind or around the door, keep shelves shallow, anchor the frame to suitable wall structure, and place heavy items low. Test the unit gradually rather than styling every shelf before confirming that the supports remain firm.
Let the Door’s Lightweight Construction Guide the New Use
The most convincing ways to repurpose hollow-core doors use the broad flat face for pattern, colour, display, or lightweight cabinet fronts while transferring real loads to added timber. Once the strong perimeter, hardware blocks, and cut edges are understood, the door becomes much easier to work with honestly.
A full folk-art paint makeover is the simplest place to begin because it leaves the slab intact. Cabinet fronts and shelves can follow when you are comfortable adding blocking and framing. Which unused door in your home could become useful again without asking its thin centre to do more than it safely can?