Old TV stands are often pushed aside when a television moves onto the wall, even though the cabinet underneath may still be sturdy, well proportioned, and full of useful storage. The awkward cable holes and media shelves can make the piece feel dated, but those same openings are often the easiest part to adapt. A shelf made for a DVD player can hold books, baskets, shoes, board games, or folded linens just as comfortably.
I usually look at the shape before I think about paint. A low, wide stand can become an entryway console or a storage bench-style cabinet, while a heavier unit with doors may work better as a sideboard. I don’t think every makeover needs dramatic cutting. Sometimes removing one door, changing the top, and giving the shelves a clearer purpose is enough.
The useful question is not simply how to make an old TV stand look newer. It is how to make the piece suit the room it lives in now. That may mean opening the storage, adding artwork, building upward, or simplifying the front so everyday clutter can disappear behind doors. Good preparation and sensible weight checks matter more than rushing toward the decorative stage.
Check the TV Stand Before You Change It
Empty the cabinet completely and inspect the joints, shelves, back panel, feet, and top. Press gently on each corner to see whether the frame twists or rocks. Tighten loose screws and repair split timber before adding paint, shelves, stone, or extra framing. A piece that was stable under a small television may not remain stable after a heavy new top or tall wall structure is attached.
Remove dust from cable openings and enclosed compartments, because media furniture often collects more dirt than its clean front suggests. Wash grease and polish residue away with a method suited to the surface, let it dry, and then decide whether sanding is necessary. Veneer, laminate, solid wood, and previously painted MDF need different preparation, so test a hidden area rather than treating every finish the same.
Plan the New Function First
Measure the objects you intend to store before moving shelves or closing openings. Baskets need clearance above their rims, game consoles need airflow, and books need enough shelf depth to sit safely. Mark the proposed arrangement with painter’s tape so you can see whether the compartments will remain practical after the makeover.
Keep Electronics Ventilated
Do not seal powered equipment inside an airtight cupboard. Leave space around devices, keep the original cable routes where they are useful, and add tidy openings only when you can do so without weakening the cabinet. Check that cords do not rub against rough timber or sharp cut edges.
Use Safe Fixings
Wide or tall furniture should be anchored where tipping is possible, especially in homes with children or pets. Upper shelves and media-wall frames need fixings suited to the wall structure rather than decorative screws chosen only for appearance. Wear eye protection when drilling or cutting, and support heavy parts instead of trying to hold and fasten them at the same time.
Useful Supplies
· Screwdrivers, adjustable spanner, drill, suitable bits, and clamps
· Wood glue, screws, corner braces, filler, and replacement shelf supports as needed
· Cleaner suited to the existing surface, sanding pads, and dust mask
· Primer and furniture paint, or stain and a compatible protective finish
· Paintbrushes, small roller, trays, masking tape, and drop cloth
· Measuring tape, square, pencil, straight edge, and spirit level
· Timber boards, trim, feet, hinges, catches, cane webbing, or baskets depending on the chosen project
· Eye protection and hearing protection when power tools are used
Turn an Old TV Stand into a Low Storage Console
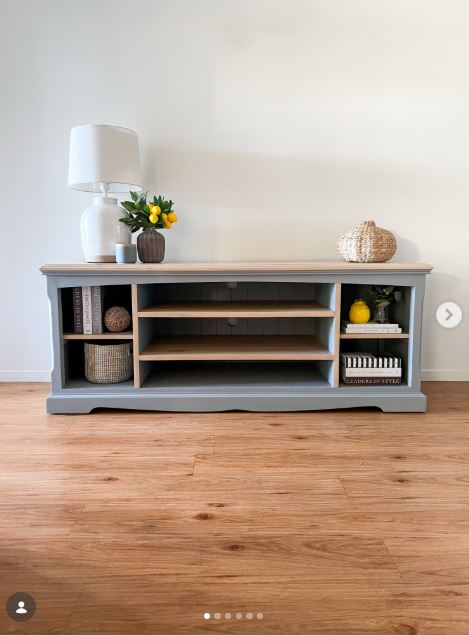
A long, low TV stand already has the proportions of a console, so this transformation works without changing the basic frame. The central media shelves become open storage, while the narrow side sections hold books and baskets. A natural wood top and matching shelf fronts warm up the muted grey body and stop the piece from looking flat.
The strongest detail is the way every compartment receives a clear job. The centre can hold shallow baskets, paperwork, folded textiles, or serving pieces, while the side openings suit taller books and small décor. Leaving some space empty keeps the cabinet from turning into a row of crowded cubbies.
This type of piece could sit in a living room, dining area, home office, or wide hallway. For me, the makeover feels successful because the original TV stand shape is not disguised completely. It is simply edited so the shelves make sense without a television sitting on top.
Materials and Tools
· A sturdy low TV stand with open or removable media compartments
· Cleaner, sanding pads, filler, and primer suited to the existing finish
· Furniture paint for the frame
· Timber board or sound existing top to strip, stain, or clear-finish
· Thin timber shelf fronts or replacement shelves when needed
· Wood glue, screws, clamps, drill, and screwdriver
· Paintbrush and small foam or short-pile roller
· Baskets or boxes measured to fit the finished openings
· Optional backing board or tongue-and-groove-style panel for a neater interior
A Practical Way to Recreate the Project
1. Strip the cabinet back to a sound frame. Remove loose shelves, doors, hardware, cable covers, and any damaged backing that will not be reused. Label every part that may return to the cabinet so the shelf supports do not become a guessing game later. Clean the frame thoroughly, tighten the joints, and fill only the holes that will remain visible in the new layout.
2. Decide which openings should stay. Measure books, baskets, and other storage items, then mark the shelf positions inside the unit. Remove unnecessary dividers only after checking whether they support the top or keep the cabinet square. If a centre divider is structural, work around it rather than cutting it away for the sake of one wider opening.
3. Prepare and paint the frame. Sand glossy areas enough for the chosen primer to grip, remove the dust, and mask any natural wood you plan to keep. Apply primer where the existing material needs it, then build the painted finish in thin, even coats. Let each layer settle according to the product instructions instead of pressing baskets into a surface that still feels soft.
4. Refresh the top and shelves. Strip or sand a solid wood top only as far as necessary, then stain or protect it with a finish suited to everyday handling. Replace sagging shelves with sound boards and add slim timber fronts if you want the warm wood line to repeat across the centre. Check every shelf with a level before securing it.
5. Style the storage without overfilling it. Place the largest practical items first, including baskets and books, then add only a few decorative objects. Keep heavy items low and avoid loading thin shelves beyond what their supports can safely hold. Then step back from the room entrance and check that the open sections feel balanced rather than packed edge to edge.
A beginner-friendly version could keep the original top and shelves, using paint only on the outer frame. I’d rather make three tidy storage zones than create many tiny sections that are difficult to use. Removable baskets also make the console easier to adapt when the room changes again.
Refresh a Wooden TV Stand with Hand-Painted Decorative Panels
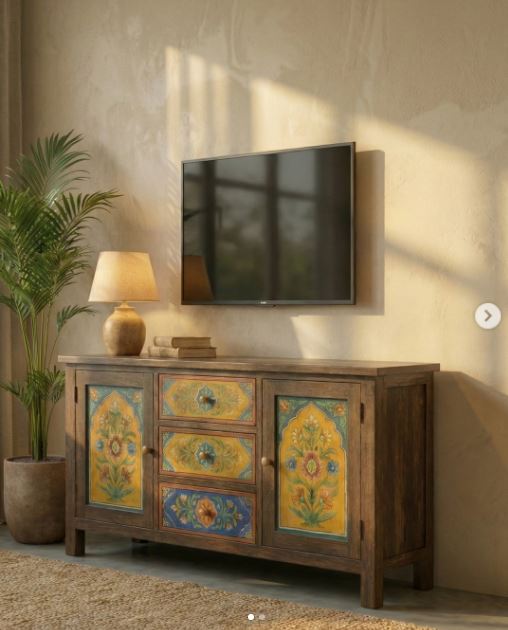
A wooden TV stand with sound doors and drawers can carry artwork without losing its useful storage. Here, the main frame remains warm and understated, while the door and drawer fronts hold the colour. That division is important because it keeps the floral panels from competing with the grain on every surface.
The repeated border shapes make the separate fronts feel connected. Larger floral designs fill the tall side doors, and smaller central motifs suit the shallower drawers. You do not need advanced painting skills to borrow the idea; stencils, traced shapes, découpage, or carefully applied wallpaper panels could create a similar rhythm.
I know it can feel tempting to decorate every available centimetre once the first panel works, but the unpainted rails give the eye somewhere to rest. Keeping the top plain also makes lamps, books, and everyday objects easier to style.
Materials and Tools
· Wooden TV stand with removable doors or drawer fronts
· Degreasing cleaner, fine sanding pads, and dust cloth
· Clear tracing paper, reusable stencil, or paper template
· Primer suited to the original finish and chosen paint
· Furniture or artist paint compatible with the prepared surface
· Small flat brushes, detail brushes, palette, and clean water or suitable thinner
· Painter’s tape, ruler, pencil, and removable marking tool
· Compatible clear protective finish for frequently handled fronts
· Replacement knobs or cleaned original hardware if desired
A Practical Way to Recreate the Project
1. Remove and label the fronts. Take off doors, drawers, hinges, knobs, and catches, then label their positions on hidden edges. Older cabinets may look symmetrical while using slightly different screw locations, so keeping each part with its original opening saves time. Clean the fronts and frame thoroughly before sanding or painting.
2. Plan the artwork across the whole cabinet. Lay the doors and drawers on the floor in their final order and sketch the overall arrangement on paper. Decide which motifs should repeat, where borders will line up, and which areas will remain plain. Then transfer only the main outlines with light marks or low-tack tape so the design can still be adjusted.
3. Prepare a reliable painting surface. Lightly sand or degloss the decorated areas without cutting through thin veneer. Prime only where the chosen paint system requires it, and let the surface settle before adding detail. Test the colours and brush behaviour on a scrap or hidden section, especially if the existing finish is unknown.
4. Build the pattern from broad shapes to details. Paint the largest background shapes first and keep the layer thin enough that door edges still close cleanly. Add flowers, leaves, borders, and small accents after the base is stable. Work across all fronts in stages so the colours remain consistent rather than finishing one panel completely before beginning the next.
5. Protect and reinstall the hardware. Apply a compatible protective coat when the artwork is fully ready for it, paying particular attention to drawer fronts that will be touched often. Clear paint from hinge recesses and screw holes before reassembly. Refit the doors and drawers, adjust the gaps, and add bumpers so painted surfaces do not strike the frame each time they close.
A simpler version could use one patterned centre drawer and keep the remaining fronts natural. Floral paper, vintage wrapping paper, or fabric sealed behind a thin clear panel may suit readers who prefer not to hand-paint. The key is repeating one or two colours so the decoration feels connected to the timber.
Build a Rustic TV Stand from Concrete Blocks and Reclaimed Wood
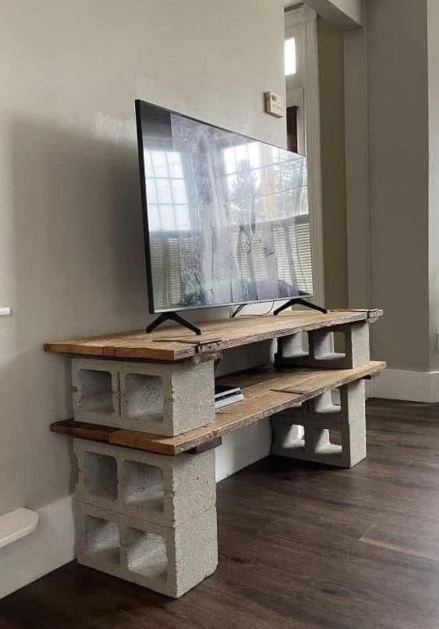
This open stand uses basic building materials rather than a conventional cabinet. Stacked concrete blocks carry two timber boards, creating a broad top for the television and a lower shelf for media equipment. The rough materials suit an industrial or temporary interior, but the structure needs more care than its simple appearance suggests.
The blocks must sit on a level, sound floor, and every board needs enough thickness and support to resist bending. Smooth timber edges also matter because cables and hands will pass close to them. The design works best when it remains low and uncomplicated rather than growing into an unstable stack.
I’d treat this as a carefully assembled furniture project, not as loose materials placed together for a photograph. If the stand can shift when pushed, it is not ready to hold a television.
Materials and Tools
· Clean, intact concrete or masonry blocks of matching height
· Straight reclaimed timber boards without deep splits, rot, or active insect damage
· Tape measure, square, long spirit level, and pencil
· Sanding block or sander, dust mask, and eye protection
· Wood finish suited to indoor furniture use
· Non-slip rubber or protective pads between suitable contact surfaces
· Optional discreet brackets or anchoring method appropriate to the materials and room
· Cable clips or sleeves to keep wires away from rough edges
A Practical Way to Recreate the Project
1. Inspect every reused material. Reject cracked blocks, crumbling corners, twisted boards, and timber with soft or rotten areas. Clean the blocks outdoors or in a suitable work area, and let them dry fully. Check reclaimed wood for embedded nails and metal fragments before sanding, because a hidden fastener can damage tools and send debris into the air.
2. Prepare the boards for indoor use. Cut the boards to matching lengths only after measuring the television base and the proposed support points. Sand the top, sides, and especially the cable-facing edges until they are comfortable to touch. Apply a suitable finish to all accessible faces so the wood is easier to clean and less likely to shed rough fibres.
3. Mark a level footprint. Choose a solid part of the floor and mark the block positions with removable tape. Set the first supports in place and use a long level across them in both directions. Correct the floor protection or support arrangement before adding boards; do not use unstable scraps as makeshift shims under a heavy structure.
4. Assemble the lower and upper tiers. Lay the lower board across the first block level and confirm that each end and centre area have adequate support. Add the next blocks in aligned positions, then place the top board and check again for rocking, bowing, and uneven contact. Keep the block openings oriented consistently unless a different direction has a structural reason.
5. Test the stand before adding electronics. Press gently at several points and confirm that the structure does not slide, tilt, or separate. Route cables so they cannot scrape against concrete and keep powered devices in the open for ventilation. Place the television only after checking the stand against the equipment manufacturer’s support and weight requirements, and anchor the screen where tipping is a concern.
For a softer look, paint the blocks with a suitable masonry coating and use boards from an old tabletop or shelving unit. A lower, single-shelf version is easier to stabilise. This idea is not suitable where children may climb on the structure unless a qualified, secure installation method makes the whole assembly safe.
Expand a Low TV Stand into a Rustic Media Wall
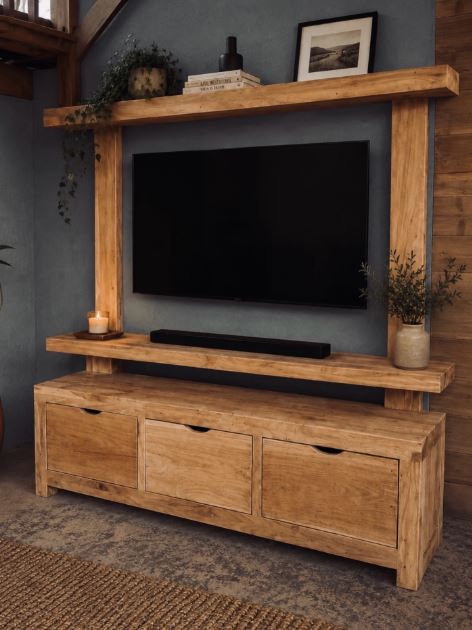
A low cabinet can feel undersized beneath a wall-mounted screen, particularly on a tall or wide wall. This project extends the furniture upward with side posts, a narrow shelf for a soundbar, and a long display shelf above the television. Using the same timber tone across the new pieces makes the arrangement read as one structure.
The existing cabinet still does the practical work at floor level. Three wide compartments hide media accessories, while the raised shelf keeps the soundbar clear of the cabinet top. The upper ledge holds light décor, but it should never rely on the lower cabinet alone for support.
The part I would check most carefully is the relationship between the television, shelf, and wall fixings. A visually balanced frame is useful only when the upper timber is secured to suitable structural points and leaves enough clearance around the screen.
Materials and Tools
· Sturdy low TV cabinet with a sound top and level base
· Straight timber boards or reclaimed wood prepared for indoor use
· Wall fixings and brackets suited to the wall construction and shelf load
· Screws, wood glue, clamps, drill, driver bits, and spirit level
· Stud finder or other suitable method for locating safe fixing points
· Sander, dust mask, stain or paint, and compatible protective finish
· Cable management clips, grommets, or removable cover channel
· Optional soft bumpers between removable parts
A Practical Way to Recreate the Project
1. Measure the screen and existing cabinet. Record the cabinet width, screen width, mounting height, soundbar dimensions, and the clearance needed for cables and ventilation. Sketch the front view before buying timber. Keep the side posts outside the screen edges and leave enough room to remove or service the television without dismantling the whole frame.
2. Repair and level the base cabinet. Empty the cabinet and tighten the frame, doors, and legs. Place it in the final position and level it before using its dimensions to set the upper parts. If the floor slopes, correct the cabinet safely rather than cutting the wall frame to match a temporary lean.
3. Build the lower raised shelf. Cut the soundbar shelf and its short supports, then dry-fit them on the cabinet top. Keep the supports wide enough to resist sideways movement and position them so they do not block doors, vents, or cable routes. Secure the assembly in a way that respects the cabinet material and allows access where future repairs may be needed.
4. Install the vertical posts and upper shelf. Prepare the posts and upper board, then mark their positions with a level on the wall. Fix the load-bearing parts into appropriate structural points using hardware suited to the wall and expected shelf load. Do not assume that attachment to the furniture alone will safely support the upper shelf.
5. Finish and organise the full media wall. Match the new timber to the cabinet with stain, paint, or a clear finish after testing on an offcut. Route cables behind the posts or through a proper cover without pinching them. Add only light objects to the upper shelf, keep candles and heat sources away from the television, and recheck every fixing after the unit has settled.
A smaller adaptation could add only the raised soundbar shelf, leaving the wall above untouched. Renters may prefer a freestanding surround designed by a competent furniture maker, although any tall structure still needs an appropriate anti-tip solution. I don’t think the upper shelf needs much decoration; a few light pieces keep the screen area calmer.
Update a Plain TV Stand with Arched Doors and Cane Panels
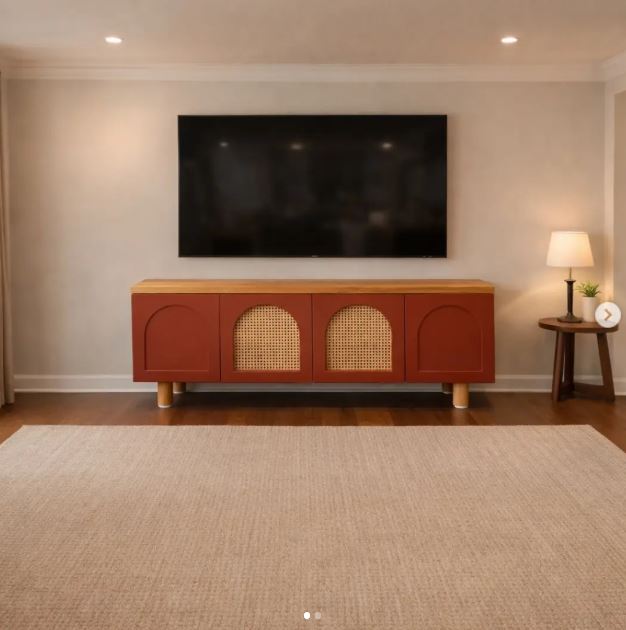
Changing the door fronts can alter a TV stand more than painting the whole piece. This version uses four repeated arches, with woven cane filling the two centre panels and solid recessed shapes on the outer doors. The pattern creates a steady rhythm across the long cabinet while keeping the storage closed.
Cane is useful around media equipment because it can allow some airflow, but the openings still need enough clearance behind them. The natural weave also links the warm wood top and legs to the deeper terracotta body. Small, simple feet lift the cabinet from the floor and make the long shape feel less heavy.
For me, careful spacing is what makes this front work. Even arches and consistent door gaps matter more than adding complicated hardware. A slightly uneven painted curve will be far more noticeable when it repeats four times.
Materials and Tools
· Plain TV stand with a strong cabinet box and suitable door openings
· New plywood or stable furniture board for replacement door fronts
· Cane webbing or another ventilated woven insert
· Paper template, compass or flexible curve, ruler, and square
· Jigsaw or router used with appropriate safety equipment and skill
· Hinges, magnetic catches, screws, and optional concealed pulls
· Primer and furniture paint for the cabinet and solid door sections
· Timber board or existing top to refinish
· Replacement feet and mounting plates if the original base is suitable
· Staples, spline, or secure trim method appropriate to the cane and doors
A Practical Way to Recreate the Project
1. Check whether new doors will fit. Measure each opening separately rather than assuming the cabinet is perfectly square. Decide whether the doors will sit inset, overlay the frame, or reuse the original hinge positions. Make a full-size paper template for one door and test the gaps before cutting all four fronts.
2. Create one accurate arch pattern. Draw the arch with a template, compass, or flexible curve and mark a consistent border around it. Cut a trial piece from scrap board first, smooth the curve, and place it against the cabinet. Once the shape looks balanced, use that first accurate pattern to mark the remaining doors.
3. Cut the solid and cane openings. Prepare the two solid outer doors with shallow applied shapes or routed recesses according to your tools and skill. Cut the centre-door openings for cane while leaving enough frame width for hinges and secure attachment. Sand every edge thoroughly, especially where the woven material will touch the board.
4. Paint and fit the cane panels. Prime and paint the cabinet and door frames before installing the cane so the weave stays clean. Prepare the cane according to its material requirements, stretch it evenly, and secure it from the back with an appropriate trim or fastening method. Keep the pattern straight across both doors and trim loose fibres carefully.
5. Hang, align, and ventilate the cabinet. Install the hinges and catches, then adjust the doors until the gaps remain even across the full front. Fit the top and feet only after confirming that the cabinet base can carry them safely. Place electronics with space around vents, keep power strips accessible, and check that the cane openings are not blocked by solid storage boxes inside.
Readers without woodworking tools could update existing flat doors with thin applied arch trim and cane-look panels fixed inside shallow frames. Fluted fabric, perforated metal, or speaker cloth may provide other textures, but any material near electronics should remain suitable for airflow and everyday heat.
Problems That Can Ruin a TV Stand Makeover
Changing the Look Before Checking the Frame
Paint cannot correct a loose corner, bowed shelf, or weak base. Repair the cabinet first and test it under realistic weight. Decorative additions should never hide damage that still affects the way the furniture carries a load.
Removing a Structural Divider
Some centre panels support the top and keep a long cabinet square. Cutting one out may cause sagging or twisting even when the opening looks cleaner. Confirm how the piece is assembled and add proper reinforcement before changing any load-bearing section.
Painting Over Polish or Laminate Without Preparation
A smooth finish can cause new paint to scratch or peel. Clean away wax and grease, use the preparation recommended for the surface, and test the full coating system on a hidden area. More paint is not a substitute for reliable adhesion.
Blocking Airflow Around Electronics
Closed doors, baskets, and solid backing can trap heat around game consoles, receivers, and routers. Leave space around vents, keep cable openings clear, and choose cane or another ventilated panel only when the interior layout also allows air to move.
Adding Tall Shelves Without Wall Support
A cabinet does not automatically become a safe foundation for a media wall. Upper posts and shelves need suitable structural fixings, and the television must remain accessible. Heavy objects should stay low rather than being placed on a decorative ledge above the screen.
Using Reclaimed Materials Without Inspecting Them
Old timber may contain nails, rot, sharp splinters, or insect damage, while masonry blocks may be cracked or uneven. Clean, inspect, and prepare every component before assembly. Rejecting one unsafe board is much easier than repairing damage after electronics are installed.
Ignoring Door and Drawer Clearance
Extra paint, new trim, thick cane frames, or a replacement top can stop doors from opening cleanly. Dry-fit parts before finishing and keep paint out of tight hinge recesses. Small, even gaps make the cabinet work better and look more carefully made.
Overdecorating Open Storage
A newly opened TV stand can quickly become a display shelf for every spare object in the room. Group practical storage into baskets, keep heavy pieces low, and leave some open space. The cabinet should solve clutter rather than frame it.
Frequently Asked Questions
Can any TV stand be repurposed?
Many can, but the frame must be sound and the size should suit the new job. Units with severe swelling, crumbling board, unstable legs, or major structural damage may not be worth rebuilding. A simple solid cabinet is usually easier to adapt than a weak flat-pack unit that has been repeatedly dismantled.
Do I need to sand a TV stand before painting it?
That depends on the existing surface and the paint system. Glossy finishes often need cleaning and deglossing, while damaged paint may require more thorough sanding. Test a hidden section and follow the coating manufacturer’s preparation instructions rather than sanding thin veneer aggressively.
What else can an old TV stand become?
A low unit can work as an entryway console, dining-room sideboard, toy cabinet, home-office storage piece, or low bookcase. The best choice depends on its height, depth, door layout, and strength. Measure the intended storage before altering shelves or closing openings.
Can I remove the back panel?
You may be able to remove or replace a thin non-structural back, but some back panels keep the cabinet square. Check how the piece behaves before taking it off completely. A new partial back can tidy the interior while preserving cable access and airflow.
How can I hide cables in a repurposed TV stand?
Reuse existing cable holes where possible, or add smooth grommeted openings in safe locations. Keep cords away from sharp edges and do not trap power strips in spaces with poor ventilation. Removable cable clips or a cover channel make future changes easier.
Is cane webbing suitable for media cabinet doors?
Cane can provide texture and some airflow, but it does not guarantee safe ventilation by itself. Electronics still need clearance around their vents, and the cabinet interior must not be packed tightly. Secure the cane well so loose edges cannot catch on devices or cables.
How do I stop a wide TV stand from tipping?
Place it on a level surface, repair weak feet, and use an anti-tip method suited to the furniture and wall. Tall additions and upper shelves increase leverage, so they need proper structural fixing. Keep heavy objects low and do not allow children to climb on doors or drawers.
Give the Cabinet a Job That Fits Your Home Now
Learning how to repurpose a TV stand starts with noticing what is already useful. The low proportions, cable openings, adjustable shelves, drawers, and closed compartments can all serve a different room once the furniture no longer needs to support a screen. A thoughtful makeover keeps those strengths and changes only the parts that get in the way.
Begin with the smallest version that solves a real problem. Paint and open baskets may be enough for one cabinet, while another may justify new doors or a carefully secured media-wall frame. I’d rather finish one stable, easy-to-use piece than add decorative details that make the furniture heavier and less practical.
Before discarding an old unit, empty it, check the frame, and imagine it without the electronics it once held. Which new job would make it useful in your home now?