Old keys are easy to overlook because once they stop opening a door, drawer, cabinet, or padlock, they seem to have finished their job. Yet the modern flat house key has a useful little shape for crafting: it is light, easy to hang through the existing hole, sturdy enough for small accessories, and simple enough to paint without losing its character. I’m Stella Eve Louise, and I’m especially drawn to objects like this because they do not need a complicated makeover to become useful again.
A handful of spare keys can become plant markers, a soft-sounding wind chime, a pendant, frame decoration, bookmarks, wall art, or a zipper charm with only basic materials. The important part is choosing keys that are genuinely retired and preparing them properly before paint or hardware goes on. I don’t think every key needs to look vintage or decorative to deserve another use. Plain everyday keys can work beautifully because the familiar shape is what makes these projects interesting in the first place.
Why Old Keys Are Worth Keeping
Keys have several built-in features that make them surprisingly practical craft materials. The head gives you a ready-made place to paint or decorate, the hole can accept cord or a jump ring, and the narrow blade creates a recognizable shape without needing to cut metal. Even a group of identical house keys can look quite different once you vary color, spacing, tassels, or the way they are arranged.
They are also small enough to save without creating another storage problem. A jar or shallow box can hold keys until you have enough for a grouped project, while one or two can become a quick accessory on their own. For me, that makes old keys more useful than many craft leftovers: you can start with a single piece, or build a larger design slowly as more retired keys appear.
There is one sensible limit, though. Do not repurpose a key simply because you have not used it recently. Confirm that it no longer belongs to an active home, office, vehicle, storage unit, rented property, or lock you may need again. If the key still has a tag, address, room number, or other identifying information attached, remove that before the key becomes a decorative object.
Choose the Right Keys for Repurposing
For these projects, ordinary flat metal house keys are actually easier to work with than ornate antique-style keys. Their broad round or square heads take paint well, the central hole is large enough for small rings or cord, and their simple shape looks clean when several keys are grouped together. Try to choose keys with smooth edges and enough metal around the head that the hole does not look cracked or distorted.
Match the key to the job. A plant marker can use a lightweight key because it will sit in soil with very little stress. A zipper pull needs a key that feels smooth in the hand and is not excessively heavy. A wind chime or wall display can use a mixture of sizes, but similar proportions usually make the finished arrangement easier to balance visually.
I know it can feel tempting to gather every spare key and decide the project later, but sorting first makes the craft easier. Put aside any key that is bent, badly corroded, sharply burred, or still potentially useful for security. Then separate the safe retired keys by size and condition. Once that is done, color and decoration become the enjoyable part rather than a way of hiding problems.
Clean and Prepare Old Keys Before Crafting
Keys collect hand oils, pocket lint, dust, and sometimes adhesive from old labels. Wash safe retired keys with mild soapy water, scrub around the grooves with a small brush if necessary, then dry them thoroughly. If a key has a greasy surface, paint and glue may lift later, so cleaning is worth the few extra minutes.
Check the edges with your fingers carefully. A rough burr near the blade or head can catch fabric, cord, or skin, especially on bookmarks and bag charms. Fine sandpaper or a small metal file can smooth minor roughness, but wear eye protection if you are filing metal and stop if the key is damaged enough to require aggressive grinding. For most of these ideas, there is no need to alter the key’s shape at all.
If you plan to paint, protect the work surface and apply thin coats rather than trying to cover the metal heavily in one pass. A suitable metal-compatible primer can help when the finish needs extra durability, especially for items that will be handled. Let each coating cure according to its product directions. A key may be tiny, but sticky paint on a book page or bag zipper is still capable of ruining your afternoon.
Use Painted Old Keys as Herb and Plant Markers
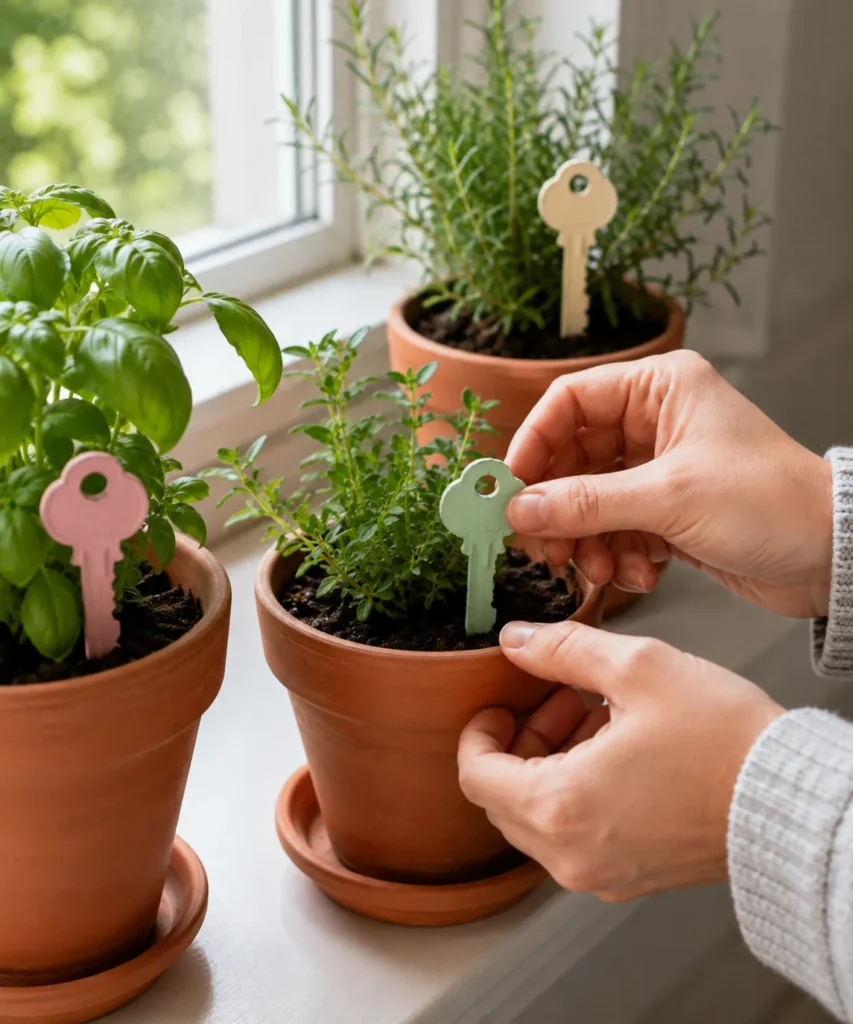
A painted house key slips neatly into potting soil, which makes it a simple marker for herbs, seedlings, or houseplants. The key head stays visible above the soil while the blade acts like a short stake. The pastel version works especially well in terracotta pots because the soft color stands out against the clay without turning the windowsill into a row of plastic labels.
Because the image uses plain everyday keys rather than decorative skeleton keys, this is an easy idea to reproduce with the kind of spare keys many households actually have. You can color-code plants instead of writing on the keys: one color for herbs you use often, another for newly planted cuttings, and another for plants that need different care. If you do want names, attach a small removable tag rather than trying to squeeze permanent lettering onto a tiny metal head.
Keep in mind that repeated watering can affect some paints. If the markers will stay outdoors or receive frequent splashes, choose a finish intended for that exposure and keep the painted head above the soil line as much as possible. The goal is not to make the key indestructible; it is to create a marker you can wipe, reuse, and repaint when your planting changes.
Materials and Tools
· Clean retired flat house keys
· Metal-compatible paint or suitable craft coating
· Small brush or painting sponge
· Fine sandpaper for minor roughness
· Protective paper or a reusable craft mat
· Optional clear protective finish suitable for the intended location
A Practical Way to Make It
1. Clean and sort the keys. Wash the keys, dry them completely, and check that none has a sharp burr or damaged head. Choose keys that are long enough to stand in the soil without disappearing below the pot rim.
2. Prepare the surface for color. Lightly smooth only rough or flaky areas and wipe away dust. If your chosen paint needs a primer on metal, apply it in a thin coat and follow the product directions before adding color.
3. Paint the visible section. Hold or lay the key flat and apply thin coats to the head and upper blade, then turn it once the first side is ready. Keep the layers light so the key still looks crisp rather than buried under thick paint.
4. Place the markers in the pots. Push the blade into firm soil near the edge of the pot rather than directly against the plant stem. Leave the painted head above the soil where it can be seen and removed easily when the plant changes.
5. Refresh instead of replacing. Wipe the marker when repotting and check the finish for wear. If the color has faded or chipped, clean the key and repaint it rather than discarding the marker.
Why the Simple Shape Works Here
I would keep this version uncomplicated. The key already looks different enough from a normal plant label to feel intentional, and the pastel color does the rest. Adding beads or bulky tags near the soil could make watering more awkward, so I’d rather let the key stay slim and easy to move.
Variations and Alternatives
Use one muted color across every pot for a calmer windowsill, or assign a different color to each plant group. Unpainted keys can work in a more industrial-looking planter display, and a short loop of waterproof cord through the hole can hold a removable written label if you need exact plant names.
Keep the Markers Easy to Reuse
Lift the key out before heavy repotting so it does not become buried or bent. Wipe away soil with a damp cloth and dry the metal before storing it. If a marker becomes rusty or rough, retire it from plant use and choose another clean key rather than pushing a damaged edge back into the pot.
Beginner Shortcut
Skip complicated surface treatments and paint only the circular key head. The blade can remain its original metal color and disappear into the soil, which means less painting, less drying time, and a cleaner finish for a first attempt.
Turn Old Keys Into a Simple Painted Wind Chime
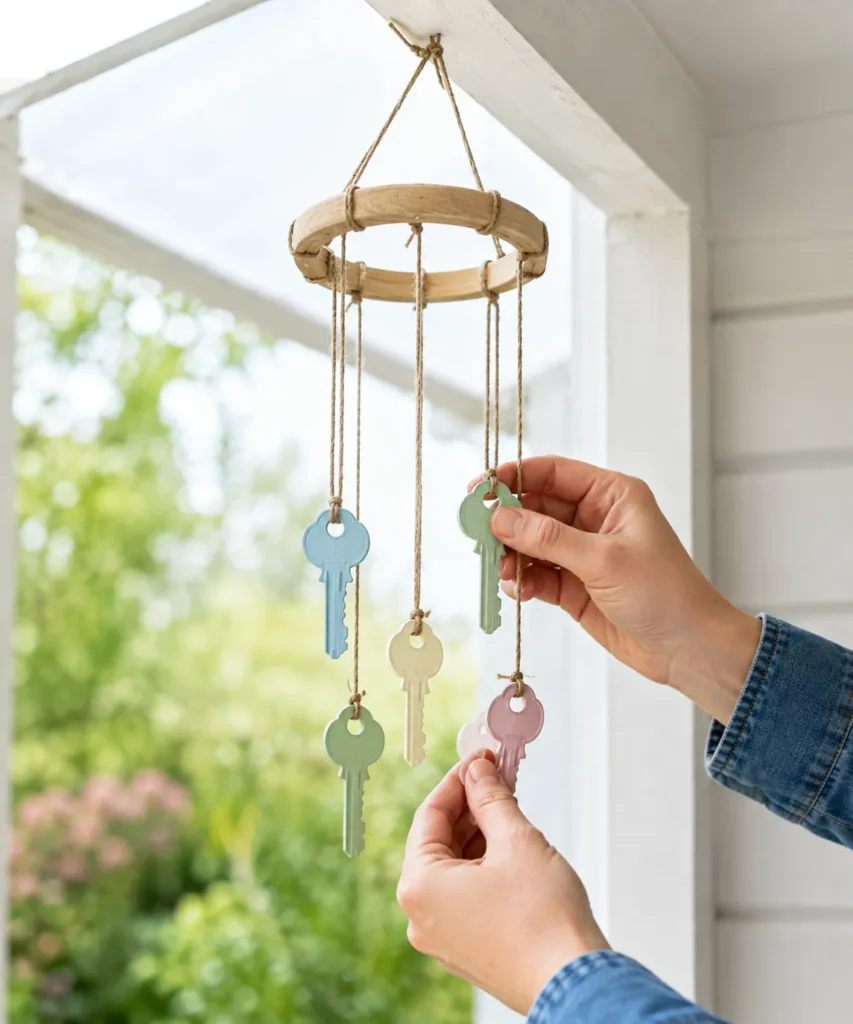
Keys already have hanging holes, so a wind chime is one of the most natural ways to reuse several at once. The simple version uses a lightweight wooden ring and individual lengths of twine, with painted keys placed at slightly different heights. When the keys move, they can tap gently against one another rather than relying on a complicated metal frame.
The easiest way to make the arrangement look balanced is to vary the cord lengths without making them random. Put the longest key near the middle and distribute shorter lengths around it, or alternate two or three heights. A mix of soft colors helps separate identical keys visually, but the project works just as well with bare metal if you prefer a quieter finish.
This should be treated as a decorative chime for a sheltered location, not a heavy outdoor fixture. Strong wind can tangle cord or pull on the hanging point, so I would use it on a covered porch, balcony, or near an open window where it can move gently. Check the knots occasionally, especially after weather changes.
Materials and Tools
· Several clean retired house keys
· Small wooden or sturdy craft ring
· Jute twine, cotton cord, or other suitable hanging cord
· Scissors
· Optional pastel paint for the keys
· Optional clear protective finish for a sheltered outdoor location
A Practical Way to Make It
1. Plan the hanging lengths first. Lay the ring flat and arrange the keys around it before cutting cord. Choose three or four different drop lengths so the keys can move and occasionally touch without forming one heavy cluster.
2. Prepare and paint the keys. Clean the metal and apply thin coats of your chosen colors, allowing the finish to cure fully. Keep the hole clear so cord passes through cleanly and does not scrape away fresh paint.
3. Tie each key securely. Thread cord through the key head and tie a compact knot that cannot slide back through the hole. Attach the other end to the ring, then check that every key hangs freely without twisting tightly around neighboring cords.
4. Create the top hanger. Tie three or four equal support cords to the ring and bring them together above the center. Knot them into one hanging loop and lift the chime before trimming anything, because this is where you can see whether the ring sits level.
5. Test it in a sheltered place. Hang the chime where it can move in a light breeze and watch for tangles or hard impacts. Shorten any cord that swings too widely, then check the hanging knot once more before leaving it in place.
Balance Matters More Than Extra Decoration
For me, the movement is the decoration here. I don’t think beads, bells, ribbons, and several other additions are necessary when the keys already provide shape and a little sound. A simpler arrangement is easier to untangle and usually hangs more evenly too.
Variations and Alternatives
Use two colors only, leave every key silver, or paint the wooden ring to match your porch. You can also make a smaller indoor version with four keys for a sunny window. If sound is not wanted, space the keys farther apart and treat the piece as hanging mobile decor instead of a chime.
Check Cord and Finish Before the Weather Does
Cord can weaken outdoors even in a covered area. Look at the top loop, the knots around the ring, and the cord passing through each key every so often. Bring the chime indoors during severe weather, and touch up chipped paint only after the key is clean and dry.
Beginner Shortcut
Use five keys and one unfinished wooden ring. Skip paint completely, cut only two cord lengths, and focus on secure knots. Once you know the simple version hangs well, you can make a second one with more color or a fuller arrangement.
Make a Painted Key Pendant for a Simple Necklace
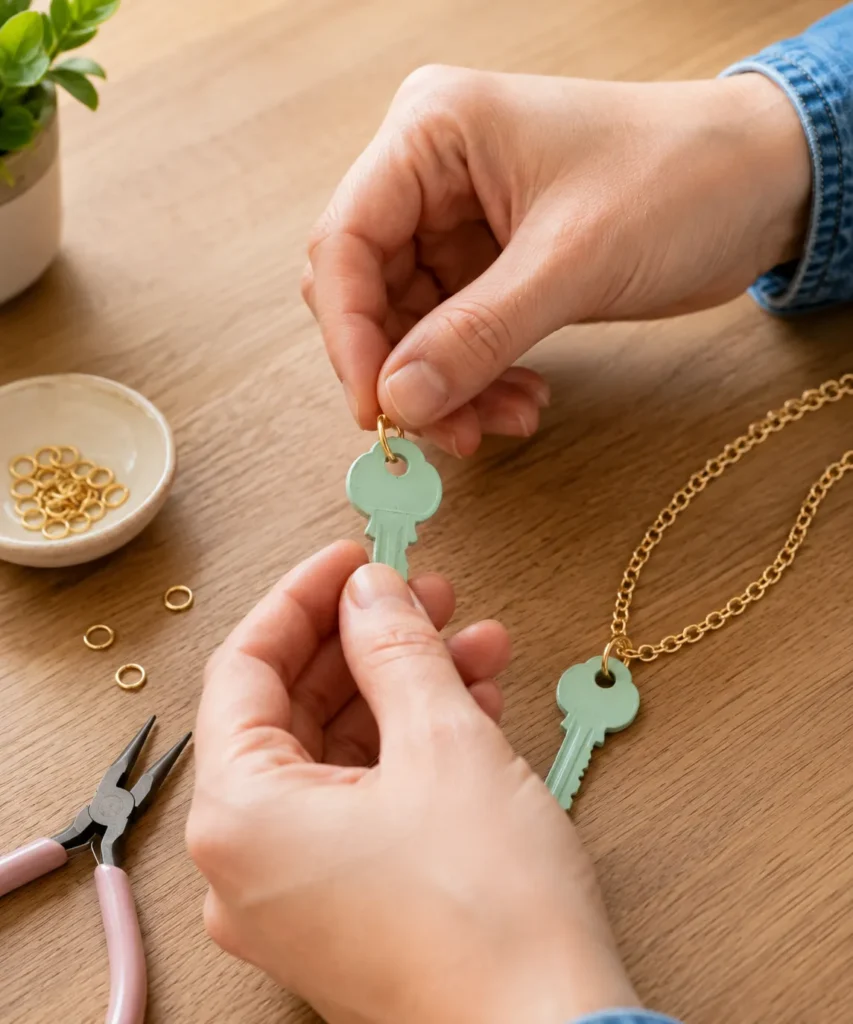
A house key can become a pendant without drilling because the existing hole already accepts a jump ring. Painting the key one soft color changes its character immediately, while a simple chain keeps the result casual rather than costume-like. This is a useful project for a single spare key when you do not have enough for a larger display.
Comfort matters more than decoration. Choose a key that is fairly light, smooth along the blade, and not unusually long. The head should sit flat when suspended from the ring, and the edges should not snag clothing. If the finished pendant feels too heavy after a few minutes in your hand, use it as a bag charm instead of forcing it into jewelry.
Small jewelry findings make the assembly easier, but you do not need advanced jewelry-making skills. Two pairs of pliers are helpful for opening a jump ring sideways rather than pulling it apart. That small technique keeps the ring round and reduces the chance that the pendant slips off later.
Materials and Tools
· One clean retired house key
· Metal-compatible paint
· One sturdy jump ring sized for the key hole
· Simple chain or cord necklace
· Two small jewelry pliers
· Optional clear protective finish
A Practical Way to Make It
1. Choose a smooth lightweight key. Run a finger along the edges and remove minor roughness before painting. Set aside heavy, bent, or sharp keys for another project because a pendant will sit close to clothing and skin.
2. Apply the decorative finish. Clean the key, paint it in thin coats, and keep the hanging hole open. Let the coating cure fully before adding metal findings; twisting a ring through soft paint can scrape the finish immediately.
3. Open the jump ring correctly. Grip each side of the ring with pliers and twist the ends sideways in opposite directions. Do not pull the circle wide apart, because that can distort the ring and make it harder to close securely.
4. Add the key and chain. Slide the key head and the chain or necklace loop onto the open ring, then twist the ring closed until the ends meet neatly. Check the join with your fingernail so there is no obvious gap that could catch fabric.
5. Wear-test the pendant briefly. Try the necklace over a simple top and check the weight, length, and movement. If the key knocks uncomfortably or feels heavy, shorten the chain or convert the pendant into a zipper pull or bag charm instead.
A Key Pendant Should Still Feel Comfortable
The part I would check carefully is weight. A tiny object can look delicate in your hand and still feel surprisingly solid around your neck after an hour. I’d rather use a smaller key with a clean finish than add more beads and make the pendant heavier.
Variations and Alternatives
Leave the key unpainted and use a dark cord for a simpler look, or add one small bead above the key instead of decorating the whole pendant. A pair of similar small keys could become mismatched charms on bracelets, though I would keep the hardware light and smooth.
Protect the Finish From Daily Friction
Painted metal jewelry rubs against fabric, skin, and hardware, so some wear is normal. Store the pendant where it will not scrape against other metal pieces and avoid soaking it. If the coating begins to chip, remove the chain and refinish the key rather than painting around the hardware.
Beginner Shortcut
Use a cord necklace with a ready-made clasp and one jump ring. Paint only the front of the key if you want the fastest decorative version, then let it cure completely before assembly. The back can stay plain metal if it will not be visible.
Decorate a Plain Photo Frame With Painted Keys
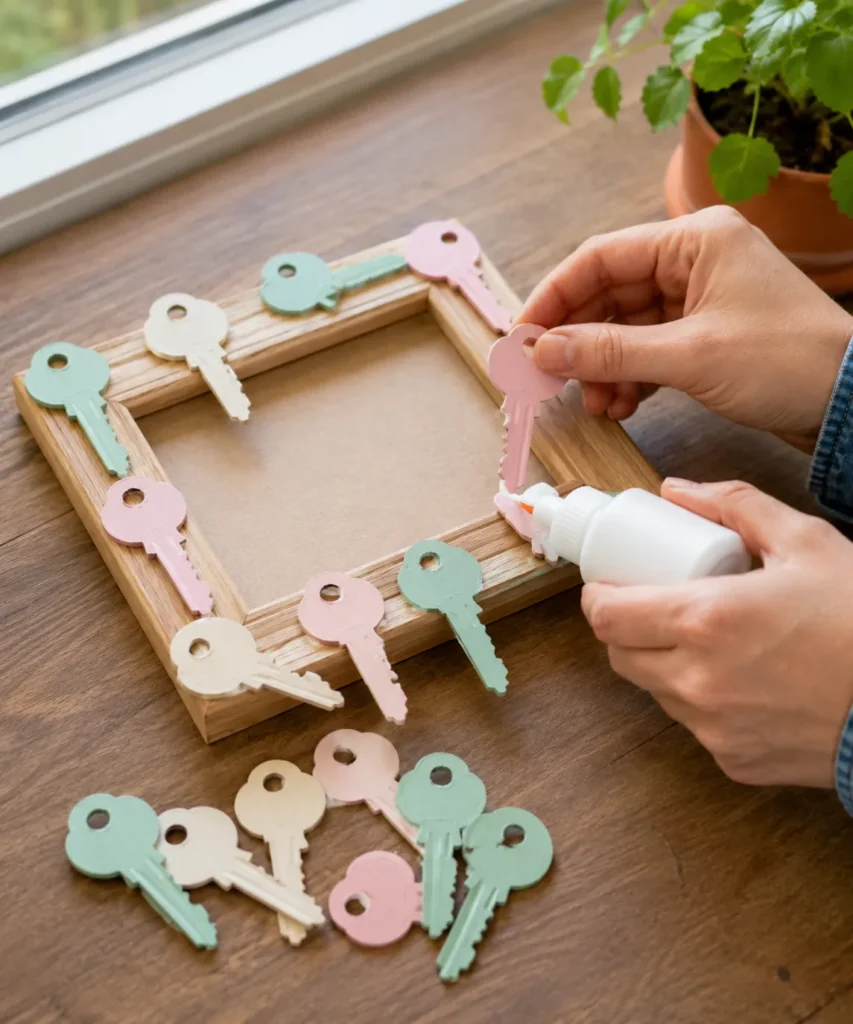
A plain wooden frame gives several keys enough surface area to become decoration without needing a separate backing board. The easiest arrangement is loose and spaced rather than completely covered: a few keys along each side, some vertical and some horizontal, with enough wood still visible to keep the frame from feeling crowded.
This works especially well with keys of the same general style because paint supplies the variation. Soft pink, mint, cream, and pale blue can make modern house keys feel playful while the natural wood keeps the project grounded. If your keys differ in size, put the larger ones near corners or long edges and use smaller ones to fill gaps.
The most important step happens before glue. Arrange everything first and take a quick photo of the layout. Keys slide surprisingly easily when you begin attaching them, and having a reference saves you from trying to remember which angle looked balanced five minutes earlier.
Materials and Tools
· Plain wood or sturdy craft frame
· Several clean retired house keys
· Metal-compatible paint
· Strong adhesive suitable for metal and the frame material
· Craft paper to protect the table
· Optional clamps or low-tack tape to hold pieces while curing
A Practical Way to Make It
1. Prepare the frame and keys. Wipe dust from the frame and clean the metal keys thoroughly. Paint the keys in a limited palette and let them cure before you begin arranging them on the wood.
2. Build the layout without adhesive. Place the frame flat and move the keys around the border until the spacing feels even. Rotate some keys, keep others straight, and avoid placing a blade where it sticks dangerously beyond the frame edge.
3. Photograph the arrangement. Take one clear reference photo from above before lifting any pieces. This tiny step is useful because once adhesive is involved, you will want to work steadily rather than redesigning every side again.
4. Attach a few keys at a time. Use only enough adhesive for a secure bond and keep it away from visible edges. Press each key in place, then use temporary support if the adhesive needs help holding the metal flat while it cures.
5. Check the frame before displaying it. Run a hand around the outside edge and confirm no key blade protrudes sharply. Make sure the frame still stands or hangs correctly and that the added weight has not made the back hardware unstable.
Leave Some of the Frame Visible
I know it can feel tempting to fill every empty strip of wood once the first few keys look good, but negative space helps this project. The frame needs to remain recognizable as a frame. A little breathing room around the keys also makes the painted colors easier to notice.
Variations and Alternatives
Use one color for every key, group keys only on two opposite corners, or leave the metal bare against a painted frame. For a rental-friendly display, create the decorated frame as a tabletop piece instead of hanging it, so no additional wall hardware is needed.
Keep the Keys Secure Without Overloading the Frame
Pick up the frame by its wooden structure rather than by a glued key. Dust around the metal pieces with a soft brush instead of catching a cloth on the blades. If a key loosens, remove old adhesive carefully and reattach it rather than adding more glue around the outside where it will remain visible.
Beginner Shortcut
Decorate only the bottom edge with three or four painted keys. That gives you the same idea with far less layout work, and it keeps the project light enough for almost any basic tabletop frame.
Add Tassels to Old Keys and Use Them as Bookmarks
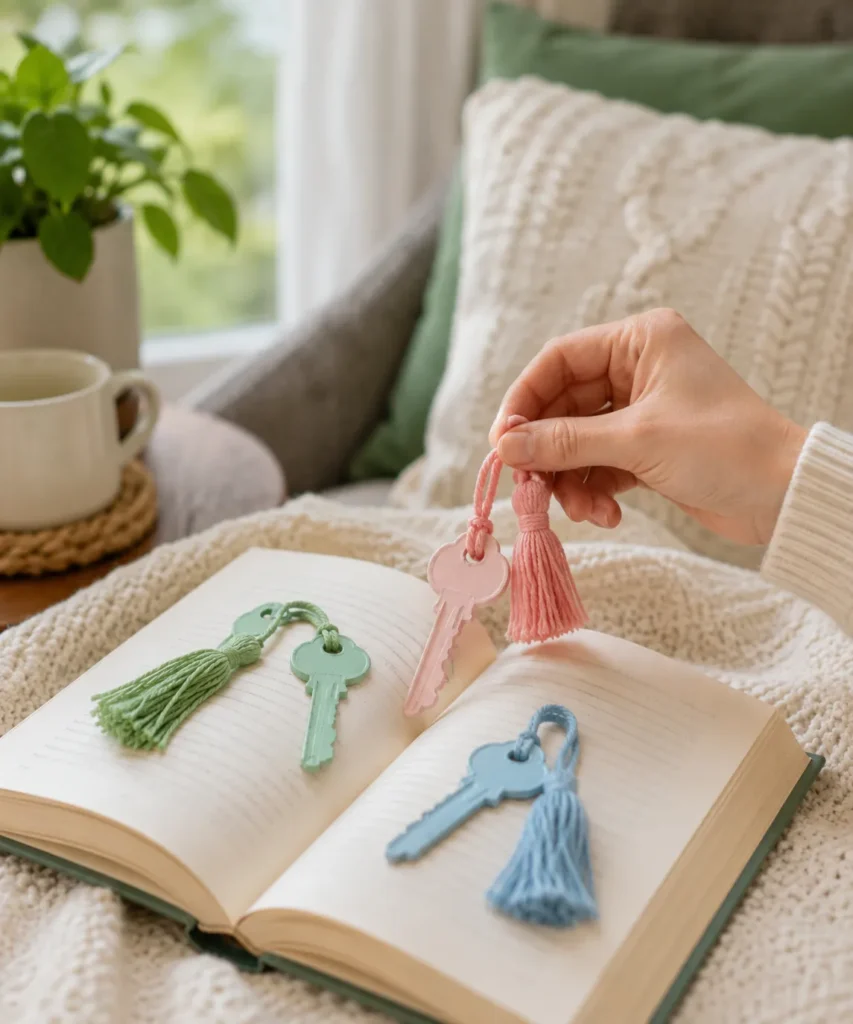
The hole in a key head makes it easy to tie on a tassel, creating a bookmark that feels more like a small keepsake than a strip of paper. The key sits outside or near the edge of the pages while the tassel gives you something soft to grab. Pastel paint keeps the metal visually light, and coordinating thread ties the two materials together.
This idea needs a little judgment because metal is thicker than a normal bookmark. I would use it with sturdy hardback books, journals, or notebooks rather than delicate pages, valuable editions, or tightly bound paperbacks. Place the key near the outer edge instead of deep in the spine so the book does not have to close around the thickest part of the metal.
A soft tassel also helps separate the bookmark from an ordinary loose key. Keep the knot compact and trim the thread evenly. You can make several in different colors and use them for different journals, recipe books, or notebooks without needing to label each one.
Materials and Tools
· Small smooth retired house keys
· Metal-compatible paint
· Embroidery thread, cotton cord, or fine yarn
· Scissors
· Optional small jump ring
· A sturdy book or journal for testing
A Practical Way to Make It
1. Choose small keys with smooth edges. Avoid heavy keys and anything with a rough blade that could mark paper. Clean and paint the keys, then let the finish cure completely so no color transfers to book pages.
2. Make a compact tassel. Wrap thread around your fingers or a small card, tie the top securely, and cut the lower loops. Wrap a short piece of thread beneath the top to form the tassel head, then trim the ends until they hang evenly.
3. Attach the tassel through the key head. Loop the tassel cord directly through the hole or use a small jump ring if the thread rubs awkwardly against the metal. Keep the connection short so the key and tassel do not tangle around each other.
4. Test the bookmark in a sturdy book. Place the key near the outside edge of the page and close the book gently. If the cover lifts too much or the key presses strongly into the paper, use it as a journal charm instead of a bookmark.
5. Store it with the right book. Keep the tassel visible outside the pages so you can remove the bookmark without dragging the metal across paper. If the finish chips, stop using it inside a book until the key has been refinished or converted to another purpose.
Use the Key Near the Page Edge
This is one of those projects where placement matters more than appearance. The key may look lovely in the middle of an open book, but I would keep it close to the outer edge so the binding is not forced around a lump of metal. The tassel can do the visible work while the key stays mostly outside the pages.
Variations and Alternatives
Skip paint and use natural metal with cream cotton tassels, or match each tassel to a notebook cover. If you love the look but worry about paper, attach the key and tassel to a large paper clip so only the clip slides onto the page and the key hangs outside.
Protect Both the Book and the Paint
Do not leave a painted key inside a damp bag with a book, and avoid using it where the metal can press against photographs or coated pages. Wipe the key gently if it becomes dusty, and replace fuzzy or fraying tassel thread before loose fibers begin catching between pages.
Beginner Shortcut
Use one ready-made craft tassel and attach it through the key hole with a small jump ring. No tassel-making is required, and you can leave the key unpainted for a two-minute assembly once the metal is clean and smooth.
Arrange Painted Keys Into Heart-Shaped Wall Art
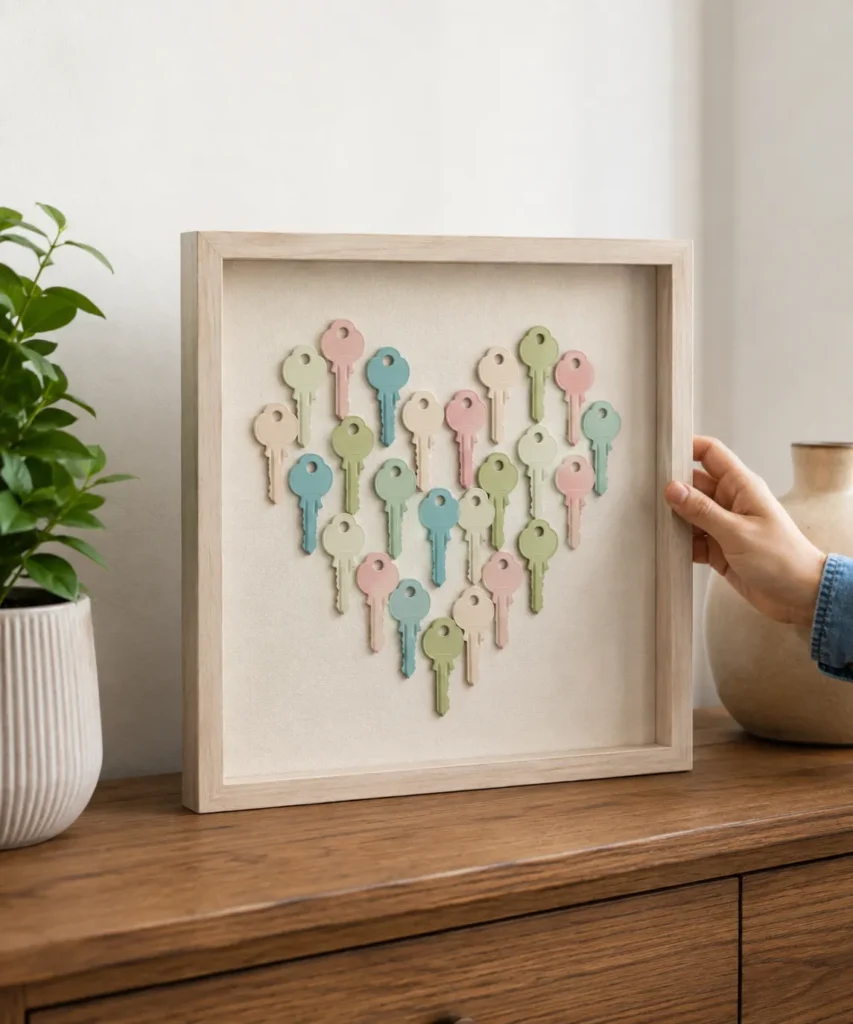
A group of similar house keys can create wall art without pretending to be anything other than what they are. Arranged into a heart inside a shallow frame or shadow box, the repeated key shape becomes the pattern. Pale paint colors soften the metal and help the individual pieces read as one composition instead of a random collection.
The heart works because it is built from the outside in. Place a few keys at the top curves, establish the lower point, then fill the center gradually. The blades can point mostly downward so the shape feels organized, while a few angled keys help define the curves. You may need to move pieces around several times, and that is normal; the first arrangement rarely ends up being the final one.
A neutral fabric or paper backing keeps the composition easy to read. The keys should be attached securely enough that the frame can hang vertically, but there is no reason to use excessive adhesive. If you might want to reuse the keys later, choose a reversible mounting method that is appropriate for the weight and backing material.
Materials and Tools
· A collection of clean retired house keys
· Metal-compatible paint in a limited palette
· Shallow frame or shadow box
· Neutral backing board, fabric, or heavy paper
· Adhesive or removable mounting method suitable for the materials
· Ruler and pencil for light layout guides
· Appropriate wall hardware for the finished frame
A Practical Way to Make It
1. Prepare a consistent set of keys. Clean the keys, smooth any rough edges, and paint them in a small group of coordinating colors. Let the finish cure before placing them against the backing so soft paint does not stick or leave marks.
2. Mark the center and outer heart shape. Lay the backing flat and lightly mark a vertical center line plus a few reference points for the top curves and lower point. Keep the guides faint because the keys should cover most of them.
3. Arrange the keys before attaching anything. Build the two top curves first, place a key at the bottom point, then fill the middle with evenly spaced pieces. Step back often and remove keys if the shape starts looking crowded or lopsided.
4. Secure the arrangement carefully. Attach one section at a time using a method suited to the key weight and backing. Keep adhesive hidden beneath the metal and allow the work to set flat so keys do not drift while the bond develops.
5. Check the complete frame and hanging hardware. Once secure, lift the frame upright and make sure no keys shift. Confirm that the frame backing and wall hardware can comfortably support the added metal weight before placing it on the wall.
The Heart Needs Space Around It
For me, the empty border is just as important as the keys. If the heart reaches every edge of the frame, the composition can feel cramped. I would choose a frame slightly larger than the arrangement needs and let the neutral backing create a calm margin around the color.
Variations and Alternatives
Create a circle, initial, simple house outline, or loose vertical column instead of a heart. You can use all one color for a more graphic result, or leave a few keys unpainted so the original metal appears among the pastel pieces. A smaller version can sit on a shelf rather than hang on a wall.
Make the Display Strong Enough for Metal
Keys add more weight than paper decorations, so do not rely on a weak frame backing. Check the tabs, backing board, and wall hanger before display. Dust the front gently and avoid pressing on individual keys, especially if you used a removable mounting method.
Beginner Shortcut
Use nine to twelve keys and make a much smaller heart on a tabletop frame. Fewer pieces are easier to balance, the project weighs less, and you can test the layout without committing an entire collection of keys.
Turn One Painted Key Into a Zipper Pull or Bag Charm
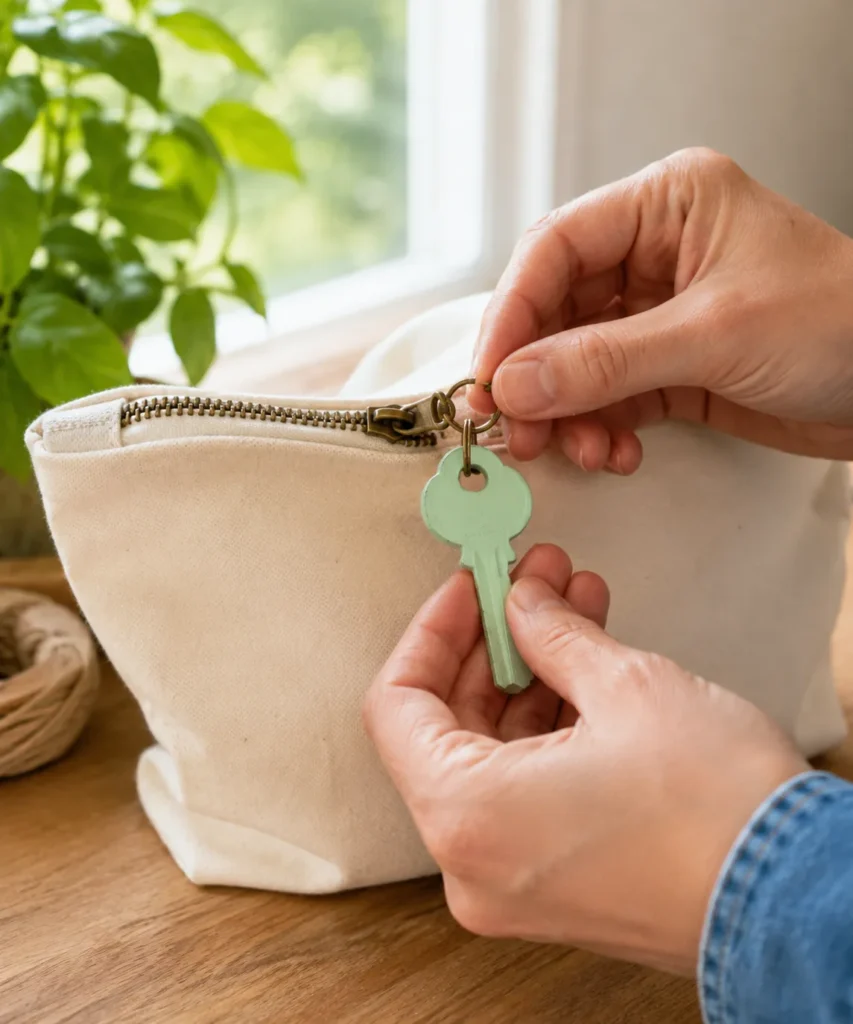
A single key can become a practical zipper pull with almost no construction. The head already gives you a hole for a small ring, and the blade creates enough length to grab easily when opening a pouch or bag. On a plain canvas case, a mint-painted key also adds a small color cue that can help you recognize the right pouch quickly.
This is a better use for keys that feel a little too heavy for jewelry but are still smooth and lightweight enough for a bag. The attachment ring should be strong, and the key should not be so long that it bangs against the bag constantly. I would test it on a small pouch first before putting one on an everyday handbag or backpack.
Because zipper pulls receive repeated handling, preparation matters. Paint needs to be fully cured, edges need to be smooth, and the ring should close without a gap. If the color eventually wears along the edges, that is easy to refresh because the key can be removed from the zipper and repainted separately.
Materials and Tools
· One clean retired house key
· Metal-compatible paint
· Small sturdy split ring or jump ring
· Jewelry pliers if using a jump ring
· Plain zipper pouch, tote, or bag
· Optional clear protective finish
A Practical Way to Make It
1. Choose a key that feels good in the hand. Pick a smooth, medium-size key that is easy to grip without being heavy. Check the blade and head for burrs because the charm will rub against fabric and may be handled several times a day.
2. Paint and cure the key. Apply thin coats to the clean metal and keep the head hole open. Let the finish cure fully before attaching hardware; a zipper pull is a high-contact use, so soft paint will mark quickly.
3. Add the attachment ring. Thread a split ring through the key head or open a jump ring sideways with pliers. Close the hardware completely so there is no gap that can work its way off the zipper loop.
4. Attach it to the zipper and test movement. Clip the key onto the existing zipper ring, then open and close the pouch several times. Make sure the key does not catch in the zipper teeth, scrape the fabric, or swing into an uncomfortable position.
5. Adjust if the charm feels too large. Swap to a smaller key or shorter ring rather than accepting an awkward pull. The finished piece should make the zipper easier to grab, not add enough weight to drag the slider around.
Function Comes First on a Zipper Pull
The good thing is that this project tells you very quickly whether it works. Zip the pouch open and closed a few times. If the key keeps twisting, catching, or hitting your hand, change the ring or use a smaller key. A useful charm should disappear into the routine instead of demanding attention every time you open the bag.
Variations and Alternatives
Add a short matching tassel beside the key, use an unpainted key on a denim bag, or assign different colors to several similar travel pouches. You can also attach the key to a tote handle as a removable charm if you prefer not to place extra weight on the zipper slider.
Expect Some Wear on a Frequently Handled Key
Zipper pulls rub against fabric and hardware, so inspect the ring and paint periodically. Tighten or replace any ring that begins to open, and smooth the key again if the metal becomes rough. Remove the charm before washing the bag unless every material in the assembly is suited to that cleaning method.
Beginner Shortcut
Leave the key unpainted and use a small split ring. This gives you the practical benefit with no drying time and no jewelry tools. If you like using it for a week or two, remove it later and add paint once you know the size feels right.
Old Key Repurposing Mistakes That Can Ruin a Simple Project
Old keys are forgiving craft materials, but the small size can make it easy to overlook practical details. The most common problems are not artistic ones. They come from using a key that is still needed, leaving rough metal where it can snag, rushing paint, or making a decorative idea heavier and more complicated than its new job requires.
· Repurposing a key before confirming it is retired. A key that has not been used for months may still belong to a back door, storage lock, old office, or rented property. Confirm its purpose first. If there is any uncertainty, photograph or label it and keep it with active keys rather than turning it into a craft project.
· Leaving identifying tags attached. Old labels can reveal addresses, room numbers, lock names, or other information that should not become part of a visible decoration. Remove tags and identifying notes before cleaning or painting the key.
· Skipping edge checks. A rough blade may not matter when a key sits in a drawer, but it can catch a book page, scrape a pouch, or snag cord once repurposed. Feel along the metal carefully and smooth minor burrs before the key is used around fabric, skin, or paper.
· Painting over grease or residue. Keys are handled frequently and can hold oils that interfere with paint. Clean the surface thoroughly, dry it, and use thin compatible coatings. Thick paint may chip around the hole when you add a jump ring or cord.
· Using too much adhesive on frames or wall art. Excess glue can squeeze beyond the key edges and remain visible against wood or fabric. Arrange first, use a controlled amount, and support the metal while it cures rather than flooding the entire back of the key.
· Making a bookmark too thick for the book. Metal keys are not suited to every binding. Keep them near the page edge and use them only with sturdy books or journals. For delicate books, convert the design into a clip-on charm so the key hangs outside instead.
· Hanging a wind chime where weather is too harsh. A lightweight ring and craft cord can tangle or wear quickly in strong wind and rain. Use a sheltered location, inspect knots, and bring the piece indoors during severe weather rather than treating it as permanent outdoor hardware.
· Choosing a heavy key for a necklace or zipper. The key should suit the amount of movement and contact the project receives. If it feels heavy in the hand, use it for framed art or a plant marker instead of asking a small jump ring, zipper slider, or necklace chain to carry it all day.
· Adding decoration that makes the new use harder. A simple painted key is often enough. Large beads on a plant marker can obstruct watering, long tassels on a zipper can tangle, and extra metal on a necklace can make it uncomfortable. If an addition does not improve function or appearance clearly, leave it off.
Frequently Asked Questions
What kinds of keys are easiest to repurpose?
Ordinary flat house keys with a clear hole in the head are easy to use because they can accept cord or rings without drilling. Choose keys that are genuinely retired, reasonably lightweight, and free from sharp burrs. Modern-looking keys work just as well as ornate or antique ones.
How do I know whether an old key is safe to craft with?
Confirm that the key no longer operates any lock you still use or may need to access. Remove identifying tags, clean the metal, and inspect the edges. If the key is bent, deeply corroded, cracked around the head, or unusually sharp, choose a different piece for a handled project.
What paint can I use on metal keys?
Use a coating intended to adhere to metal and follow its preparation and curing directions. Some finishes may benefit from a compatible primer. The exact product depends on whether the key will stay indoors, be handled frequently, or sit in a sheltered outdoor location, so match the coating to the final use rather than relying on one craft paint for everything.
Can painted keys be used outdoors?
They can work in sheltered outdoor projects such as a covered-porch chime or plant markers, but the finish needs to suit the exposure. Moisture, soil, and sunlight can wear paint over time. Keep the keys easy to remove so they can be cleaned, touched up, or brought indoors when needed.
Are key bookmarks safe for books?
They are best for sturdy hardbacks, journals, or notebooks and should sit near the outer page edge rather than deep in the spine. Avoid using a metal key in delicate, valuable, or tightly bound books. A clip-on version that keeps the key outside the pages is a safer alternative when in doubt.
How can I attach an old key without drilling it?
The existing hole in the key head is usually enough. Cord can pass through it for a wind chime or tassel, while a jump ring or split ring can connect the key to a chain, zipper, or charm loop. For framed projects, adhesive or suitable removable mounting methods can attach the flat back to a surface.
What can I do with only one spare key?
A single retired key can become a plant marker, necklace pendant, zipper pull, journal charm, or tassel bookmark. You do not need a collection to make the object useful again. Start with the project that matches the key’s weight and condition, then keep future retired keys for grouped wall art or a wind chime.
Give Spare Keys a Job That Still Makes Sense
Learning how to repurpose old keys is mostly about using the shape that already exists. The hole makes hanging easy, the blade gives the object a natural stake or handle, and the flat metal surface can take a little color without requiring complicated construction. That is why the simplest projects – a plant marker, pendant, bookmark, or zipper pull – can be just as satisfying as a grouped frame or wind chime.
I would begin with one key whose original purpose is completely finished and match it to the easiest new job in your home. If you have herbs on the windowsill, paint it as a marker. If a plain pouch needs an easier zipper grip, add a ring and use it there. Then, as more keys become genuinely redundant, you can save them for a larger heart display or hanging chime.
The nicest part is that the keys do not need to pretend they were never keys. Their familiar shape is what gives these projects personality. Clean them, smooth them, keep the construction sensible, and let the new purpose remain simple enough that the object can keep being useful rather than becoming one more thing stored in a drawer.