A hoodie can become difficult to part with long before it becomes impossible to wear. The fleece may still feel soft, the hood may sit exactly the way you like, and the front graphic may carry a memory, even though the cuffs are stretched, the hem feels dated, or a stain has settled in a very visible place.
That mixture of comfort and damage makes a hoodie especially useful for clothing upcycles. Thick sweatshirt fabric can support patches, topstitching, cut panels, new hems, and visible mending. The existing hood, pocket, ribbing, and drawcord also give you finished components that would take time and extra material to recreate from scratch.
I don’t think every hoodie needs a dramatic transformation. A careful crop can correct an awkward length, a patch can cover one damaged section, and a sleeveless conversion can keep the hood and pocket working through warmer weather. The best method usually begins with the problem the hoodie already has.
Before cutting, decide which parts deserve to stay untouched. A favourite print, an unusually comfortable hood, or a strong kangaroo pocket may become the centre of the finished design. Then plan the alteration around those details instead of treating the whole garment as blank fabric.
Inspect the Hoodie Before Choosing a New Shape
Wash and dry the hoodie in the way you intend to care for the finished garment. Fleece and ribbing can shrink differently, and older sweatshirts sometimes twist slightly after washing. Marking the fabric only after it has settled gives you a more dependable length and a straighter centre line.
Check the hoodie for:
· Thin fabric at the elbows, cuffs, pocket corners, and underarms
· Stains that remain visible after cleaning
· Cracked prints or embroidery you want to preserve
· A pocket that crosses the proposed cutting line
· Ribbing that can be removed and reused
· A hood seam that remains strong
· Drawcord channels or metal eyelets that may need protection
· Side seams that twist toward the front or back
· Enough width for patchwork or reshaping
· A fabric weight your sewing machine can handle
Never cut or pin a hoodie while someone is wearing it. Use a flat work surface, sharp fabric scissors, and a suitable needle when sewing through several layers of sweatshirt fabric.
Turn the garment inside out and study how it was assembled. Many hoodies use overlocked seams, coverstitching, and ribbed bands that can be unpicked and reused. Photograph the original construction before removing a cuff, pocket, or hem, especially if you may need to recreate the same order later.
A practice test on an old sweatshirt scrap can save a great deal of frustration. Try your stretch stitch, needle, thread tension, bleach mixture, or appliqué technique on fabric with a similar weight. Sweatshirt fleece can look calm on the table and then become surprisingly determined once several layers reach the presser foot.
Mark the True Centre and Finished Length
Fold the hoodie by matching the shoulder seams and side seams rather than simply aligning the outer edges. Mark the centre front and centre back with removable chalk. For a cropped style, measure from the shoulder to the intended finished edge on both the front and back, then add the allowance needed for a reused band or new hem.
Try a temporary fold before cutting. Pin the excess fabric inside, wear the hoodie over a normal outfit, and check the length while standing, sitting, and lifting your arms. This is where an extra few centimetres can decide whether the finished garment feels comfortably cropped or constantly needs pulling down.
Add Reversible Patchwork Panels to a Plain Hoodie
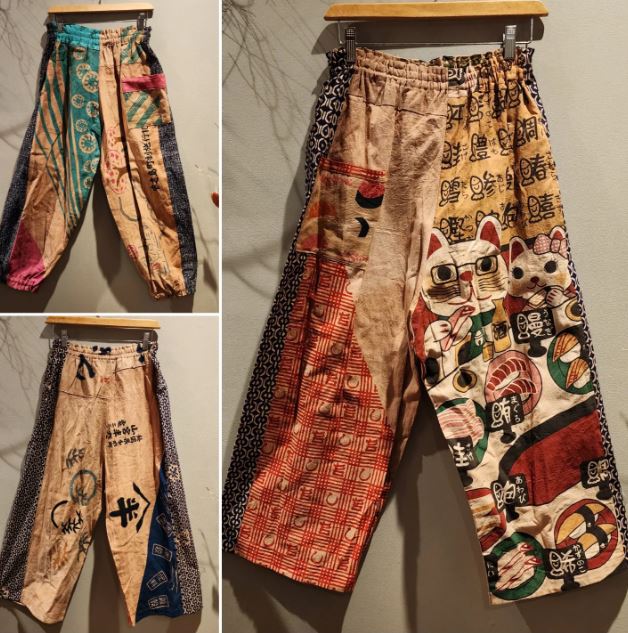
Patchwork is useful when the hoodie has several worn areas or when one plain colour no longer feels interesting. The hood, pocket, sleeves, or centre body can accept patterned panels, while the original sweatshirt provides the structure and comfortable fit.
The replacement fabric should move reasonably well with the hoodie. Very stiff woven cloth can make a soft sweatshirt pull awkwardly, so use light cotton, jersey, flannel, or pieces backed with flexible interfacing only where necessary.
Materials and Tools
· Sound hoodie
· Reclaimed fabric scraps
· Paper for templates
· Fabric scissors or rotary cutter
· Pins or clips
· Sewing machine
· Ballpoint needle for the hoodie
· Universal needle for woven patches if needed
· Matching or contrasting thread
· Optional lightweight interfacing
Build Strong Patchwork Without Distorting the Hoodie
1. Choose the panel locations before cutting. Put the hoodie on and mark the damaged or visually empty areas with removable chalk. Photograph the garment, then place paper shapes over the hood, sleeves, front, or pocket to compare possible panel sizes. Keep the design away from thick seam intersections unless your machine can sew through the added layers comfortably.
2. Make templates and prepare the reclaimed fabric. Trace each selected area onto paper and add seam or turning allowance according to the attachment method. Wash and press the scrap fabric so it will not shrink later. Arrange the patterns, colours, and grain directions on the table before cutting, then label each piece so left and right panels do not become confused.
3. Stabilise and assemble patchwork units. Sew small scraps together into larger panels before attaching them to the hoodie. Press the patchwork seams to reduce bulk and add light backing only when the fabric is fragile or very loosely woven. Trim the completed unit to the paper template, keeping the strongest fabric around corners and attachment points.
4. Attach the panels in a controlled order. Pin or clip the largest panel first while the hoodie lies flat and unstretched. Baste around the edge, remove the pins, and check that the garment still hangs naturally. Topstitch the panel with a stretch-friendly stitch, working from the centre outward so folds and bubbles do not collect near the final edge.
5. Reinforce and finish the altered areas. Add a second row of stitching where pockets, cuffs, or sleeve panels receive repeated strain. Trim loose threads, press gently, and turn the hoodie inside out to inspect every seam. Wear it for a short movement test, then reinforce any corner that begins to lift before washing the finished garment.
For me, patchwork looks strongest when it follows the hoodie’s existing construction. A sleeve stripe that connects with a pocket detail usually feels more considered than several unrelated shapes placed wherever there happened to be empty space.
A beginner can start with one large back panel or one pocket overlay. Using a single piece of reclaimed fabric avoids piecing many small scraps while still changing the hoodie clearly.
Convert a Hoodie Into a Sleeveless Layering Vest
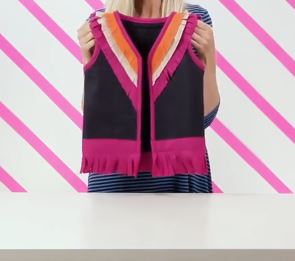
A sleeveless hoodie is a practical answer when the elbows are worn, the cuffs are stretched, or the sleeves feel too tight. The body, hood, pocket, and zip can remain almost unchanged, which makes this one of the least wasteful ways to keep the most useful parts of the garment.
The armhole finish determines whether the result looks intentional. Raw fleece may roll or shed, while a folded binding or reused cuff fabric creates a stronger edge that can tolerate regular wear.
Materials and Tools
· Old hoodie
· Fabric scissors
· Seam ripper
· Tailor’s chalk
· Clips or pins
· Sewing machine or hand-sewing needle
· Ballpoint or stretch needle
· Matching thread
· Ribbing or strips cut from the removed sleeves
· Optional bias binding suited to knit fabric
Remove the Sleeves and Finish the Armholes
1. Decide whether to keep the original armhole seam. Try the hoodie on and mark how much shoulder width you want. For a broader vest, remove the sleeves just outside the existing seam and keep the original seam allowance attached to the body. For a narrower cut, redraw the shoulder and armhole carefully, remembering that removing too much fabric may expose the underarm or make the hooded body pull backward.
2. Remove both sleeves evenly. Lay the hoodie flat and compare the left and right shoulder seams before cutting. Use a seam ripper when you want the cleanest original armhole, or cut beyond the seam if the stitching is too damaged to preserve. Keep the sleeves whole until the vest is complete because their fabric can supply binding, patches, pockets, or replacement ribbing.
3. Test the raw armholes on the body. Put the sleeveless hoodie over the clothes you expect to wear beneath it and move your arms forward, upward, and across your chest. Check that the opening does not gape, rub, or pull the hood toward the back. Mark small corrections while wearing it, then remove the garment before trimming anything.
4. Create and attach a flexible edge finish. Cut ribbing or sleeve fabric into strips long enough to go around each armhole, joining pieces if necessary. Fold the strip lengthwise and clip it to the armhole with the right sides together, distributing any stretch evenly. Sew with a stretch stitch, then turn the binding inward or outward according to the finish you prefer and topstitch it flat.
5. Check symmetry and reinforce the underarms. Hang the vest and compare both armholes from the front and back. Add extra stitching at the underarm and shoulder points, where the binding experiences the most movement. Wash the vest once before trimming very close to the seam, because the binding may settle or roll slightly after its first full cycle.
I’d keep a little more shoulder than a standard tank top. The hood adds weight at the back, and a wider shoulder helps the vest sit securely instead of sliding toward the neck.
For a no-sew version, cut outside the sleeve seams and leave a narrow raw edge. This works best with stable fleece, but the vest should still be tested for shedding, curling, and weak underarm corners.
Match the Upcycle to the Hoodie’s Main Problem
The Body Is Too Long
Choose the cropped version and reuse the ribbed hem. Preserve the pocket when possible, and test the folded length with the hood in place because the hood changes the garment’s balance.
The Hoodie Has Stains
Choose controlled surface decoration, patches, or embroidery. Bleach is permanent and unpredictable, while stitched panels offer more precise coverage and can strengthen thin fabric at the same time.
Several Areas Are Worn
Choose patchwork and let the repaired areas become the design. Replace or cover the weakest sections before they tear into neighbouring seams.
The Sleeves Are Damaged
Choose a sleeveless vest and reuse the sleeve fabric for binding. This preserves the hood, pocket, zip, and body while removing the least successful part of the garment.
Hoodie Upcycles That Can Go Wrong at the First Cut
Cropping Through the Kangaroo Pocket
A pocket that crosses the cutting line cannot simply remain half attached. Remove it first, raise the crop line, or plan to rebuild the pocket at a smaller size.
Forgetting the Seam Allowance
The marked finished length is not always the cutting line. Add enough fabric for a new hem, binding, or reattached ribbed band before using the scissors.
Stretching Ribbing Unevenly
Pulling one side harder creates waves and a twisted hem. Divide both the band and body into matching quarter points, then distribute the stretch between them.
Using a Straight Stitch on High-Stretch Areas
A straight seam may break when the cuff, hem, or armhole stretches. Test a narrow zigzag, stretch stitch, or overlocker seam on scrap before sewing the garment.
Bleaching Without a Hidden Test
Two dark hoodies can react in completely different colours. Test the dye and fibre strength first, and choose another method if the result looks weak or uneven.
Adding Heavy Woven Patches to Soft Fleece
A stiff patch can pull the garment out of shape and make the surrounding knit tear. Use flexible reclaimed fabric, round the corners, and spread the stitching over a generous area.
Cutting Armholes Too Deep
A deep opening can expose the side body and pull the vest backward under the weight of the hood. Begin outside the original sleeve seam and reduce the shoulder gradually.
Throwing Away the Sleeves and Hem Too Soon
Removed pieces are the best colour and fabric match for bindings, patches, and repairs. Keep every sound offcut until the finished hoodie has been worn and washed.
Ignoring Thick Seam Intersections
Pocket corners, side seams, and ribbing can create several bulky layers. Grade seam allowances, sew slowly, and avoid forcing the fabric when the needle cannot penetrate cleanly.
Frequently Asked Questions
Can I crop a hoodie without sewing?
Yes, stable sweatshirt fleece can be left with a raw edge. Cut conservatively and test how the fabric rolls after washing. A sewn or reattached ribbed band creates a more durable finish.
What needle should I use for sweatshirt fabric?
A ballpoint or stretch needle often works well for knit sweatshirt fabric. Use a size suited to the fabric thickness and test several layered scraps before sewing through ribbing or patchwork.
Can I bleach any hoodie?
No. Fibre content and dye affect both the colour change and fabric strength. Test a hidden area, work with ventilation and protective equipment, and never mix bleach with other cleaners.
How do I stop a patch from stretching the hoodie?
Baste the patch while the hoodie lies flat and unstretched. Use flexible fabric, rounded corners, and a stitch that allows some movement. Lightweight backing may help fragile patch fabric.
Can I turn a zip hoodie into a vest?
Yes. Keep enough shoulder width to balance the zip and hood, then finish the armholes with ribbing, knit binding, or strips cut from the removed sleeves.
What can I make from leftover hoodie fabric?
Sound pieces can become cuffs, armhole binding, visible-mending patches, a small pouch, a headband, pocket extensions, or matching details on another sweatshirt.
Should I remove cracked vinyl graphics?
Only when the print can be lifted without damaging the fabric. Covering it with a patch, embroidery, or a larger panel is often safer than scraping or applying strong heat.
Keep the Hood, Comfort, and Best Parts in Use
Learning how to upcycle a hoodie begins with identifying what still works. The hood may be comfortable, the body may fit well, and the pocket may remain useful even when the length, sleeves, colour, or surface no longer suits you.
Choose one clear alteration and preserve the strongest original details. Reattach the ribbed band after cropping, place patches where they strengthen weak fabric, or use the removed sleeves to finish a new vest. Those decisions make the result feel connected rather than randomly changed.
Begin with temporary folds, paper templates, and test stitching. Then cut gradually and keep every usable offcut until the hoodie has been worn and washed. A careful first project is more valuable than an ambitious design that becomes uncomfortable after one afternoon.
Which hoodie problem would you solve first: an awkward length, a stubborn stain, several worn areas, or sleeves that no longer deserve to stay?