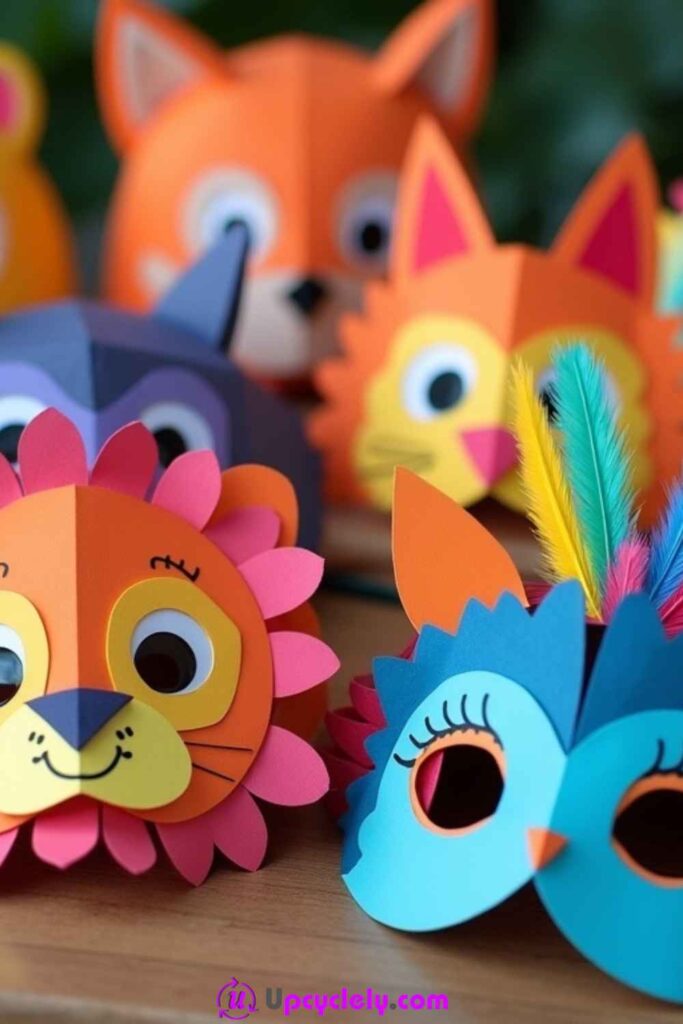
Animal Masks
Materials Needed:
- Colorful cardstock or construction paper
- Scissors
- Glue
- Markers or crayons
- Elastic band or string
- Feathers or decorative embellishments (optional)
Steps:
- Choose Your Animal and Shape the Mask
Start by picking which animal you want to bring to life. For a lion, for example, draw an oval or circular face on cardstock and add ear shapes. Be sure to cut out spaces for eyes in the right spots. It doesn’t have to be perfect—as long as it resembles the general shape, kids will absolutely adore it! - Add Details to Match the Animal
Cut out smaller pieces of colored paper for adding unique details. For a lion, create a bright mane by cutting strips of orange and pink paper and gluing them around the edge of the mask. For an owl, large feathers on the top of the mask can mimic wings. Make sure to overlap layers for a full, exciting effect. - Attach the Elastic Band
Measure the elastic around your head or your child’s head, and staple or glue it to the edges of the mask. Adjust elasticity for comfort. Try it on! Watching your creation come alive is pure joy.
Pro Tip: To make the masks extra sturdy, glue the cardstock onto old cereal boxes or cardboard for a base layer before decorating.
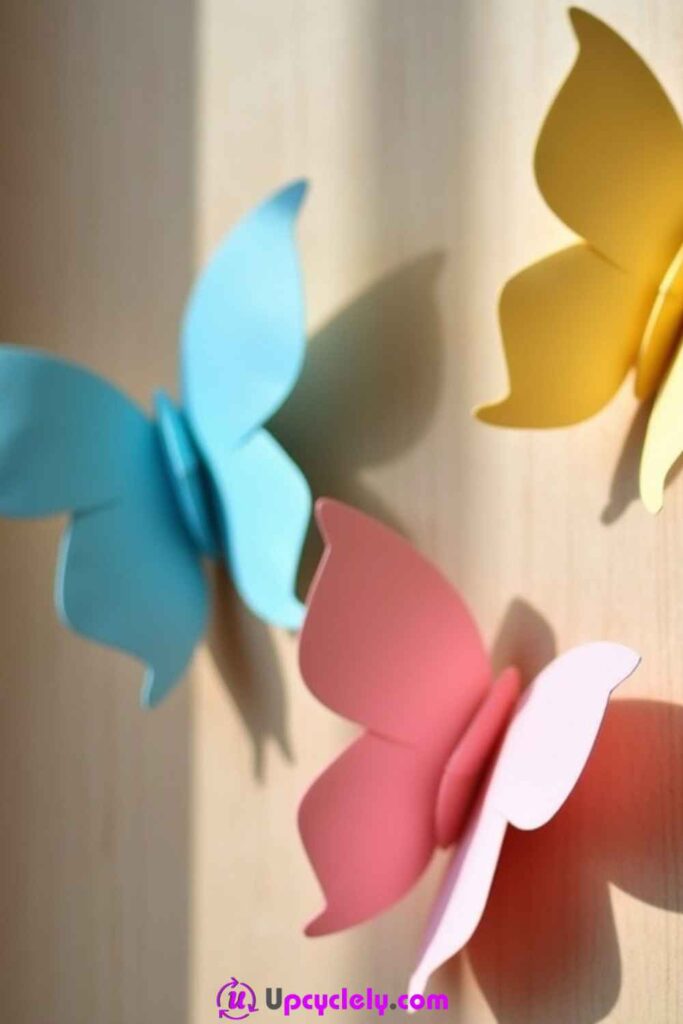
3D Paper Butterflies
Materials Needed:
- Pastel-colored cardstock or decorative paper
- Scissors
- Pencil
- Double-sided tape or glue
- Glitter or markers (optional)
Steps:
- Create the Butterfly Template
First, sketch a butterfly shape on a piece of paper. Fold the paper in half to make both wings symmetrical. Once you’re happy with the design, carefully cut it out. You can reuse this as your template. - Cut and Fold the Wings
Trace the butterfly shape onto your chosen cardstock or patterned paper. Cut it out. To give a 3D effect, fold the wings upward by slightly creasing them along the center of the body in a V-shape. This little detail makes them look like they’re about to flutter away! - Stick and Decorate
Secure your butterflies on a wooden plank, a wall, or on cards using double-sided tape. Sprinkle some glitter on the edges or use fine markers to add intricate designs on the wings for an extra creative touch.
Pro Tip: Stack layers of different colored butterflies slightly offset to add depth and a dynamic visual effect.
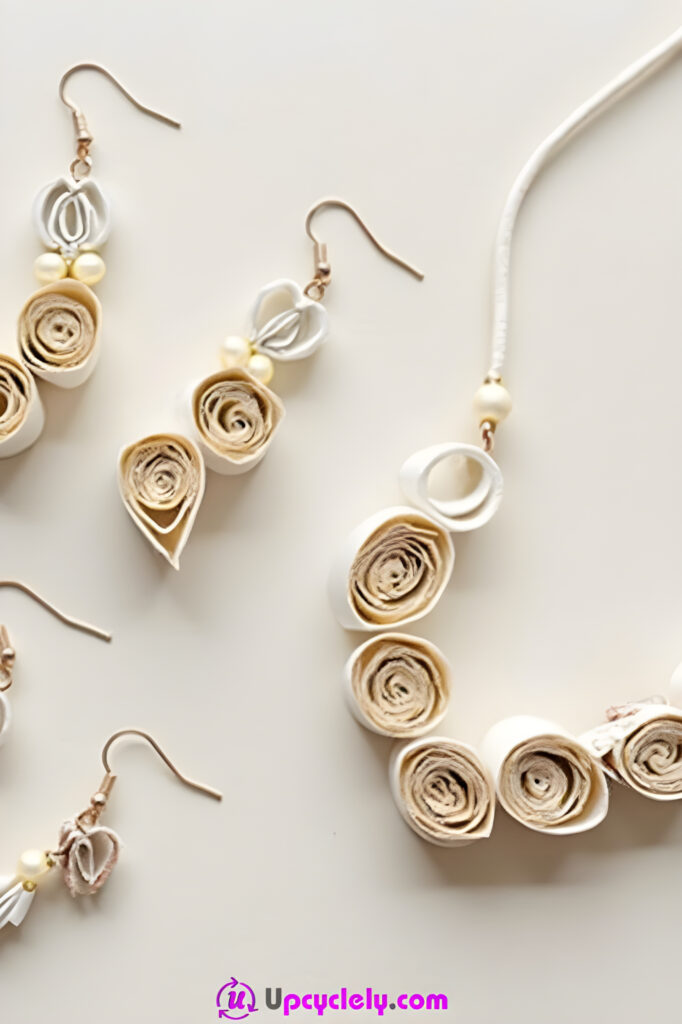
DIY Paper Jewelry
Materials Needed:
- Old magazines or scrap paper
- Glue stick
- Toothpicks
- Small beads
- Jewelry string or hooks
- Scissors or craft knife
Steps:
- Create Paper Roll Beads
Cut strips of paper (about 1 inch wide) from magazines or colorful cardstock. Roll each strip tightly around a toothpick, securing the end with glue. Make rolls of different lengths to add variety to your designs. - Prepare the Jewelry Base
For a necklace, string your paper beads and small decorative beads on a jewelry string in your desired pattern. For earrings, attach beads to hooks using loops of thin wire. - Seal for Durability
Cover the paper beads with a light layer of glue or decoupage glue to make them sturdy and water-resistant. Allow them to dry completely before wearing or gifting. It’s such a satisfying feeling to finish your first piece!
Pro Tip: Use ombre-color paper patterns for a trendy, gradient look.
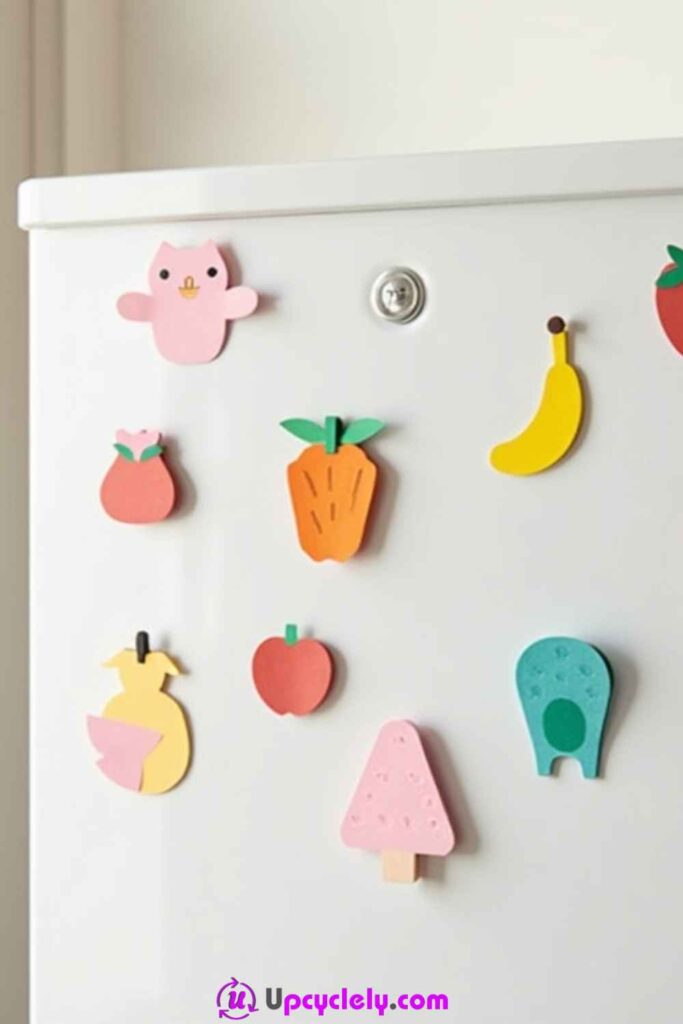
DIY Paper Magnets
Materials Needed:
- Bright cardstock or patterned paper
- Magnetic sheets (back adhesive preferred)
- Scissors
- Glue stick
- Clear tape or mod podge for sealing
Steps:
- Draw and Cut Out Shapes
Sketch the designs you want to create, such as fruits like pineapples, bananas, or a cute little owl. Once your designs are ready, cut them out neatly. Keep the sizes between 3-7 inches for a good fit. - Layer and Build Details
Use different papers and layer them to add realistic or fun features. For example, add green leaves to a strawberry or create a textured feather effect on the owl’s body. - Attach the Magnet
Stick your completed designs to the adhesive side of your magnetic sheet. If your magnet doesn’t have adhesive, simply use glue to attach them. Press firmly and trim any corners for a clean look.
Pro Tip: Use metallic or glitter paper to make the magnets eye-catching and unique!
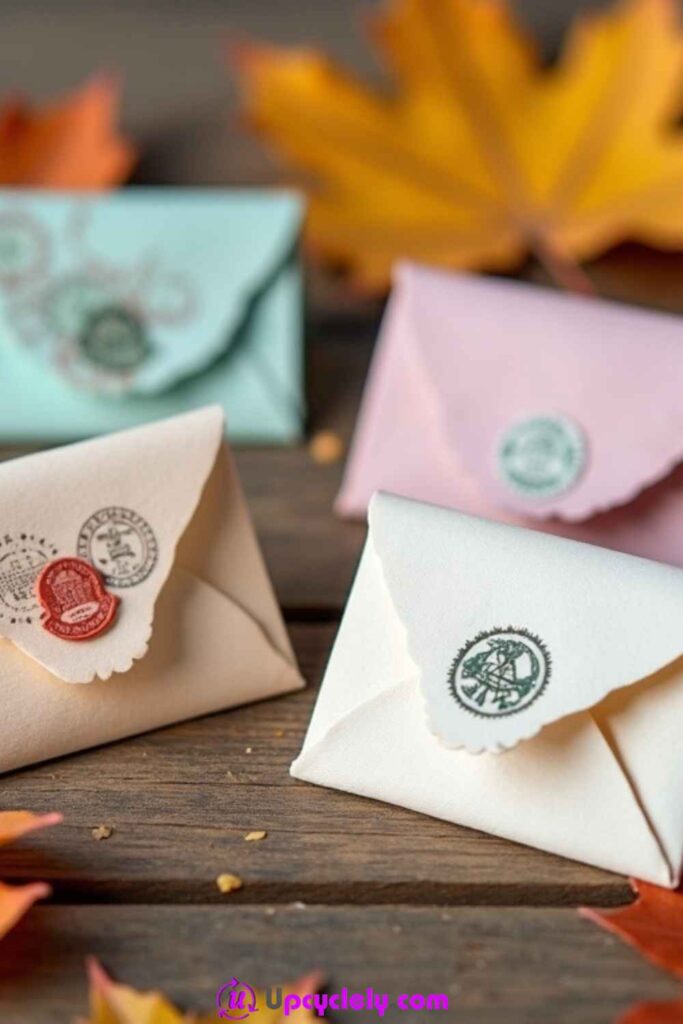
Mini Paper Envelopes
Materials Needed:
- Designer paper or plain craft paper
- Wax or pre-made decorative seals
- Scissors
- Ruler
- Glue
- Small stamps (optional)
Steps:
- Create the Template
Draw a large diamond shape on the back of your paper, measuring about 4 inches wide and tall. Cut it out and lightly fold the edges inward to create the envelope flaps. Keep the edges straight and sharp for a clean fold. - Seal Your Envelope
Apply a thin layer of glue to the bottom flap’s inside edge and press the side flaps over it. Then, fold the top flap down securely after placing a small letter or note inside. - Decorate with a Vintage Flair
Top the flap with a wax seal or stick a decorative stamp on the front to give it an elegant look. Add small sprigs of dried flowers or leaves underneath the seal for a seasonal touch.
Pro Tip: Pair the envelope with matching stationery made from leftover bits of your decorative paper for a cohesive, polished presentation.
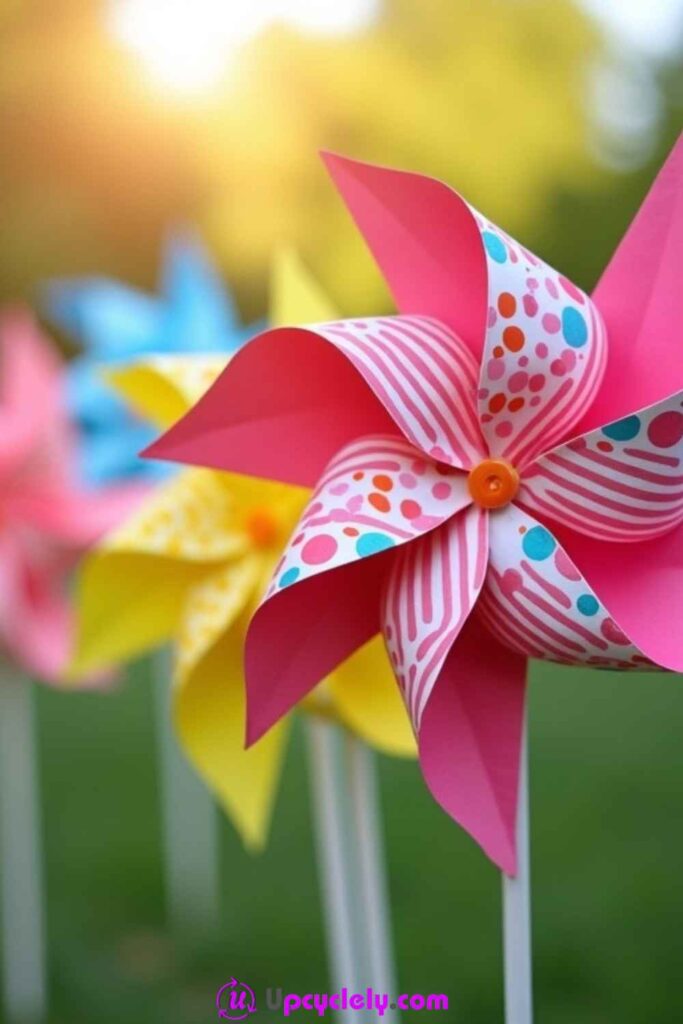
Paper Pinwheels
Materials Needed:
- Colorful patterned paper (6×6 inches is ideal)
- Scissors
- Push pin or thumbtack
- Pencil with an eraser
- Ruler
- Glue or tape
Steps:
- Prepare the Paper
Take a square piece of patterned paper and fold it diagonally both ways to form an “X” crease. Using a ruler, make a small mark about one inch from the center along each crease line. This will guide your cuts. Carefully cut along the creases but stop at the marked points. This will create four triangular flaps. - Shape the Pinwheel
Fold the right corner of each triangular flap toward the center. Hold each corner there, overlapping them slightly, and secure them together with glue or tape to form the pinwheel shape. Be gentle to avoid creasing the paper where it shouldn’t be. - Attach and Finish
With the thumbtack, secure the middle of the pinwheel to the eraser end of a pencil. Make sure to leave a slight gap between the pinwheel and the eraser so it spins freely. Test it out! Watching it twirl in the breeze is pure magic.
Pro Tip: Use double-sided patterned paper for an eye-catching, dynamic design when the pinwheel spins.
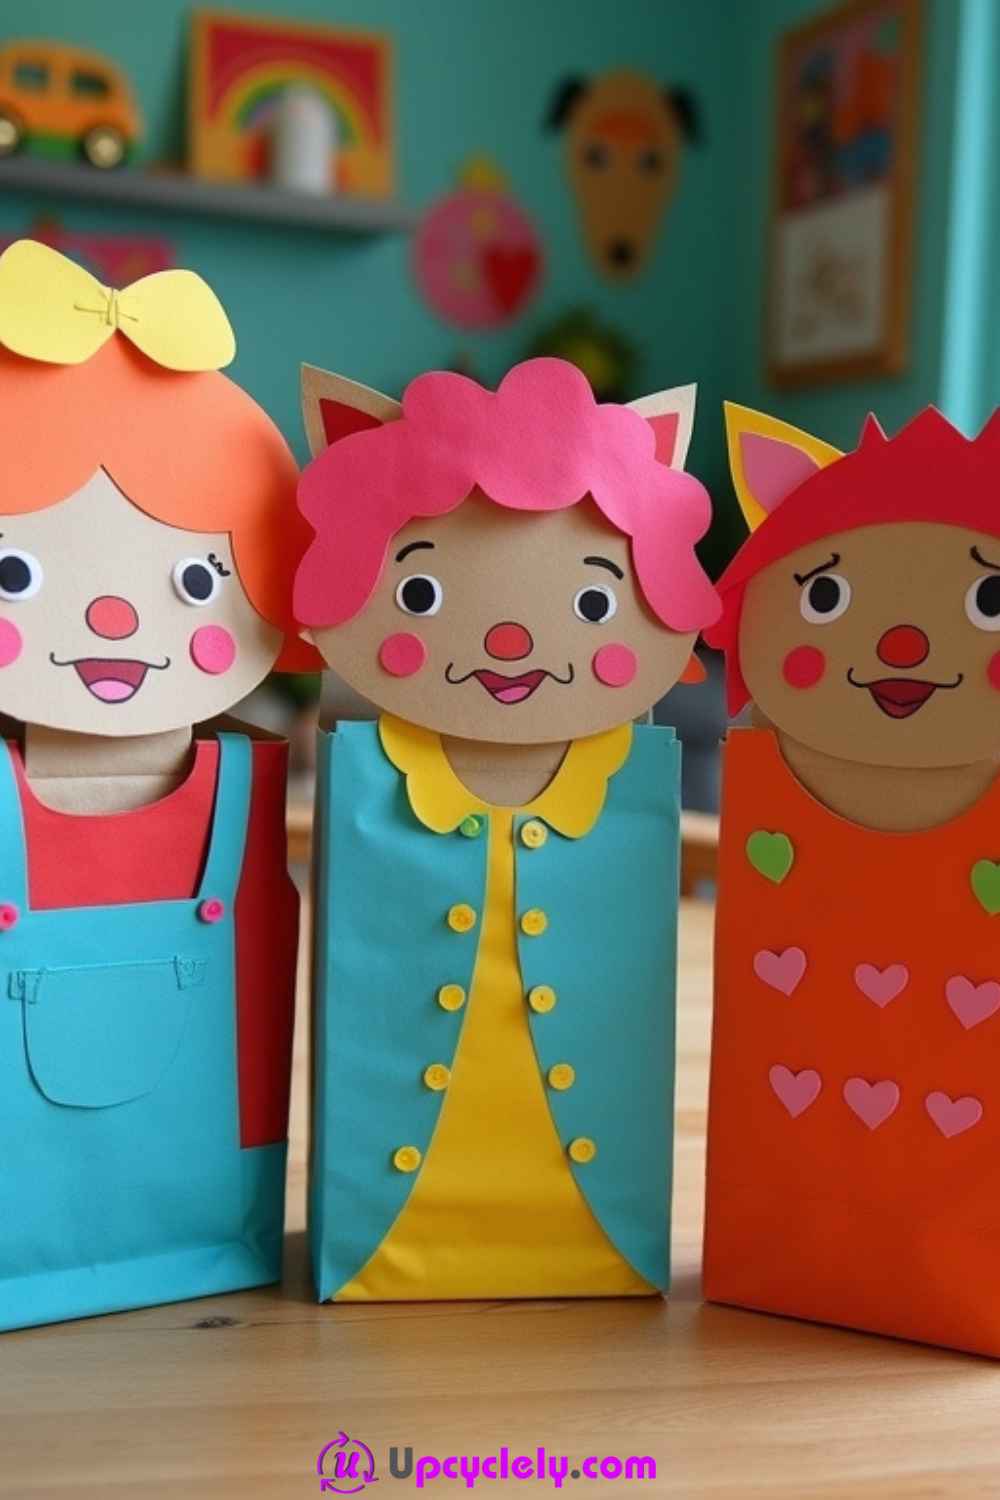
Paper Bag Puppets
Materials Needed:
- Brown paper lunch bags
- Colorful paper for embellishments
- Markers or crayons
- Glue stick
- Scissors
- Yarn or ribbon (for “hair”)
Steps:
- Form the Face Base
Fold the bottom flap of the paper bag as the mouth section for your puppet. On this flap, draw or glue on the character’s face. Add big, expressive eyes and whatever unique features you want. - Build the Outfit
Use colorful paper to cut out clothing elements like shirts, jackets, or dresses. Glue them onto the bag, covering the body section beneath the flap. Add details like patterns or buttons with markers to give the character a personality. - Add Finishing Touches
Glue yarn or ribbon to the top of the bag for hair. You can get as funky or cool as you like here. Short, curly, or even a wild Mohawk! Bring it all together with accessories like bows, hats, or whiskers for animal designs.
Pro Tip: Create a set of puppets and host a mini puppet show. It’s perfect for entertaining kids or bringing stories to life!
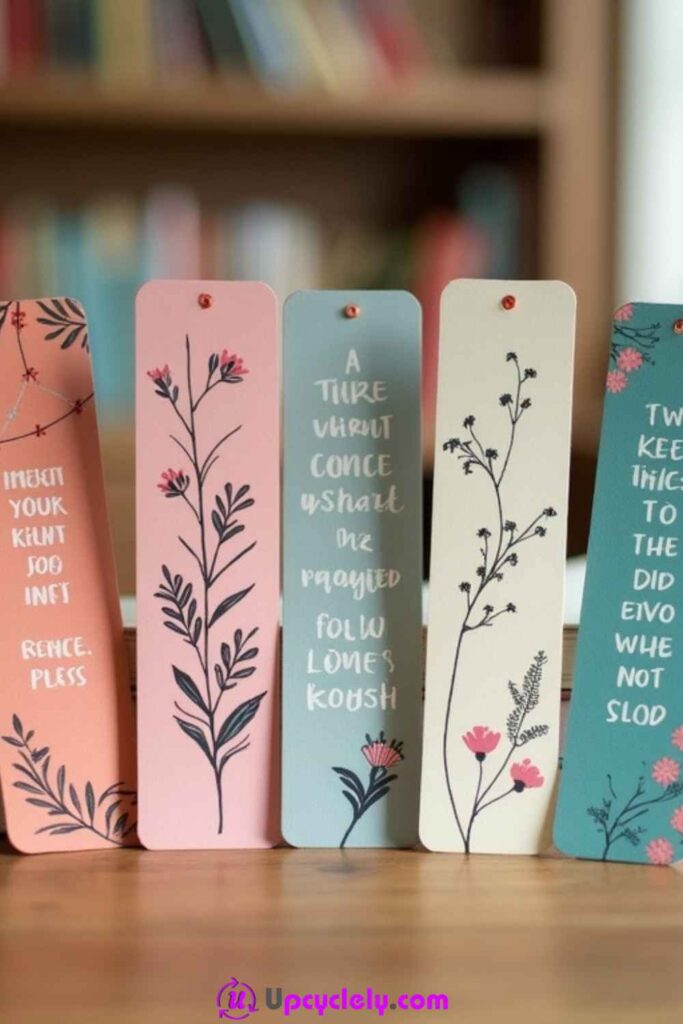
Paper Bookmarks
Materials Needed:
- Thick cardstock or watercolor paper
- Watercolor paints or markers
- Ruler
- Scissors
- Laminating sheets or clear packing tape
- Hole punch (optional)
- Ribbon or twine (optional)
Steps:
- Cut Your Canvas
Cut your cardstock into strips about two inches wide and six inches long. This shape makes a great foundation for your bookmark. - Design and Decorate
Use watercolors or markers to paint or draw your designs. Abstract swirls, floral patterns, or even a favorite quote can make the bookmark personal and unique. Be creative and make it something you’ll smile at every time. - Protect and Accessorize
Once the design is dry, laminate the bookmark with laminating sheets or cover both sides with clear packing tape to add durability. If desired, punch a hole at the top and tie a ribbon or piece of twine to make it extra special.
Pro Tip: Add pressed flowers or leaves under the laminate for a delicate, nature-inspired bookmark design.
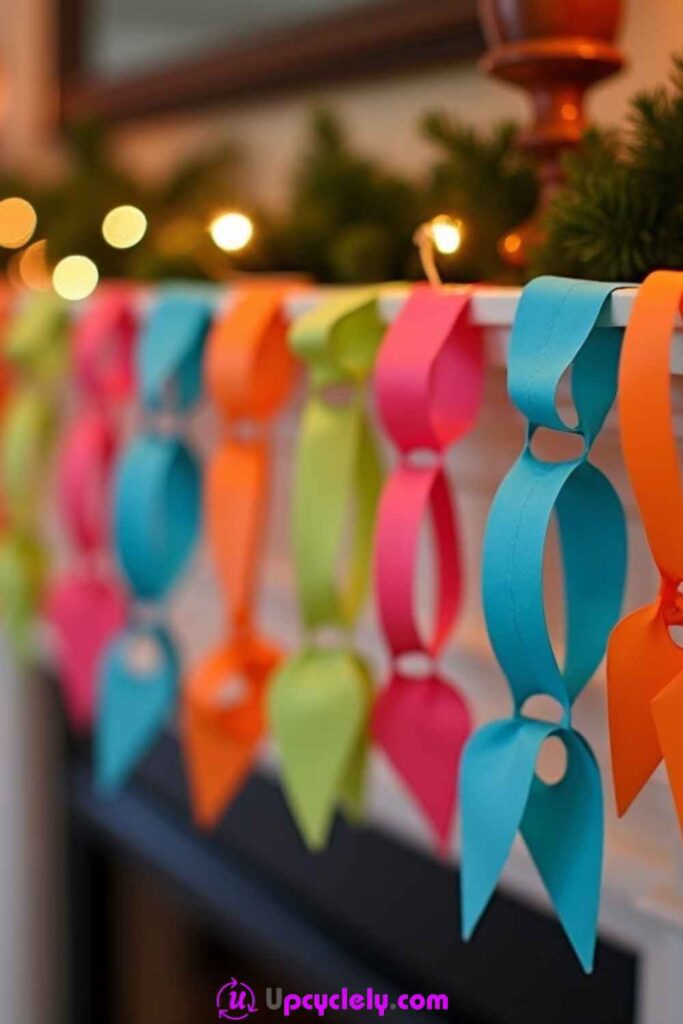
Paper Chain Decorations
Materials Needed:
- Colorful construction paper
- Scissors or paper cutter
- Glue stick or stapler
Steps:
- Cut Strips
Start by cutting your construction paper into strips about an inch wide and six inches long. The uniform size makes the chain look neat and balanced. - Link the Chains
Take one strip, loop it into a circle, and secure the ends with glue or a staple. Thread the next strip through the circle you just made, loop it, and secure it. Continue linking strips until you reach the desired length. - Hang and Display
Once your chain is complete, drape it along doorways, wrap it around banisters, or line shelves. It’s such an instant mood booster to add these bright pops of color to your space.
Pro Tip: Alternate colors in a set pattern (like red-blue-yellow) for an eye-catching, coordinated look.
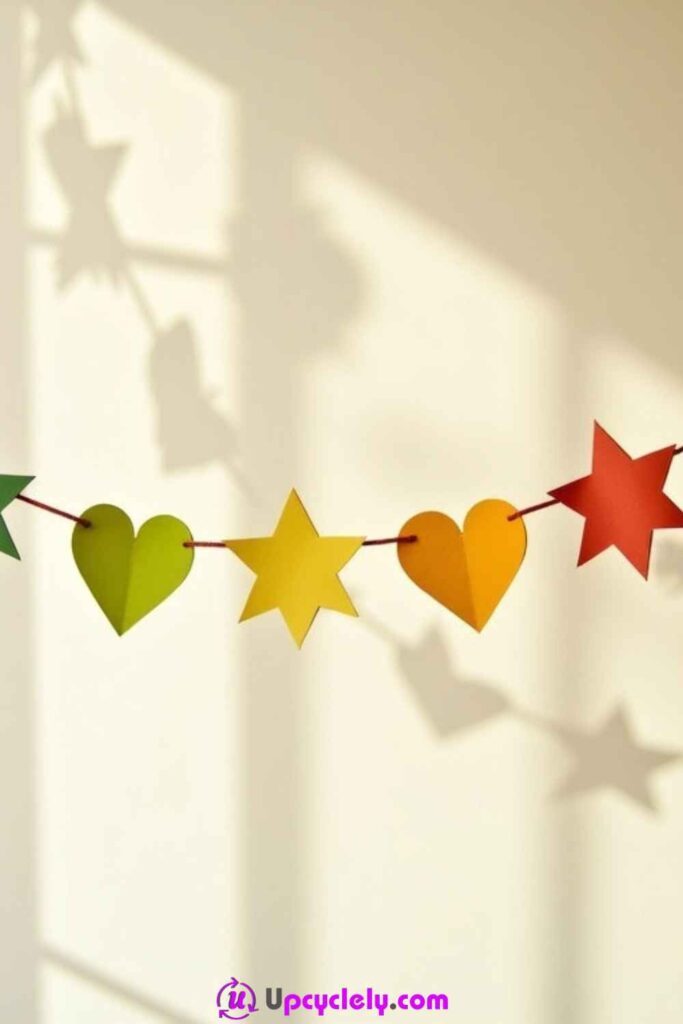
Paper Garland
Materials Needed:
- Colored paper
- Star and heart stencils or cookie cutters
- Scissors
- String
- Glue stick or hole punch
Steps:
- Cut Out Shapes
Trace star and heart shapes onto your colored paper using stencils or cookie cutters as guides. Cut out as many as you’d like, depending on the garland’s length. Use a mix of sizes for added charm. - String the Shapes
Punch a hole in the top of each shape and thread your string through, gently sliding each shape into position. Space them out evenly, or bunch them up depending on the look you’re going for. - Hang and Enjoy
Drape the garland across a blank wall, over door frames, or even wrap it around furniture. Stand back and admire your handiwork. It’s amazing how a little pop of color can brighten up a room!
Pro Tip: Use shimmering or glitter paper during the holidays for a glamorous touch!
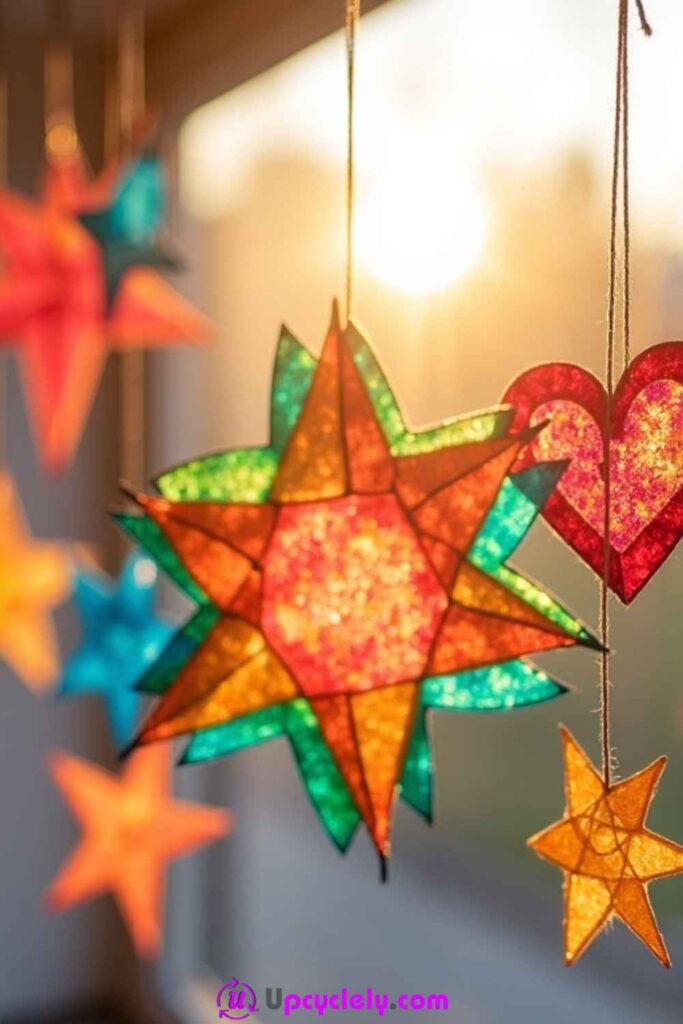
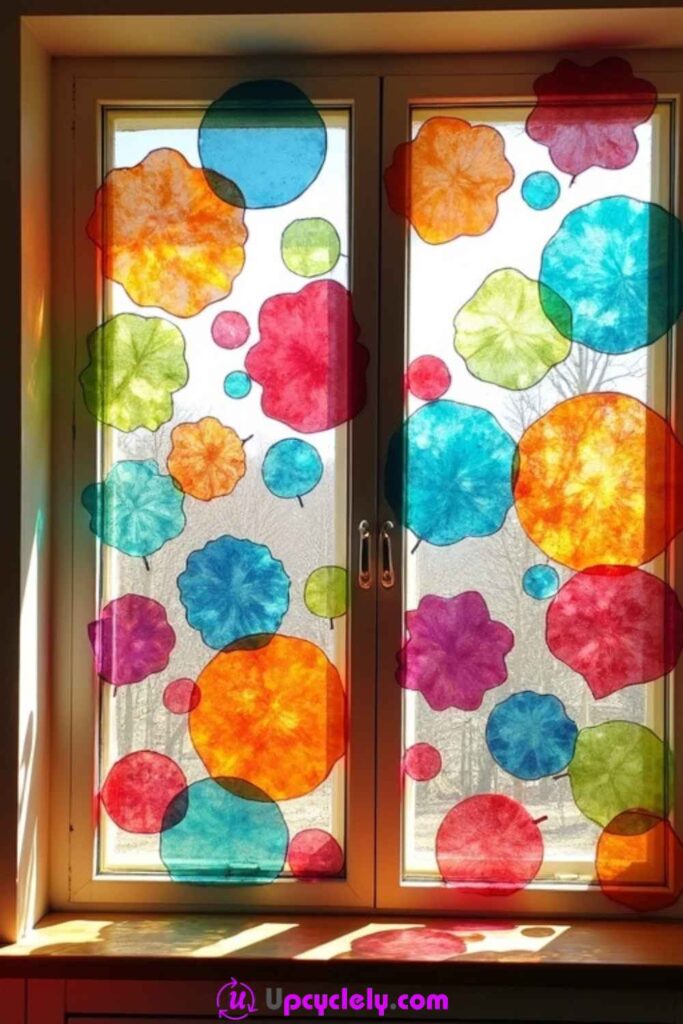
Paper Sun Catchers
Materials Needed:
- Translucent colored tissue paper
- Clear contact paper
- Scissors
- String for hanging
- Star and heart templates (or shapes of your choice)
Steps:
- Prepare Your Shapes
Start by tracing stars, hearts, or other shapes you love onto the tissue paper. Use a pencil to make the lines, as it’s easier to clean up. Carefully cut out the shapes. I like layering different colors for a dimensional effect. Gluing smaller hearts onto larger stars brings them to life. - Seal for Transparency
Cut pieces of clear contact paper slightly larger than your shapes. Stick your tissue paper shapes onto one piece, making sure they lie flat. Once satisfied with the placement, cover them with another layer of contact paper, sealing everything in. Trim the edges for a clean finish. - String and Display
Punch a small hole at the top of each sun catcher. Thread them onto a string and secure with a knot or small dabs of glue. Hang them in front of a sunny window, and watch as they transform daylight into dazzling colors.
Pro Tip: For extra sparkle, add small bits of glitter in between tissue paper layers before sealing them. They’ll catch the light beautifully!
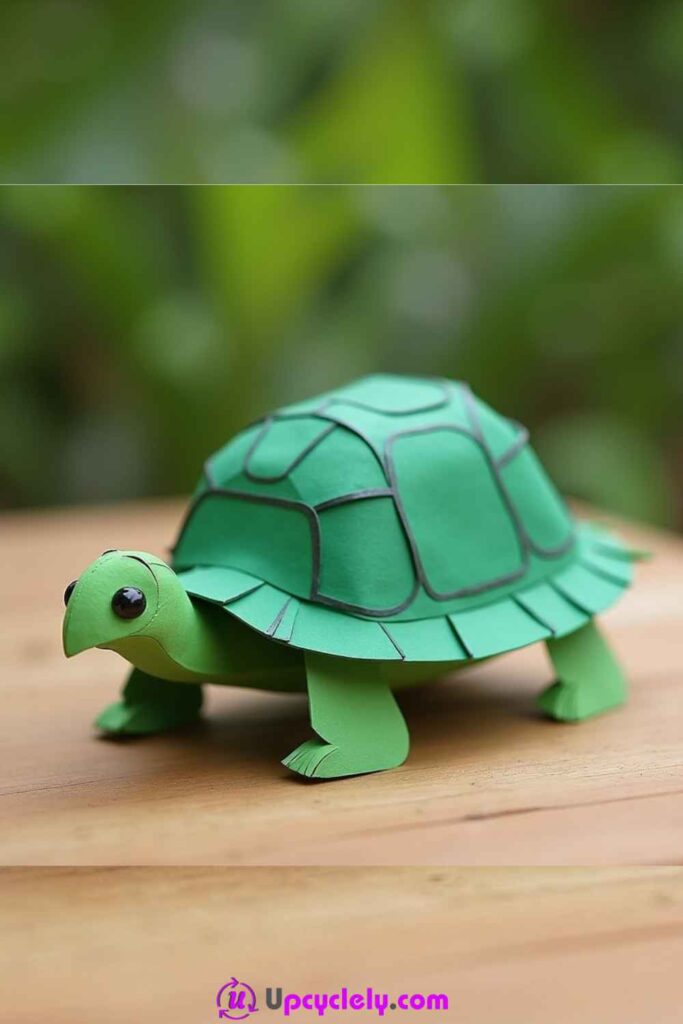
Paper Turtles
Materials Needed:
- Green cardstock or construction paper
- Marker or black pen
- Googly eyes
- Glue
- Scissors
Steps:
- Craft the Base Body
Cut a large oval-shaped piece out of green paper to form the turtle’s shell. Next, cut a smaller circle (this will be for the turtle’s body under the shell). Use smaller scraps for its four legs and a tiny triangle for the tail. Assemble these onto the circle shape using glue. - Add Shell Patterns
Draw patterns onto the oval “shell” using a marker or pen (hexagons or wavy lines look great). Paste the completed shell over the circular body base. Don’t worry if it’s a bit uneven; imperfections make it unique! - Bring It to Life
Add googly eyes to the head section! Seeing those fun eyes instantly brings your little turtle to life. Once done, it’s ready to decorate your shelves or become a cute desk companion.
Pro Tip: Use different shades of green and add tiny red blush spots near its eyes for extra charm!
Scrapbook Paper Greeting Cards
Materials Needed:
- Scrapbook paper with various designs
- A plain card or cardstock for the base
- Scissors
- Glue stick
- Pens or markers
Steps:
- Create a Background
Cut a rectangular piece from scrapbook paper that perfectly fits the front of your card base. I like choosing floral patterns for a cheerful vibe. Glue it to the card’s surface and smooth it out to remove air bubbles. - Layer Decorative Elements
Cut shapes (like hearts or geometric patterns) out of contrasting scrapbook paper. Arrange and stick these slightly overlapping on your background. Don’t feel pressured to make it too symmetrical. Organic arrangements can look artful and whimsical. - Personalize Your Message
Using bold pens or markers, write a thoughtful message in the blank space. Whether it’s “Happy Birthday” or “Just Thinking of You,” a carefully written note elevates the handmade touch.
Pro Tip: Attach tiny embellishments like small dried flowers, ribbons, or gems to your card for a professional finish.
Paper-Stained Glass
Materials Needed:
- Black construction paper
- Colored tissue paper
- Glue stick
- Scissors or craft knife
Steps:
- Design the Framework
Fold the black construction paper in half and draw a design—from simple circles to intricate flowers. Carefully cut out sections inside the shape, leaving enough of a border to hold the structure. You’ve got a frame for your faux stained glass. - Fill with Colors
Cut small pieces of tissue paper slightly larger than the openings in your frame. Glue them to the backside of the paper, covering the cut-out sections. Overlapping tissue colors creates a beautiful layered effect. - Display in Light
Tape your finished stained glass creation to a sunny window. Watching the sunlight filter through the vibrant colors is genuinely magical.
Pro Tip: For bolder patterns, glue two frames back to back to double its sturdiness.
Paper Stars
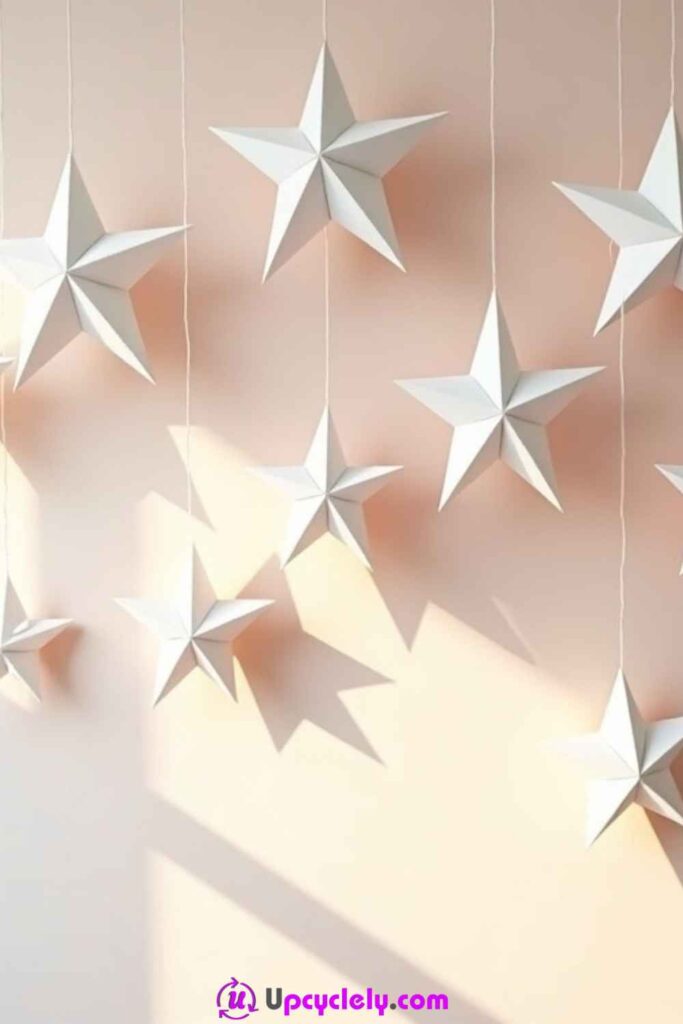
Materials Needed:
- White or colorful cardstock
- Ruler
- Pencil
- Hot glue gun or strong glue
- String
Steps:
- Draw and Cut Out Stars
Trace two identical star shapes for each decoration (five or six-point stars work best). Carefully cut them out so you have pairs for each star. - Create the 3D Effect
Gently score lines from the center of the star to each point using a ruler and pencil. Fold along the lines to add dimension. Attach the middle of two stars using glue, ensuring the folded edges flare outward for a 3D look. - Hang and Style
Attach strings to the back of your completed stars and hang them at varying heights. They look especially stunning against pastel-colored walls or as party decor.
Pro Tip: Use metallic paper to add a touch of sparkle for festive occasions like Christmas or New Year celebrations.