DIY Denim Jeans Utility Organizer
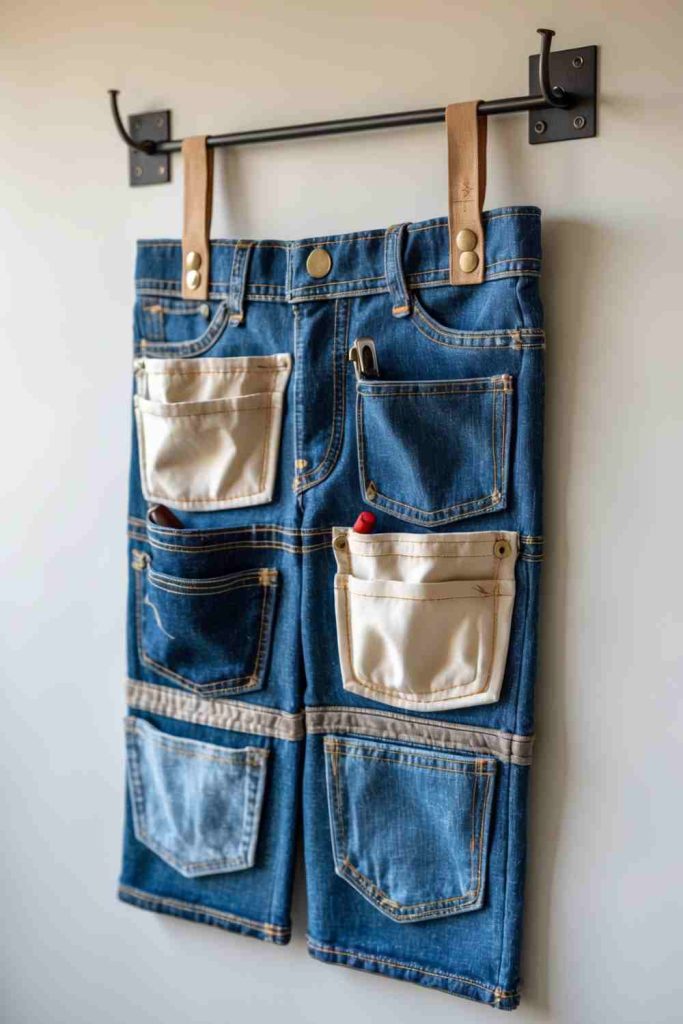
4 Steps to Create This DIY Denim Jeans Utility Organizer
- Gather Materials
Grab an old pair of denim jeans, white canvas fabric (for pockets), scissors, needle and thread or a sewing machine, leather straps, a metal rod, and hooks. - Cut and Design
Cut a section of the jeans (from the thigh down) to use as the base. Decide on the placement of your canvas and denim pockets for maximum utility. Mix small and large pocket sizes for added functionality. - Attach Pockets
Stitch the canvas and additional denim pockets onto the base piece. Add decorative stitching or embellishments for a personal touch. Ensure the pockets are securely attached to handle small tools or supplies. - Finishing Touches
Attach leather straps to the top of your organizer and loop them over a metal rod with hooks. Hang it on a wall or gift it as a multifunctional organizer for tools, art supplies, or even gardening gear!
DIY Lanterns from Old Cans
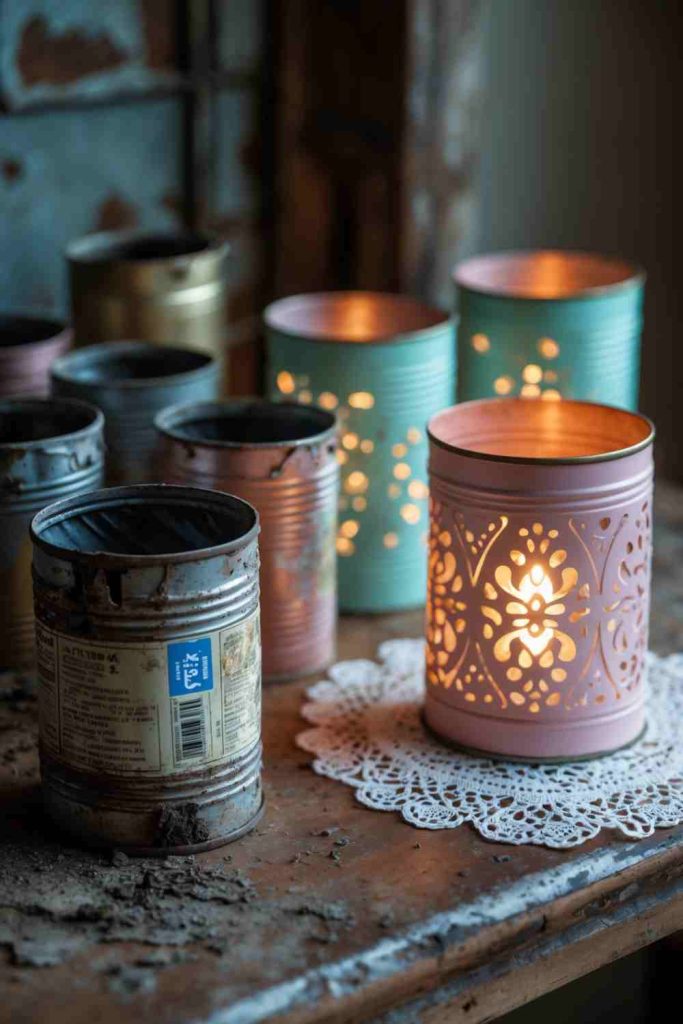
4 Steps to Create This DIY Lanterns from Old Cans
Gather Materials
Collect old cans of various sizes, a hammer and nail (or drill) for creating patterns, paint in pastel or metallic shades, small candles or LED lights, and optional lace doilies for decoration.
Clean and Prep
Wash and dry the cans thoroughly. Remove any labels and smooth over sharp edges with sandpaper to make them safe to handle.
Create Patterns
Use a hammer and nail (or a drill with a small bit) to punch holes into the cans, forming creative cut-out patterns like stars, flowers, or geometric shapes. Be sure to wear gloves for safety and work slowly to avoid denting the cans.
Paint and Finish
Paint the cans in your desired color and leave them to dry completely. Insert small candles or LED lights inside, and optionally, place them on a doily for an extra vintage touch. Your upcycled lanterns are now ready to be gifted or displayed!
DIY Magnets from Bottle Caps
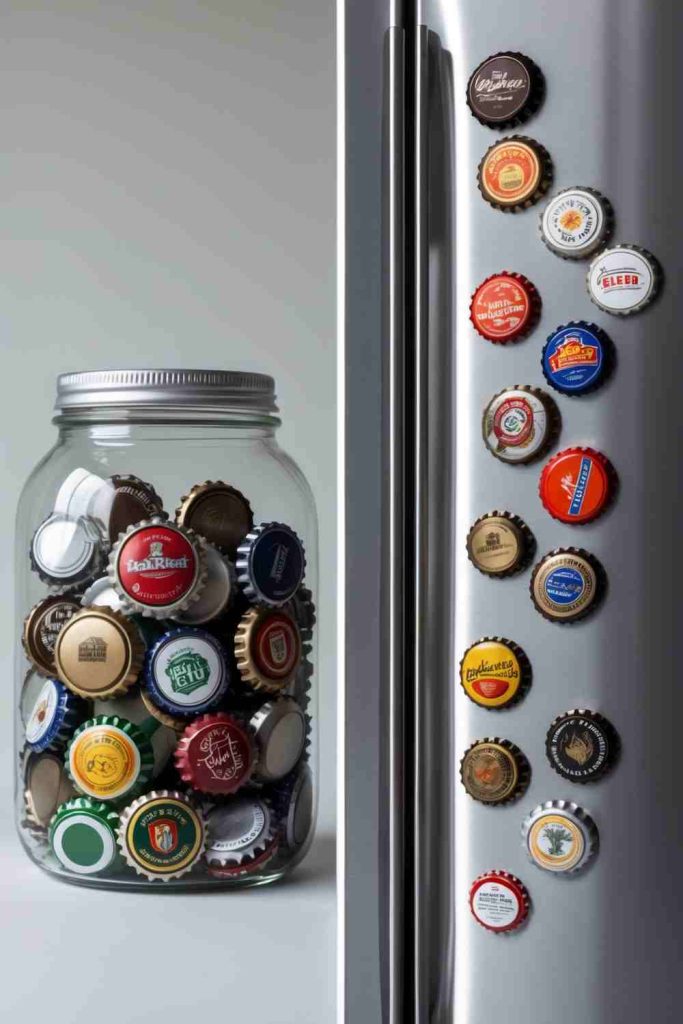
4 Steps to Create This DIY Magnets from Bottle Caps
- Gather Materials
Collect colorful bottle caps, round magnets, hot glue or strong adhesive, and optional decorative items like small beads, paint, or glitter. - Clean the Bottle Caps
Wash the caps thoroughly to remove any residue. Dry them completely to ensure the adhesive sticks properly. - Customize (Optional)
Add personal touches to your caps! Paint them, add glitter, or glue small embellishments inside to make them truly unique. - Attach Magnets
Use hot glue or strong adhesive to attach a round magnet to the inside or back of each cap. Allow the glue to dry completely, then test the magnets on your fridge or any metal surface.
DIY Kitchen Organizers from Tin Cans
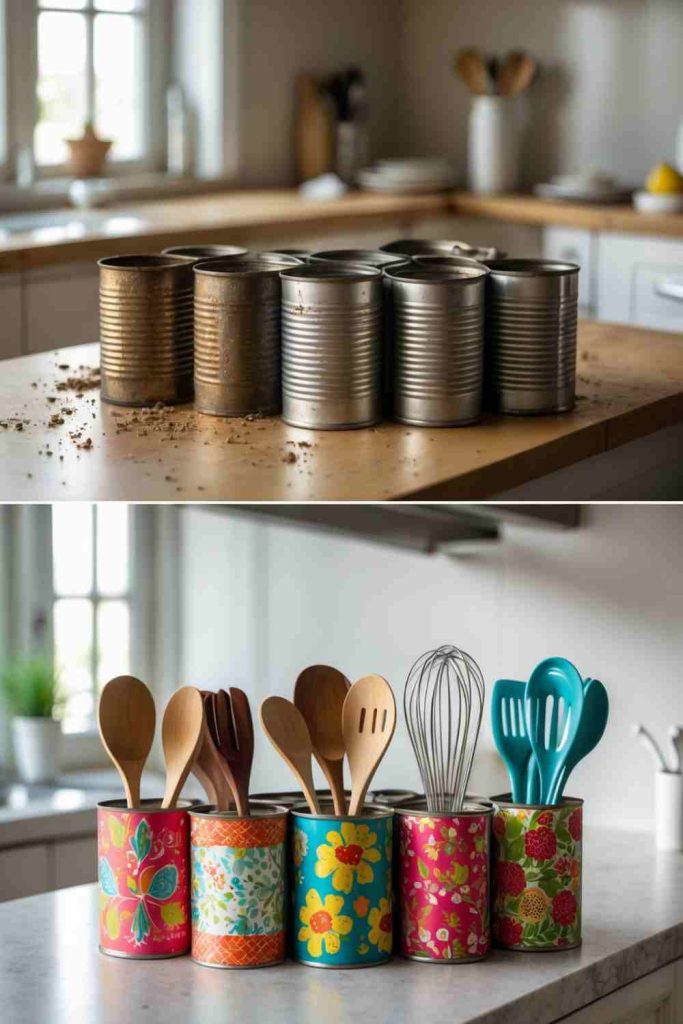
4 Steps to Create This DIY Kitchen Organizers from Tin Cans
- Gather Materials
Collect empty tin cans, decorative paper or fabric, glue or double-sided tape, scissors, and optional embellishments like ribbon or twine. Ensure the cans are clean and any labels are removed. - Decorate the Cans
Measure and cut your decorative paper or fabric to fit around each can. Secure it using glue or double-sided tape. Add details like ribbons, lace, or stickers for a personalized touch. - Add Functionality
Fill the decorated cans with kitchen utensils like spatulas, whisks, and wooden spoons. You can also use them as planters, desk organizers, or storage for other small items. - Gift or Display
Arrange the organizers on your kitchen counter for a practical and stylish addition, or gift them to someone who loves upcycled, handmade treasures. They’re perfect for organizing while reducing waste!
Handmade Jewelry from Buttons
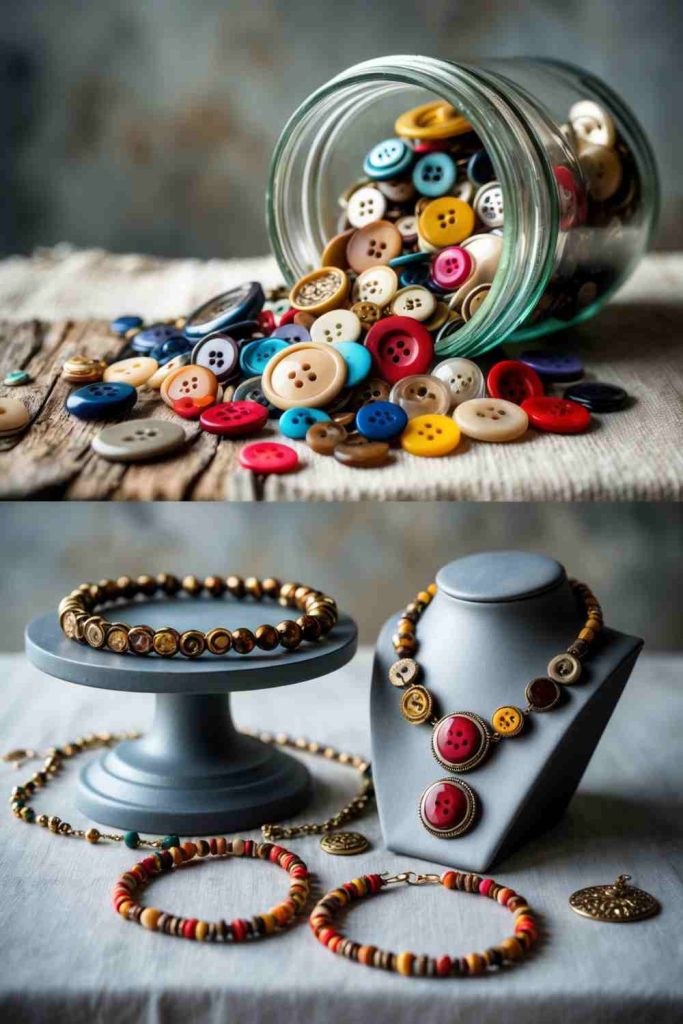
4 Steps to Create This Handmade Jewelry from Buttons
- Gather Materials
Collect an assortment of buttons in various sizes, shapes, and colors. You’ll also need jewelry-making supplies like chains, clasps, jump rings, beading wire, pliers, and optional beads for added flair. - Plan Your Design
Lay out the buttons and beads on a flat surface to envision your design. Decide if you’ll create a necklace, bracelet, or earrings, and arrange the buttons in your desired pattern or sequence. - Create the Jewelry
Thread buttons and beads onto the wire or string, securing them tightly. For necklaces or bracelets, attach clasps to the ends. If making earrings, affix buttons to earring hooks using jump rings or glue. - Polish and Finish: Double-check all connections to ensure durability. Give your jewelry a final polish, and it’s ready to wear or gift! Package it in a pretty box or pouch for an extra-special touch.
DIY Tote Bags from Old T-Shirts
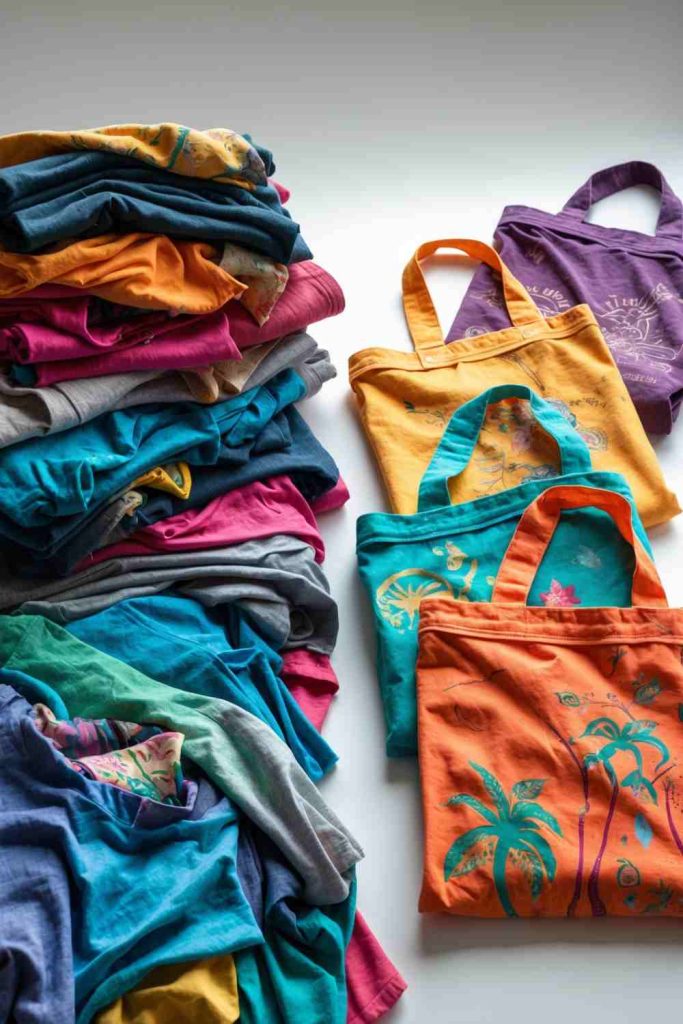
4 Steps to Create This DIY Tote Bags from Old T-Shirts
- Gather Materials
Collect old t-shirts, sharp scissors, and a ruler or tape measure. Optionally, grab fabric paint or embellishments to decorate your finished tote bag. - Cut the Shirt
Lay the t-shirt flat and cut off the sleeves, neckline, and hem. Cut the bottom of the shirt into 1-inch strips up to 3 inches high for tying. - Tie the Base
Stretch and tie the bottom strips together, knotting them securely to create a bag base. For added durability, you can double-knot or layer the ties. - Decorate and Use
Decorate your tote bag if desired with paint, patches, or markers. Your upcycled tote bag is now ready to be used for groceries, books, or gifting to a friend!
Creative Photo Holders from Wooden Spools
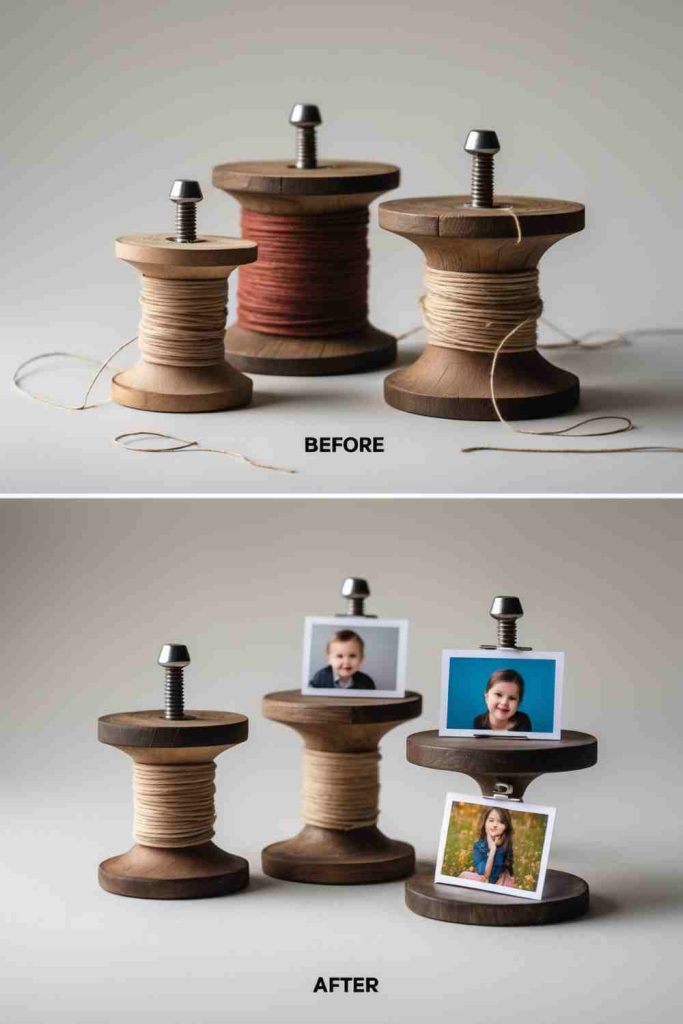
4 Steps to Create This Creative Photo Holders from Wooden Spools
- Gather Materials
Collect wooden spools, small photos or prints, glue, paint or varnish (optional), and metal photo clips or screws. Ensure the spools are clean and smooth. - Prepare the Spools
Paint or varnish the spools if desired, to match your decor theme. Allow the spools to dry completely before proceeding. - Attach Photo Clips
Screw in or glue a photo clip to the top center of each spool. Ensure the clip is secure and upright for holding photos. - Add Your Photos
Place your favorite small photos or prints into the clips. Arrange the photo holders on a shelf, desk, or mantle, or gift them to someone special.
Stunning Mosaic Art from Old CDs
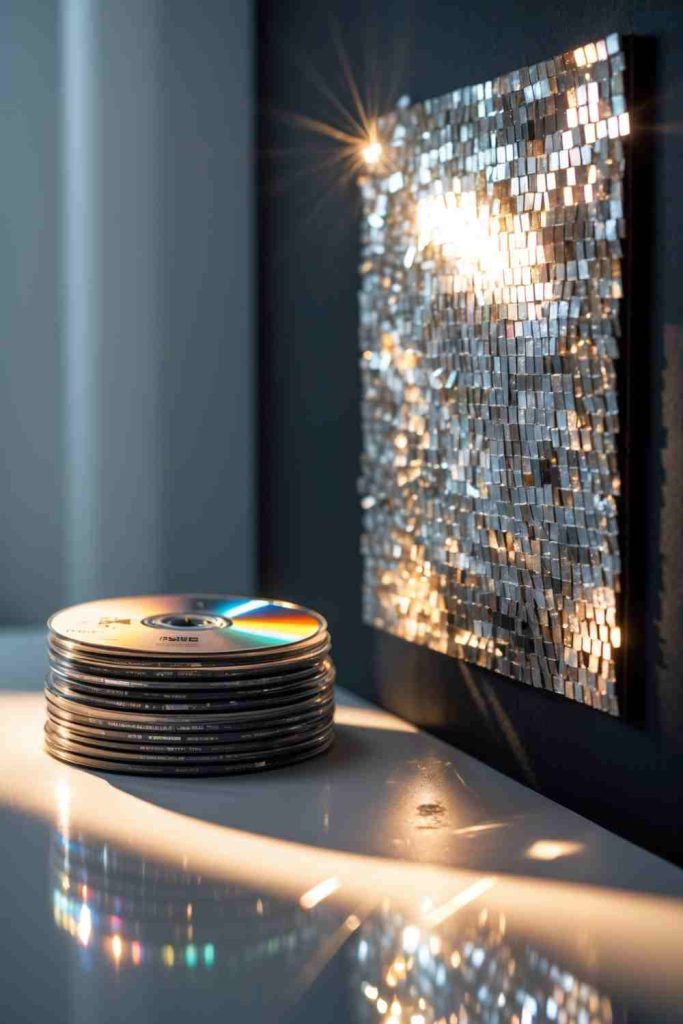
4 Steps to Create This Stunning Mosaic Art from Old CDs
- Gather Materials
Collect old CDs, a sturdy base (like a wooden board or frame), strong adhesive, and scissors. Gloves and safety goggles are recommended for handling sharp edges. - Cut the CDs
Carefully cut the CDs into small pieces. You can make squares, triangles, or irregular shapes depending on your design. Use sharp scissors and work slowly to avoid cracks. - Arrange the Mosaic
Plan and lay out your design on the base. Position the CD pieces shiny side up for a reflective, eye-catching effect. - Glue and Finish
Secure the CD pieces to the base with strong adhesive. Once dry, add a layer of grout if desired to fill gaps and finalize the mosaic look. Clean the surface gently for a polished finish.
Stylish Storage Solutions from Wooden Crates
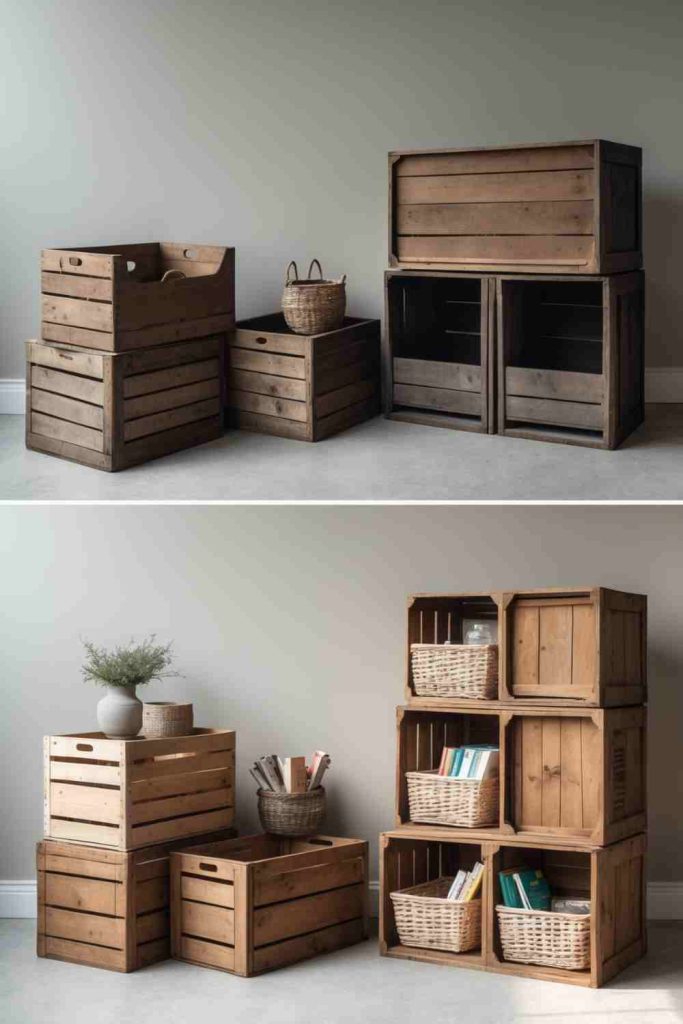
4 Steps to Create This Stylish Storage Solutions from Wooden Crates
- Gather Materials
Collect wooden crates, sandpaper, wood stain or paint (optional), screws, and a drill or screwdriver. Don’t forget your decorative items and baskets for the finishing touch! - Prepare the Crates
Sand the crates to smooth rough edges. Paint or stain them in your desired color for a polished appearance. Allow them to dry completely. - Arrange and Assemble
Plan your shelf layout. Stack and secure the crates together using screws, ensuring they are sturdy and well-aligned for safety and functionality. - Decorate and Use
Decorate your shelves with woven baskets, books, plants, or your favorite items. These upcycled storage units make the perfect gift or upgrade to your home organization.
DIY Photo Frames from Metallic Lids
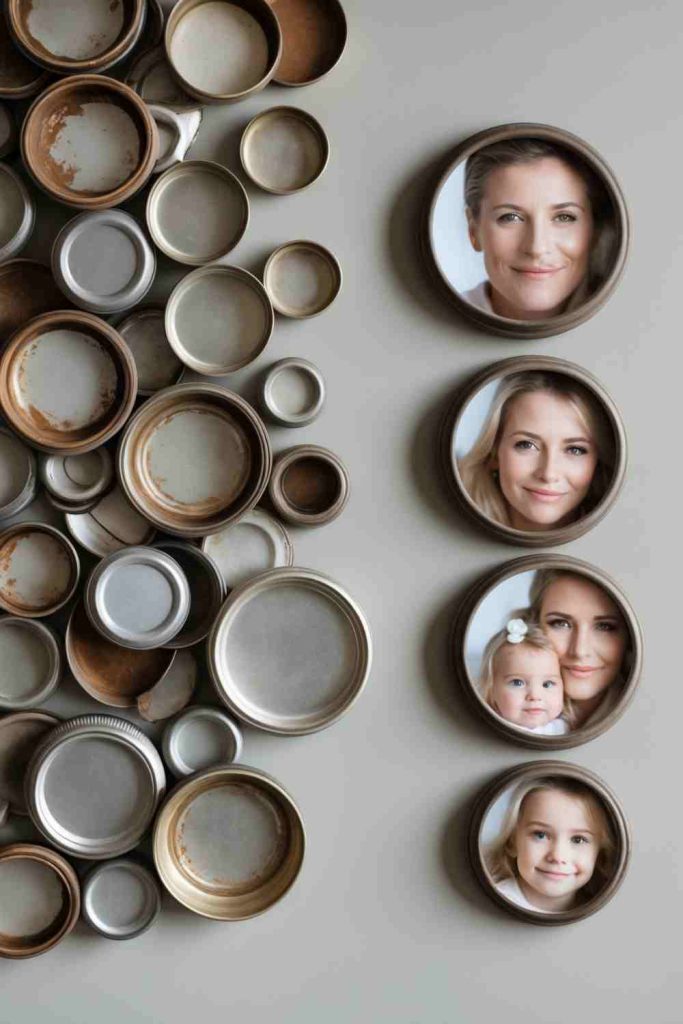
4 Steps to Create This DIY Photo Frames from Metallic Lids
- Gather Materials
Collect metallic lids, small printed photographs, strong adhesive or glue dots, scissors, and optional decorative items like paint, ribbons, or stickers. Make sure the lids are clean and rust-free. - Prepare the Lids
Paint or decorate the lids if you want to match them to a specific theme or aesthetic. Allow the paint to dry completely before proceeding. - Attach the Photos
Cut your photographs to fit the circular shape of the lids. Secure each photo inside the lid using strong adhesive or glue dots, ensuring it stays in place. - Display or Gift
Add a magnet to the back for fridge display, or attach twine for hanging on walls or a Christmas tree. These charming photo frames make thoughtful gifts or lovely additions to your decor.
Fresh Herb Jars from Glass Jars
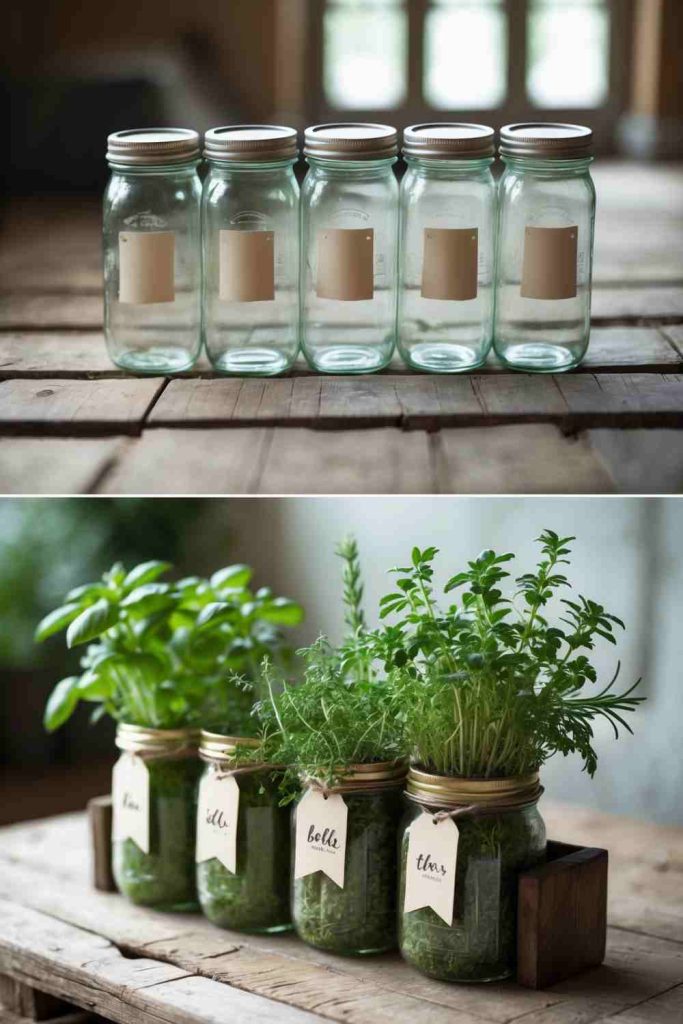
4 Steps to Create This Fresh Herb Jars from Glass Jars
- Gather Materials
Collect clean glass jars with lids, fresh herbs (like basil, dill, or thyme), string or twine, labels or tags, and a marker. Optional: decorate the jars with paint or stickers for a personal touch. - Prepare the Jars
Clean the jars thoroughly and decorate them if you’d like. Write the names of the herbs on the tags or labels and attach them to the jars using string or twine. - Fill the Jars
Add fresh herbs to each jar, ensuring the lids are secure. You can also use the jars for dried herbs if preferred. Adjust the amount of herbs to make the jars full and visually appealing. - Gift or Display
Arrange the jars on a wooden tray or in a storage space for a rustic display. These herb jars make thoughtful gifts for gardeners, cooks, or anyone who loves fresh ingredients.
Cozy Patchwork Quilt from Quilt Pieces
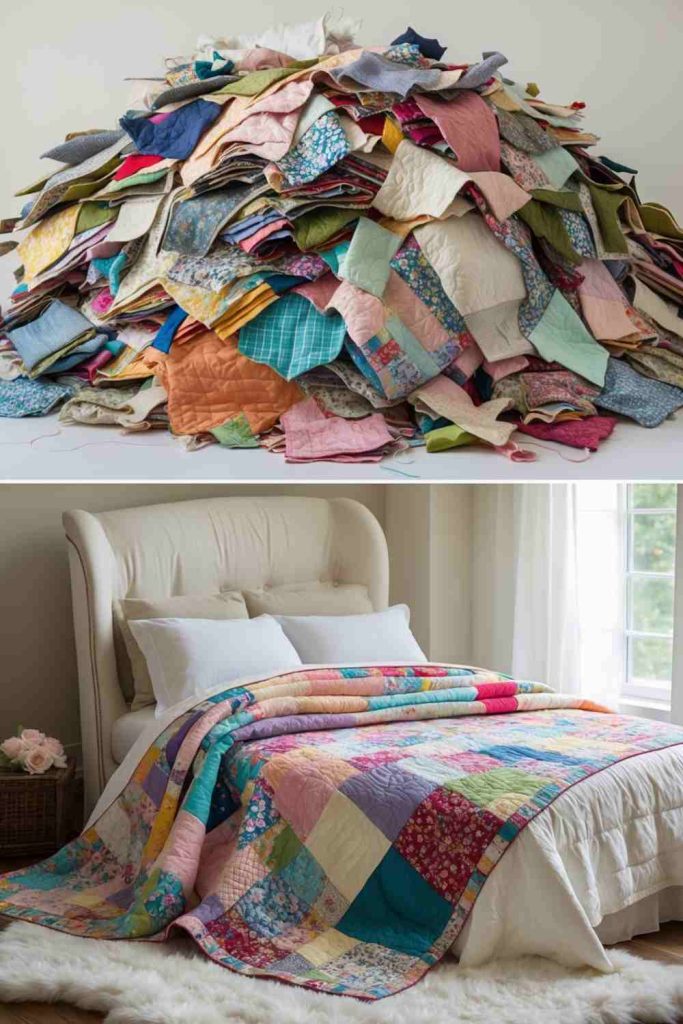
4 Steps to Create This Cozy Patchwork Quilt from Quilt Pieces
- Gather Materials
Collect your quilt pieces, sewing machine (or needle and thread), scissors, pins, a fabric measuring tape, and optional backing fabric and batting for added warmth and durability. - Plan Your Layout
Lay out the quilt pieces on a flat surface, experimenting with the arrangement of colors and patterns until you’re happy with the design. Snap a reference photo to guide you during assembly. - Sew the Pieces Together
Sew the quilt pieces together row by row. Once all rows are complete, join them to create the top layer of your quilt. Press the seams flat for a polished look. - Finish the Quilt
If desired, layer the quilt top with batting and backing fabric. Sew the layers together, adding decorative stitching or ties to secure. Hem or bind the edges for a neat finish.
Unique Wall Art from Old Keyboard Keys

4 Steps to Create This Unique Wall Art from Old Keyboard Keys
- Gather Materials
Collect old keyboard keys, a wooden or cardboard backing, a strong adhesive, paint (optional), and any additional decorative elements like beads or small tiles. - Plan Your Design
Arrange the keys on the backing to form a pattern, image, or word. Experiment with placements until you’re happy with the layout. Use pops of color from special keys like “Enter” or “Esc” for added flair. - Attach the Keys
Secure the keys onto the backing using strong adhesive, working row by row. Ensure each key is firmly in place to prevent movement. - Finish and Display
Add final touches, like a painted border or additional embellishments. Once dry, mount your artwork on a wall or gift it to someone special.
Vintage Wall Art from Old License Plates
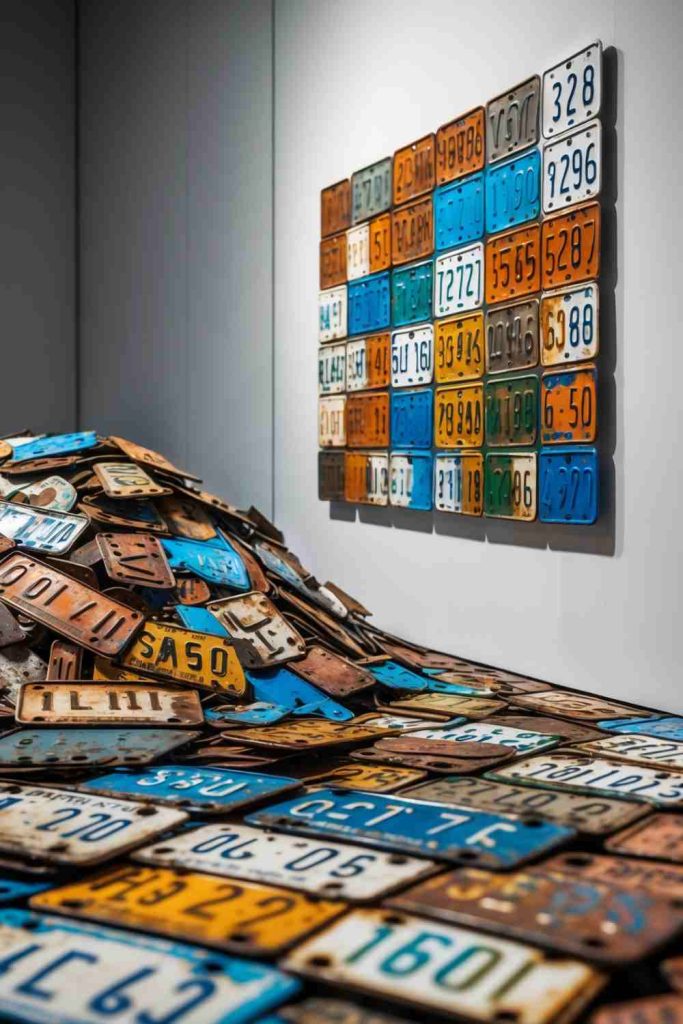
4 Steps to Create This Vintage Wall Art from Old License Plates
- Gather Materials
Collect old license plates, a wooden or metal backing for support, nails or strong adhesive, a hammer, and optional paint or varnish for added flair. - Plan Your Design
Lay out the license plates on the backing to experiment with patterns or arrangements. Create a collage, line them up symmetrically, or arrange them in a creative shape like a heart or initials. - Secure the Plates
Once satisfied with the layout, attach the plates to the backing using nails or adhesive. Ensure each plate is firmly fixed and overlaps seamlessly if creating a collage. - Finish and Display
Customize further by painting the backing, adding a protective varnish, or even highlighting numbers or letters on the plates. Hang your unique artwork in a living room, garage, or gift it to someone who loves vintage aesthetics!
Elegant Candle Holders from Old Teacups
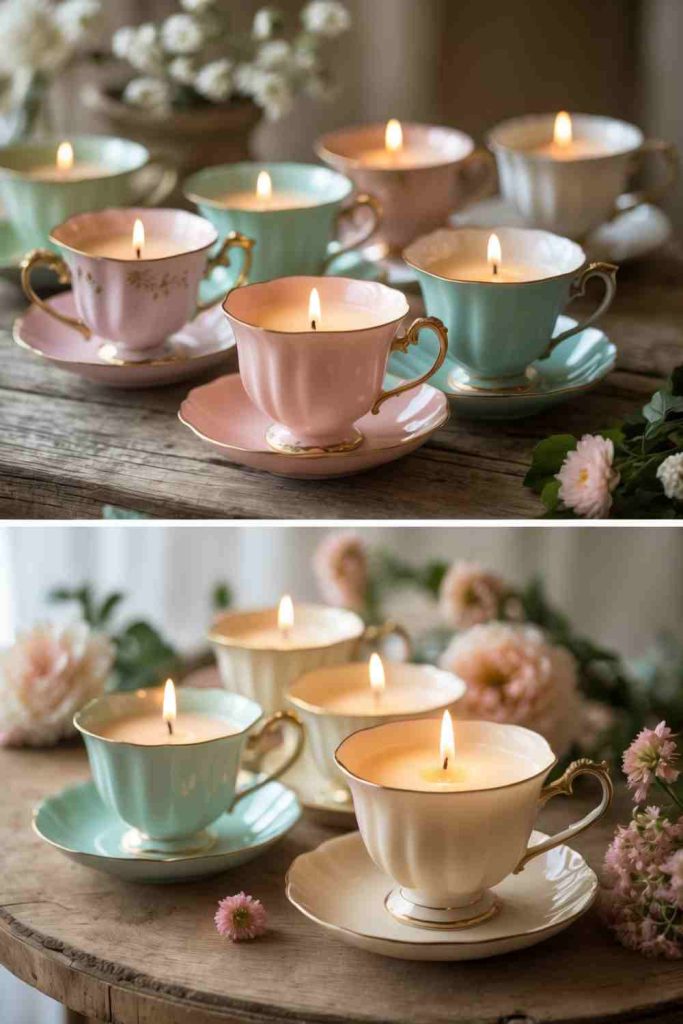
4 Steps to Create This Elegant Candle Holders from Old Teacups
- Gather Materials
Find old teacups with saucers, candle wax (or recycled candle bits), wicks, a double boiler for melting the wax, a wooden skewer, and optional scented oils for fragrance. - Secure the Wicks
Place a wick in the center of each teacup. Use a dab of melted wax or a wick sticker to keep it in place. Rest the top of the wick against a skewer laid across the teacup to hold it upright. - Melt and Pour the Wax
Use a double boiler to melt the candle wax. Once melted, mix in a few drops of scented oil if you wish. Carefully pour the wax into the teacups, filling them almost to the rim while avoiding the wick. - Set and Light: Allow the wax to cool and harden completely. Once solid, trim the wick down to about 1/4 inch. Light your teacup candles and enjoy the warm, elegant glow or gift them to someone special!
Rustic Bookshelf from Wooden Pallets
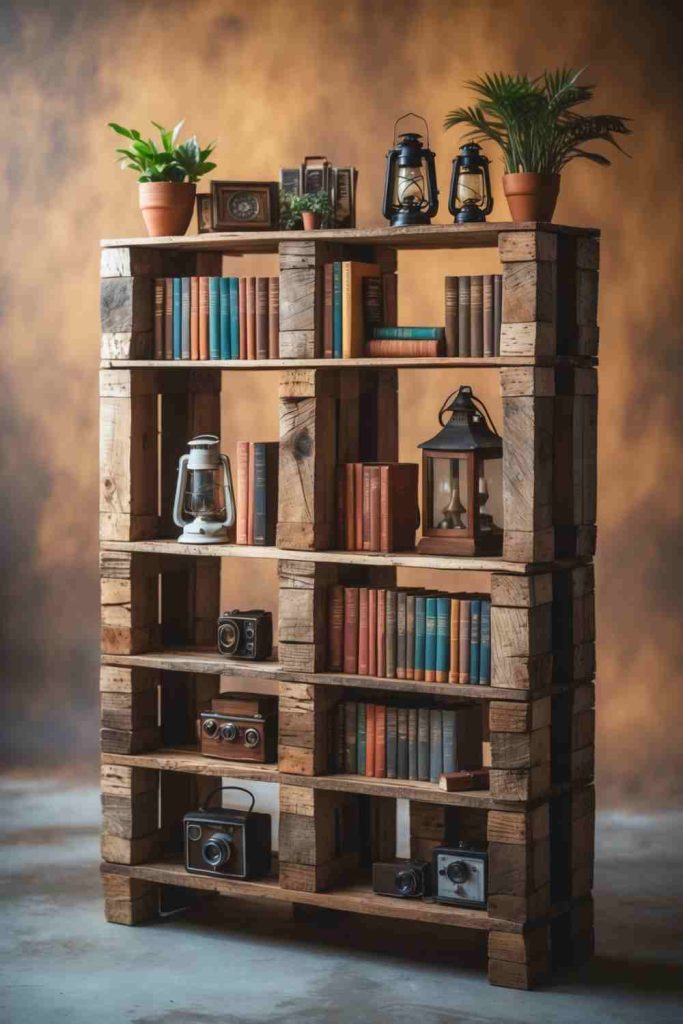
4 Steps to Create This Rustic Bookshelf from Wooden Pallets
- Gather Materials
Collect wooden pallets, sandpaper, wood screws, a saw, a drill, wood stain or paint (optional), and a protective sealer for finishing. - Prepare the Pallets
Disassemble the pallets and sand all the wooden pieces to smooth rough edges and remove splinters. This will create a safe, polished surface for your bookshelf. - Build the Bookshelf Frame
Measure and cut the wood to create the side panels, back panel, and shelves. Assemble the bookshelf by attaching the pieces with screws and a drill, ensuring it’s sturdy and level. - Finish and Style
Apply wood stain or paint to customize the look, then seal the wood for durability. Once dry, arrange your books, plants, or decor for a cozy and rustic display.