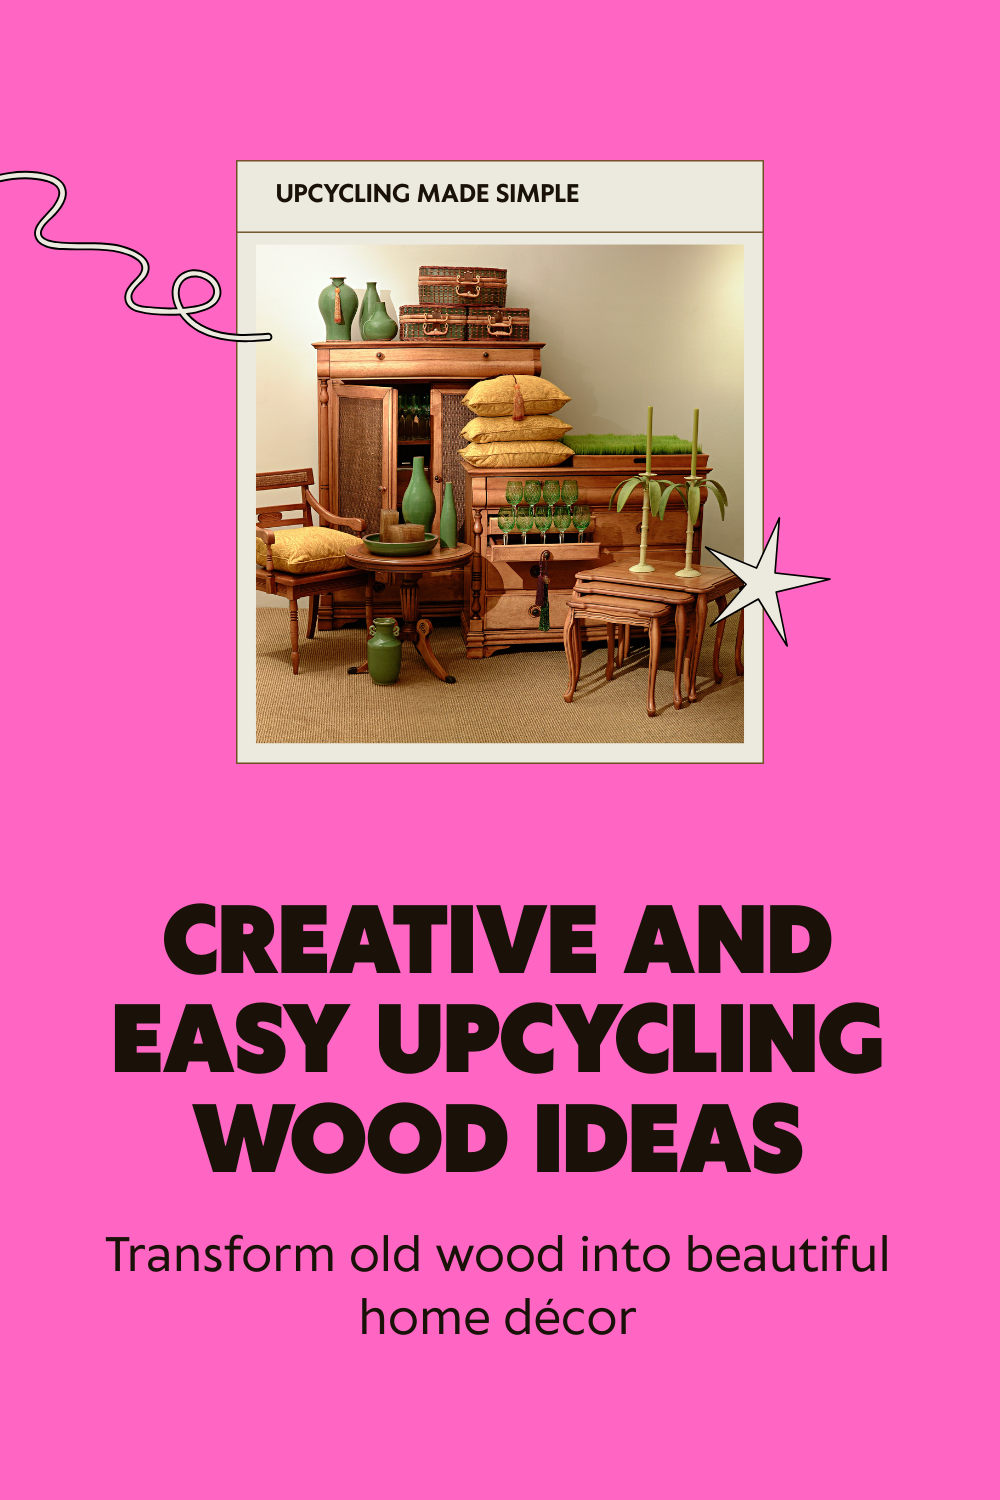
DIY Driftwood Key Holder

Steps to Create This DIY Driftwood Key Holder:
- Add Hooks: Drill holes and screw in hooks below the driftwood or directly onto it, creating spaces to hang keys and small items.
- Collect Materials: You’ll need a piece of driftwood, a wooden board (as the base), screws, hooks, a drill, and sandpaper.
- Prepare Driftwood and Board: Clean the driftwood, sand it smooth, and cut the wooden board to the desired size.
- Assemble: Attach the driftwood to the wooden board securely using screws. Arrange it horizontally for a sturdy and stylish look.
Upcycled Wood Birdhouse
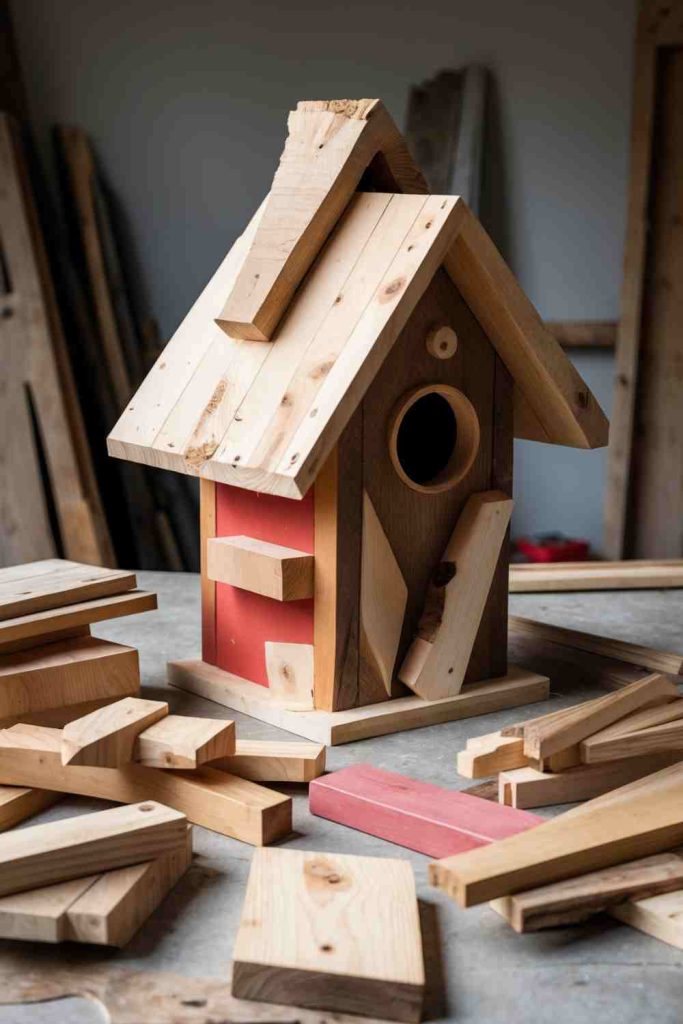
Steps to Create This Upcycled Wood Birdhouse:
- Mount and Place: Use a sturdy post or tree to mount the birdhouse securely, making it ready for your feathered friends to settle in!
- Gather Materials: Collect leftover wood planks, nails, wood glue, a saw, sandpaper, and a drill.
- Cut and Assemble: Shape the wood into pieces for the birdhouse base, walls, and roof. Assemble them carefully with nails and wood glue.
- Add Finishing Touches: Sand the edges for a smooth look, and decorate as you like! Don’t forget to create a hole for the bird’s entry.
DIY Pallet Dog Bed

Steps to Create This DIY Pallet Dog Bed:
- Finish and Decorate: Place a soft cushion inside the bed frame. Optionally, paint or stain the wood to match your home decor.
- Collect Materials: Gather wooden pallets, sandpaper, screws, a drill, a saw, a cushion, and optional paint or wood stain.
- Prepare the Wood: Sand the pallets to smooth out rough edges and ensure they’re safe for your pet.
- Assemble the Bed Frame: Use screws to attach the pallets together, forming a stable base and sides.
DIY Wooden Pallet Bookshelf
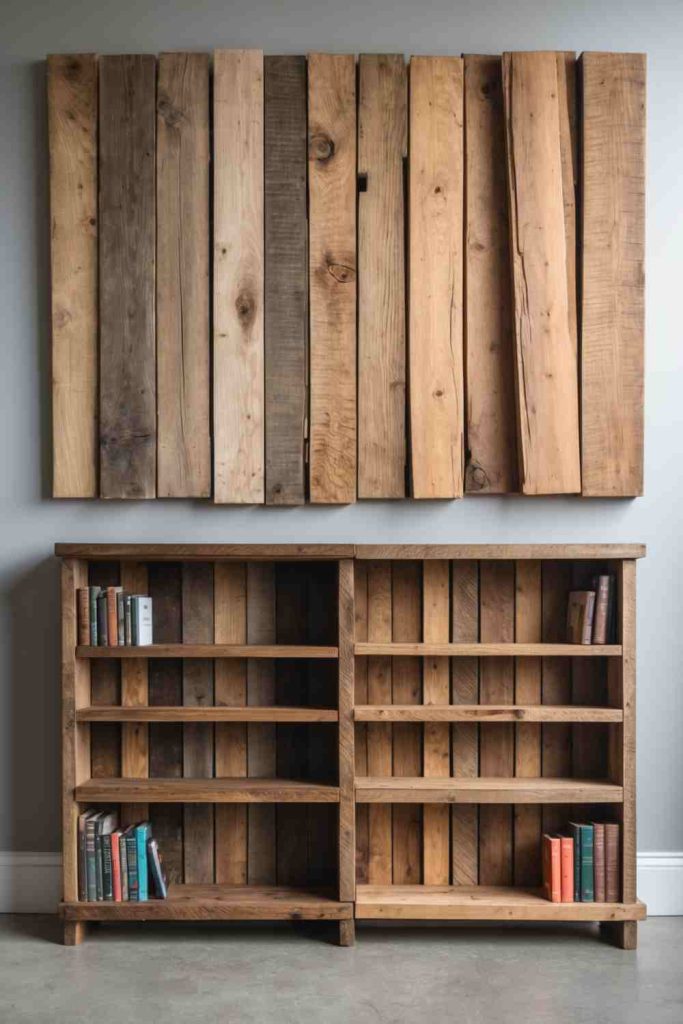
Steps to Create This DIY Wooden Pallet Bookshelf:
- Assemble and Finish: Secure the shelves with screws, then sand again for a clean finish. Apply wood stain or paint to match your decor style.
- Collect Materials: Gather a wooden pallet, sandpaper, screws, a saw, a drill, and wood stain or paint.
- Prepare the Wood: Sand the pallet thoroughly to smooth out rough edges and ensure it’s ready for use.
- Customize the Design: Cut the pallet as needed to shape the shelves, and attach additional wood pieces if required for support.
DIY Wooden Crate Coffee Table

4 Steps to Create This Coffee Table:
Gather Materials:
4 wooden crates
Sandpaper
Wood screws
Wood stain or paint (optional)
Casters (for mobility, optional)
Prepare the Crates:
Sand the crates thoroughly to remove rough edges or splinters.
Apply a wood stain or paint for a finished look and let them dry completely.
Assemble the Table:
Arrange the crates in a square formation with the open sides facing outward to create storage.
Secure them together using wood screws for stability.
Add Finishing Touches:
Attach casters to the bottom for a mobile coffee table, if desired.
Decorate the table with books, plants, or decorative items to make it your own.
DIY Wooden Picture Frame
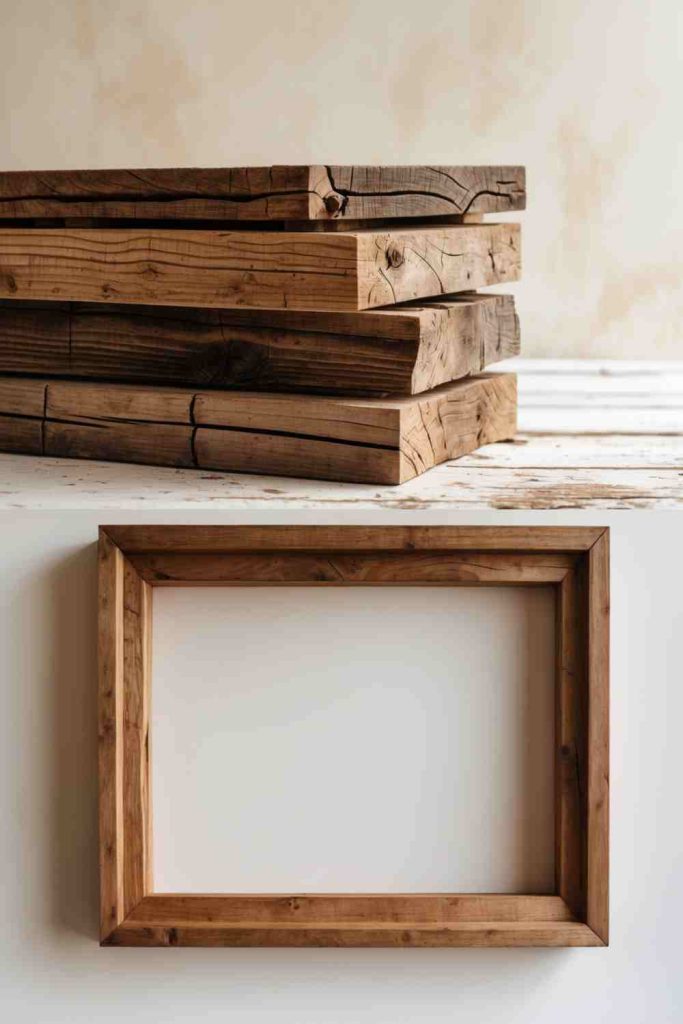
4 Steps to Create This DIY Wooden Picture Frame:
- Gather Materials: Collect old wood scraps, a saw, sandpaper, wood glue or small nails, clamps, and optional paint or wood stain for finishing. Don’t forget a photo or artwork to frame!
- Measure and Cut: Measure the size of your photo and cut the wood scraps into four pieces to form the frame (two long sides and two shorter sides).
- Assemble the Frame: Attach the wood pieces together using wood glue or nails, securing them in place with clamps until dry. Make sure the corners are aligned.
- Sand and Finish: Sand the surface and edges for a smooth finish, then paint or stain the frame if desired. Once dry, insert your photo and hang it up!
DIY Wooden Plant Holder
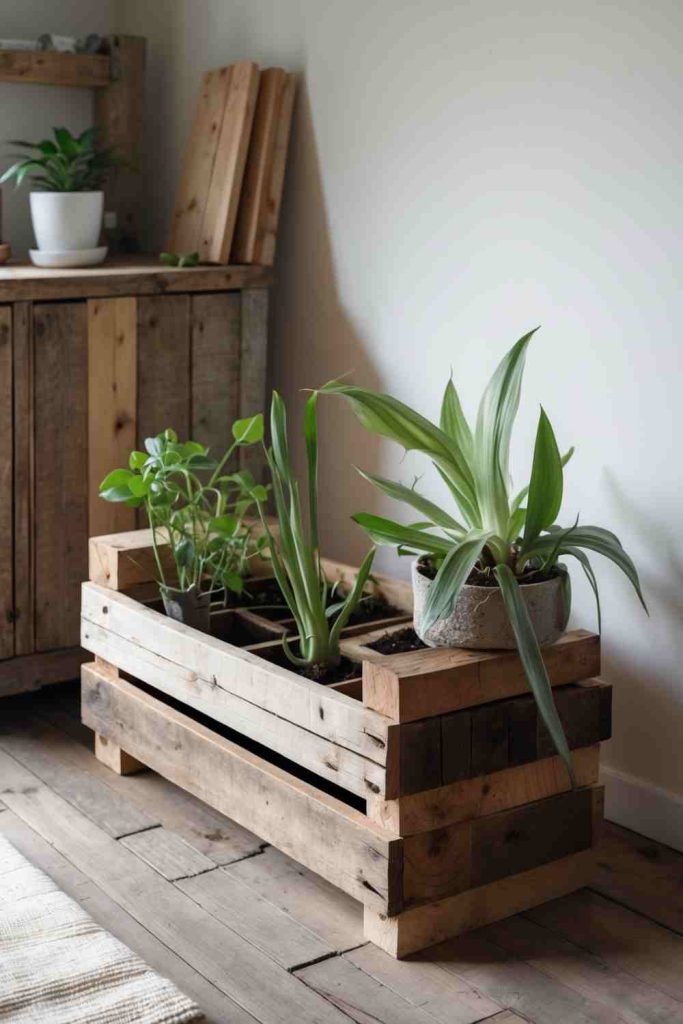
4 Steps to Create This DIY Wooden Plant Holder:
- Sand and Finish: Smooth the edges with sandpaper and apply paint or stain if desired. Let it dry, then arrange your plant pots inside for a rustic and beautiful display.
- Gather Materials: Collect an old wooden pallet, a saw, sandpaper, a hammer, nails, wood glue, and paint or wood stain (optional). You’ll also need some small plant pots to fit inside.
- Disassemble the Pallet: Use the hammer to carefully take apart the wooden pallet. Sort and select the best planks for your plant holder.
- Cut and Assemble the Holder: Measure and cut the wood to build a box or frame that will hold your plant pots securely. Use nails or wood glue to assemble the structure, ensuring it is sturdy.
DIY Rustic Frame
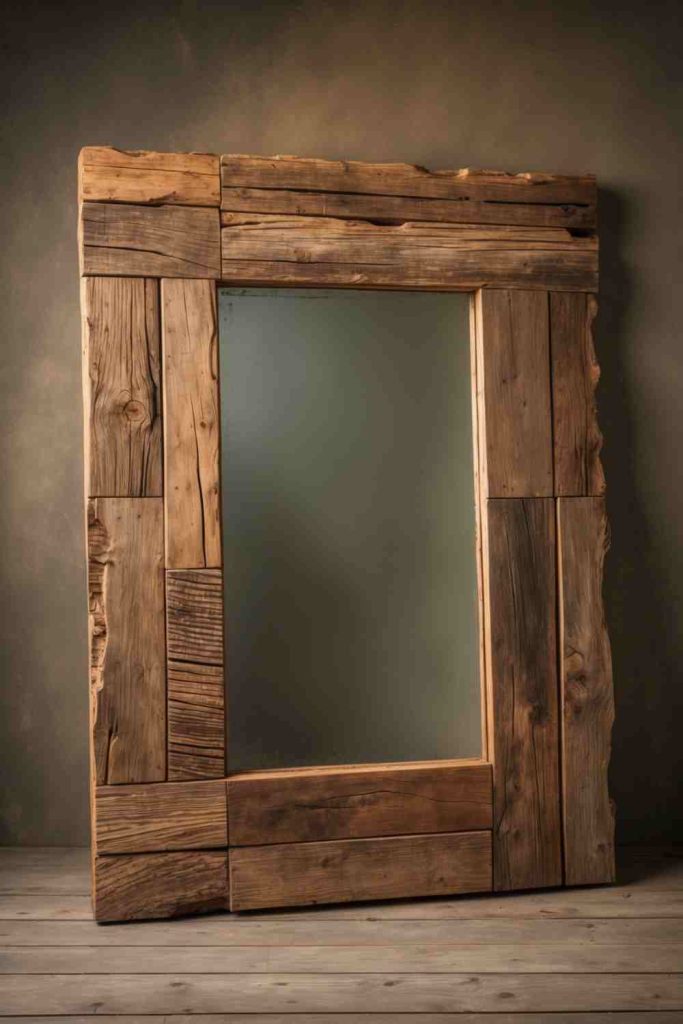
4 Steps to Create This DIY Rustic Frame:
- Assemble the Frame: Use wood glue to attach the pieces together into a rectangular frame, and secure with clamps until dry. Optional: Apply paint or wood stain for a polished look.
- Prepare Your Materials: Gather old wooden planks, a measuring tape, saw, sandpaper, wood glue, clamps, and optional paint or wood stain.
- Cut the Wood: Measure and cut the planks into two long and two short pieces to create the frame shape.
- Smooth and Sand: Sand the pieces thoroughly to remove splinters and create a smooth surface for assembly.
DIY Wooden Serving Tray
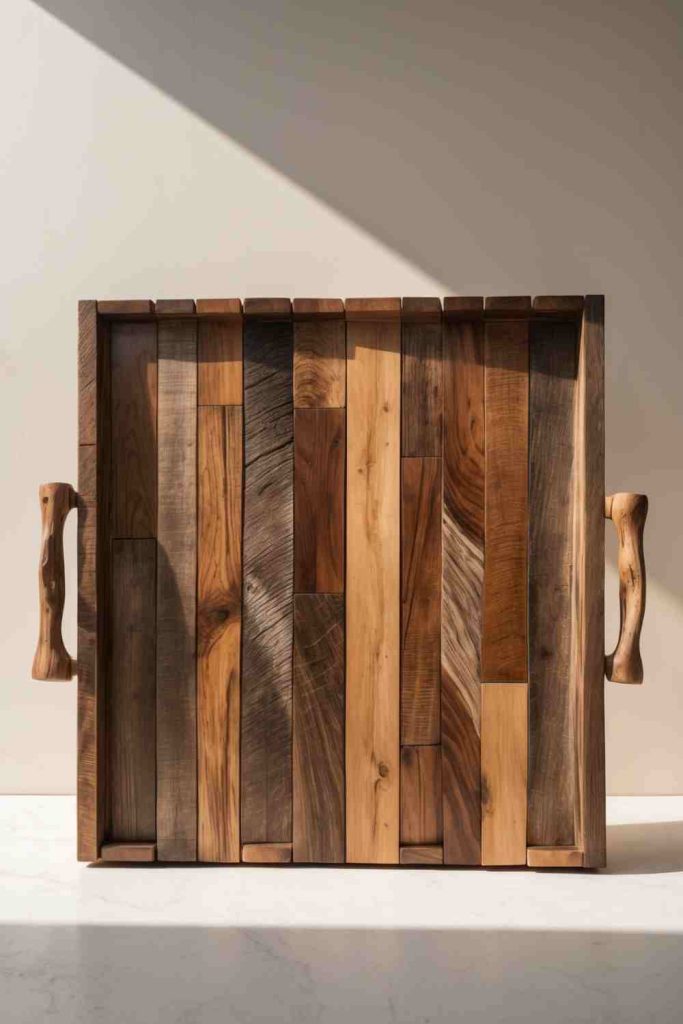
4 Steps to Create This DIY Wooden Serving Tray:
- Attach Handles and Finish: Fix the handles on both ends of the tray using screws or adhesive. Optionally, apply paint or wood stain for a polished look and let it dry before use.
- Gather Materials: Collect reclaimed wood, a saw, sandpaper, wood glue or nails, two handles (metal or wooden), and optional paint or wood stain.
- Cut and Shape the Wood: Measure and cut the wood into a rectangular shape for the tray base. You can also use smaller wood pieces to assemble a pattern, such as herringbone or straight planks.
- Assemble the Tray: Join the wood pieces using wood glue or nails, ensuring the structure is sturdy. Sand the edges and surface for a smooth finish.
DIY Rustic Wooden Headboard
4 Steps to Create This Headboard:
1. Gather Materials:
Reclaimed wooden planks
Sandpaper
Wood screws or nails
Wood glue
Wood stain or paint (optional)
Measuring tape and saw
2. Prepare the Wood:
Sand the wooden planks to smooth out rough edges and splinters.
Cut the wood to the appropriate size for your headboard, based on your bed’s measurements.
3. Assemble the Headboard:
Lay the planks side by side, arranging them in a design that fits your aesthetic (herringbone, vertical, etc.).
Attach the planks together using wood screws or nails. You can use horizontal support boards at the back for added stability.
4. Finish and Install:
Stain or paint the wood to match your room’s theme and allow it to dry.
Mount the headboard to your wall or secure it to your bed frame using brackets or screws.
DIY Wooden Cutting Boards
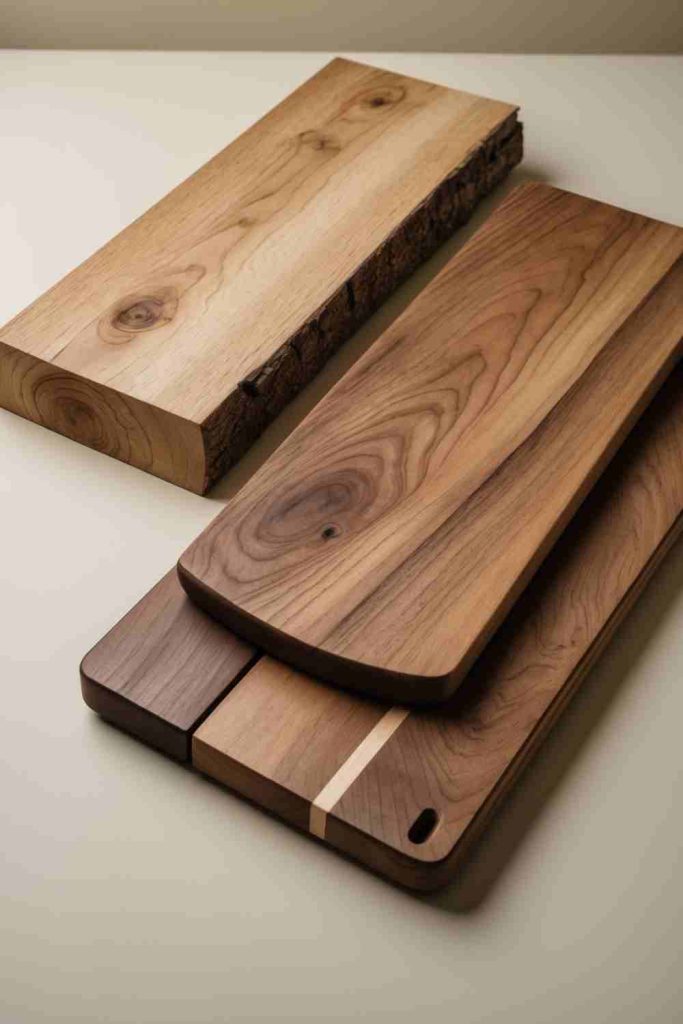
4 Steps to Create Wooden Cutting Boards:
1. Choose and Prep Your Wood:
Select reclaimed wood pieces free of nails, staples, or damage.
Cut the wood into the desired size and shape for your cutting boards.
Sand thoroughly to smooth out any rough surfaces or splinters.
2. Shape Your Design:
Customize your cutting boards by creating rectangular, circular, or handle designs.
Use a jigsaw for detailed curves or unique shapes.
3. Finish and Protect the Boards:
Apply a food-safe wood finish or mineral oil to seal and protect the surface.
Allow the boards to dry completely before applying additional coats if necessary.
4. Add Functional Details:
Drill a hole for a hanging option, or attach rubber feet for stability during use.
Wipe the boards clean and enjoy your handcrafted, upcycled creations!
DIY Rustic Wall Clock
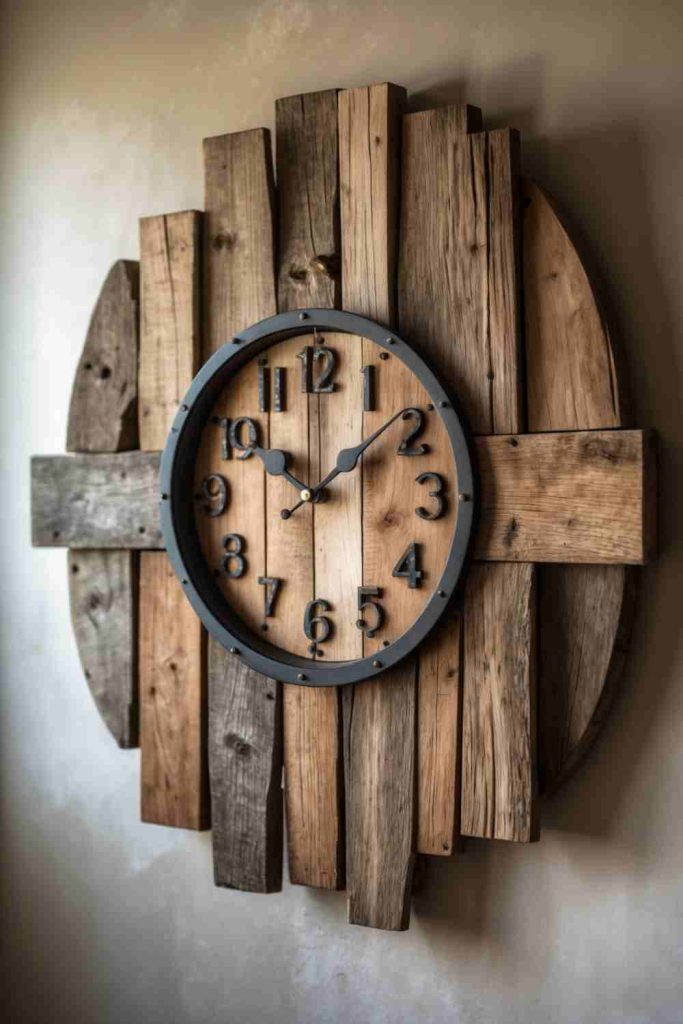
4 Steps to Create This Wall Clock:
1. Gather Materials:
Old wooden pallets
Clock mechanism
Clock hands
Sandpaper
Saw
Wood glue
Screws
Metal clock frame
2. Prepare the Wood:
Disassemble the pallets and cut the planks into smaller pieces.
Sand the wood thoroughly to smooth rough edges and give it a polished look.
3. Assemble the Clock Face:
Arrange the planks in a circular design or any shape of your choice.
Secure them using wood glue and screws to ensure stability. Attach the metal clock frame to the front.
4. Install the Clock Mechanism:
Drill a hole in the center of your clock face to fit the clock mechanism.
Insert the mechanism, attach the clock hands, and set the time.
DIY Reclaimed Wooden Candle Holder
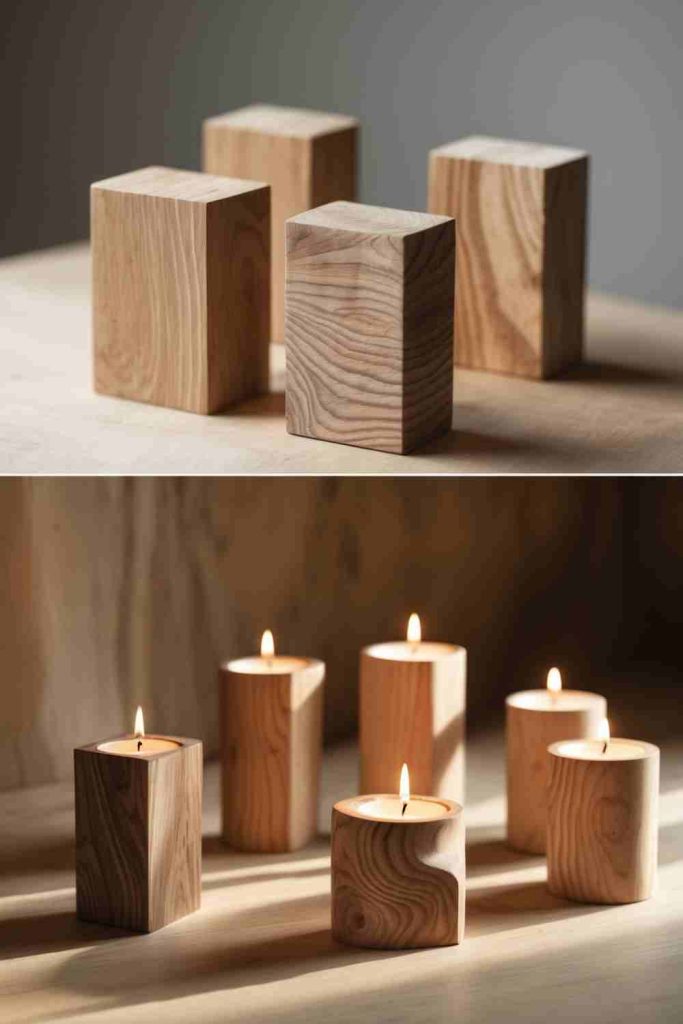
4 Steps to Create This DIY Reclaimed Wooden Candle Holder:
- Polish and Finish: Sand the entire piece for a refined look, then apply paint, stain, or varnish if desired. Once dry, insert the candles to complete your project.
- Collect Materials: Gather old reclaimed wood, a saw, sandpaper, a drill with a spade bit (to create the candle holes), wood glue or nails, and optional paint or stain.
- Cut the Wood: Measure and cut the wood into blocks or rectangular shapes, depending on your desired candle holder size and style.
- Drill Candle Holes: Use the drill with the spade bit to carve out holes that fit your candles snugly. Sand the edges for a smooth finish.
Transform Simple Wood Pieces into Creative Children’s Toys
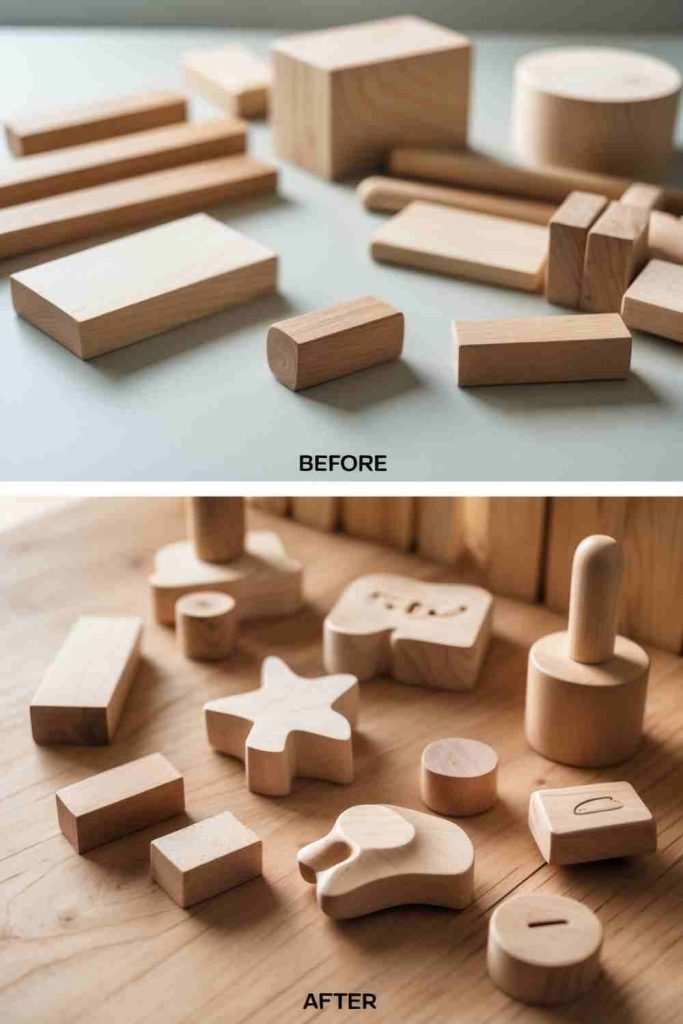
Steps to Create This Creative Children’s Toys:
1. Collect Your Supplies: Gather simple wood pieces, such as blocks, cylinders, or leftover planks, ensuring they’re clean and splinter-free.
2. Sketch and Plan: Decide on your toy designs—think fun shapes like stars, animals, or cars. Create stencils if needed for precision.
3. Shape and Smooth: Use tools like a saw to cut the wood into your chosen designs. Sand all edges and surfaces thoroughly to make them child-safe.
4. Add a Fun Finish: Use non-toxic paints or finishes to decorate the toys. Let them dry completely before sharing with little ones.
Transform Wood Scraps into Stylish Floating Shelves
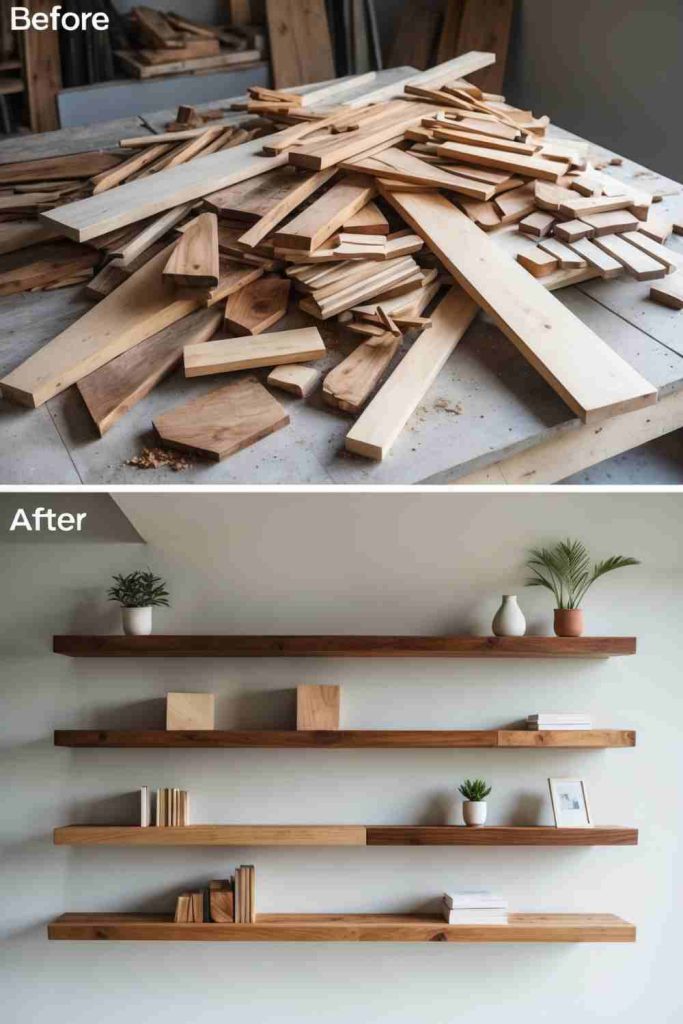
4 Steps to Create This Stylish Floating Shelf:
1. Prepare Your Materials and Tools: Gather wood scraps, a saw, sandpaper, wood screws, brackets, a drill, and paint or wood finish for decoration.
2. Cut and Sand the Wood: Measure and cut the wood to your desired shelf sizes. Smooth all surfaces and edges with sandpaper to ensure a polished finish.
3. Assemble the Shelves: Arrange the wood pieces into your desired shelf structure. Use screws or wood glue to secure them firmly.
4. Mount Your Shelves: Mark where you want the shelves to be mounted. Attach brackets to the wall and then secure your shelves onto the brackets, ensuring everything is level.
Simple Wooden Crates to Beautiful Garden Planters
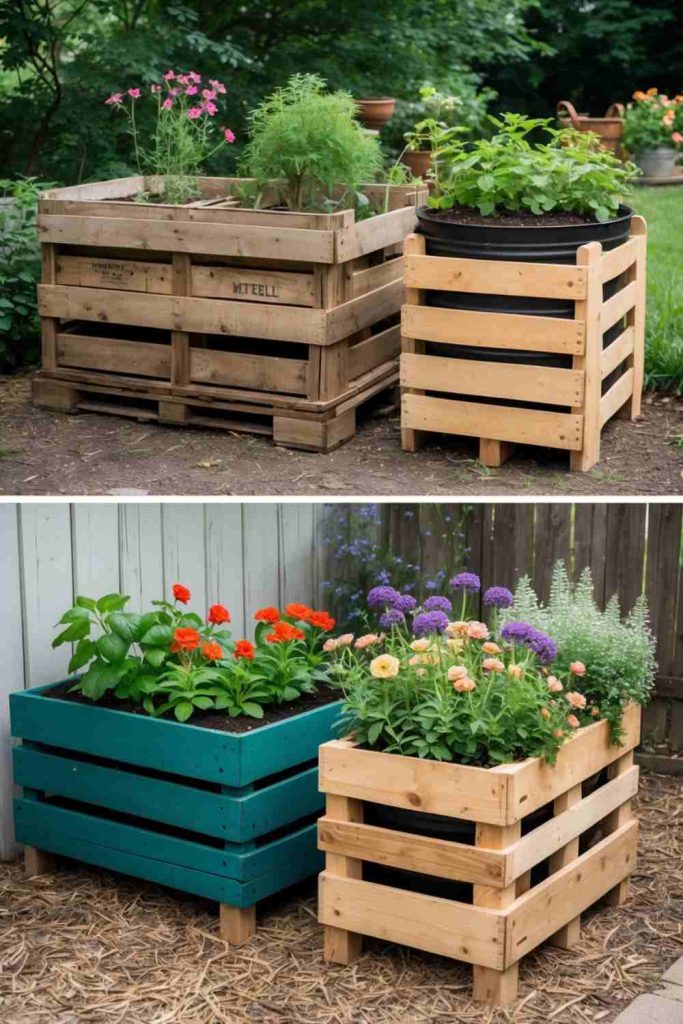
4 Steps to Create This Beautiful Garden Planter:
1. Clean the Crates: Start by thoroughly cleaning the wooden crates to remove dirt or debris. Sand any rough edges for a smooth finish.
2. Add a Protective Layer: Line the inside of the crates with plastic or a fabric liner to prevent soil from falling through. Make sure to include drainage holes for excess water.
3. Decorate Your Crates: Paint or stain the crates to match your outdoor decor. Let them dry completely before moving on.
4. Fill and Plant: Add soil and your favorite flowers, herbs, or plants. Arrange the crates creatively to enhance your garden’s aesthetic appeal.
Transform Simple Wooden Doors or Pallets into a Rustic Headboard
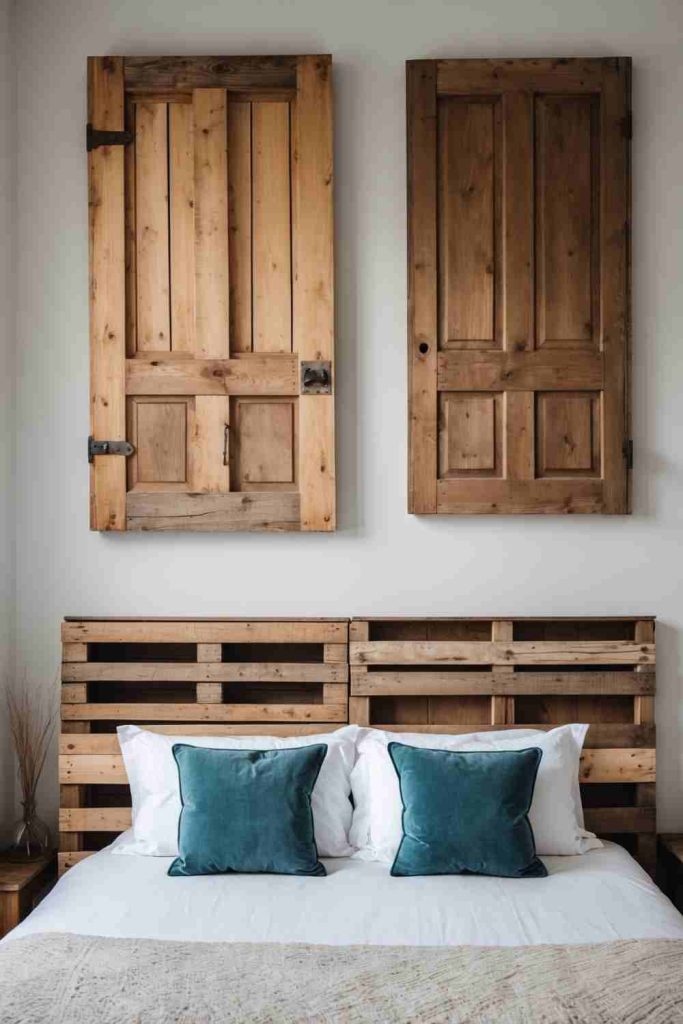
4 Steps to Create This Pallet into a Rustic Headboard:
1. Prepare Your Wooden Materials: Collect old wooden doors or pallets. Ensure they’re clean, free of nails or screws, and sanded smooth to eliminate rough edges.
2. Design and Assemble: Arrange the wooden doors or pallets to fit your bed’s width. Secure them together with wood screws or brackets for a sturdy structure.
3. Mount the Headboard: Safely attach the headboard to the wall or bed frame using strong brackets. Make sure it’s level and aligned properly.
4. Add Finishing Touches: Stain or paint the headboard to match your room’s decor. You can leave it raw for a natural, rustic look or add decorations like lights for extra flair.
Transform Simple Wooden Panels into Charming Wooden Lanterns
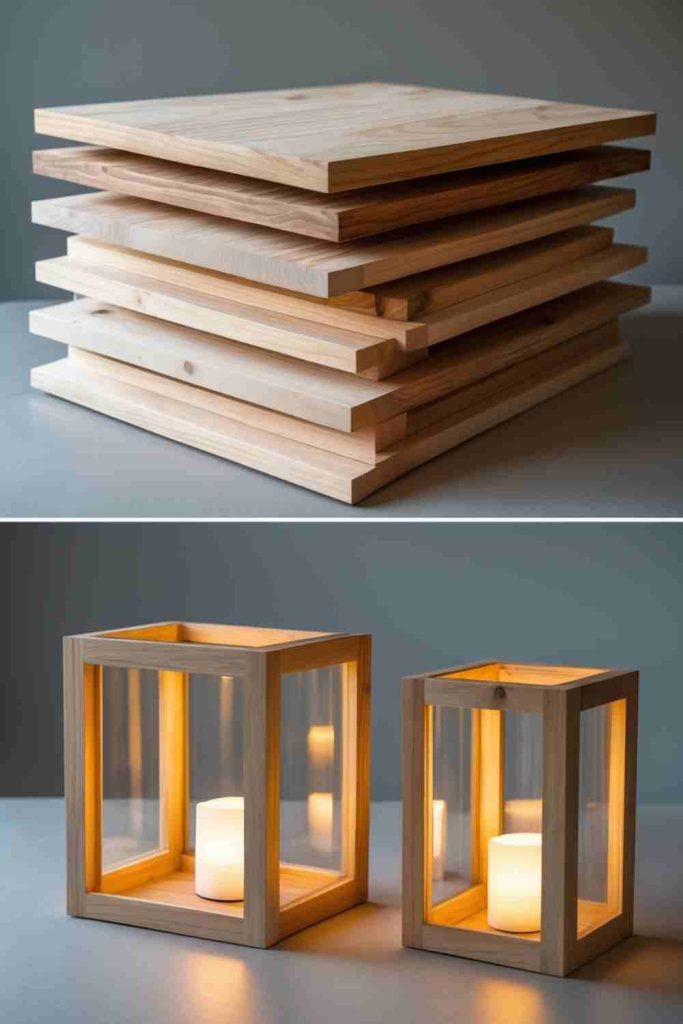
4 Steps to Create This Charming Wooden Lanterns:
1. Prepare Your Materials: Gather wooden panels, sandpaper, nails, wood glue, and glass or acrylic sheets for the lantern sides.
2. Cut and Assemble: Shape the wooden panels into smaller pieces to form the lantern’s frame. Use wood glue and nails to secure the sides, top, and base together.
3. Add Transparent Sides: Measure and attach glass or acrylic sheets to the wooden frame for a polished and functional look.
4. Decorate and Insert Light: Paint or stain the lantern to match your decor, then add a candle or LED light inside for a warm glow.
DIY Wooden Pieces Stool or Ottoman
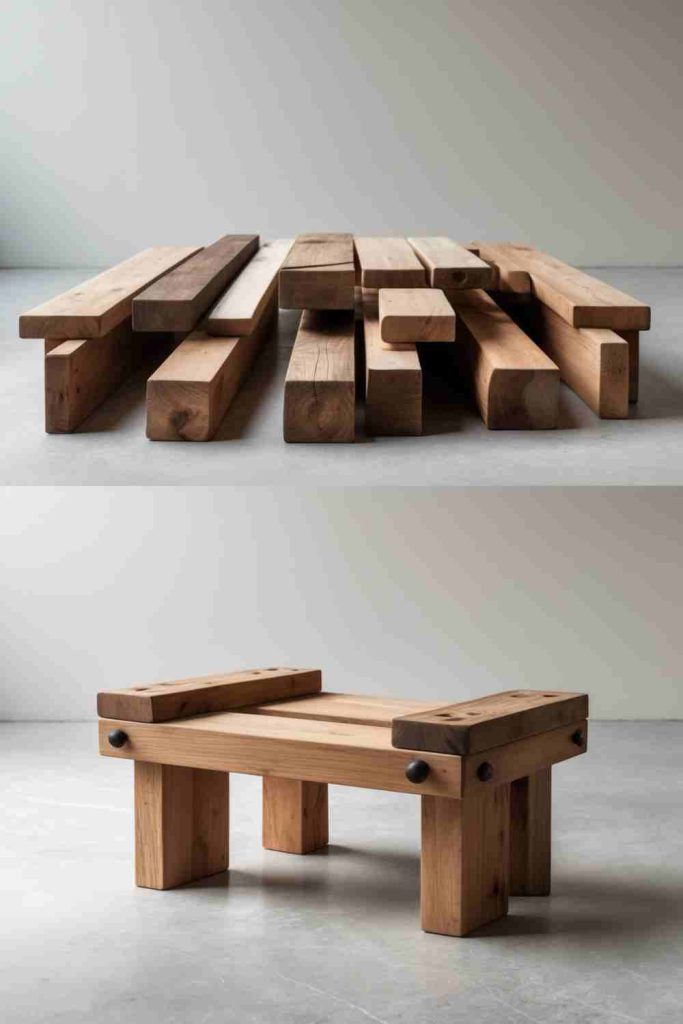
Steps to Create This DIY Wooden Pieces Stool:
1. Gather Your Supplies: Collect wooden pieces, screws, bolts, sandpaper, and optional wood finish or paint. Ensure the wood is cleaned and sanded for a polished look.
2. Assemble the Frame: Use the wooden pieces to construct the base frame for your stool or ottoman. Secure them together with screws and bolts for a sturdy foundation.
3. Build the Seat: Arrange and attach additional wooden pieces on top to create the seat. Ensure they’re evenly spaced and secured tightly.
4. Add Finishing Touches: Sand down rough edges, then apply a wood finish or a coat of paint for a customized look. Let it dry completely before use.
Simple Wooden Plank to Rustic Coat Rack
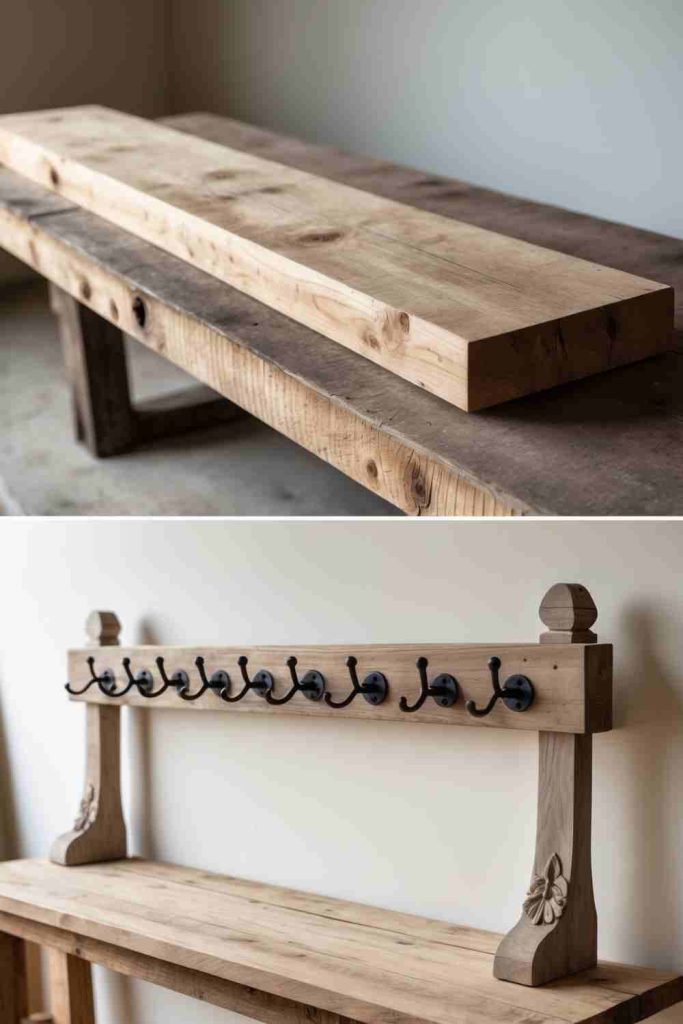
Steps to Create This Simple Wooden Plank to Rustic Coat Rack:
1. Prepare the Wooden Plank: Start with a clean wooden plank. Sand it down to smooth out rough edges and splinters, ensuring a safe and polished base.
2. Mark and Attach Hooks: Measure and mark evenly spaced points along the plank. Secure the metal hooks in place using screws, ensuring they are firmly attached.
3. Optional Decorations: Add personal touches such as a coat of paint, wood stain, or decorative carvings to enhance the design and match your style. 4. Mount the Coat Rack: Attach mounting brackets to the back of the plank, then securely install it on your wall at the desired height. Double-check stability before hanging any items.
Simple Wooden Plank to DIY Jewelry Organizer
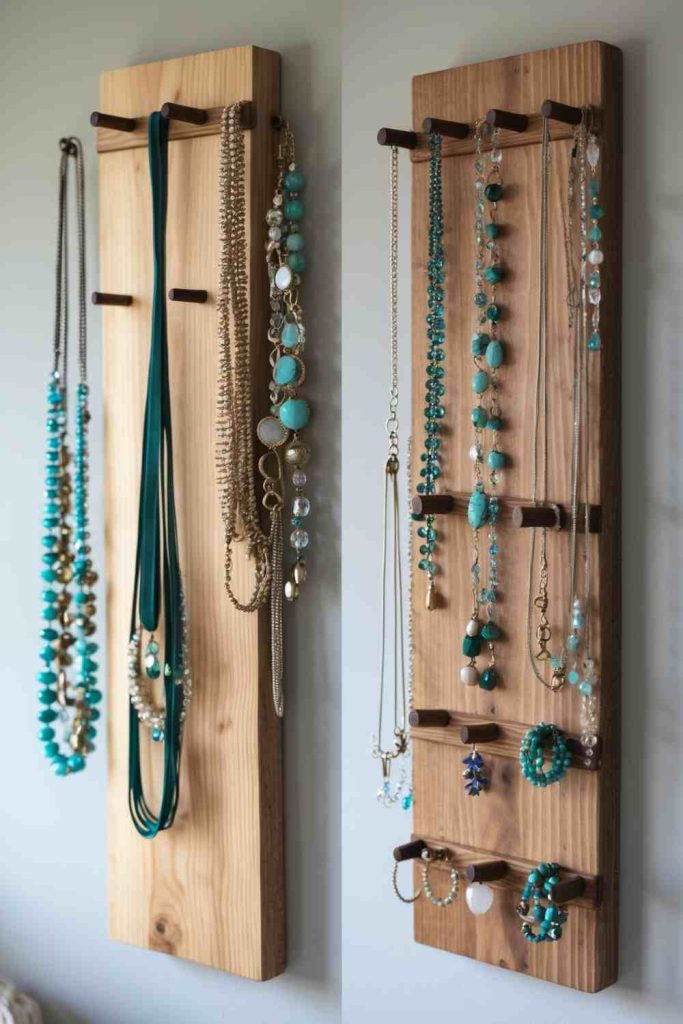
Steps to Create This Simple Wooden Plank to DIY Jewelry Organizer:
1. Prep the Wooden Plank: Clean and sand the wooden plank to remove rough edges. You can paint or stain it to match your decor if desired.
2. Add Hooks or Knobs: Attach small hooks, knobs, or nails along the plank for hanging necklaces, bracelets, and earrings. Space them evenly for an organized look.
3. Incorporate a Shelf (Optional): Attach a small flat piece of wood to the bottom of the plank to create a shelf for rings or other small items. Secure it with screws or wood glue.
4. Mount on the Wall: Install wall brackets on the back of the plank and securely mount it to your wall. Make sure it’s at a convenient height for easy access.
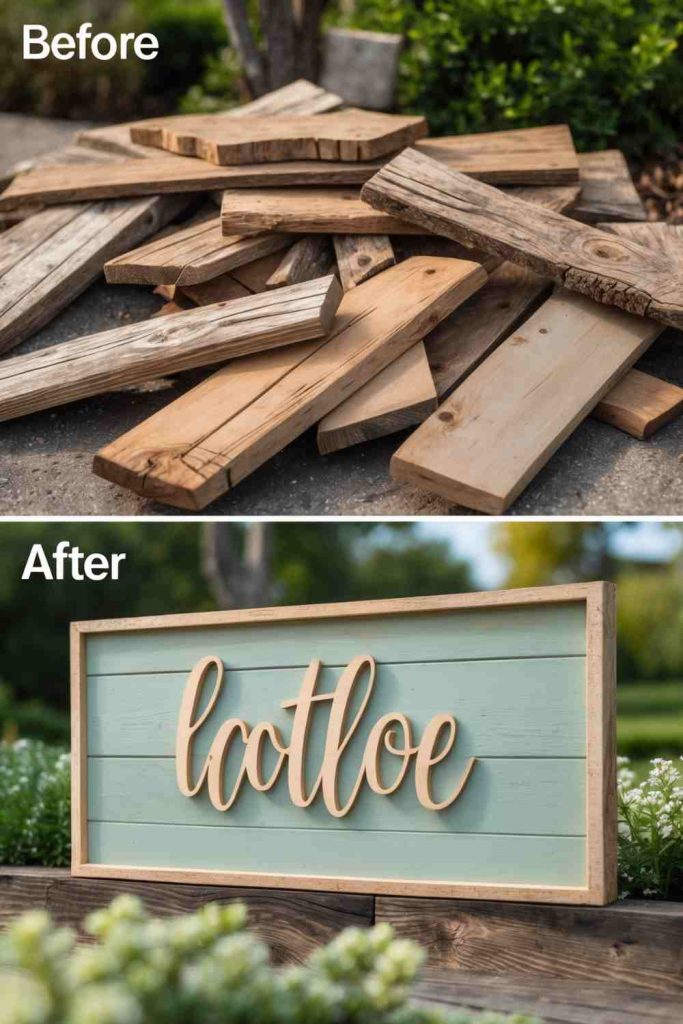
DIY Decorative Wall Art from Simple Wooden Planks
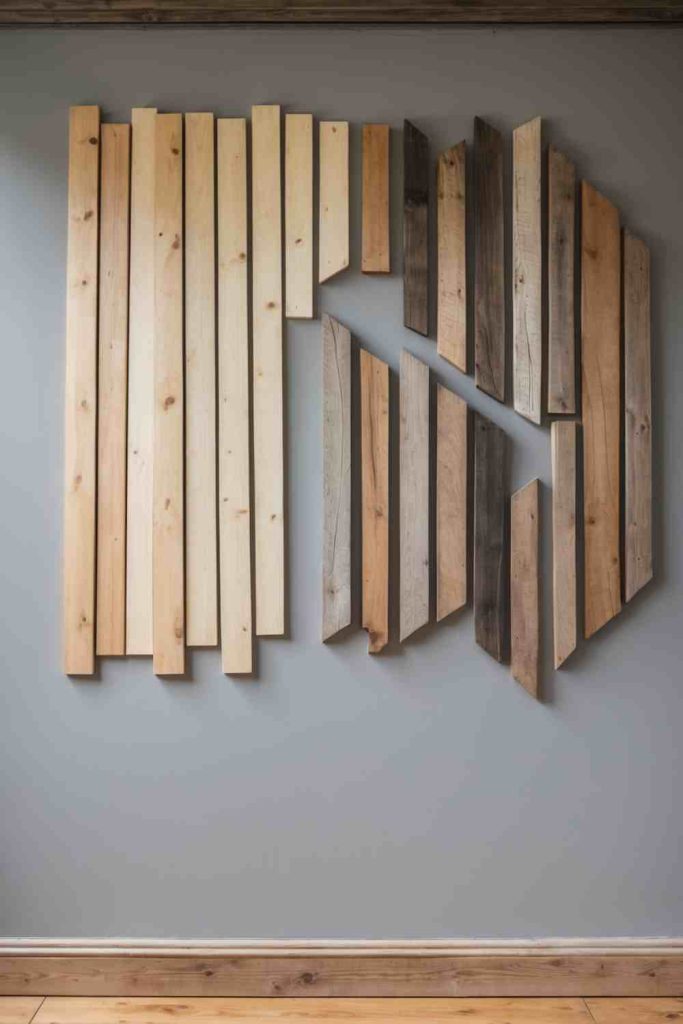
Steps to Create This DIY Decorative Wall Art from Simple Wooden Planks:
1. Clean and Prepare the Planks: Start by cleaning the wooden planks and sanding them to remove rough edges for a smooth finish.
2. Design Your Wall Art: Arrange the planks on a flat surface and experiment with different patterns, such as geometric designs or abstract layouts, until you find your favorite.
3. Secure the Pieces Together: Use nails or wood glue to attach the planks into your chosen design, ensuring they are stable and securely fixed.
4. Mount and Display: Install mounting brackets on the back and carefully hang your new decorative wall art in the desired spot. Ensure it is level for a polished look.
Transform Wooden Planks into a Picnic Table
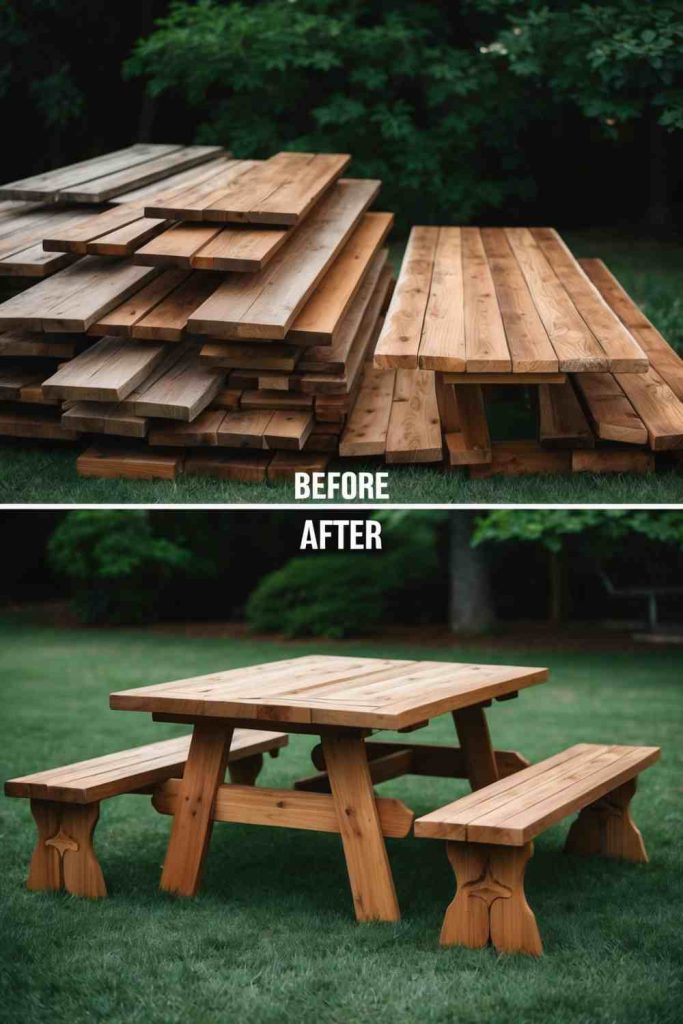
4 Steps to Create This Wooden Plank into a Picnic Table:
1. Prepare the Materials: Gather wooden planks, screws, a saw, a drill, sandpaper, and wood stain or sealant. Ensure the wood is clean and free of nails or debris.
2. Cut the Wood: Measure and cut the planks to appropriate sizes for the table surface, benches, and legs. Double-check your measurements for precision.
3. Assemble the Picnic Table: Begin by screwing the wooden planks together to form the table top. Next, attach the legs securely, and then construct the benches in a similar fashion.
4. Smooth and Finish: Sand down all surfaces and edges for a polished look. Apply wood stain or sealant to protect the table from the elements and enhance its durability. Allow it to dry before using.