If you’re like me, you probably have a few pieces of clothing buried in your wardrobe that you don’t wear anymore. They might be outdated, a bit too worn, or just not your style anymore.
One item that tends to be forgotten is the halter top it might have been your go-to summer piece, but now it just collects dust. Well, instead of tossing it or donating it, why not upcycle it?
Upcycling isn’t just a way to keep your clothes out of the landfill it’s also a fantastic opportunity to create something fresh, new, and totally personalized.
In this blog post, I’m going to show you how to take your old halter top and give it a stylish makeover. Whether you’re looking to refresh it for a new season, or you just want to try your hand at DIY fashion, I’ve got all the details covered.
I’ll walk you through the process with easy, step-by-step instructions and share some tips to make the most of your upcycling experience.
Ready to turn your old halter top into something fabulous? Let’s get started!
Why Upcycle?
Upcycling has become an increasingly popular way to add a unique touch to your wardrobe. Not only is it environmentally friendly, but it’s also a great way to get creative without breaking the bank.
So, if you’re sitting on an old halter top that you no longer wear, why not turn it into something amazing? Whether it’s a new top, a bag, or even accessories, the possibilities are endless when it comes to upcycling clothes.
Step 1: Assess Your Halter Top
Before diving into the creative process, you need to assess your halter top and decide what exactly you want to do with it. Not all halter tops are created equal – some are made of fabrics that are easier to work with than others. Here’s a quick checklist to evaluate your garment:
- Fabric Type: Cotton, linen, or knit fabrics are often the easiest to work with. If your halter top is made of a thicker material, you might need more advanced tools (like a sewing machine) for precise cuts and stitching.
- Fit: Does it still fit you well? If it’s too small or too big, this could give you some creative opportunities for adjustments.
- Condition: Check for any damage. If the fabric has holes or stains, consider how you can incorporate these flaws into your design or simply work around them.
Step 2: Gather Your Materials
Once you know what you’re working with, you’ll need a few tools to help with the upcycling process. Here’s a simple list of materials you’ll need to transform your halter top:
- Scissors or rotary cutter (for cutting fabric)
- Needle and thread (if you’re hand-sewing)
- Sewing machine (optional, for faster results)
- Fabric glue (optional, for no-sew options)
- Decorative elements (such as beads, lace, or fabric paint)
- Measuring tape (for accurate measurements)
- Pins or clips (to hold the fabric in place while sewing)
Step 3: Transforming Your Halter Top: Ideas to Try
Here are some fantastic ways to upcycle your old halter top into something fresh and new.
1. Turn It Into a Crop Top
If your halter top is a little too long or just isn’t your style anymore, cutting it into a crop top is a great option. Here’s how you can do it:
- Measure: Decide how short you want the top to be. You can use a ruler or measuring tape to mark the length before cutting.
- Cut: Use fabric scissors or a rotary cutter to trim the top.
- Finish the Edges: If you prefer a clean, finished look, fold over the edges and sew or use fabric glue. If you like a more casual, raw edge, you can leave it as-is.
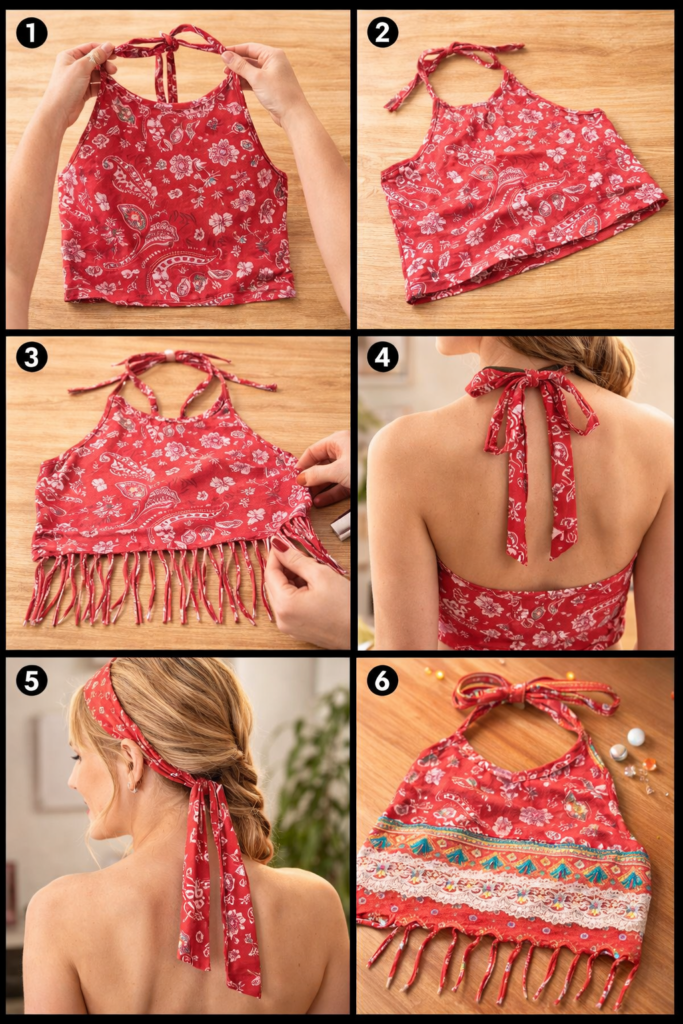
2. Add Fringe for a Boho Look
If you want to give your halter top a fun, bohemian vibe, adding fringe is a fantastic idea. Here’s how to add it:
- Select Your Fringe: You can buy ready-made fringe from a craft store, or make your own by cutting long strips of fabric from an old shirt or piece of fabric.
- Sew the Fringe: Pin the fringe along the bottom hem of your halter top, and then sew it in place. You can also add fringe along the straps or neckline for a more dramatic look.
3. Create a Tied Back Design
This upcycling idea is perfect for those looking for a flirty, summery design. You can turn your halter top into something with a tied-back feature:
- Cut the Straps: If the straps are too short, you can cut and extend them using extra fabric. The straps can be lengthened by sewing in pieces of fabric that match or complement the original.
- Create the Tie: At the back of the top, create two long fabric ties. These can be tied into a bow for an added touch of femininity.
4. Turn It into a Headband or Bandana
If you’re not interested in making a whole new top, consider cutting your halter top into a smaller accessory like a headband or bandana. Here’s how:
- Cut: Cut the halter top into a long strip. The width can vary depending on the look you want.
- Tie: Simply tie the strip around your head, or use fabric glue to secure the ends. You can also make the fabric into a chic, knotted bandana.
5. Add Embellishments and Paint
If you’re into adding personal flair to your clothes, painting and embellishing your halter top is a fantastic way to give it new life:
- Fabric Paint: Use fabric paint to add unique patterns or designs to your halter top. You can create geometric shapes, floral patterns, or even your favorite quotes.
- Sew on Beads or Sequins: If you want to add a little sparkle to your look, sew beads, sequins, or rhinestones onto the fabric for a personalized touch.
Mistakes to Avoid When Upcycling a Halter Top
While upcycling is a fun and rewarding experience, there are some common mistakes you should avoid to ensure that your project goes smoothly:
- Not Prepping the Fabric Properly: Always wash and dry the fabric before working on it. This will prevent shrinkage or fading once you start wearing the upcycled top.
- Rushing the Project: Take your time and plan each step carefully. Haste can lead to uneven cuts or mismatched designs.
- Using the Wrong Tools: Make sure you have sharp scissors or a rotary cutter for clean, precise cuts. Dull blades can make the process harder and create jagged edges.
- Forgetting About Fit: If you’re altering the top’s shape, remember that fit matters. Try the top on before making major changes to ensure it’s still flattering.
- Overcomplicating the Design: Sometimes, simpler is better. Don’t feel the need to overdo it with too many embellishments or design changes. Less is often more.
Conclusion
Upcycling your old halter top isn’t just a way to save money and reduce waste – it’s an opportunity to express your creativity and style. Whether you’re turning it into a crop top, adding fringe, or painting your design, there’s no wrong way to breathe new life into your garments.
Key takeaways:
- Take time to assess your halter top and gather the necessary tools.
- Get creative by cutting, sewing, and adding embellishments.
- Avoid rushing through the process and remember that fit and quality matter.
I hope this post inspires you to take an old piece of clothing and give it a brand-new life. If you try upcycling your halter top, share your results with me in the comments – I’d love to see what you come up with!
FAQs
Can I upcycle any type of halter top?
Yes, most halter tops can be upcycled, but lightweight fabrics like cotton or linen are easier to work with. Thicker materials might require additional tools like a sewing machine for precise cuts.
Do I need sewing skills for upcycling a halter top?
Not necessarily! If you don’t know how to sew, you can use fabric glue or try no-sew options like tying fabric strips into a knot. There are plenty of easy alternatives for beginners.
How can I make my upcycled halter top stand out even more?
To make your top unique, try adding personalized touches like embroidery, beads, or fabric paint. These small details can really make your creation shine!