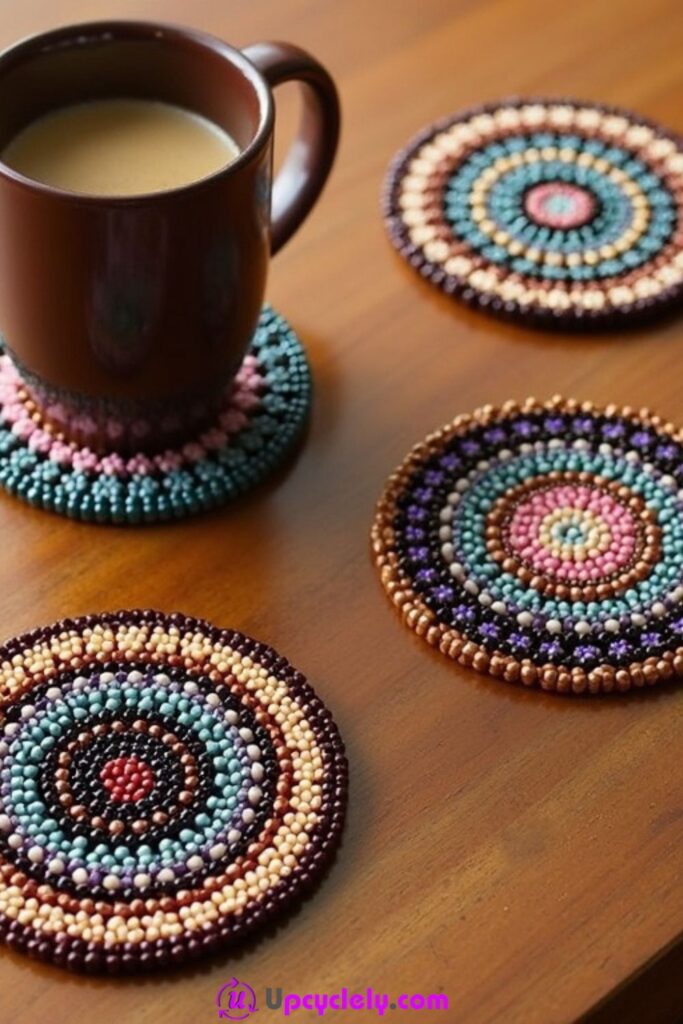
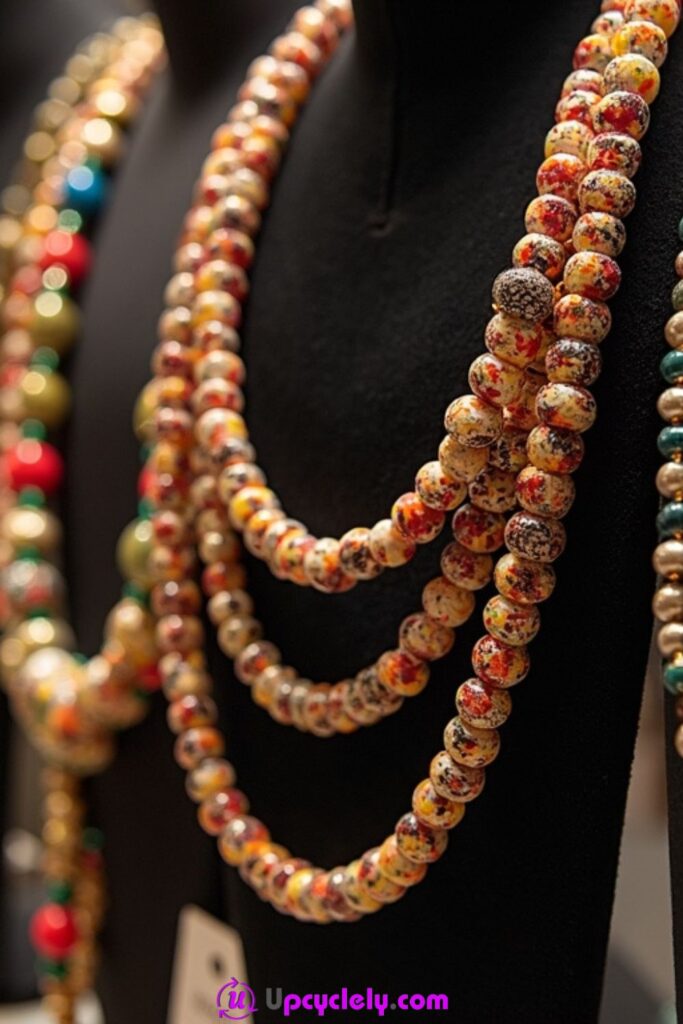
Beaded Coasters
Materials Needed:
- Assorted colorful beads
- Nylon thread or strong beading wire
- Beading needle
- Scissors
- Craft glue (optional)
Steps to Create:
- Plan Your Design
I start by sketching out the concentric circles I want on my coaster using a sheet of paper. This gives me a visual guide. I pick beads in complementary colors, ensuring a vibrant look. If you prefer a random design, just select beads in varied colors and sizes. - String the Foundation
Using a strong nylon thread or beading wire, I string a circular base. I loop beads until it forms a tight loop and secure it with a knot. This base acts as the center of the coaster. - Layer On the Patterns
I continue adding concentric layers of beads around the initial circle. I ensure every layer is tightly strung and secured at regular intervals by tying knots or looping the thread back into previous rows. This helps form a sturdy design. - Finish and Secure
When the coaster reaches my desired size, I tie off the thread securely. A drop of craft glue on the knot helps hold everything in place. Once dry, it’s ready to use as a decorative or practical item.
Pro Tip:
To make the coasters more durable, I secure the underside with a piece of felt using craft glue. This also protects furniture from scratches.
Bead Embellished Journal Cover

Materials Needed:
- A journal or notebook
- Assorted small beads in neutral shades
- Strong adhesive
- Toothpick or stylus for bead placement
Steps to Create:
- Clean the Surface
Before starting, I wipe the notebook cover to remove dust. This ensures the adhesive sticks properly. I lay it flat on a work surface for easy handling. - Plan the Borders
I place the beads along the edges of the notebook without gluing them at first. This helps me figure out how many beads I need and adjust the arrangement for a balanced look. - Glue the Beads
Using a strong adhesive, I apply a thin line of glue along a short section of the border. I use a toothpick or stylus to place each bead carefully into the glue line. I work in small sections so the glue doesn’t dry out. - Secure and Dry
Once all the beads are applied, I press them gently to ensure they stick properly. I leave the notebook flat and undisturbed for a few hours to allow the glue to dry completely.
Pro Tip:
For a more intricate design, I use multi-colored beads to create patterns or motifs on the journal cover.
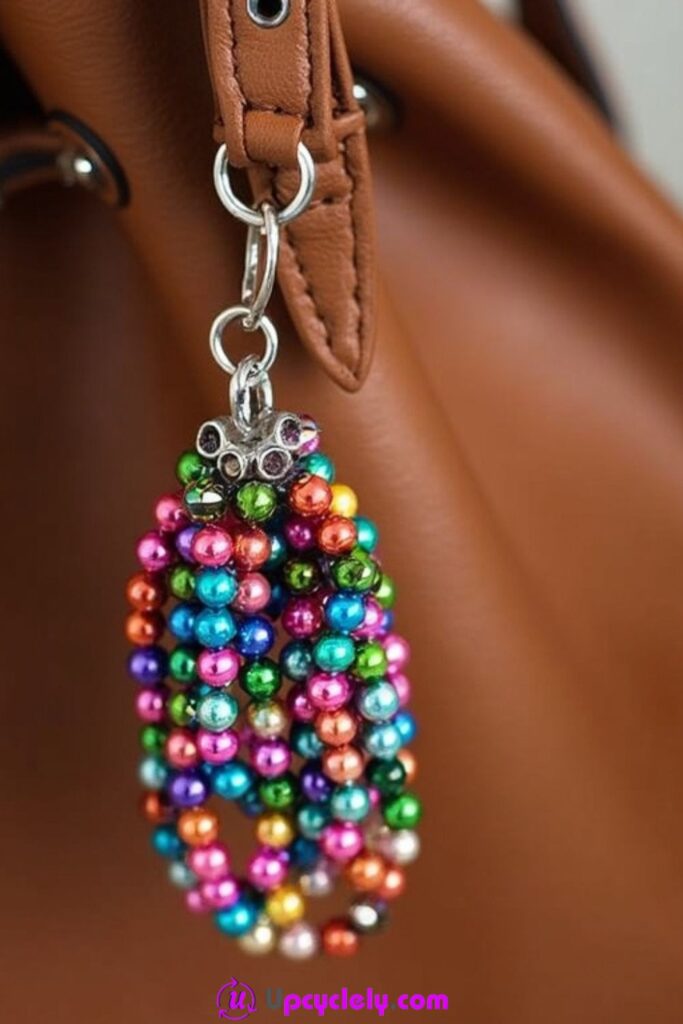
Beaded Bag Charm
Materials Needed:
- Assorted colorful beads
- Keychain ring or lobster clasp
- Strong thread or wire
- Pliers
- Jump rings (optional)
Steps to Create:
- Select the Beads
I pick beads in bright, contrasting colors to make the charm stand out. For added texture, I include beads of different shapes and sizes. - Create a Beaded Strand
I cut a piece of strong thread or wire about 6 inches long. Then, I string the beads onto it, leaving some space at the top for attaching it to the clasp. - Secure the Ends
Once the strand is complete, I tie the end into a tight knot or use crimp beads to secure it. Using pliers, I attach the strand to a keychain ring or lobster clasp with a jump ring for sturdiness. - Attach to Bag
Finally, I clip the charm onto the handle or zipper of my handbag. The process instantly transforms a plain bag into a colorful, stylish accessory.
Pro Tip:
Add a small tassel or pendant to the charm for an extra decorative touch.
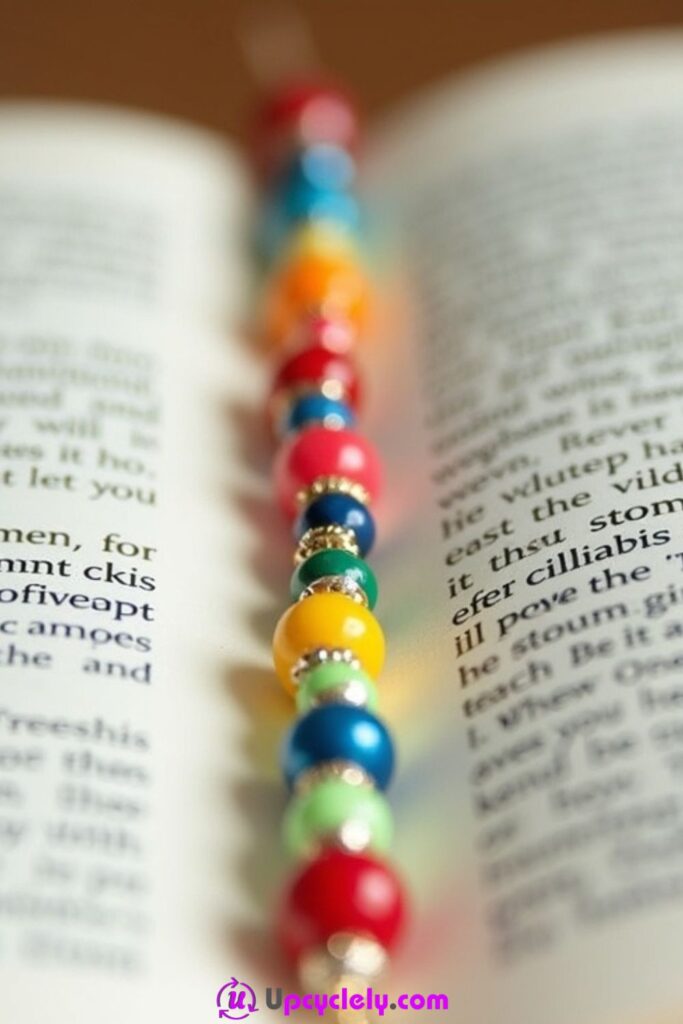
Beaded Bookmark
Materials Needed:
- Assorted tiny beads
- Gold spacer beads
- Strong thread or elastic cord
- Scissors
- Needle
Steps to Create:
- Measure the Bookmark
I measure the height of an average book and cut a thread or elastic cord about 2 inches longer than this length. This ensures it fits snugly within the book. - String the Beads
I alternate colorful beads with gold spacers as I thread them. Keeping the design symmetrical makes the bookmark look polished, but I also sometimes get creative with unique patterns. - Secure the Ends
Once all the beads are threaded, I tie a knot at each end of the cord. If using thread, I double the knot for added security. - Test the Bookmark
I gently place it in a book to ensure it stays in place and doesn’t slip. If needed, I adjust the tightness of the cord.
Pro Tip:
Add a charm or bead tassel at one end for a fun, personalized bookmark.
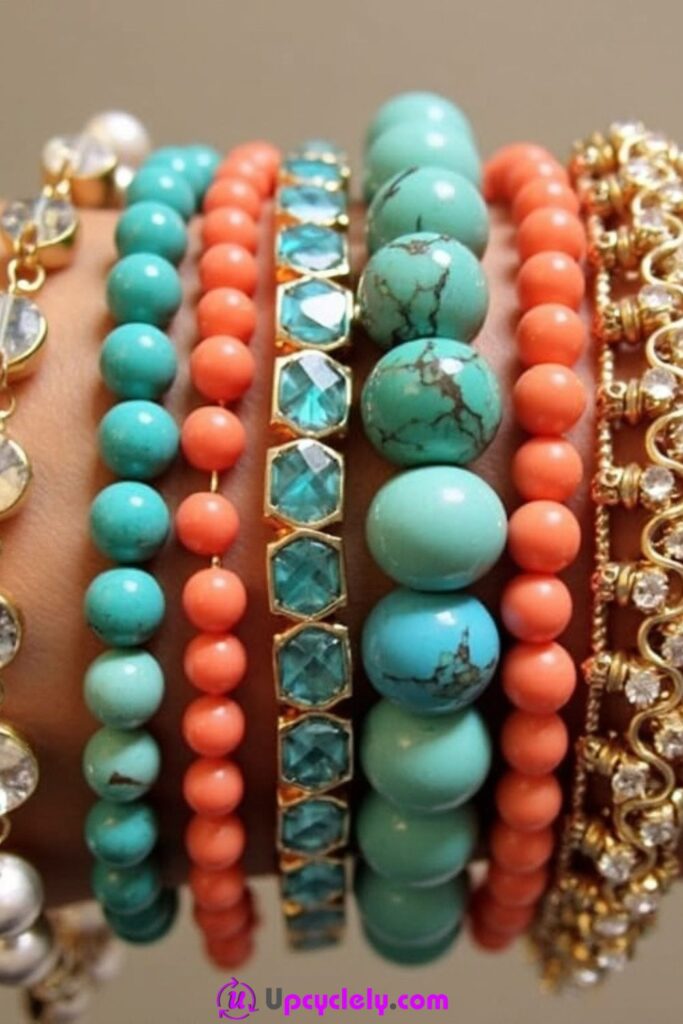
Beaded Bracelets
Materials Needed:
- Assorted beads (turquoise, coral, gold, etc.)
- Stretchy beading cord
- Scissors
- Crimp beads (optional)
Steps to Create:
- Measure for Fit
I wrap the stretchy cord around my wrist to determine the right length, leaving a little extra for knotting. Then, I cut the cord. - Choose the Beads
I select beads that complement each other. For variety, I mix turquoise, coral, and gold beads. To keep things visually appealing, I alternate colors and textures. - Thread the Beads
Holding the end of the elastic cord, I start threading the beads. I push them snuggly against each other to minimize gaps. - Tie and Finish
Once all the beads are strung, I tie a double knot to secure the bracelet. For additional security, I slide a crimp bead over the knot and use pliers to flatten it.
Pro Tip:
For a professional look, I hide the knot by tucking it into one of the larger beads.
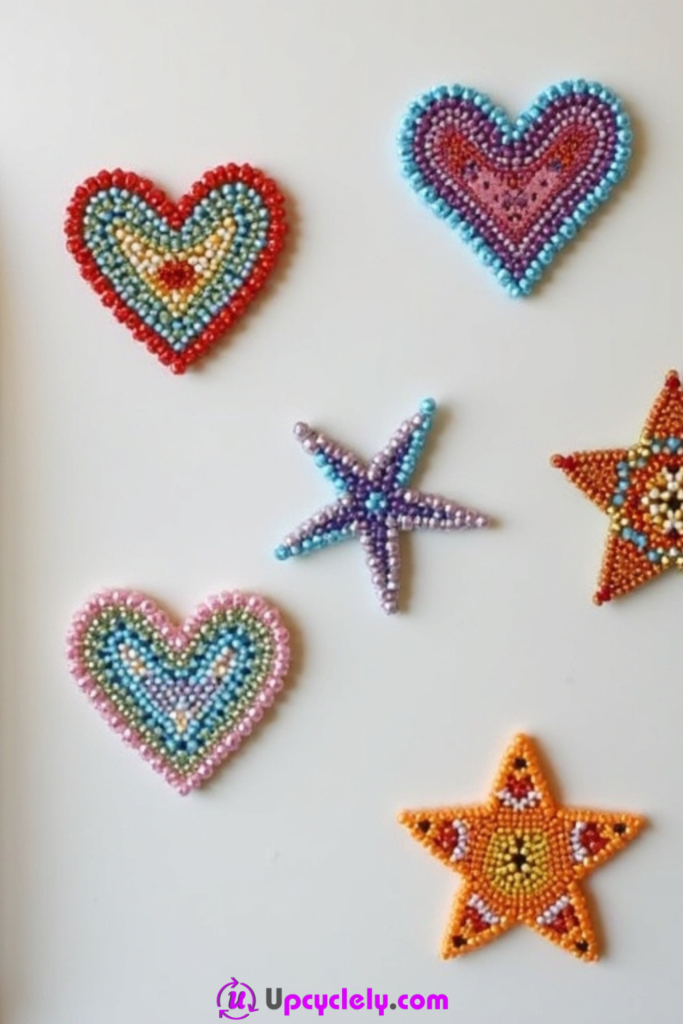
Beaded Fridge Magnets
Materials Needed:
- Assorted colorful beads (shaped beads are great for hearts and stars)
- Strong adhesive (hot glue or craft glue)
- Thin cardboard or stiff felt
- Magnet discs
- Scissors or utility knife
Steps to Create:
- Design the Base Shape
I start by cutting out base shapes, like hearts or stars, from thin cardboard or stiff felt. I use stencils for precision or freehand draw the shapes for a personal touch. - Arrange the Beads
Before gluing anything, I lay out the beads on the base shape to determine the pattern. This allows me to experiment with color gradients or create symmetry in my design. - Glue the Beads
Using a strong adhesive, I start gluing beads onto the base, working from the edges inward. I apply glue in small sections to avoid it drying too quickly. I press each bead firmly to ensure it stays in place. - Attach the Magnet
Once the beads are securely attached and the glue has dried, I flip the piece over and glue a magnet disc to the back. After ensuring it’s centered, I leave it to fully dry before testing it on the fridge.
Pro Tip: Before attaching the magnet, I coat the back with a thin layer of glue for added reinforcement and to prevent any accidental peeling.
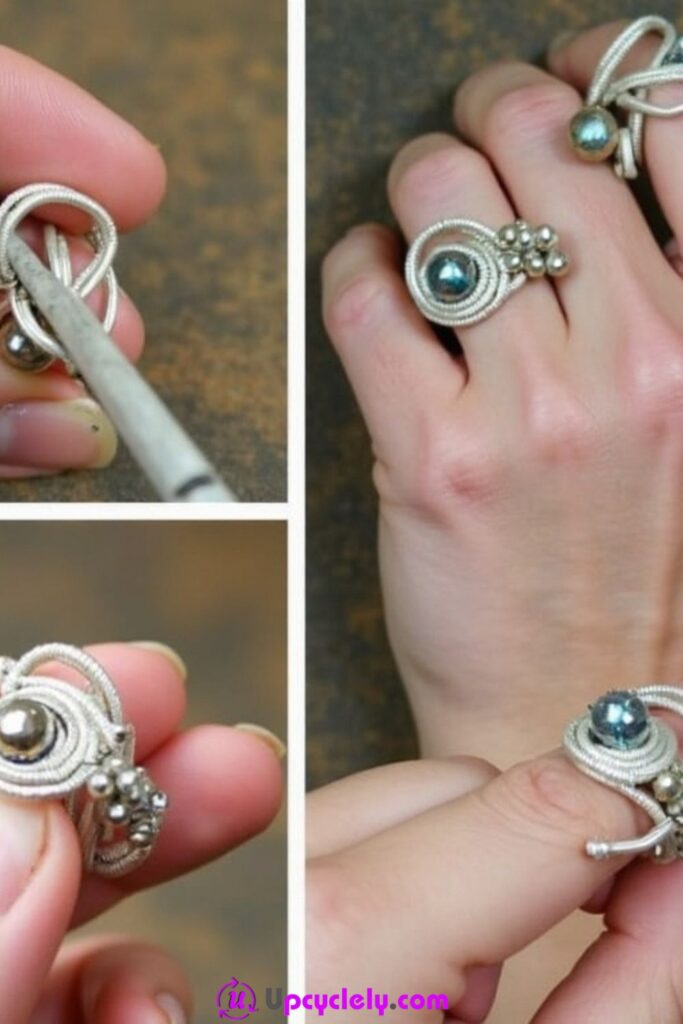
Beaded Coiled Rings
Materials Needed:
- Metallic wire (about 22-24 gauge)
- Assorted beads (small and medium sizes)
- Needle-nose pliers
- Wire cutters
- Ring mandrel or marker (to size the ring)
Steps to Create:
- Cut and Shape the Wire
I cut a length of wire about 8 to 10 inches long. Using the ring mandrel or a marker, I wrap the wire around the tool to create the circular base of the ring. I overlap the wire a few times for added durability. - Secure the Base Loop
I twist the overlapping ends of the wire together to secure the loop. This creates a foundation for adding beads while also holding the ring shape in place. - Add Beads to the Design
I thread a single focal bead or a cluster of smaller beads onto the wire. I position the beads at the center of the ring and secure them by coiling the wire tightly around them. - Finish and Tidy the Wire Ends
Once the beads are secure, I trim any excess wire, leaving just enough to tuck in neatly against the base. I use pliers to press the ends flat, ensuring there are no sharp edges.
Pro Tip:
To add a polished touch, I choose beads in metallic or gemstone finishes. These elevate the overall look of the ring.
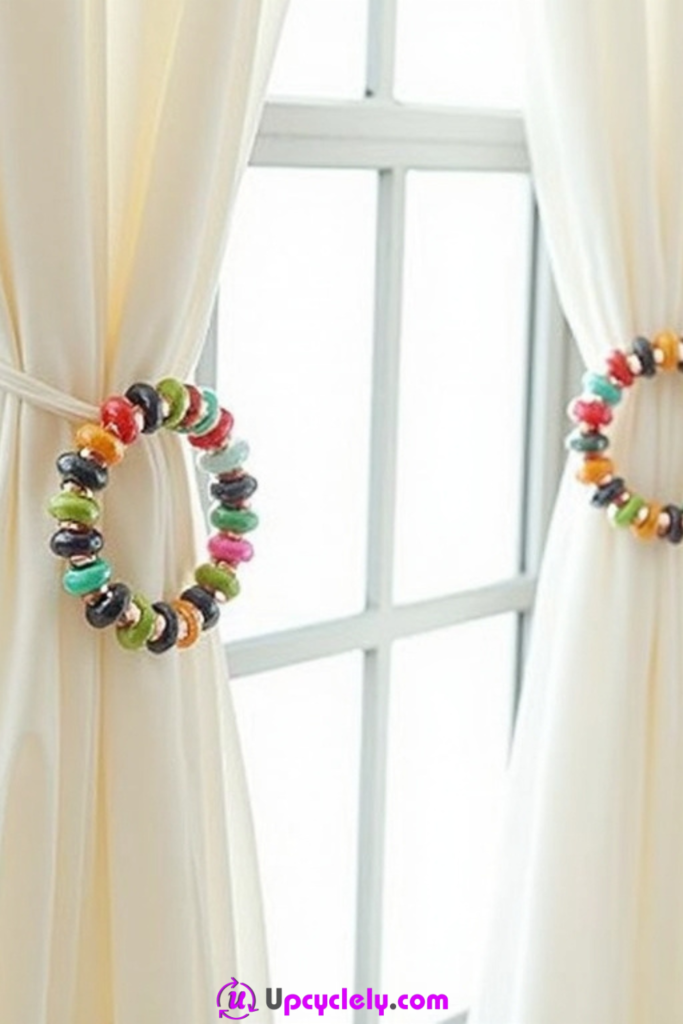
Beaded Curtain Tiebacks
Materials Needed:
- Assorted colorful beads (varying sizes and shapes)
- Strong cord or jewelry wire
- Scissors
- Clasps or hooks (optional)
- Measuring tape
Steps to Create:
- Measure the Curtain
I measure the width of the curtain to decide the length of the tieback. I add a few extra inches to ensure there’s enough length for wrapping or securing. - String the Beads
Using a strong cord or jewelry wire, I start threading the beads. I use a mix of colors and shapes, alternating them for a balanced look. I can also create repeating patterns for symmetry. - Secure the Ends
Once all the beads are arranged, I tie secure knots at both ends of the cord. If using wire, I twist the ends into loops for clasps or hooks to be attached. - Tie or Clip Onto the Curtain
I wrap the finished piece around the curtain and tie it securely. For an easier on-and-off solution, I use clasps or hooks at the ends to clip the tieback in place.
Pro Tip:
For a fancier look, I add small charms or tassels to each end of the tieback.
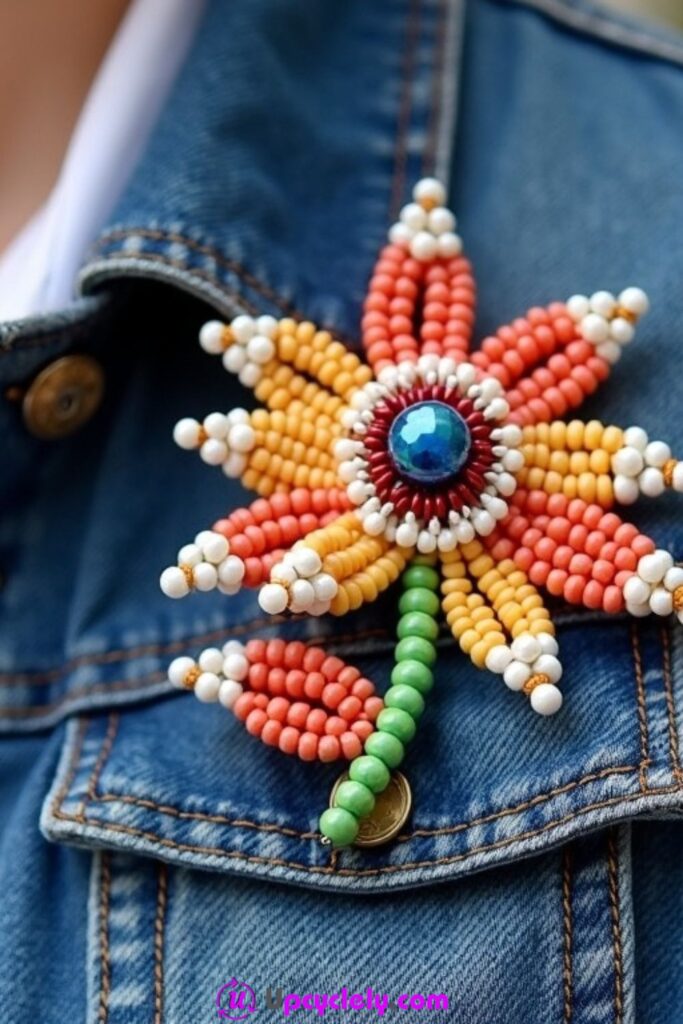
Beaded Flower Pin
Materials Needed:
- Seed beads and larger focal beads
- Jewelry wire (thin gauge)
- Brooch base or safety pin
- Pliers and wire cutters
- Glue (optional, for added security)
Steps to Create:
- Form the Flower Petals
I cut about 6 inches of jewelry wire and thread seed beads onto it. Once I have enough beads for one petal, I shape the wire into a loop and twist the ends to secure. I repeat this process for all petals. - Create the Flower Center
I use a larger focal bead for the center of the flower. Using a small piece of wire, I thread the bead and position it in the middle of the petals, twisting the wire ends around the petal bases to secure everything. - Combine the Petals and Stem
With all the petals complete, I twist the wires together tightly to form the base of the flower. I wrap additional wire around the “stem” for stability and if necessary, add green seed beads over it for a natural look. - Attach to the Brooch Base
I attach the flower securely to the brooch base or pin using wire. To ensure a neat finish, I tuck and trim excess wire. If needed, I use glue to reinforce the attachment.
Pro Tip:
Experiment with different petal and center bead colors to create a variety of flower designs for your pins.
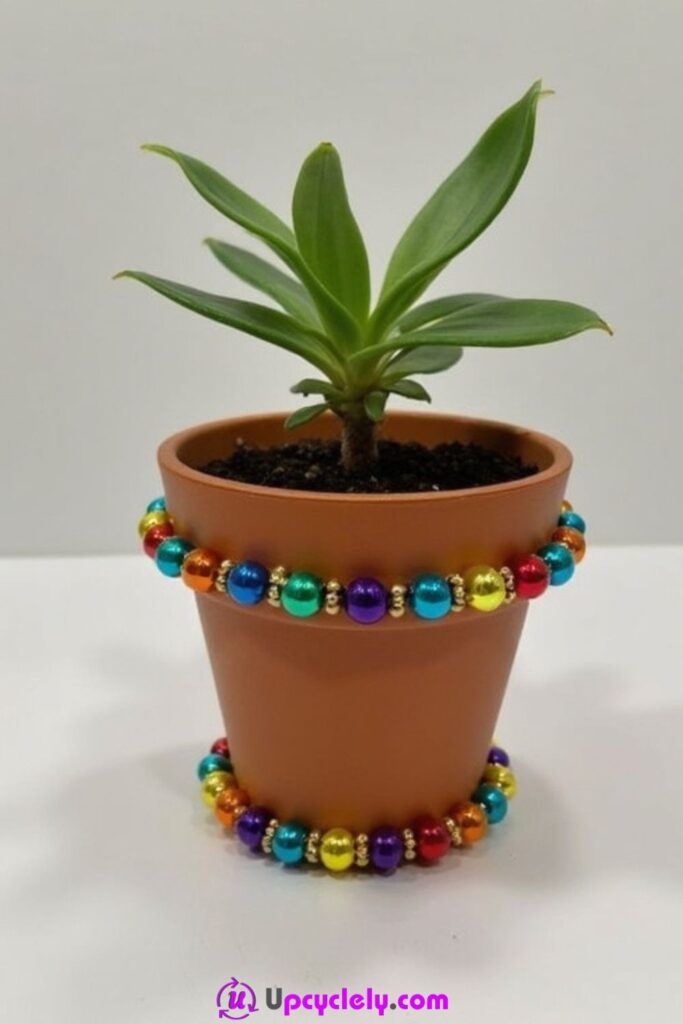
Beaded Flowerpot Decor
Materials Needed:
- Assorted metallic beads
- Jewelry wire or thin string
- Scissors or wire cutters
- Terracotta pot
- Glue (optional, for securing beads into position)
Steps to Create:
- Measure the Pot’s Circumference
I use a measuring tape to determine the circumference of the pot at the top and base. This helps me decide the length of the decorative bead strings. - String the Beads
I cut lengths of wire or string to fit comfortably around the pot. Then, I thread metallic beads onto the wire. Small gold spacer beads add a touch of elegance to the design. - Wrap the Beads Around the Pot
I carefully wrap the beaded strings around the top and bottom edges of the flower pot. For stability, I secure the ends by tying them tightly or using a small amount of glue at the back of the pot. - Adjust and Finalize
Once the beads are in place, I adjust them to ensure an even distribution. I inspect each section to make sure the beads are snug and aligned.
Pro Tip:
For a more dramatic effect, I combine several strings of beads in different colors and designs to create a layered look.
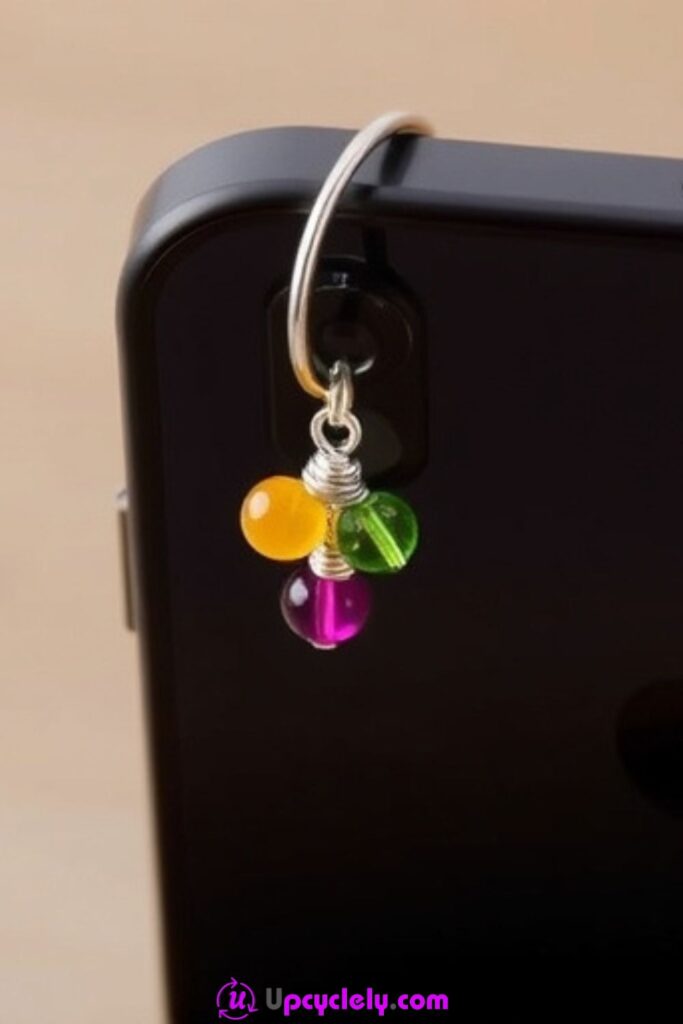
Beaded Phone Charm
Materials Needed:
- Assorted colorful beads
- Silver keyring or phone charm string
- Jump rings
- Jewelry pliers
- Strong thread or thin jewelry wire
- Scissors
Steps to Create:
- Plan the Bead Layout
First, I pick a combination of beads that I want to use for the charm. I like to mix bright colors like orange, pink, and green with neutral tones for balance. I also arrange the beads in the order I plan to use them, experimenting with different patterns to see what looks best. - Prepare the String
I cut a length of strong thread or thin jewelry wire, making sure it’s long enough to accommodate my beads while leaving extra room for tying knots. Then, I thread the wire through the loop of a silver keyring or phone charm string, folding it in half so the charm hangs securely. - Thread the Beads
Carefully, I begin threading the beads onto the wire, pushing each bead down to secure it in place. To add visual depth, I sometimes use spacer beads or mix various bead shapes. Once I’ve used all the beads, I double-check that the design looks symmetrical and balanced. - Secure and Finish
To finish the charm, I twist the ends of the wire tightly and loop it around the base of the keyring. Using my pliers, I secure jump rings to reinforce the charm, ensuring it stays intact. I then trim off any excess wire for a clean finish. The charm is ready to be attached to my phone for a personalized touch!
Pro Tip:
For added sparkle, include a small dangling pendant or crystal at the end of the charm.
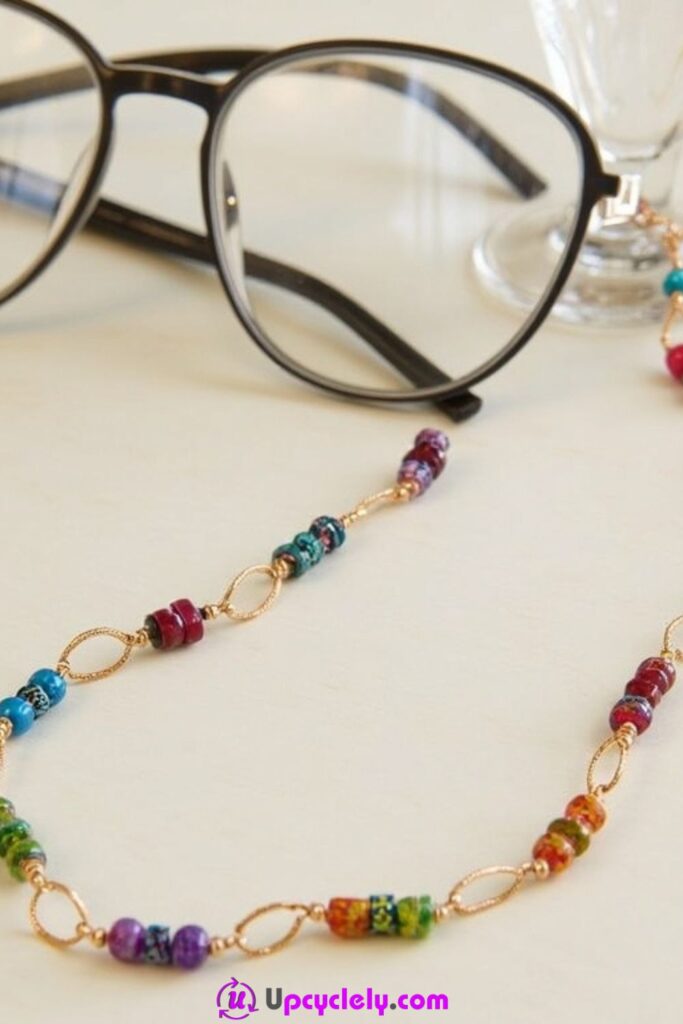
Beaded Glasses Chain
Materials Needed:
- Assorted beads in various colors and shapes
- Strong beading cord or thin jewelry wire
- Crimp beads
- Rubber glasses grips
- Jewelry pliers
- Scissors
Steps to Create:
- Measure and Cut the Cord
I start by measuring the length of the chain, typically around 24-30 inches, depending on how low I want it to hang. Then, I cut the beading cord or wire, making sure to leave an extra inch for securing the ends. - String the Beads
I carefully thread beads onto the cord, mixing colors and patterns to create a fun and decorative chain. I like alternating between bright beads and metallic ones to give the chain a stylish and polished finish. To keep the design cohesive, I space out focal beads like larger or patterned ones. - Attach the Grips
Once the beading is done, I thread crimp beads onto both ends of the cord, followed by attaching rubber glasses grips to each side. I slide the crimp beads close to the grips and clamp them down tightly using jewelry pliers, ensuring they don’t slide off. - Secure and Test
After double-checking that all the beads are in place and the grips are secure, I attach the chain to the arms of my glasses. Finally, I test the grips to make sure they hold firmly and the chain doesn’t fall off while in use.
Pro Tip:
Add small charms or metallic cuffs near the ends of the chain for extra elegance.
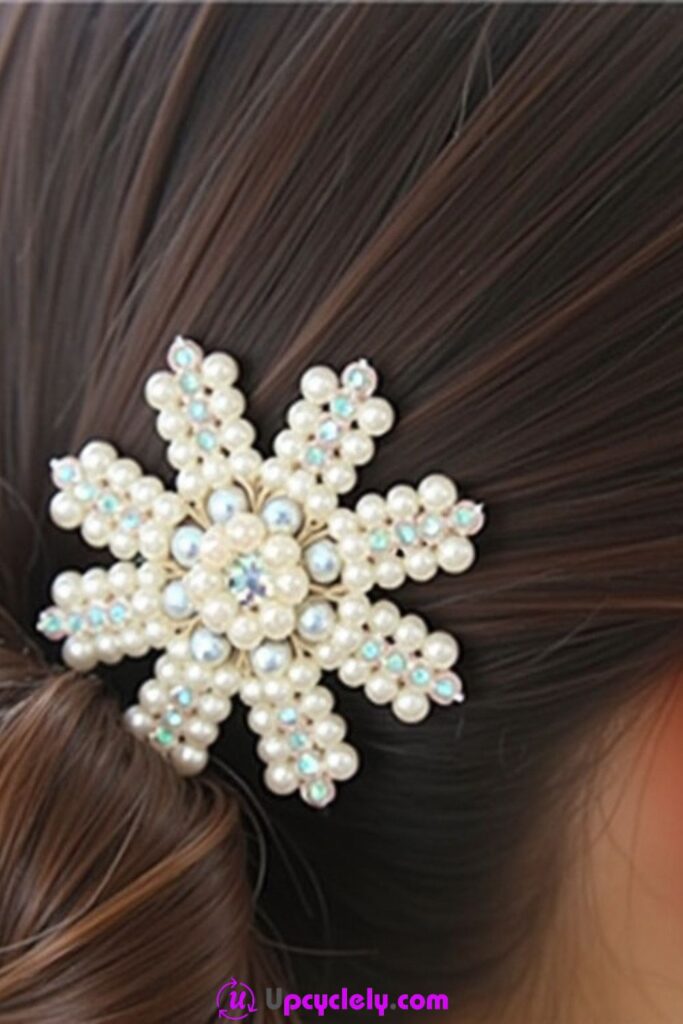
Beaded Hair Accessories
Materials Needed:
- Pearl beads or small decorative beads
- Hairpins or plain hair combs
- Jewelry wire (thin gauge)
- Pliers
- Craft glue (optional)
Steps to Create:
- Plan the Hair Accessory Design
I decide on the design of the accessory, whether it’s simple with a few beads or intricate like a snowflake pattern. For hairpins, I use just a few beads, but for hair combs, I go all out with larger, symmetrical designs. - Wrap the Beads onto the Frame
Using thin jewelry wire, I thread a bead through and wrap the wire tightly around the hairpin or comb to secure it. I continue building the design by adding beads one by one, shaping each section with care to make sure it stays symmetrical. - Secure the Wire
After all the beads are added, I twist the remaining wire tightly around the frame of the hair accessory to keep it stable. I use pliers to clamp the wire ends, preventing any sharp edges from sticking out that could catch on hair. - Finish and Test
Once the design is complete, I check each section to make sure the beads are firmly attached. If I feel the wire isn’t secure enough, I add a drop of craft glue as extra reinforcement. Finally, I test it by placing it in my hair to ensure it holds and complements my look.
Pro Tip:
Choose iridescent small beads to add a delicate sparkle, perfect for weddings or formal occasions.
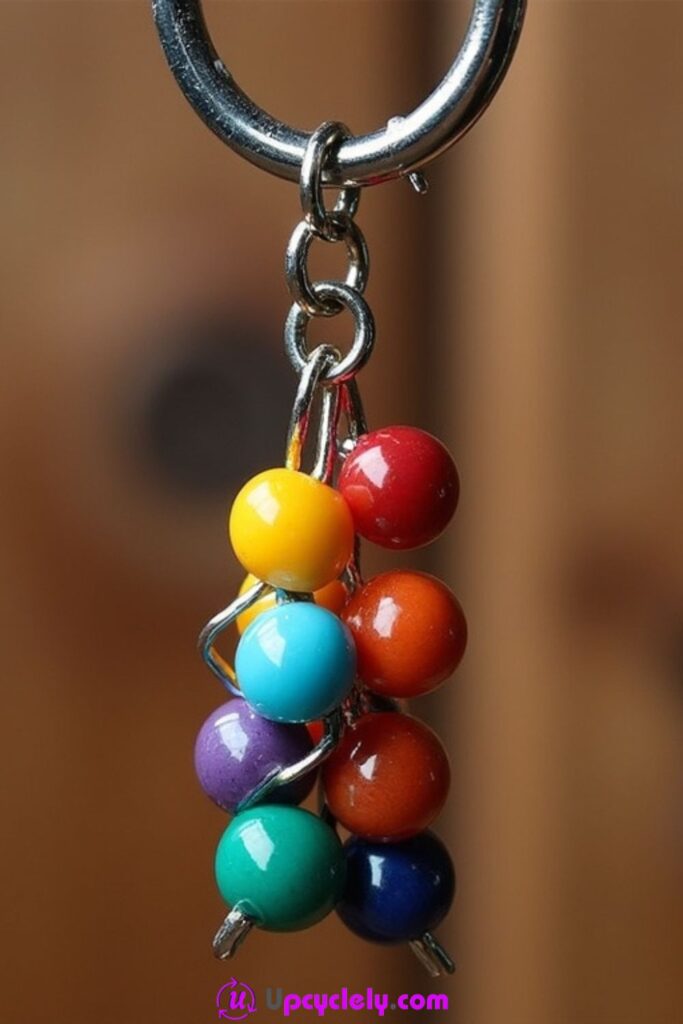
Beaded Keychains
Materials Needed:
- Large and small beads in a variety of colors
- Keychain ring
- Jewelry wire or strong thread
- Jump rings
- Pliers and scissors
Steps to Create:
- Pick the Beads
I choose a mix of beads with different sizes and colors to create an eye-catching cluster. I focus on ensuring the colors complement each other, whether it’s a rainbow theme or something more subdued like gold and pastel tones. - Prepare the Wire or Thread
For each bead cluster, I cut small sections of jewelry wire, about 3-4 inches long. I fold the wires in half and loop them through the holes in the keyring or attach them with jump rings, creating individual strands. - Thread the Beads
I begin threading beads onto each wire strand, creating little clusters or patterns with the beads. After placing the beads, I twist the wire ends together to secure the design and then loop the excess around the base of the cluster for additional stability. - Attach to Keyring
I group the bead clusters into a single bunch, attaching each to the main keyring with additional wire or jump rings. Using pliers, I tighten all the wire connections to prevent them from coming loose. The keychain is now ready for use!
Pro Tip:
Add a larger charm or bead at the bottom of the cluster to act as an anchor and emphasize the design.
Beaded Necklaces
Materials Needed:
- Large statement beads and smaller accent beads
- Jewelry thread or wire
- Clasp and jump rings
- Crimp beads
- Pliers and scissors
Steps to Create:
- Choose the Bead Arrangement
I lay out the beads on a flat surface, experimenting with different arrangements. I like alternating large focal beads with smaller decorative ones for a balanced design. Sometimes I incorporate metallic or textured beads for extra flair. - String the Beads
Once I’m satisfied with the arrangement, I start threading the beads onto the jewelry wire. I double-check the spacing as I go, making adjustments to keep the necklace symmetrical or to follow the desired pattern. - Attach the Clasp
After all the beads are strung, I add crimp beads at both ends of the necklace. Then, I slide a clasp and jump ring onto the wire before looping the wire back through the crimp beads. Using pliers, I press the crimp beads tightly to secure everything in place. - Finalize and Adjust
I trim any excess wire close to the closure and test the necklace for durability. If needed, I reinforce the crimped sections to make sure the clasp stays intact. Finally, I polish the beads gently with a soft cloth to highlight their shine.
Pro Tip:
Use a mix of matte and glossy beads to create a dynamic, high-fashion look that stands out.
Beaded Pillows
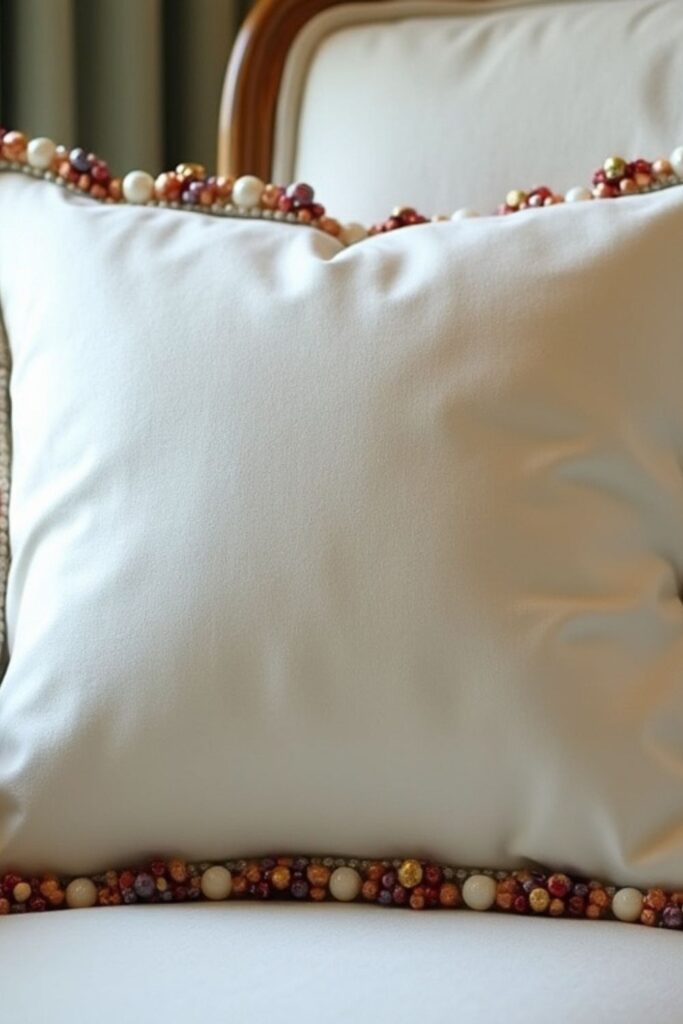
Materials Needed:
- A plain pillowcase or pillow
- Assorted beads in various sizes and colors
- Strong needle and thread (matching or clear thread works best)
- Fabric chalk or marker
- Straight pins
Steps to Create:
- Mark the Design
I use fabric chalk or a marker to draw out the design I want on the pillowcase. This could be a simple border along the edges, a unique geometric pattern, or even a floral design in the center. I make sure the marks are light and easy to follow while sewing. - Plan Bead Placement and Thread the Needle
I sort the beads by size and color, deciding where I want each bead in the design. Next, I thread a strong needle with durable thread that can hold the weight of the beads. Double knotting the thread ensures it stays secure while I work. - Sew the Beads Onto the Fabric
Very carefully, I start sewing the beads onto the pillowcase. For best results, I secure each bead tightly by passing the thread through the bead twice before stitching it to the fabric. I also work slowly, section by section, to ensure the design looks clean and evenly spaced. - Check and Tidy Up
Once the beading is complete, I go over the design to ensure all beads are firmly attached. Loose threads are carefully knotted and trimmed on the inside of the pillowcase to prevent any unraveling. Finally, I slip the pillow into the case to admire my completed project.
Pro Tip:
For quick embellishments, use a hot glue gun to attach beads to the fabric. However, sewn beads last longer and allow for more intricate designs.
Beaded Table Runner
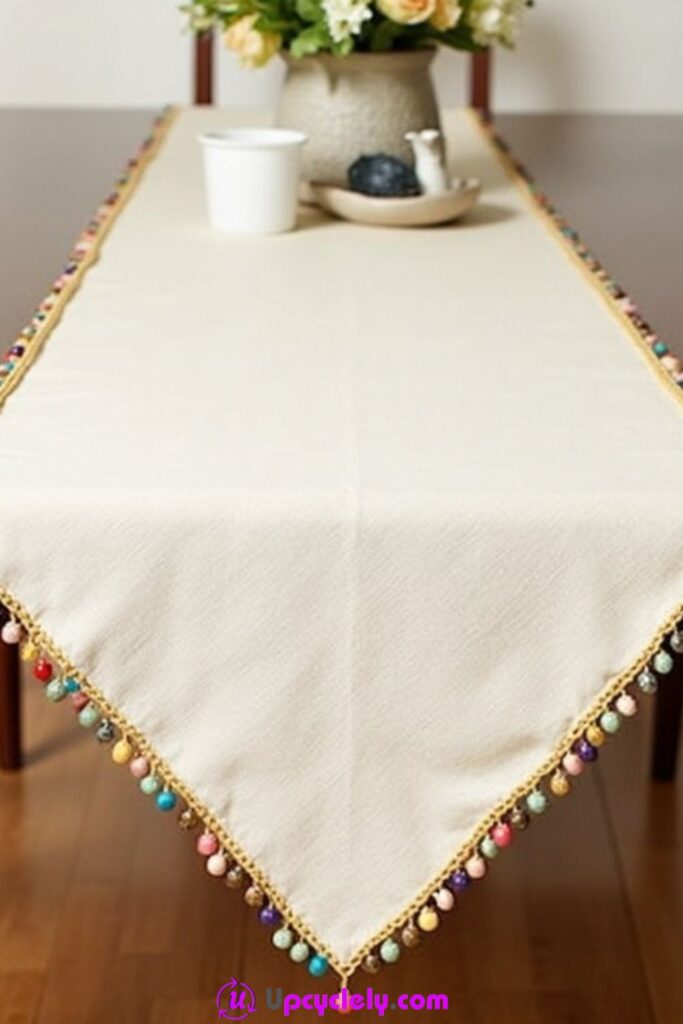
Materials Needed:
- A plain fabric table runner
- Assorted beads (multicolored or single-tone, depending on your style)
- Strong needle and thread
- Fabric glue (optional, for larger embellishments)
- Measuring tape
- Pins
Steps to Create:
- Measure and Plan the Design
I spread out the table runner on a flat surface and use a measuring tape to decide where I want the beads. Most commonly, I decorate the edges or corners, but for a more elaborate look, I might create intricate bead patterns throughout. I use pins or fabric chalk to mark these areas for reference. - Anchor the Beads
I thread a needle with strong, durable thread and begin attaching beads to the marked areas. For corners or borders, I sew the beads in a straight line or create soft curves. For intricate designs, I sew one section at a time, making sure each bead is anchored tightly onto the fabric. - Enhance With Patterns
Once the basic beading is done, I add additional layers or clusters of beads to enhance the design. For example, I use smaller beads to fill in spaces between larger ones or create tiny accents like flowers or stars. I ensure the patterns are consistent along the length of the table runner. - Inspect and Finish
After completing the decoration, I inspect the table runner to ensure no beads have been left loose. If needed, I add a dab of fabric glue underneath larger beads for extra security. I tidy up all remaining threads, and the table runner is now ready for use at my next gathering.
Pro Tip:
For a more textured and playful look, use pom-poms or fringe alongside the beads at the edges of the runner.
Bead-Embellished Picture Frame

Materials Needed:
- A plain wooden or plastic picture frame
- Assorted colorful beads
- Strong craft glue or hot glue gun
- Toothpick (for glue application)
- Sandpaper (for wooden frames)
- A protective clear sealant spray (optional)
Steps to Create:
- Prepare the Picture Frame
I begin by ensuring the frame is clean and smooth. If I’m using a wooden frame, I take sandpaper and lightly sand the surface to make it even and help the glue adhere properly. Next, I wipe off any dust with a damp cloth and wait for it to dry completely. This step might seem small, but it goes a long way in ensuring the beads stick securely. - Plan the Bead Layout
Before gluing anything, I lay out the beads on the frame to plan the design. Whether I want a random mix or a specific pattern, like stripes or clusters, this helps me visualize how the frame will look. Taking the time to arrange the beads ensures the final piece looks cohesive and intentional. - Attach the Beads
Using craft glue or a hot glue gun, I start attaching the beads one by one to the frame. I apply a small amount of glue to each bead using a toothpick for precision. I work in small sections to ensure the glue doesn’t dry before I add beads. If I’m using a plastic frame, I apply minimal glue to avoid warping. - Seal and Finalize
After all the beads are secured and the glue has dried completely, I spray the entire frame with a clear sealant spray to protect the design and give it a polished finish. If I don’t have sealant, I skip this step and just double-check that every bead is securely glued. Once dry, I place a photo in the frame and proudly display it.
Pro Tip:
Use beads of different shapes and finishes (such as matte, glossy, or metallic) to add depth and character to your design.